-
简介
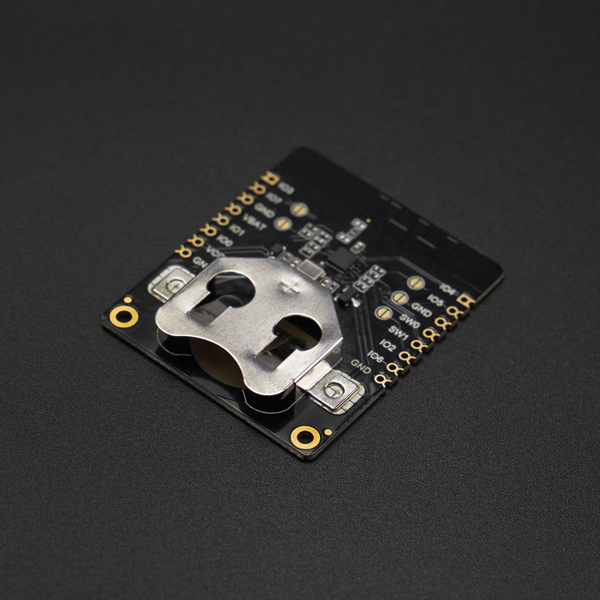
Fermion: BLE 传感器信标,是一款通过蓝牙广播传感器数据的无线信标,内置11位ADC采集,I2C写入/读取功能,可连接数字量或模拟量传感器进行数据采集和广播。使用手机、ESP32等支持BLE接收的设备,均可在信标广播范围内获取信标广播的传感器数据。
Fermion: BLE 传感器信标集成低功耗蓝牙5.3技术,数据格式可自行配置,如iBeacon、Eddystone、用户自定义等。信标广播的数据格式、广播的内容、广播的时间间隔等等都可以通过图形化界面自行配置,无需任何代码编程即可完成一个蓝牙信标。配置完成后,设备供电即作为一个蓝牙信标运行,会按照配置信息自动采集传感器数据并向外界广播。适合作为物联网传感器节点,如智能农场、办公室、工厂、仓库等场景中的数据采集节点。
相较于Gravity:BLE传感器信标改进了:
- 可使用CR2032纽扣电池供电
- 增加了两路独立I2C接口,可获取I2C传感器数据
- 引出6路可配置的GPIO
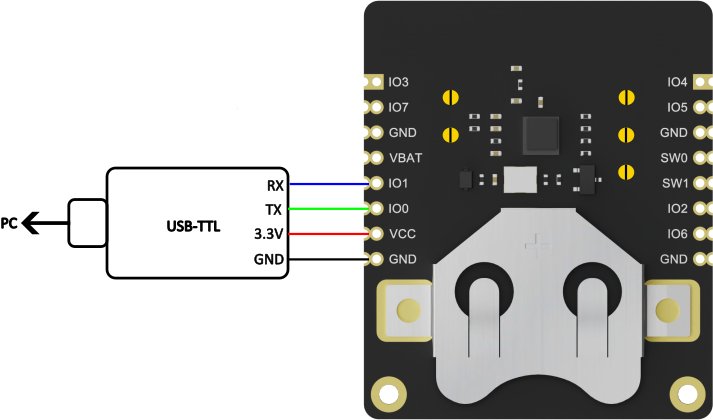
注:Fermion: BLE传感器信标需要使用3.3V USB-TTL工具进行配置。
注:因配置文件错误导致烧录后模块变砖,由用户自行承担责任。模块仅能烧录一次,在未确定配置信息前请不要点击"Burn/Program"进行烧录。非I2C传感器可通过"Run in RAM"进行测试,在烧录前"Run in RAM"可无限次使用,断电后系统复位。I2C传感器不支持"Run in RAM"测试只能直接烧录,推荐直接使用DFRobot提供的传感器样例配置文件,若要使用未提供配置文件的I2C传感器,请查阅Wiki中的教程使用。产品参数
-
工作电压: 1.1 ~3.6V DC
-
工作电流:9.1~13.8mA @2.4GHz TX mode-1Mbps
-
待机电流:0.625uA @Sleep with 32kHz RC, sleep timer
-
支持传感器:数字量/模拟量/I2C传感器
-
输入信号:数字/模拟量、I2C
-
工作频段:2.4GHz ISM
-
调制方式:GFSK
-
发射功率:+5.0dBm
-
电路板尺寸:35 * 42 mm
-
安装孔尺寸:内径2mm/外径4mm
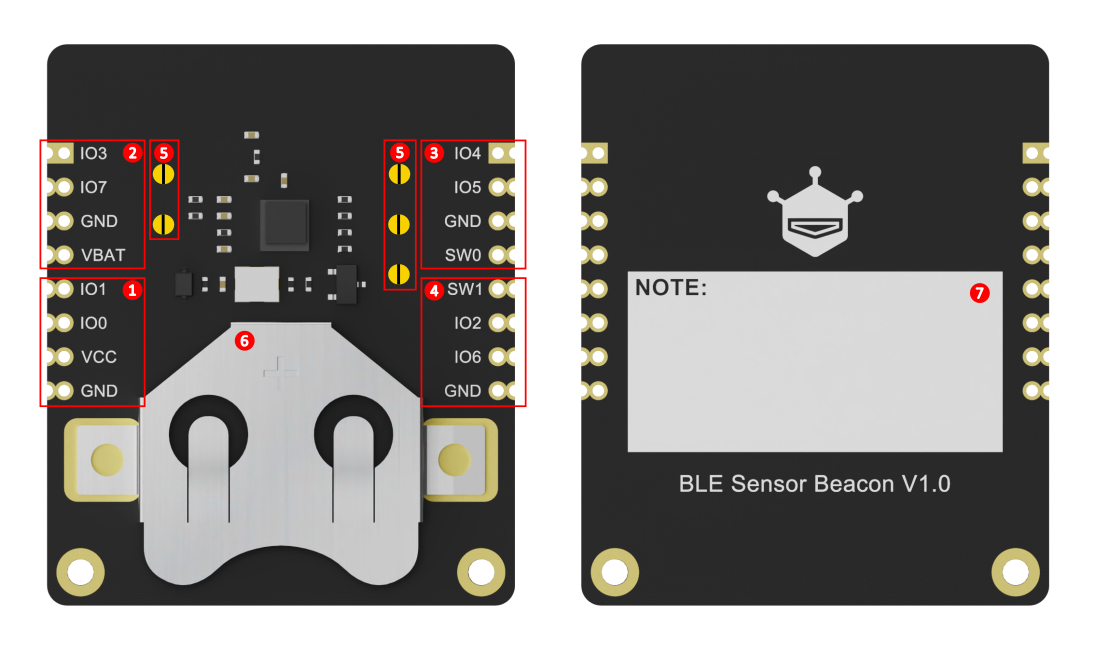
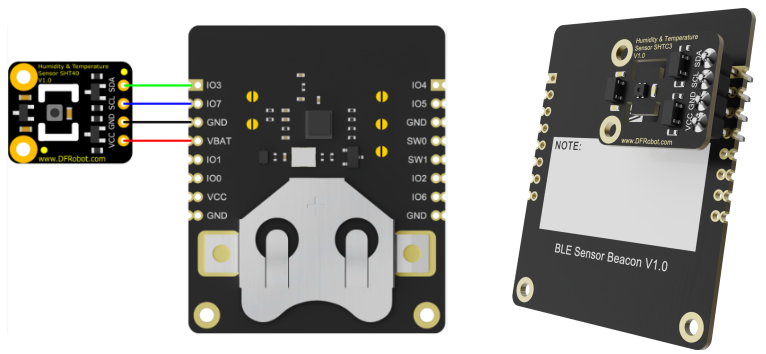
引脚说明
| 标号 | 名称 | 功能描述 |
|---|---|---|
| 1 | 串口烧录区 | VCC:3.3V输入 GND:供电地 IO0:RX(3.3V) IO1:TX (3.3V) |
| 2 | I2C/其他传感器(纽扣电池供电) | VBAT:纽扣电池正极 IO3/IO7:可设置为SDA/SCL或者数字/模拟输入输出 |
| 3 | I2C/其他传感器(动态电源控制) | SW0:可配置动态电源,仅在广播时输出高电平为传感器供电 IO4/IO5:可设置为SDA/SCL或者数字/模拟输入输出 |
| 4 | 数字/模拟传感器 | SW1:可配置动态电源,仅在广播时拉低 IO2:可设置为SDA/SCL IO6:可设置为数字/模拟输入,此引脚内置分压电阻,推荐接入模拟量传感器 |
| 5 | 上拉电阻选择焊盘 | IO3/IO7/IO4/IO5/IO2上拉电阻焊点,连接后对应IO接到上拉电阻,默认不接上拉。 Fermion 和Gravity系列传感器的上拉电阻均在传感器端 |
| 6 | 电池座 | CR2032纽扣电池。 正极连接VBAT,负极连接GND |
| 7 | NOTE | 信标信息标记处,可以标记所烧录的信标的关键信息 |
数字/模拟传感器使用教程
以自定义数据格式为例,通过手机app和ESP32获取传感器数据。
一、软硬件准备
- 硬件
- TEL0168 Fermion: 传感器信标x1
- 3.3V USB-TTL工具 x1
- Gravity:模拟LM35线性温度传感器 x1 或其他模拟量传感器
- Windows/Linux/Mac OS 电脑 x1
- ESP32
- 软件
- 手机APP推荐使用:NanoBeacon BLE Scanner(IOS/Android)
- 信标配置软件:NanoBeaconConfigTool_V3.2.11
- Arduino IDE&ESP32环境:FireBeetle_ESP32_E 首次使用教程
二、配置传感器信标
*注:模块仅能烧录一次,在未确定配置信息前不要直接点击"Burn/Program"进行烧录。可通过"Run inRAM"进行测试,在烧录前"Run in RAM"可无限次使用,断电后系统复位。
模块的ADC接口输入电压不可超过1.6V,若接入的传感器电压可能会超过1.6V,则需将传感器接至GPIO6,GPIO6添加了2.06倍的分压电阻,支持输入电压最大3.3V。
-
1.下载NanoBeaconConfigTool_V3.2.11,运行NanoBeaconConfig.exe
-
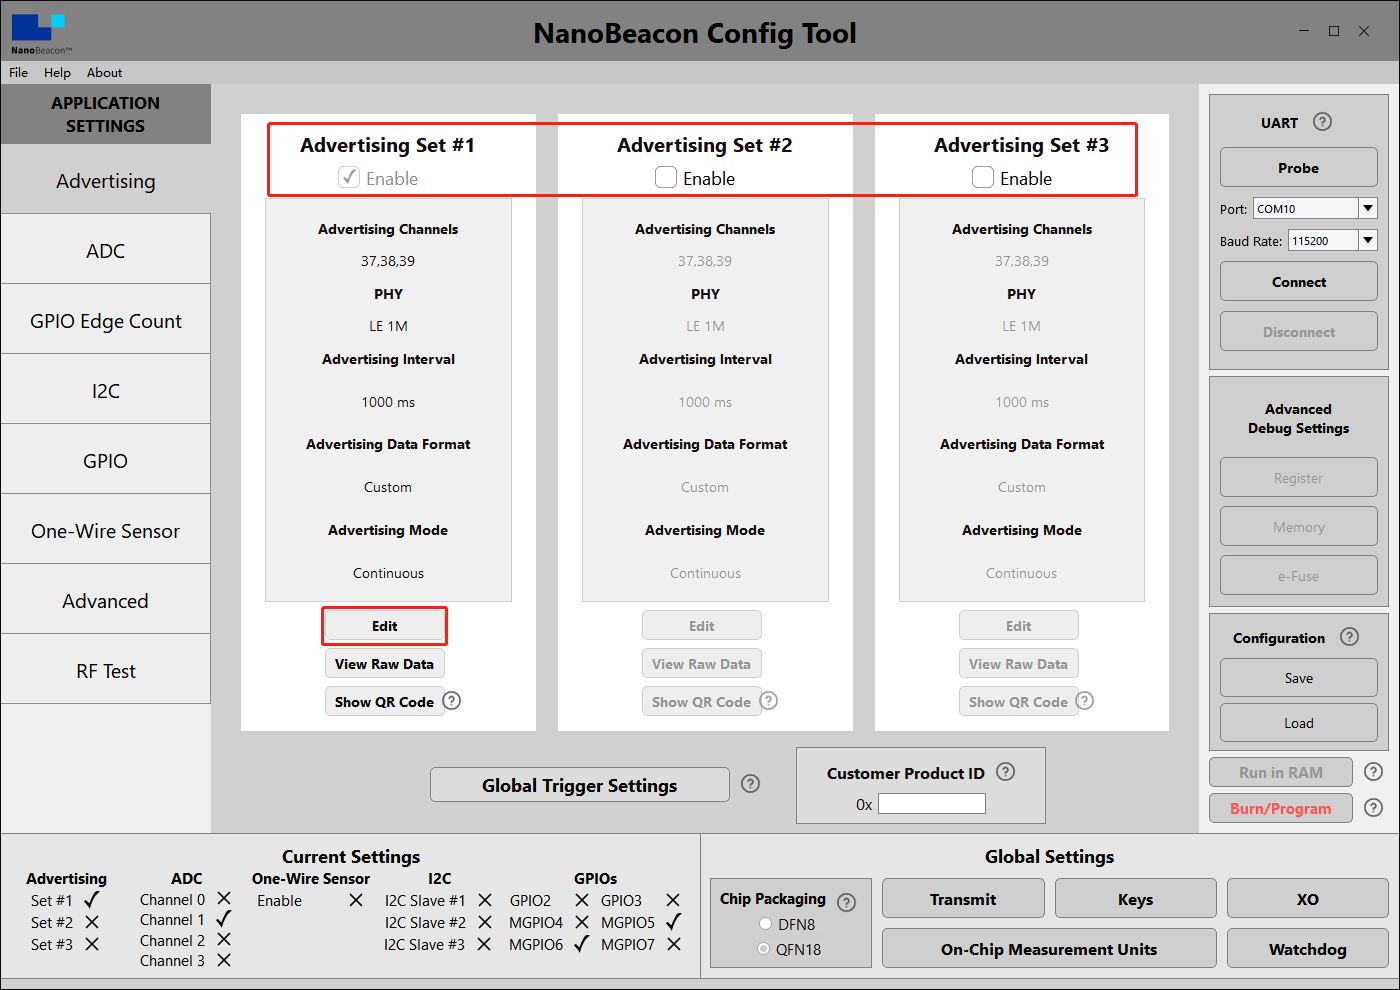
2.Advertising
Fermion: BLE 传感器信标可设置三个广播通道,勾选Enable即可开启对应广播通道,默认开启一个,Edit进入配置页面
-
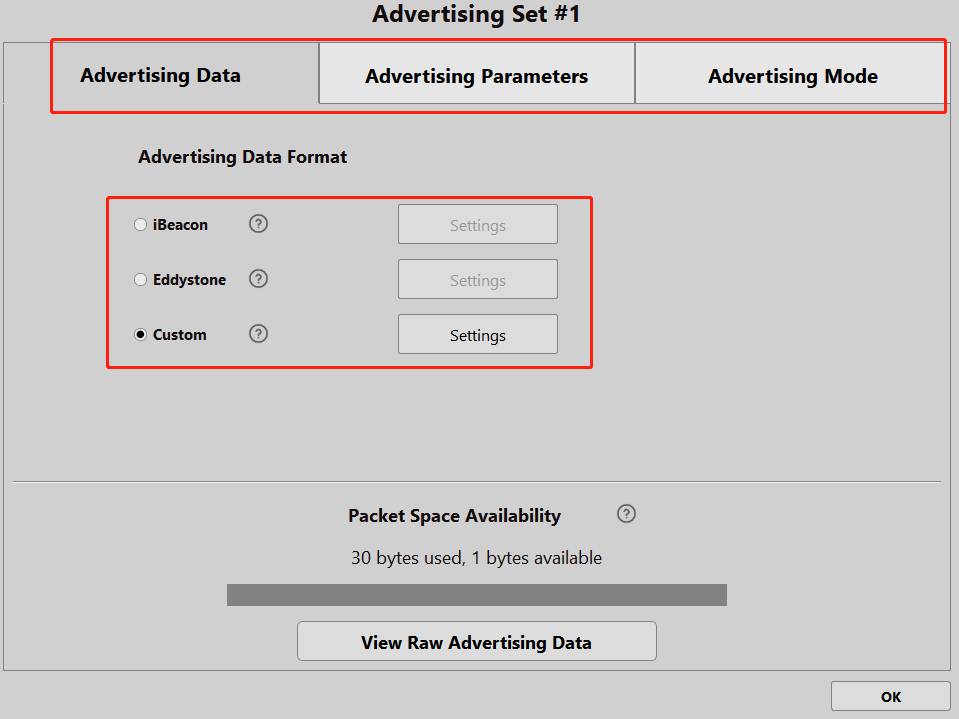
3.Advertising Set#1 - Edit - Avdertising Data
可设置iBeacon、Eddystone、Custom三种数据格式,教程中将主要使用Custom
-
4.Advertising Set#1 - Edit - Avdertising Data - Custom Settings
勾选“Device Name”,输入“Fermion: Sensor Beacon”,名字可任意起一个,手机和ESP32扫描时可直接根据名字筛选
勾选“Manufacturer Specific Data”,点击“EDIT”配置数据

-
5.Advertising Set#1 - Edit - Avdertising Data - Custom Settings - EDIT
此处只配置一条模拟量的数据,下拉框选择“ADC CH1”,勾选:“Big Endian”,点击“Append to Data”,即可在窗口中看到“0x<ADC CH1 2byte 1 0>”,点击OK退出

-
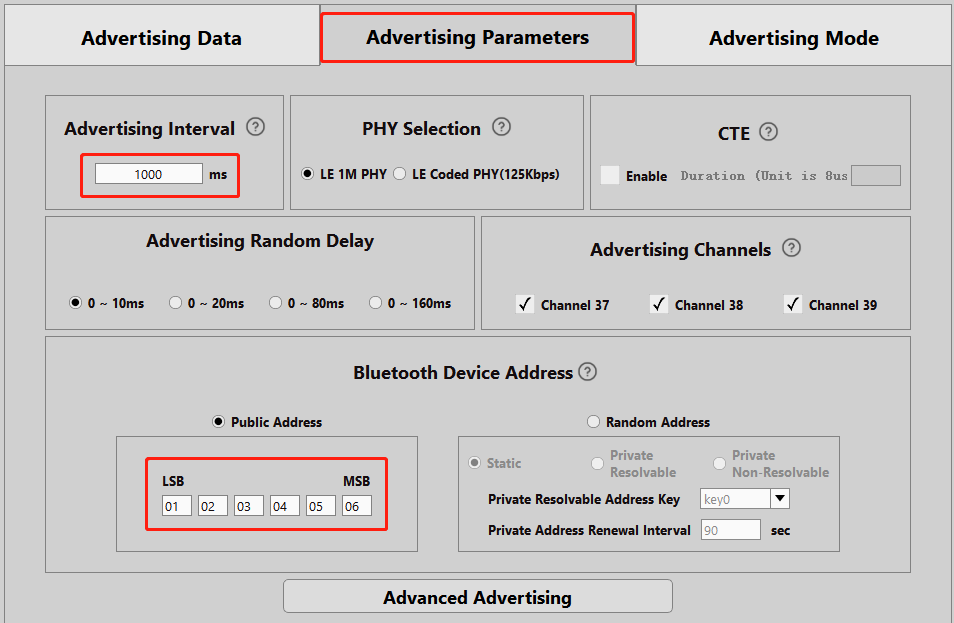
6.Advertising Set#1 - Edit - Avdertising Parameters
此处设置广播间隔时间和地址,根据需要修改即可,完成后OK退出,至此广播数据格式配置完毕,模块将以1S/次广播数据
-
7.ADC
接下来进行ADC相关配置,Fermion: BLE 传感器信标使用IO6进行模拟量采集,因此在ADC界面中Enable "ADC Channel 2 MPGIO 6",并点击Edit进行配置

-
8.ADC - ADC Channel 1 MPGIO 6 - Edit
通过查阅IN100数据手册可知,Fermion: BLE传感器信标使用的IN100芯片,ADC最高只能接收1.6V。
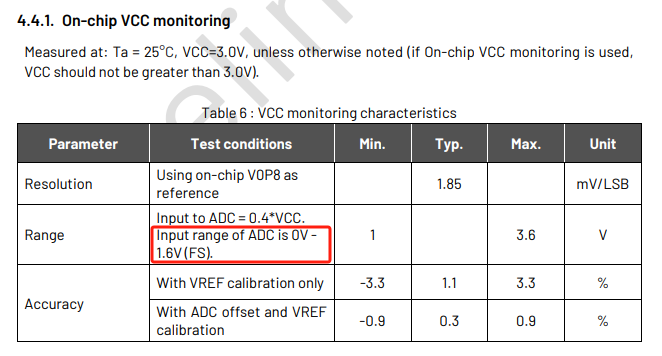
而由于很多模拟量传感器的输出电压会达到他的供电电压(往往是3.3V)。所以我们在GPIO6上串联了一个电阻做分压处理2.06。
在这里我们将在ADC设置中修改相关配置将Unit修改为0.001便于计算,对精度影响不大,若对精度有极高要求可不做修改。接下来,我们需要将分压后的电压值进行重新映射。
Value of 1.4V 修改为 2.898
Value of 0.4V 修改为 0.828
至此,完成ADC采集相关配置,此时信标广播的数据将为“传感器信号输入端”的电压值,单位mv

-
9.GPIO
由于MGPIO 6作为ADC输入端,需将其配置为“analog”

-
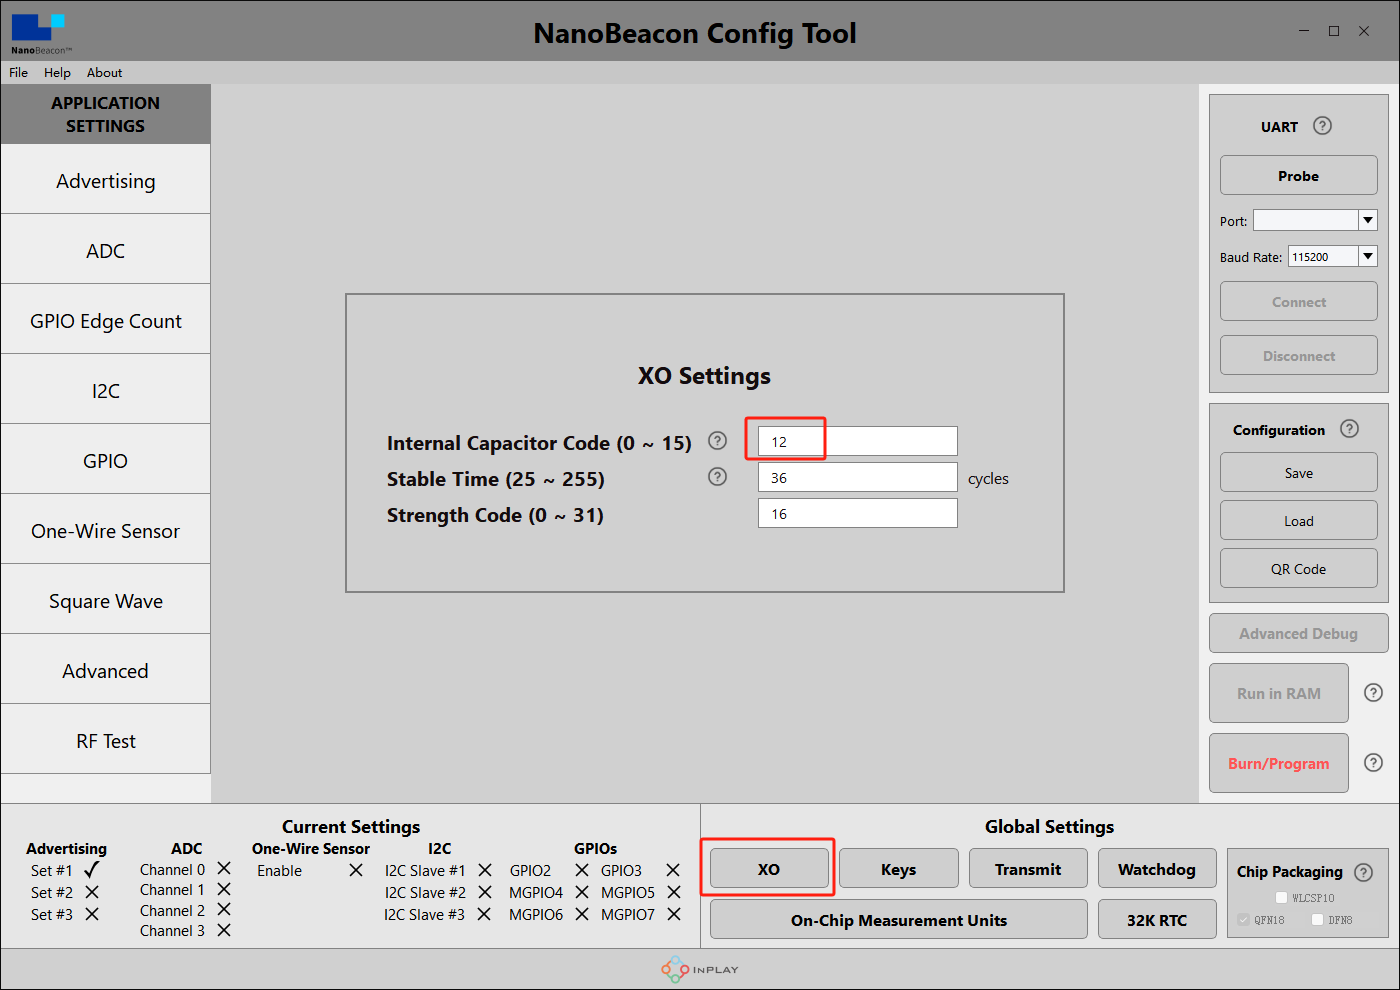
10.晶振电容匹配
NanoBeaconConfig Tool中可以通过设置来匹配晶振电容,结合我们的电路,为了使频偏保持在最佳状态,我们建议您将以下两处参数修改为12。

-
11.检查配置
软件左下角可看到我们开启了Set #1、ADC Channel 2、MGPIO6

-
12.连接模块与PC
按照接线图进行硬件连接

-
13.连接模块与PC
在软件右上角点击“Probe”刷新端口,刷新后选择对应端口,点击“Connect”,连接成功后会有弹窗提示

-
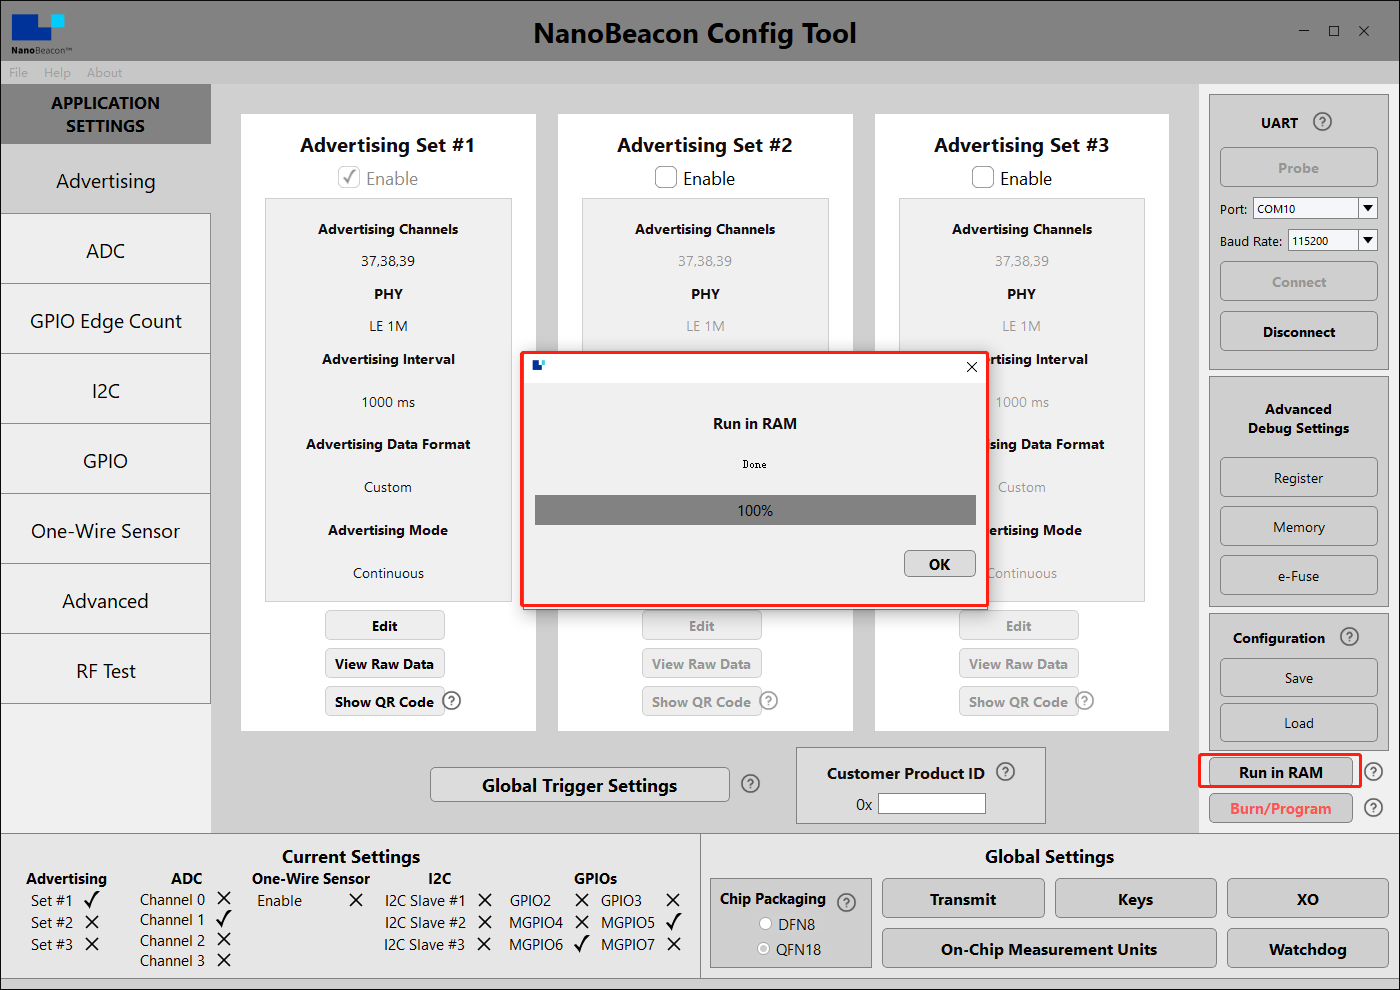
14.运行测试
点击“Run in RAM”,完成后会有弹窗提示
*注:模块仅能烧录一次,在未确定配置信息前不要直接点击"Burn/Program"进行烧录。可通过"Run inRAM"进行测试,在烧录前"Run in RAM"可无限次使用,断电后系统复位。
三、手机app获取数据
-
1.以IOS设备为例,AppStore安装并打开InPlay
-
2.若周边有太多其他信标设备,导致找不到我们的设备,则可以在筛选器中输入信标的设备名称,在配置传感器信标第4步的教程中,我们为Device Name命名为“Fermion: Sensor Beacon”
-
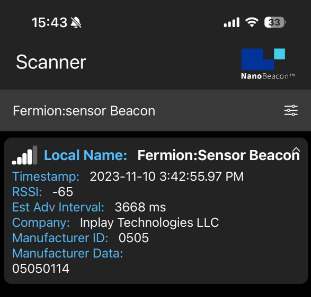
3.可以看到菜单中只保留了“Fermion: Sensor Beacon”,点击一下可看到详细信息。
-
4.数据解释
“Fermion: Sensor Beacon”为配置传感器信标第4步中设置的Device Name
"06:05:04:03:02:01"为配置传感器信标第6步中设置的地址
“05050114”中,0505为制造商编号,0114为配置传感器信标第5步中设置的ADC采集数据
-
5.传感器数据计算
当前已知信标采集到的传感器数据为“0X0114”,将其转换为十进制为276,即信标采集到的电压值为276mv
我们所连接的传感器是LM35,通过查询LM35的wiki可知,LM35输出电压和温度对应关系为10mV/℃,即信标广播的LM35温度传感器数据为27.6℃
四、ESP32获取数据
-
准备好Arduino IDE&ESP32环境:FireBeetle_ESP32_E 首次使用教程
-
为ESP32烧录以下程序
/*
   Based on Neil Kolban example for IDF: https://github.com/nkolban/esp32-snippets/blob/master/cpp_utils/tests/BLE%20Tests/SampleScan.cpp
   Ported to Arduino ESP32 by Evandro Copercini
   Changed to a beacon scanner to report iBeacon, EddystoneURL and EddystoneTLM beacons by beegee-tokyo
*/

#include <Arduino.h>
#include <BLEDevice.h>
#include <BLEUtils.h>
#include <BLEScan.h>
#include <BLEAdvertisedDevice.h>
#include <BLEEddystoneURL.h>
#include <BLEEddystoneTLM.h>
#include <BLEBeacon.h>
#define ENDIAN_CHANGE_U16(x) ((((x)&0xFF00) >> 8) + (((x)&0xFF) << 8))

float Sensor_Data;
int scanTime = 5; //In seconds
BLEScan *pBLEScan;

class MyAdvertisedDeviceCallbacks : public BLEAdvertisedDeviceCallbacks
{
    void onResult(BLEAdvertisedDevice advertisedDevice)
    {
      if (advertisedDevice.haveName())
      {
        if(String(advertisedDevice.getName().c_str()) == "Fermion:Sensor Beacon"){
          Serial.print("Device name: ");
          Serial.println(advertisedDevice.getName().c_str());
          std::string strManufacturerData = advertisedDevice.getManufacturerData();
          uint8_t cManufacturerData[100];
          strManufacturerData.copy((char *)cManufacturerData, strManufacturerData.length(), 0);
          Serial.printf("strManufacturerData: %d ", strManufacturerData.length());
            for (int i = 0; i < strManufacturerData.length(); i++)
            {
              Serial.printf("[%X]", cManufacturerData[i]);
            }
            Sensor_Data = int(cManufacturerData[2]<<8 | cManufacturerData[3]);
            Serial.println();
            Serial.print("Voltage:");Serial.print(int(Sensor_Data));Serial.println("mV");
            Serial.print("Temp_LM35:");Serial.print(Sensor_Data/10);Serial.println("℃");
            Serial.println("------------------");
        }
      }
    }
};
void setup()
{
  Serial.begin(115200);
  Serial.println("Scanning...");

  BLEDevice::init("");
  pBLEScan = BLEDevice::getScan(); //create new scan
  pBLEScan->setAdvertisedDeviceCallbacks(new MyAdvertisedDeviceCallbacks());
  pBLEScan->setActiveScan(true); //active scan uses more power, but get results faster
  pBLEScan->setInterval(100);
  pBLEScan->setWindow(99); // less or equal setInterval value
}
void loop()
{
  // put your main code here, to run repeatedly:
  BLEScanResults foundDevices = pBLEScan->start(scanTime, false);
  pBLEScan->clearResults(); // delete results fromBLEScan buffer to release memory
  delay(2000);
}

-
此程序是根据ESP32自带的BLE_Beacon_Scanner修改得到,根据需要可自行修改。

五、确认数据并烧录
-
*注:模块仅能烧录一次,若仅为了测试功能可跳过此步
-
以上的数据格式是以自定义格式进行广播,意在使大家能够快速使用,其他格式请根据自己的需要参考软件规格书自行配置。
-
确认数据无误后即可将数据格式烧录固化到芯片中。
-
点击右下角的“Burn/Program”按钮烧录程序,烧录成功后会有烧录成功的弹窗提示。
I2C传感器使用教程
以自定义数据格式为例,通过手机app和ESP32获取I2C传感器数据。
一、软硬件准备
-
硬件
- TEL0168 Fermion: 传感器信标x1
- 3.3V USB-TTL工具 x1
- Fermion: SHT40数字温湿度传感器 x1 或其他I2C传感器
- Windows/Linux/Mac OS 电脑 x1
- ESP32
- CR2032 纽扣电池*1
-
软件
-
手机APP推荐使用:NanoBeacon BLE Scanner(IOS/Android)
-
信标配置软件:NanoBeaconConfigTool
-
Arduino IDE&ESP32环境:FireBeetle_ESP32_E 首次使用教程
-
cfg配置文件/传感器测试/ESP32测试示例代码:Fermion: BLE Beacon sensor Gitee
*注:因配置文件错误导致烧录后模块变砖,由用户自行承担责任。模块仅能烧录一次,在未确定配置信息前请不要点击"Burn/Program"进行烧录。
I2C传感器不支持"Run in RAM"测试只能直接烧录,推荐直接使用DFRobot提供的传感器样例配置文件,我们会不断丰富官方示例,若要使用未提供配置文件的I2C传感器,请仔细阅读Wiki中的教程使用。
二、配置传感器信标
-
-
1.下载NanoBeaconConfigTool,运行NanoBeaconConfig.exe
-
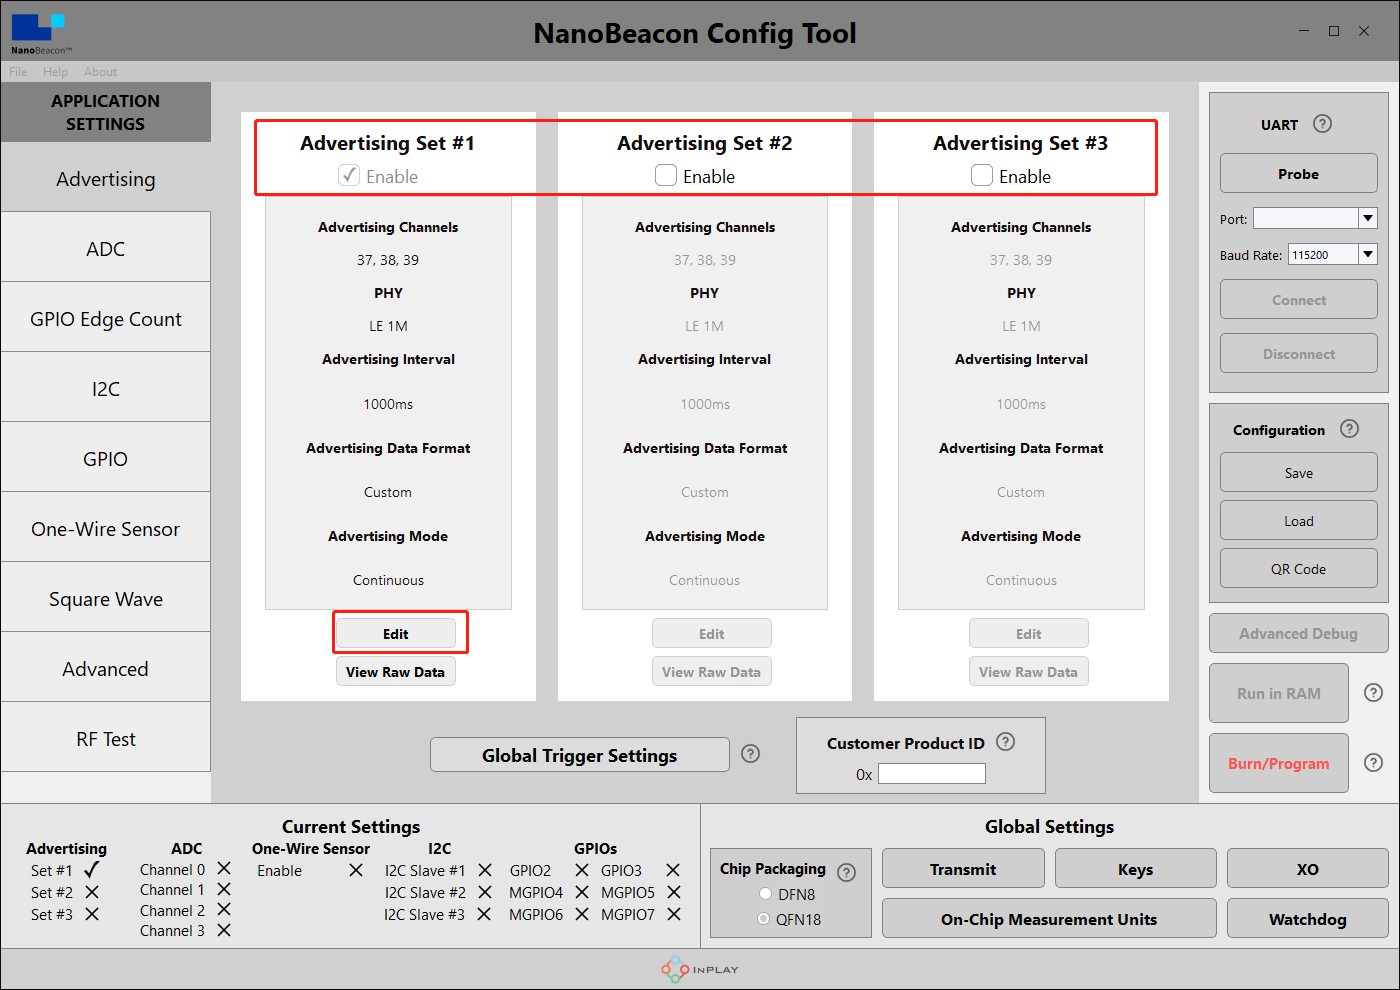
2.Advertising
Fermion: BLE 传感器信标可设置三个广播通道,勾选Enable即可开启对应广播通道,默认开启一个,Edit进入配置页面
-
3.Advertising Set#1 - Edit - Avdertising Data
可设置iBeacon、Eddystone、Custom三种数据格式,教程中将主要使用Custom

-
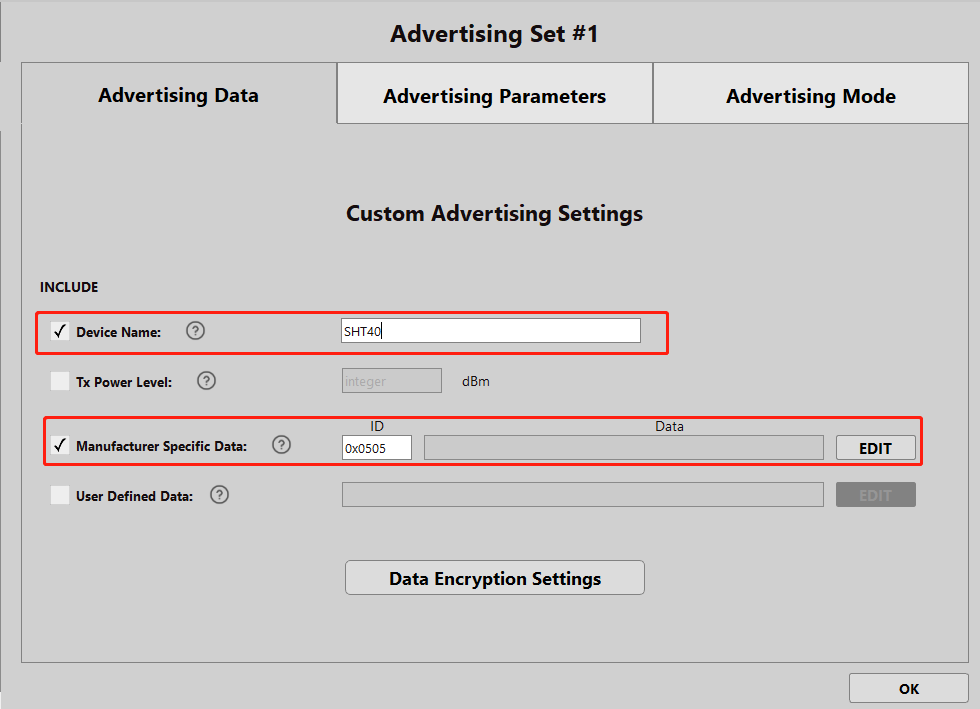
4.Advertising Set#1 - Edit - Avdertising Data - Custom Settings
勾选“Device Name”,输入“SHT40”,名字可任意起一个,建议长度在5个字符以内,名字过长会占用数据位,手机和ESP32扫描时可直接根据名字筛选
勾选“Manufacturer Specific Data”,点击“EDIT”配置数据
-
5.Advertising Set#1 - Edit - Avdertising Data - Custom Settings - EDIT
此处只配置一条I2C的数据,下拉框选择“I2C Slave #1 Read Data”,
Offset处填写0,Bytes处选择5.
如果您使用的I2C传感器单次返回的I2C数据帧字节数在六个或以上。需要配合Offset和byte进行字节选取和取舍。Offset解释:
设置传感器I2C反馈的字节偏差,由于I2C反馈的数据为一串字节。有时传感器反馈的前几个字节可以舍弃,以达到节约板载IN100数据缓存区的目的。
如传感器反馈:00 00 06 FF,此时前两个字节没有任何意义,可将Offset设置为2,将前两字节舍弃。
Bytes 解释:
由于内置IN100芯片的缓存区采用环形队列进行数据采集,同时缓存区最大同时储存5个字节。所以单次I2C读取到缓存区的字节数被限制在5个。
然后,再点击上方的Append to Data即可在窗口中看到“0x<I2C1R0 5byte 0 0>”,点击OK退出。

-
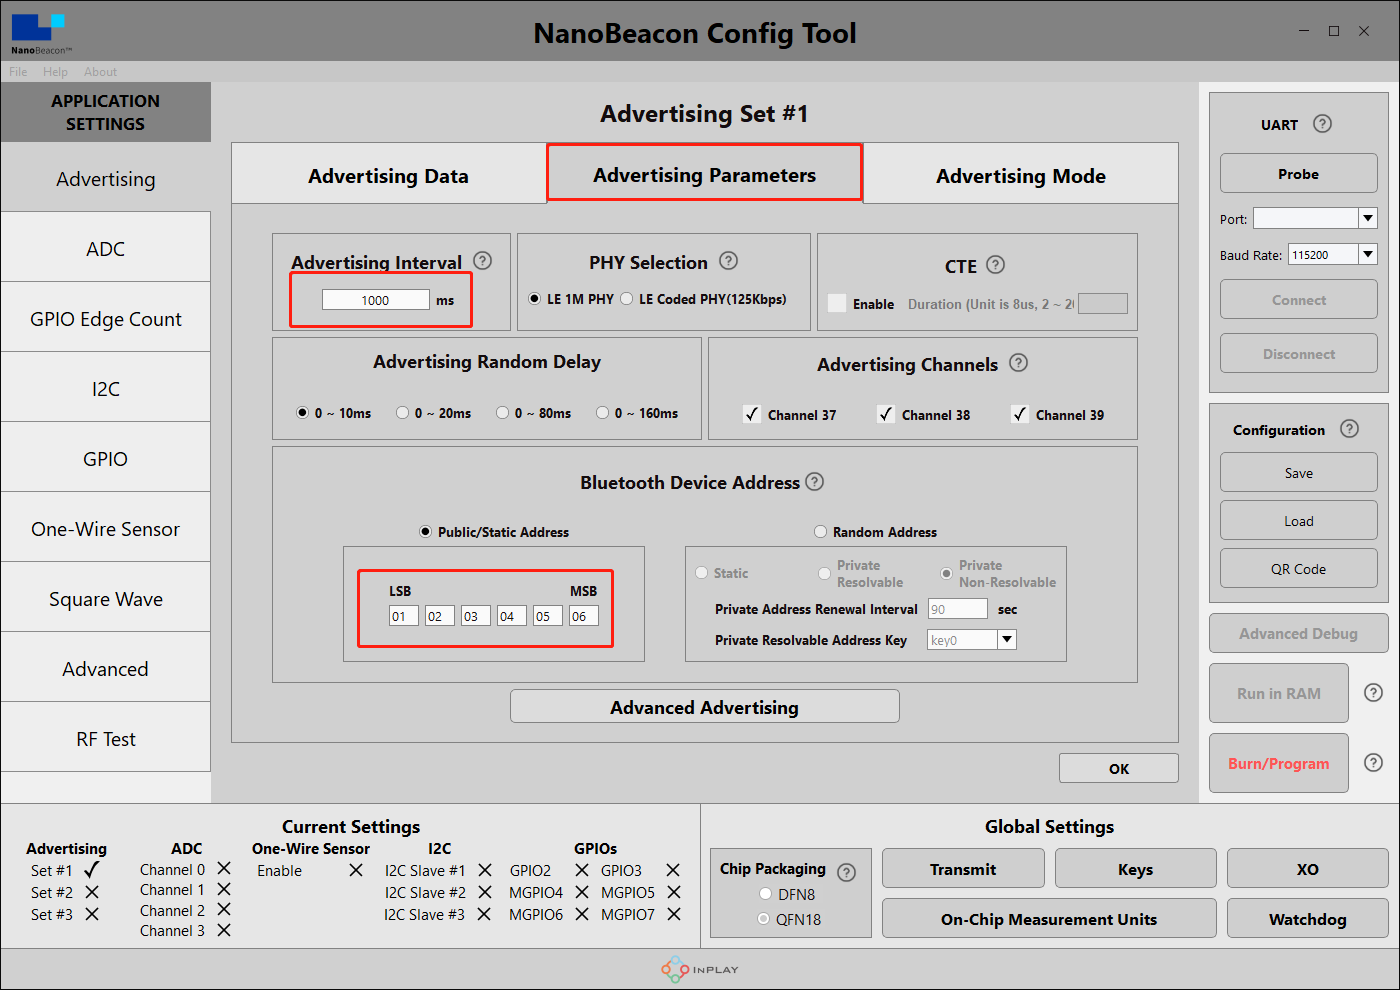
6.Advertising Set#1 - Edit - Avdertising Parameters
此处设置广播间隔时间和地址,根据需要修改即可,完成后OK退出。此处广播间隔设为1000ms,即模块将以1S/次广播数据。
Advertising Interval为自动广播的时间间隔
Bluetooth Device address 可以设置Fermion: BLE 传感器信标的地址。(LSB为最低有效位,MSB为最高有效位)
-
7.I2C通信设置——使用Arduino进行前期测试
由于Fermion: BLE传感器信标的I2C配置仅能烧录一次,因此建议先使用代码编程的方式,在Arduino等控制器中测试I2C的通信控制是否正确。
使用Arduino UNO上传I2C读取代码,确认返回的数据是否正确。
连线图可参考 SHT40(SEN0428)wiki页面代码如下:
#include <Wire.h>

#define SHT40_ADDRESS 0x44 // 传感器的 I2C 地址,此处的SHT40为0x44
int l = 5;// 读字节长度

void setup(){
  Serial.begin(115200);
  Wire.begin();
}

void loop() {

  Wire.beginTransmission(SHT40_ADDRESS);
  Wire.write(0xFD);//i2ctx:3
  Wire.endTransmission();//i2c null

  delay(10); // 程序等待10ms,让SHT40做好准备

  Wire.requestFrom(SHT40_ADDRESS, 5);//因为最后一位为湿度CRC校验,可以不被读取
  if (Wire.available() >= l) {
    byte data[l];
    for (int i = 0; i < l; i++) {//读取多次I2C传感器输出的数据
      data[i] = Wire.read();
      Serial.print(data[i], HEX);
      Serial.print(" ");
    }
  Serial.println();
  }
  Wire.endTransmission();//i2c null
  delay(1000);
}
当串口监视器中有数值出现,说明SHT40传感器正常输出,可继续进行下面的配置。
代码解释:
在常见的I2C通讯传感器中,通讯流程往往都是:第一步,主控向传感器的I2C写入读取指令——>主控向传感器读取数据
Wire.write(0xFD);是主控向SHT40传感器写入0xFD一字节,查阅数据手册可知,0xFD字节是让SHT40传感器测量温湿度的指令。

第二步,主控等待一段时间,传感器准备数据
delay(10);
表示主控等待10ms,查阅数据手册可知:
SHT40推荐的最小等待时间为1ms,但是在这里为了保险起见,我们通常设置等待时间为10ms。
第三步,主控向传感器请求数据
Wire.requestFrom(SHT40_ADDRESS, 6);是主控向SHT40请求读取6字节,查阅数据手册可知,此帧数据:
第1,2字节为温度数据,第3位为CRC校验
第4,5字节为湿度数据,第6位为CRC校验。
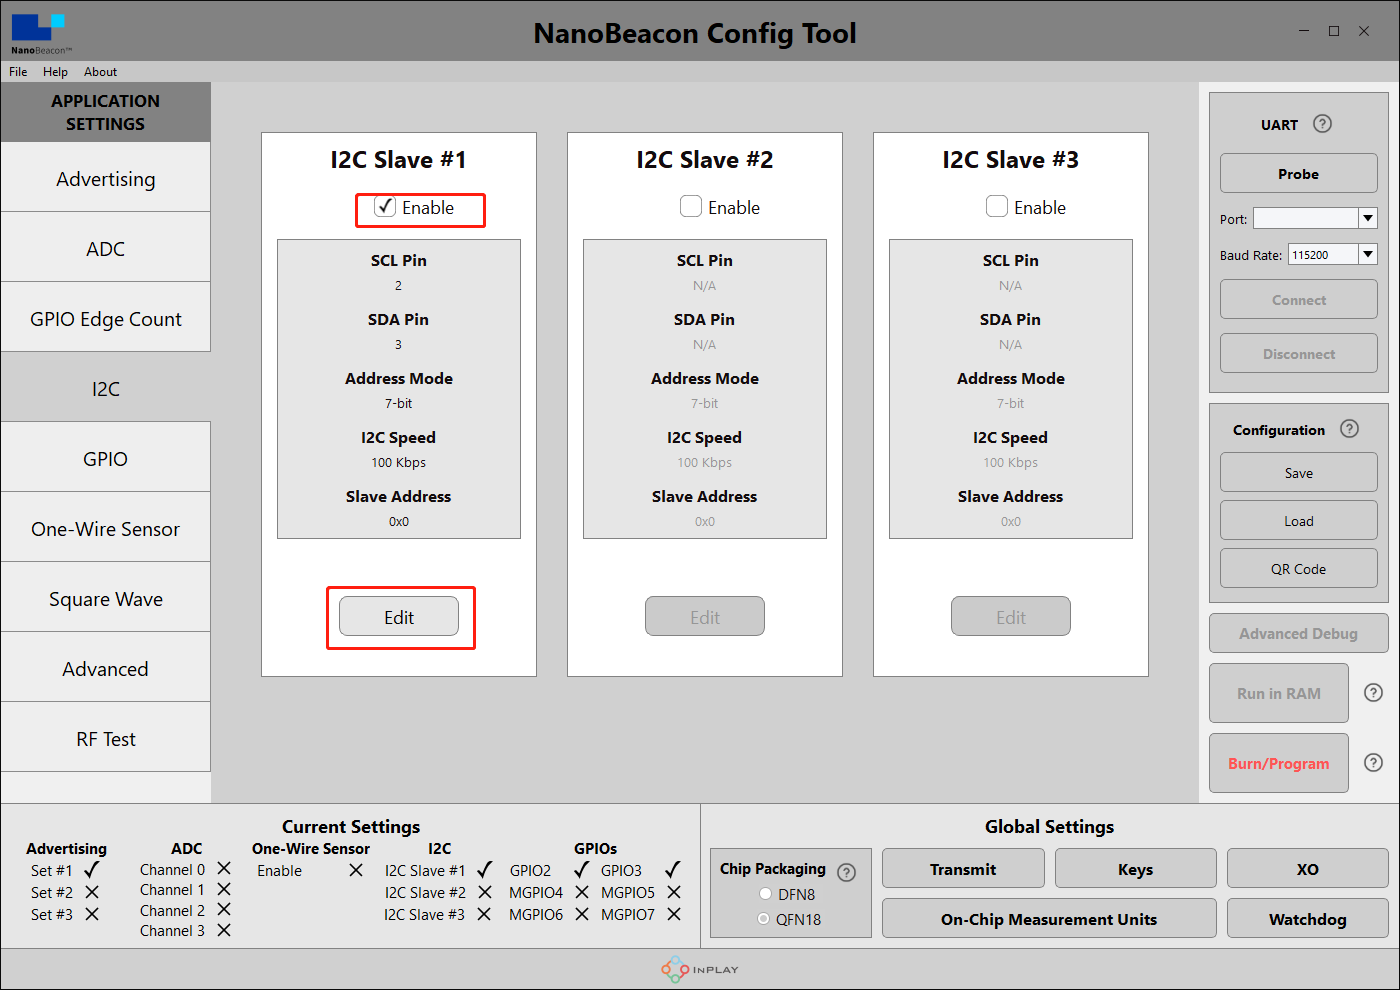
- 8.I2C通信设置——I2C参数配置
接下来进行I2C相关配置,使Fermion: BLE 传感器信标可以获取I2C传感器数据。
当我们回到Nano Beacon Config Tool,并且选择了左侧的I2C选项卡后。
有三个通道进行I2C数据采集,在这里我们选取通道1进行I2C传感器的配置。在I2C界面中Enable "I2C Slave#1",并点击Edit进行配置
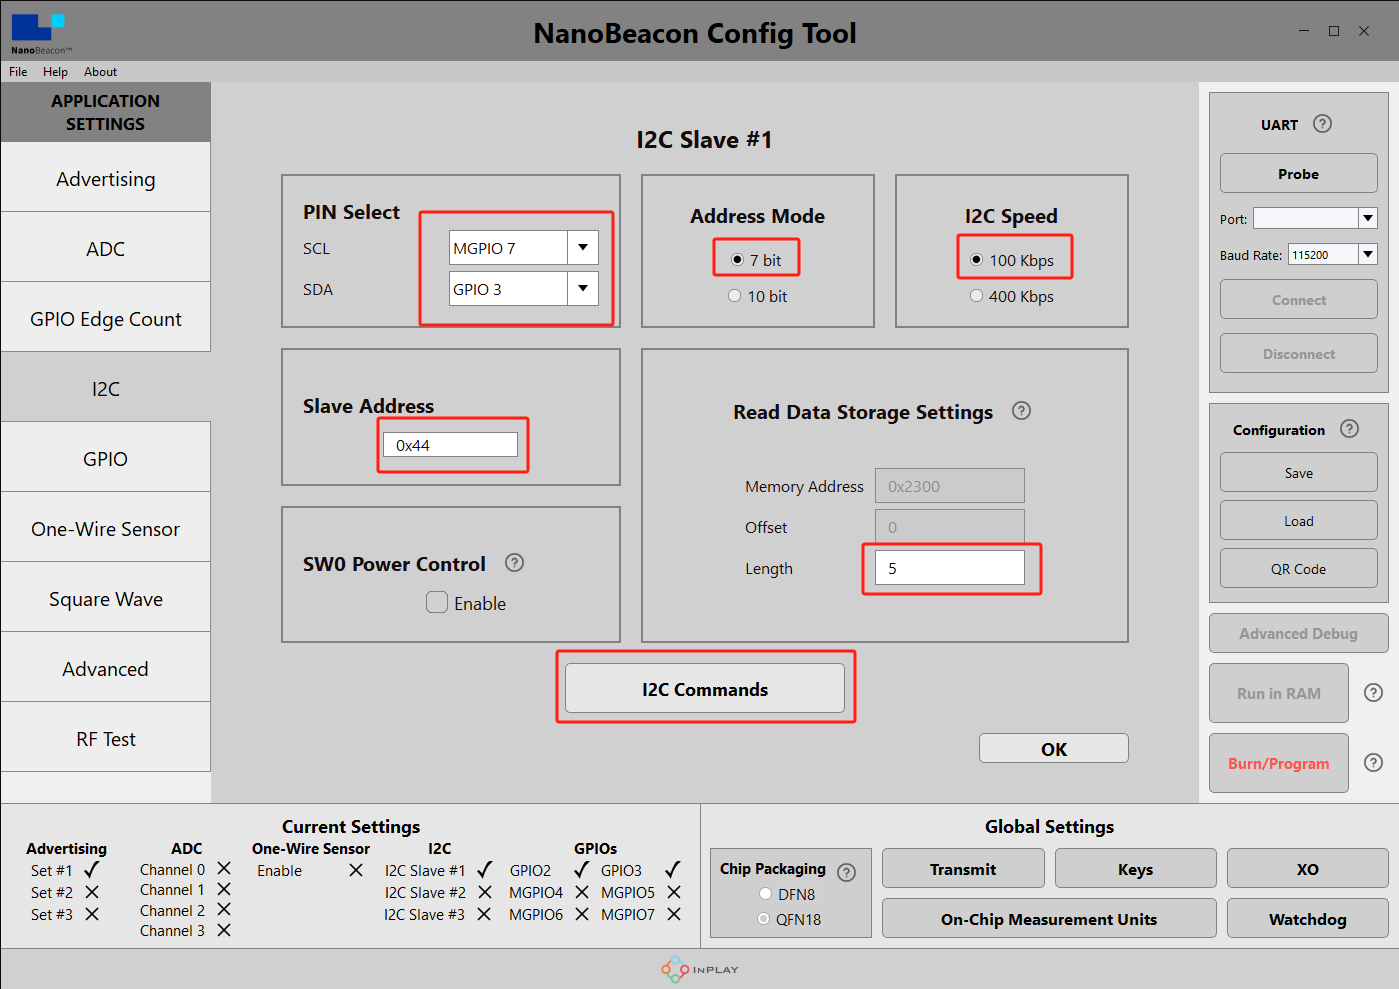
根据模块的引脚布局,PIN Select 中选择SCL为MGPIO7, SDA为GPIO3。这样布局后BLE信标和SHT40的连接会如下图所示,更加合理。
Slave Address选择为0x44(SHT40从机地址)
Address Mode 为7 bit(I2C标准模式)
I2C Speed 为100kps(I2C标准速度)
Read Data Storage Settings设定Length为5。此处为ring buffer机制,当读取数据长度>Length时会自动回绕。通过查看SHT40数据手册可知,当主机发送指令0xFD后,传感器会返回:[2 * 8-bit T-data; 8-bit CRC; 2 * 8-bit RH-data; 8-bit CRC],共6字节。
但是由于信标板载芯片的缓冲区设置, Fermion: 传感器信标发送1个指令后最多只能连续接收5个字节,结合SHT40返回的数据,最后一位为湿度校验位,可以舍弃,因此向SHT40获取的数据共5位,故Read Data Storage Settings设定Length为5。
- 9.I2C通信设置——I2C参数配置
点击I2C Commands进行指令设定
根据第7步中与Arduino控制器的通信流程,我们首先需要让传感器信标发送读取指令(0xFD)给SHT40芯片:
勾选Execute I2C command when cold boot以及Execute I2C command when warm boot选择i2c_write的一行,填入将读取SHT40传感器的指令0xFD,然后点击Add添加到指令列表。接下来,我们需要延时10ms等待SHT40准备数据:
我们等待10ms选择delay_command的一行,填入延时10000us,然后点击Add添加到指令列表。最后,我们需要从SHT40读取温湿度数据:
选择i2c_read的一行,填入读取的数据长度为5(IN100一次最多读取为5个字节),然后点击Add添加到指令列表。配置完成后,格式应与下图一致。
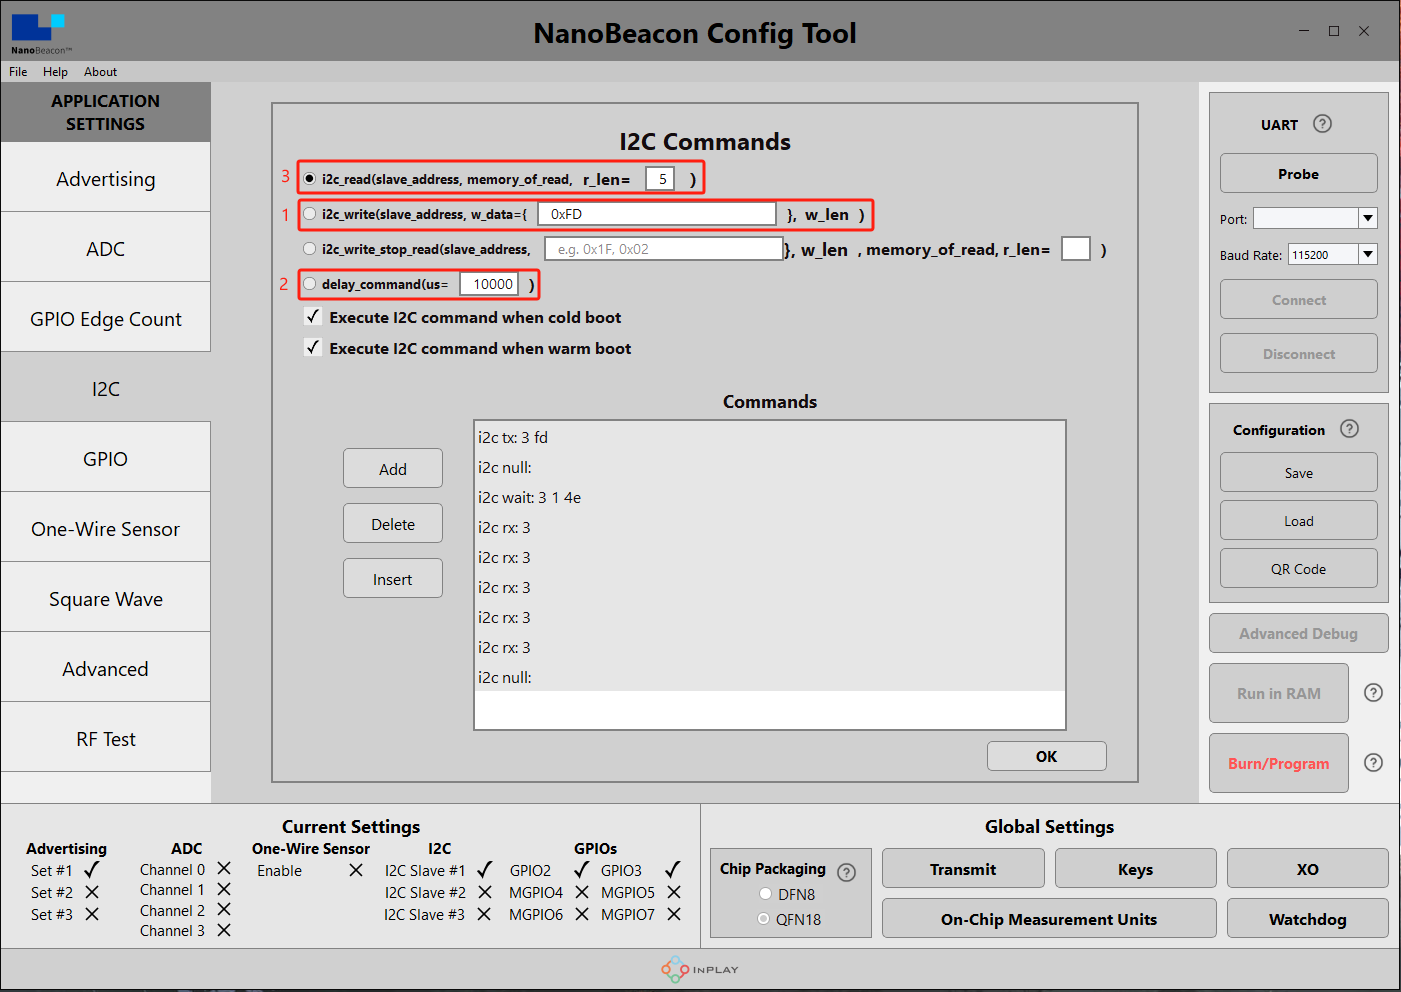
上述SHT40样例可直接下载后Load:Fermion: BLE Beacon
I2C传感器不支持"Run in RAM"测试只能直接烧录,推荐直接使用DFRobot提供的传感器样例配置文件,我们会不断丰富官方示例,若要使用未提供配置文件的I2C传感器,请仔细阅读Wiki中的教程使用。
- 10.晶振电容匹配
NanoBeaconConfig Tool中可以通过设置来匹配晶振电容,结合我们的电路,为了使频偏保持在最佳状态,我们建议您将以下两处参数修改为12。
-
11.检查配置
软件左下角可看到我们开启了Set #1、I2C Slave #1、GPIO3和MGPIO7

-
12.连接模块与PC-硬件
按照接线图进行硬件连接
-
13.连接模块与PC-软件
在软件右上角点击“Probe”刷新端口,刷新后选择对应端口,点击“Connect”,连接成功后会有弹窗提示

-
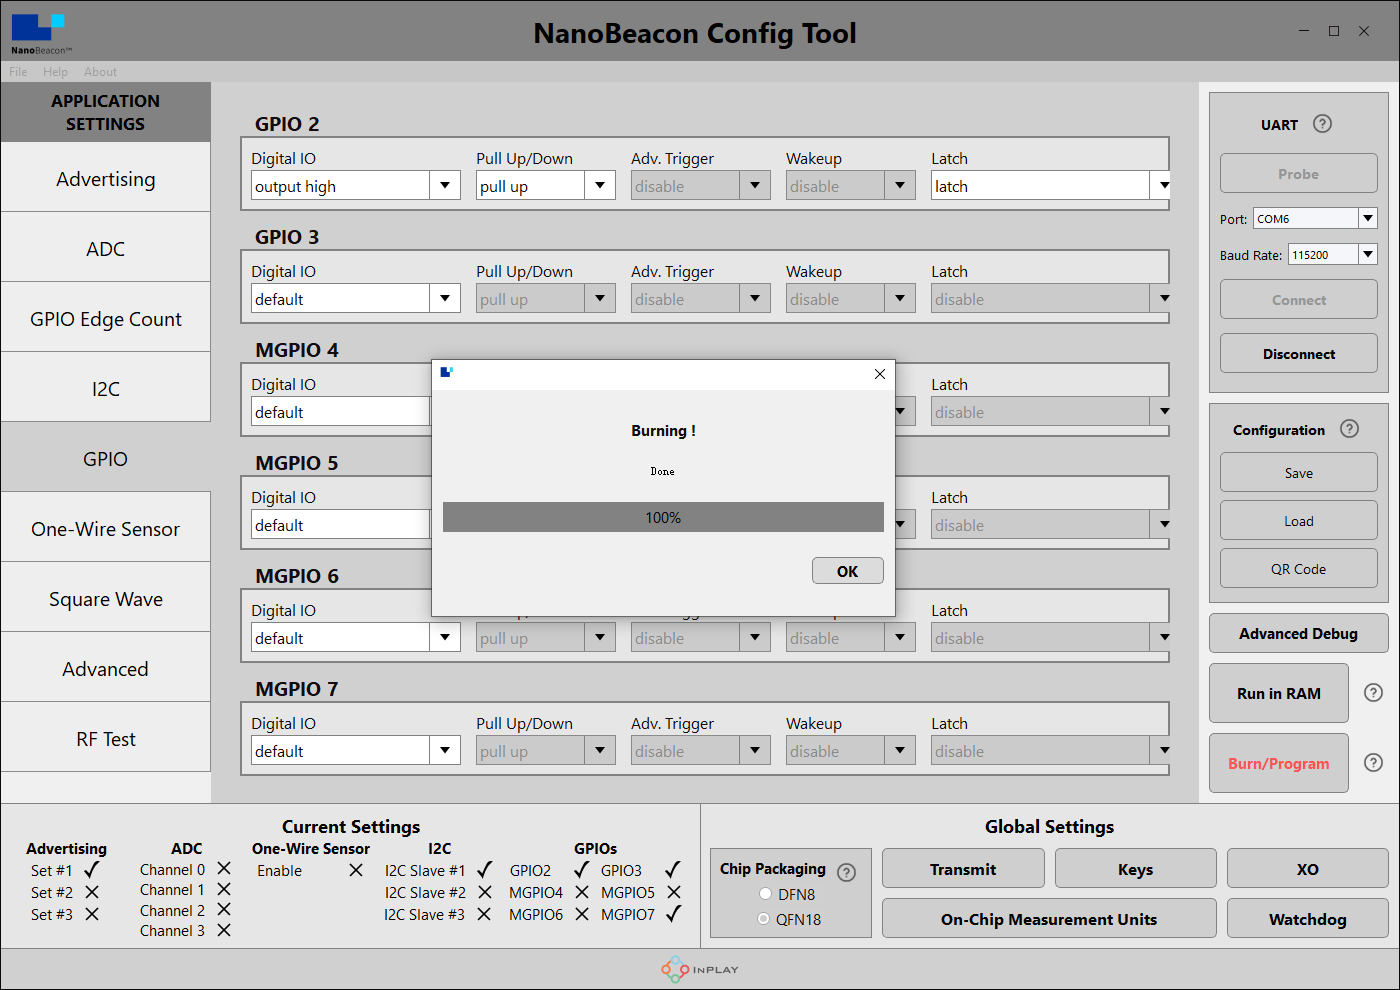
14.烧录配置
点击“Burn/Program”,完成后会有弹窗提示
*注:模块I2C配置下仅能烧录一次,在烧录前请详细核对上述过程中的指令是否正确!!!
三、手机app获取数据
-
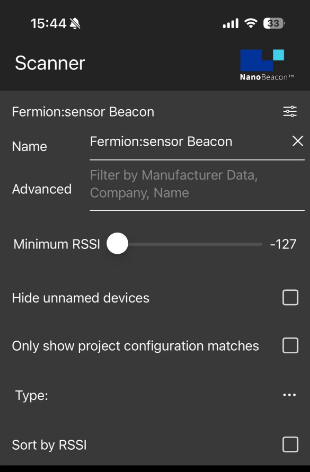
1.以IOS设备为例,AppStore安装并打开InPlay
-
2.若周边有太多其他信标设备,导致找不到我们的设备,则可以在筛选器中输入信标的设备名称,在配置传感器信标第4步的教程中,我们为Device Name命名为“SHT40”


-
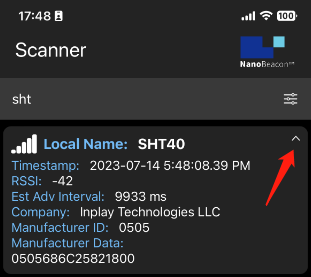
3.可以看到菜单中只保留了“SHT40”,点击一下可看到详细信息

-
4.数据解释
“SHT40”为配置传感器信标第4步中设置的Device Name
“686C25 821800”为配置传感器信标第5步中设置的I2C采集数据
-
5.传感器数据计算
当前已知信标采集到的传感器数据为“686C25 821800”,即为0x68 0x6C 0x25 0x82 0x18 0x00。
通过查询SHT40数据手册可知:当向传感器写入0xFD的时候,传感器会给I2C主机回复6字节的数据:

由于IN100一条tx指令只能接收5个字节数据,但是SHT40接收到0xFD后会吐出6条数据,所以第六位数据无法被读出,即为默认值0x00。
以我们读出的686C25 821800为例,即:
温度数值两字节为:0x68,0x6C,原始数值为0x686C=26732
温度数值CRC校验为:0x25
湿度数值两字节为:0x82,0x18,原始数值为0x8218=33304
湿度数据CRC由于硬件限制无法读取。再通过SHT40数据手册中的计算公式:
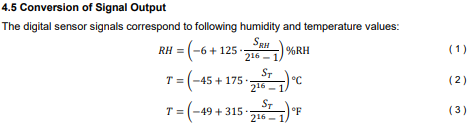
可得出:
温度=-45+(175x26732/65535)≈26.38℃
湿度=-6+(125x33304/65535)≈57.52%四、ESP32获取数据
-
准备好Arduino IDE&ESP32环境:FireBeetle_ESP32_E 首次使用教程
-
为ESP32烧录以下程序
/*
Based on Neil Kolban example for IDF: https://github.com/nkolban/esp32-snippets/blob/master/cpp_utils/tests/BLE%20Tests/SampleScan.cpp
Ported to Arduino ESP32 by Evandro Copercini
Changed to a beacon scanner to report iBeacon, EddystoneURL and EddystoneTLM beacons by beegee-tokyo
*/
#include <Arduino.h>
#include <BLEDevice.h>
#include <BLEUtils.h>
#include <BLEScan.h>
#include <BLEAdvertisedDevice.h>
#include <BLEEddystoneURL.h>
#include <BLEEddystoneTLM.h>
#include <BLEBeacon.h>
#define ENDIAN_CHANGE_U16(x) ((((x)&0xFF00) >> 8) + (((x)&0xFF) << 8))
float TemperatureData,HumidityData;
float Temperature,Humidity;
//设置ESP32 5秒扫描一次蓝牙设备
int scanTime = 5; //In seconds
BLEScan *pBLEScan;
class MyAdvertisedDeviceCallbacks : public BLEAdvertisedDeviceCallbacks
{
void onResult(BLEAdvertisedDevice advertisedDevice)
{
if (advertisedDevice.haveName())
{
if(String(advertisedDevice.getName().c_str()) == "SHT40")//扫描是否有名为SHT40的蓝牙设备
{
Serial.print("Device name: ");
Serial.println(advertisedDevice.getName().c_str());
std::string strManufacturerData = advertisedDevice.getManufacturerData();
uint8_t cManufacturerData[100];
strManufacturerData.copy((char *)cManufacturerData, strManufacturerData.length(), 0);
Serial.printf("strManufacturerData: %d ", strManufacturerData.length());
for (int i = 0; i < strManufacturerData.length(); i++)
{
Serial.printf("[%X]", cManufacturerData[i]);
}
//从SHT40获取原始数据
TemperatureData = int(cManufacturerData[2]<<8 | cManufacturerData[3]);
HumidityData = int(cManufacturerData[5]<<8 | cManufacturerData[6]);
//将原始数据转化为温湿度数据
Temperature = (175 * TemperatureData/65535) - 45;
Humidity = (125 * HumidityData/65535) - 6;
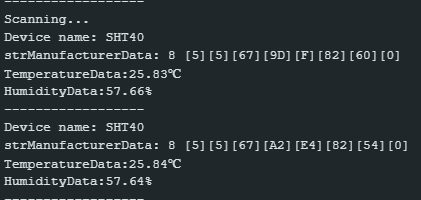
Serial.println();
Serial.print("TemperatureData:");Serial.print(Temperature);Serial.println("℃");
Serial.print("HumidityData:");Serial.print(Humidity);Serial.println("%");
Serial.println("------------------");
}
}
}
};
void setup()
{
Serial.begin(115200);
Serial.println("Scanning...");
BLEDevice::init("");
pBLEScan = BLEDevice::getScan(); //create new scan
pBLEScan->setAdvertisedDeviceCallbacks(new MyAdvertisedDeviceCallbacks());
pBLEScan->setActiveScan(true); //active scan uses more power, but get results faster
pBLEScan->setInterval(100);
pBLEScan->setWindow(99); // less or equal setInterval value
}
void loop()
{
// put your main code here, to run repeatedly:
BLEScanResults foundDevices = pBLEScan->start(scanTime, false);
pBLEScan->clearResults(); // delete results fromBLEScan buffer to release memory
delay(2000);
}
-
此程序是根据ESP32自带的BLE_Beacon_Scanner修改得到,根据需要可自行修改。
动态电源控制
APP弹窗提示
Fermion:传感器信标支持APP弹窗提示,您可以设置阈值触发手机提示,详情请见IN100官方教程
NanoBeacon Config Tool使用说明
关于NanoBeacon Config Tool更多用法,可查看软件的用户指南:NanoBeacon Config Tool User Guide EN.pdf
用户指南中使用的是“Beacon development kit”,在使用Fermion: BLE 传感器信标时,直接使用3.3V USB-TTL工具即可:
常见问题
文末的Gitee仓库链接中存放着我们测试过的传感器示例代码和配置文件。
我们会不断丰富官方例程清单,如您有新的传感器兼容性需要也可以联系您采购渠道的技术支持或者直接向techsupport@dfrobot.com发送需求邮件。
我们会在评估后尽快予以您答复。更多
