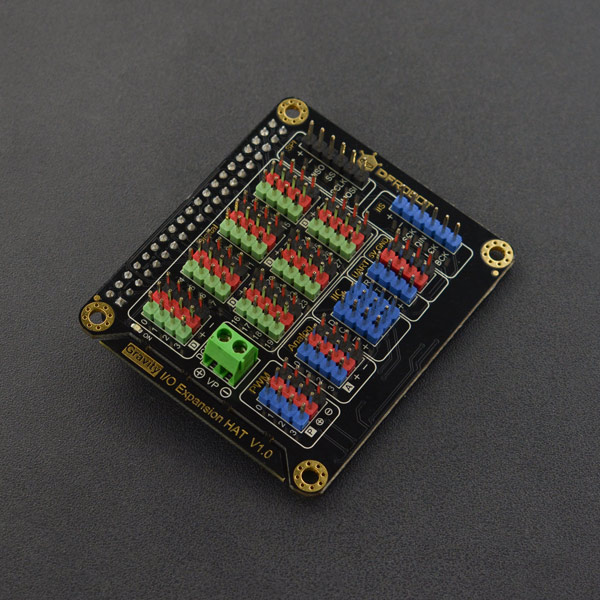
简介
IO Expansion HAT是一款专为Raspberry Pi开发的IO扩展板,扩展板将树莓派IO口均引出,包含数字端口、模拟端口、PWM端口、I2C端口、UART端口、SPI端口、IIS端口,完美兼容DFRobot的Gravity传感器系列产品,为使用树莓派省去繁琐的接线和故障排除,让学生、开发者、科研工作者可以专注实现自己的项目。 Raspberry Pi的GPIO电平最高为3.3V,该扩展板除了支持3.3V供电的传感器或功能模组外还支持更多产品的使用,以满足你的项目所需:
- 支持5V供电、3.3V电平的传感器或功能模组(将电源接到5V电源端口)
- 支持PWM外部供电(6~12V)
- 支持多路舵机控制
技术规格
- 驱动主控:STM32
- 工作电压:5V
- PWM接口外接电压:6-12V
- PWM引脚电压:5V
- 传感器接口电压:3.3V
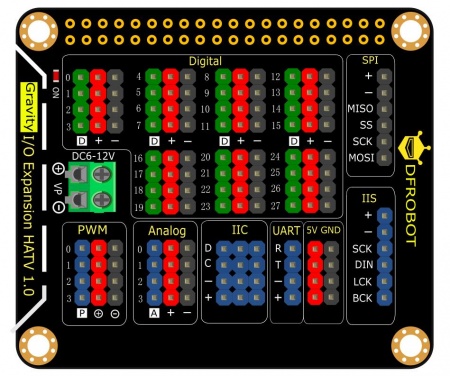
- 通信接口:28组数字端口、4组PWM端口、4组模拟端口、3组I2C端口、1组UART端口、4组5V电源端口、1组SPI端口、1组IIS端口
- 设备地址:0x10
- 外形尺寸:65*56mm
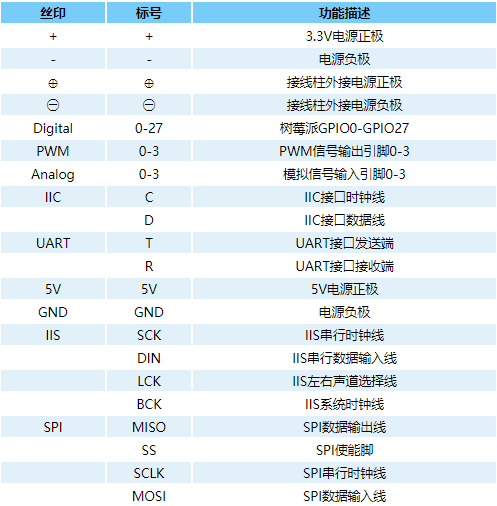
接口说明
注意:
此扩展板上GPIO编号采用BCM编玛
VP端未外部供电时,PWM端口 ⊕ 电压为5V
VP端外部供电时,PWM端口 ⊕ 电压为VP外部电压6~12V
教程
教程
端口及学习指导
的GPIO0~GPIO27引出。
GPIO学习指导") |
 |
 |
的GPIO14(TXD)和GPIO15(RXD)引出。
UART学习指导") |
的GPIO2(SDA.1)和GPIO3(SCL.1)引出。
I2C学习指导") |
的GIO21(SCK)、GPIO20(DIN)、GPIO19(LCK)、GPIO18(BCK)引出。") |
的GPIO10(MOSI)和GPIO9(MISO)、GPIO11(SCLK)、GPIO8(SS)引出。
SPI学习指导") |
 |
例程
本例程是讲如何在树莓派上扩展板上使用各类端口的传感器。
- 硬件
- 1 x 树莓派控制板
- 1 x IO Expansion HAT for Raspberry Pi
- 1 x HDMI线
- 1 x 显示屏
- 1 x 键盘鼠标
I2C使用步骤和程序运行介绍
- a.启动树莓派的I2C接口。(SPI开启方式与I2C相同)如已开启,可跳过该步骤。
打开终端(Terminal),键入如下指令,并回车:
sudo raspi-config
依次“键盘回车键”选择:【 Interfacing Options 】(或者【 Advanced Options 】)->【 I2C 】->【 Yes 】->【 OK 】->【 Finish 】: 


- b.安装Python依赖库与git,树莓派需要联网。如已安装,可跳过该步骤。
在终端中,依次键入如下指令,并回车:
sudo apt-get update
sudo apt-get install build-essential python-dev python-smbus git
- c.下载驱动库,并运行。
在终端中,依次键入如下指令,并回车:
cd ~
git clone https://github.com/DFRobot/DFRobot_RaspberryPi_Expansion_Board.git
- 在安装好库后,可通过两种方式运行程序:
方式1:输入命令
cd DFRobot_RaspberryPi_Expansion_Board/raspberry
python demo_adc.py
方式2:在树莓派系统打开Thonny Python IDE可在下载的文件夹看到下载后的库。

I2C使用例程
Gravity:IO Expansion HAT for Raspberry Pi 有3路I2C端口,通过树莓派(BCM编码)直接引出。
以SEN0290 Gravity:闪电传感器为例, 点击下载闪电传感器库文件 或者在终端中,依次键入如下指令,并回车:
cd ~
git clone https://github.com/DFRobot/DFRobot_AS3935.git
下载后运行DFRobot_AS3935_ordinary程序
# file DFRobot_AS3935_ordinary.py
#
# SEN0290 Lightning Sensor
# This sensor can detect lightning and display the distance and intensity of the lightning within 40 km
# It can be set as indoor or outdoor mode.
# The module has three I2C, these addresses are:
# AS3935_ADD1  0x01   A0 = 1  A1 = 0
# AS3935_ADD2  0x02   A0 = 0  A1 = 1
# AS3935_ADD3  0x03   A0 = 1  A1 = 1
#
#
# Copyright    [DFRobot](https://www.dfrobot.com), 2018
# Copyright    GNU Lesser General Public License
#
# version  V1.0
# date  2018-11-28

import sys
sys.path.append('../')
import time
from DFRobot_AS3935_Lib import DFRobot_AS3935
import RPi.GPIO as GPIO
from datetime import datetime

#I2C address
AS3935_I2C_ADDR1 = 0X01
AS3935_I2C_ADDR2 = 0X02
AS3935_I2C_ADDR3 = 0X03

#Antenna tuning capcitance (must be integer multiple of 8, 8 - 120 pf)
AS3935_CAPACITANCE = 96
IRQ_PIN = 7

#Indoor/outdoor mode selection
AS3935_INDOORS = 0
AS3935_OUTDOORS = 1
AS3935_MODE = AS3935_INDOORS

#Enable/disable disturber detection
AS3935_DIST_DIS = 0
AS3935_DIST_EN = 1
AS3935_DIST = AS3935_DIST_EN

GPIO.setmode(GPIO.BOARD)

sensor = DFRobot_AS3935(AS3935_I2C_ADDR3, bus = 1)
if (sensor.reset()):
    print("init sensor sucess.")
else:
    print("init sensor fail")
    while True:
        pass
#Configure sensor
sensor.manualCal(AS3935_CAPACITANCE, AS3935_MODE, AS3935_DIST)
# Connect the IRQ and GND pin to the oscilloscope.
# uncomment the following sentences to fine tune the antenna for better performance.
# This will dispaly the antenna's resonance frequency/16 on IRQ pin (The resonance frequency will be divided by 16 on this pin)
# Tuning AS3935_CAPACITANCE to make the frequency within 500/16 kHz plus 3.5% to 500/16 kHz minus 3.5%
#
# sensor.setLcoFdiv(0)
# sensor.setIrqOutputSource(3)

#view all register data
#sensor.printAllRegs()

def callback_handle(channel):
    global sensor
    time.sleep(0.005)
    intSrc = sensor.getInterruptSrc()
    if intSrc == 1:
        lightningDistKm = sensor.getLightningDistKm()
        print('Lightning occurs!')
        print('Distance: %dkm'%lightningDistKm)

        lightningEnergyVal = sensor.getStrikeEnergyRaw()
        print('Intensity: %d '%lightningEnergyVal)
    elif intSrc == 2:
        print('Disturber discovered!')
    elif intSrc == 3:
        print('Noise level too high!')
    else:
        pass
#Set to input mode
GPIO.setup(IRQ_PIN, GPIO.IN)
#Set the interrupt pin, the interrupt function, rising along the trigger
GPIO.add_event_detect(IRQ_PIN, GPIO.RISING, callback = callback_handle)
print("start lightning detect.")
while True:
time.sleep(1.0)
-
当发生闪电时,中断报警引脚IRQ产生中断脉冲,触发主控显示闪电报警中断“Lightning occurs!”,并显示闪电发生距离和强度。
-
当模块附近有电磁干扰,模块会提示附近有干扰源“Disturber discovered!”,若干扰噪声过大,模块也会发出干扰噪声过大的警报“Noise level too high!”。
-

舵机控制例程
Gravity:IO Expansion HAT for Raspberry Pi拥有4路PWM接口,方便用户在树莓派上使用
在终端依次键入如下指令回车安装库:
	cd ~
	git clone <https://github.com/DFRobot/DFRobot_RaspberryPi_Expansion_Board.git>
下载后运行demo_servo程序 结果可观察到舵机从0°到180°和180°到0°转动,退出运行可点击键盘:ctrl+c
# -*- coding:utf-8 -*-

'''
  # demo_servo.py
  #
  # Connect board with raspberryPi.
  # Run this demo.
  #
  # Connect servo to one of pwm channels
  # All or part servos will move to 0 degree, then move to 180 degree, then loop
  # Test Servo: https://www.dfrobot.com/product-255.html
  # Warning: Servos must connect to pwm channel, otherwise may destory Pi IO
  #
  # Copyright   [DFRobot](https://www.dfrobot.com), 2016
  # Copyright   GNU Lesser General Public License
  #
  # version  V1.0
  # date  2019-3-28
'''

import time

from DFRobot_RaspberryPi_Expansion_Board import DFRobot_Expansion_Board_IIC as Board
from DFRobot_RaspberryPi_Expansion_Board import DFRobot_Expansion_Board_Servo as Servo

board = Board(1, 0x10)    # Select i2c bus 1, set address to 0x10
servo = Servo(board)

''' print last operate status, users can use this variable to determine the result of a function call. '''
def print_board_status():
  if board.last_operate_status == board.STA_OK:
    print("board status: everything ok")
  elif board.last_operate_status == board.STA_ERR:
    print("board status: unexpected error")
  elif board.last_operate_status == board.STA_ERR_DEVICE_NOT_DETECTED:
    print("board status: device not detected")
  elif board.last_operate_status == board.STA_ERR_PARAMETER:
    print("board status: parameter error")
  elif board.last_operate_status == board.STA_ERR_SOFT_VERSION:
    print("board status: unsupport board framware version")

if __name__ == "__main__":

  while board.begin() != board.STA_OK:    # Board begin and check board status
    print_board_status()
    print("board begin faild")
    time.sleep(2)
  print("board begin success")

  servo.begin()   # servo control begin

  while True:
    print("servo move to 0")
    servo.move(board.ALL, 0)
    time.sleep(1)
    print("servo move to 180")
    servo.move(board.ALL, 180)
    time.sleep(1)

    print("part servos move to 0")
    servo.move(0, 0)  #pwm0
    #servo.move(1, 0)  #pwm1
    #servo.move(2, 0)  #pwm2
    #servo.move(3, 0)  #pwm3
    time.sleep(1)
    print("part servos move to 180")
    servo.move(0, 180)  #pwm0
    #servo.move(1, 180)  #pwm1
    #servo.move(2, 180)  #pwm2
    #servo.move(3, 180)  #pwm3
    time.sleep(1)
数字端口例程
- 此时在扩展板27脚插上LED灯可观察到LED不停亮灭
import RPi.GPIO as GPIO
import time
import atexit
blinkPin=27
atexit.register(GPIO.cleanup)
GPIO.setmode(GPIO.BCM)
GPIO.setup(blinkPin,GPIO.OUT)
while True:
    GPIO.output(blinkPin,GPIO.HIGH)
    time.sleep(1)
    GPIO.output(blinkPin,GPIO.LOW)
    time.sleep(1)
UART串口例程
Gravity:IO Expansion HAT for Raspberry Pi 有1路UART端口,通过树莓派(BCM编码)直接引出。
以SEN0285 Gesture&Touch Sensor传感器为例, 点击下载DFRobot_Gesture_Touch库文件
或者在终端中,依次键入如下指令,并回车:
	cd ~
	git clone <https://github.com/DFRobot/DFRobot_Gesture_Touch.git>
下载后运行demo_gesture_touch程序
模拟端口例程
Gravity:IO Expansion HAT for Raspberry Pi拥有4路模拟端口, 在终端中,依次键入如下指令回车安装库:
	cd ~
	git clone <https://github.com/DFRobot/DFRobot_RaspberryPi_Expansion_Board.git>
下载后运行demo_adc程序
# -*- coding:utf-8 -*-

'''
  # demo_adc.py
  #
  # Connect board with raspberryPi.
  # Run this demo.
  #
  # All or part adc channels value will print on terminal
  #
  # Copyright   [DFRobot](https://www.dfrobot.com), 2016
  # Copyright   GNU Lesser General Public License
  #
  # version  V1.0
  # date  2019-3-28
'''

import time

from DFRobot_RaspberryPi_Expansion_Board import DFRobot_Expansion_Board_IIC as Board

board = Board(1, 0x10)    # Select i2c bus 1, set address to 0x10

def board_detect():
  l = board.detecte()
  print("Board list conform:")
  print(l)

''' print last operate status, users can use this variable to determine the result of a function call. '''
def print_board_status():
  if board.last_operate_status == board.STA_OK:
    print("board status: everything ok")
  elif board.last_operate_status == board.STA_ERR:
    print("board status: unexpected error")
  elif board.last_operate_status == board.STA_ERR_DEVICE_NOT_DETECTED:
    print("board status: device not detected")
  elif board.last_operate_status == board.STA_ERR_PARAMETER:
    print("board status: parameter error")
  elif board.last_operate_status == board.STA_ERR_SOFT_VERSION:
    print("board status: unsupport board framware version")

if __name__ == "__main__":

  board_detect()    # If you forget address you had set, use this to detected them, must have class instance

  # Set board controler address, use it carefully, reboot module to make it effective
  '''
  board.set_addr(0x10)
  if board.last_operate_status != board.STA_OK:
    print("set board address faild")
  else:
    print("set board address success")
  '''

  while board.begin() != board.STA_OK:    # Board begin and check board status
    print_board_status()
    print("board begin faild")
    time.sleep(2)
  print("board begin success")

  board.set_adc_enable()
  # board.set_adc_disable()

  while True:
    val = board.get_adc_value(board.A0)   # A0 channels read
    #val = board.get_adc_value(board.A1)   # A1 channels read
    #val = board.get_adc_value(board.A2)   # A2 channels read
    #val = board.get_adc_value(board.A3)   # A3 channels read
    print("channel: A0, value: %d" %val)
    print("")

    time.sleep(2)
PWM例程
Gravity:IO Expansion HAT for Raspberry Pi拥有4路PWM端口 在终端中,依次键入如下指令回车安装库:
	cd ~
	git clone <https://github.com/DFRobot/DFRobot_RaspberryPi_Expansion_Board.git>
下载后运行demo_pwm程序
# -*- coding:utf-8 -*-

'''
  # demo_pwm.py
  #
  # Connect board with raspberryPi.
  # Run this demo.
  #
  # All pwm channel will set frequency to 1000HZ, duty to 50%, attention: PWM voltage depends on independent power supply
  # If there is DC motors connect to pwm channle, they will move slow to fast, then loop
  #
  # Copyright   [DFRobot](https://www.dfrobot.com), 2016
  # Copyright   GNU Lesser General Public License
  #
  # version  V1.0
  # date  2019-3-28
'''

import time

from DFRobot_RaspberryPi_Expansion_Board import DFRobot_Expansion_Board_IIC as Board

board = Board(1, 0x10)    # Select i2c bus 1, set address to 0x10

def board_detect():
  l = board.detecte()
  print("Board list conform:")
  print(l)

''' print last operate status, users can use this variable to determine the result of a function call. '''
def print_board_status():
  if board.last_operate_status == board.STA_OK:
    print("board status: everything ok")
  elif board.last_operate_status == board.STA_ERR:
    print("board status: unexpected error")
  elif board.last_operate_status == board.STA_ERR_DEVICE_NOT_DETECTED:
    print("board status: device not detected")
  elif board.last_operate_status == board.STA_ERR_PARAMETER:
    print("board status: parameter error")
  elif board.last_operate_status == board.STA_ERR_SOFT_VERSION:
    print("board status: unsupport board framware version")

if __name__ == "__main__":

  board_detect()    # If you forget address you had set, use this to detected them, must have class instance

  # Set board controler address, use it carefully, reboot module to make it effective
  '''
  board.set_addr(0x10)
  if board.last_operate_status != board.STA_OK:
    print("set board address faild")
  else:
    print("set board address success")
  '''

  while board.begin() != board.STA_OK:    # Board begin and check board status
    print_board_status()
    print("board begin faild")
    time.sleep(2)
  print("board begin success")

  board.set_pwm_enable()                # Pwm channel need external power
  # board.set_pwm_disable()
  board.set_pwm_frequency(1000)         # Set frequency to 1000HZ, Attention: PWM voltage depends on independent power supply

  while True:
    print("set all pwm channels duty to 30%")
    board.set_pwm_duty(board.ALL, 30)   # Set all pwm channels duty
    time.sleep(1)

    print("set part pwm channels duty to 60%")
    board.set_pwm_duty(0, 60)   # Set pwm0 channels duty
    #board.set_pwm_duty(1, 70)  # Set pwm1 channels duty
    #board.set_pwm_duty(2, 80)  # Set pwm2 channels duty
    #board.set_pwm_duty(3, 90)  # Set pwm3 channels duty
    time.sleep(1)
SPI端口例程
DFR0413 0.96 Inch OLED Display Module For Raspberry Pi WIKI链接
常见问题
还没有客户对此产品有任何问题,欢迎通过qq或者论坛联系我们!
更多问题及有趣的应用,可以 访问论坛 进行查阅或发帖。
更多
- 有趣的应用链接
- 相关下载链接
- 推荐阅读链接
- 旧版本维库的链接
