概述
Arduino控制器的控制端口数量实在是有限,连接几个传感器,通讯设备什么的,你就会发现端口不够用了,还想扩展一个液晶显示器,怎么办?
为了解决上述问题,我们开发的I2C接口的LCD显示器,I2C只需两根线就可以实现数据显示,还可以串联多个I2C设备。标准I2C接口,除了Arduino可以使用之外,其他单片机同样可以进行驱动控制。
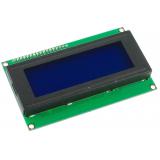
I2C/TWI LCD2004模块来自DFRobot相当酷的一款I2C接口的LCD显示器,采用I2C的通讯接口驱动。LCD2004能够为您的MCU控制器节省大量的数字引脚,也为你的Arduino控制器系统的显示开发节省大量的软件开发时间成本,只要2根信号线就可以搞定全部链接。这款LCD显示器拥有4x20字节的STN白色字符显示及炫酷的蓝色背光灯。平整的设计能够让它快速整合到你的项目中,既美观,又功能强大。
我们提供Arduino平台下的全套使用教程和代码库。当然,该LCD还兼容其他单片机平台,接线同样很简单。不同于市面上的LCD2004,DFRobot的这款产品还能够同其他I2C LCD屏串联,并通过板子后面的跳帽选择地址。该模块的另外一大福利是带有两个Windows Gadgeteer的接口。国内仅有DFRobot一家的LCD系列产品具备这种扩展,为广大Gadgeteer平台的开发用户解决了燃眉之急。
技术规格
- 工作电压:5V
- I2C设备地址:0x20~0x27(出厂默认0x20,短接帽全插上)
- 通讯接口:I2C/TWI
- 液晶参数:4行,每行20个字符
- 具有蓝色背光灯,白色字符,供电指示灯,电位器用于调节显示器对比度
- 点尺寸:0.55 x 0.55mm
- 字符尺寸:2.96 x 4.75mm
- 尺寸:98 x 60 x 24mm
- 重量:75g
地址设置
注意:短路帽插上表示0,短接帽拔掉表示1!
| A2 | A1 | A0 | 地址 |
|---|---|---|---|
| 0 | 0 | 0 | 0x20 |
| 0 | 0 | 1 | 0x21 |
| 0 | 1 | 0 | 0x22 |
| 0 | 1 | 1 | 0x23 |
| 1 | 0 | 0 | 0x24 |
| 1 | 0 | 1 | 0x25 |
| 1 | 1 | 0 | 0x26 |
| 1 | 1 | 1 | 0x27 |
连线图
在你的Arduino连接SDA的引脚4和SCL的引脚5

请注意V1.2的接口,它与老版本的LCD module的接口不同,请参考历史版本
库函数
- LiquidCrystal()
- begin()
- clear()
- home()
- setCursor()
- write()
- print()
- cursor()
- noCursor()
- blink()
- noBlink()
- display()
- noDisplay()
- scrollDisplayLeft()
- scrollDisplayRight()
- autoscroll()
- noAutoscroll()
- leftToRight()
- rightToLeft()
- createChar()
示例代码
首先下载LiquidCrystal_I2Cv1-1 library,然后安装该库,安装完后重启Arduino IDE!
//DFRobot.com
//Compatible with the Arduino IDE 1.0
//Library version:1.1
#include <Wire.h>
#include <LiquidCrystal_I2C.h>

#if defined(ARDUINO) && ARDUINO >= 100
#define printByte(args)  write(args);
#else
#define printByte(args)  print(args,BYTE);
#endif

uint8_t bell[8]  = {0x4,0xe,0xe,0xe,0x1f,0x0,0x4};
uint8_t note[8]  = {0x2,0x3,0x2,0xe,0x1e,0xc,0x0};
uint8_t clock[8] = {0x0,0xe,0x15,0x17,0x11,0xe,0x0};
uint8_t heart[8] = {0x0,0xa,0x1f,0x1f,0xe,0x4,0x0};
uint8_t duck[8]  = {0x0,0xc,0x1d,0xf,0xf,0x6,0x0};
uint8_t check[8] = {0x0,0x1,0x3,0x16,0x1c,0x8,0x0};
uint8_t cross[8] = {0x0,0x1b,0xe,0x4,0xe,0x1b,0x0};
uint8_t retarrow[8] = { 0x1,0x1,0x5,0x9,0x1f,0x8,0x4};

LiquidCrystal_I2C lcd(0x20,20,4);  // set the LCD address to 0x20 for a 20 chars and 4 line display(All jumpers should be connected!)

void setup()
{
//  Serial.begin(57600);
  lcd.init();                      // initialize the lcd
  lcd.backlight();

  lcd.createChar(0, bell);
  lcd.createChar(1, note);
  lcd.createChar(2, clock);
  lcd.createChar(3, heart);
  lcd.createChar(4, duck);
  lcd.createChar(5, check);
  lcd.createChar(6, cross);
  lcd.createChar(7, retarrow);
  lcd.home();

  lcd.setCursor(0, 0);
  for(int i = 0;i < 20; i++)  lcd.printByte(6);
  lcd.setCursor(0, 1);
  lcd.printByte(6);
  lcd.print("   Hello world    ");
  lcd.printByte(6);
  lcd.setCursor(0, 2);
  lcd.printByte(6);
  lcd.print("  i ");
  lcd.printByte(3);
  lcd.print(" arduinos!   ");
  lcd.printByte(6);
  lcd.setCursor(0, 3);
  for(int i = 0;i < 20; i++)  lcd.printByte(6);
//  lcd.clear();

}

void loop()
{

}
如果要使用库自带的样例代码,注意需要修改初始化语句,需要把:
LiquidCrystal_I2C lcd(0x27,16,2); // set the LCD address to 0x27 for a 16 chars and 2 line display
改成:
LiquidCrystal_I2C lcd(0x20,20,4); // set the LCD address to 0x20 for a 20 chars and 4 line display(All jumpers should be connected!)
因为默认的初始化语句是给LCD1602用的!
相关资料
Arduino I2C LCD库(兼容Arduino IDE 1.0以及以上版本)
 购买 IIC/TWI LCD2004液晶模块(Arduino兼容)(SKU:DFR0154)
category: Product Manual category: DFR Series category: Modules category: source category: Diagram