简介
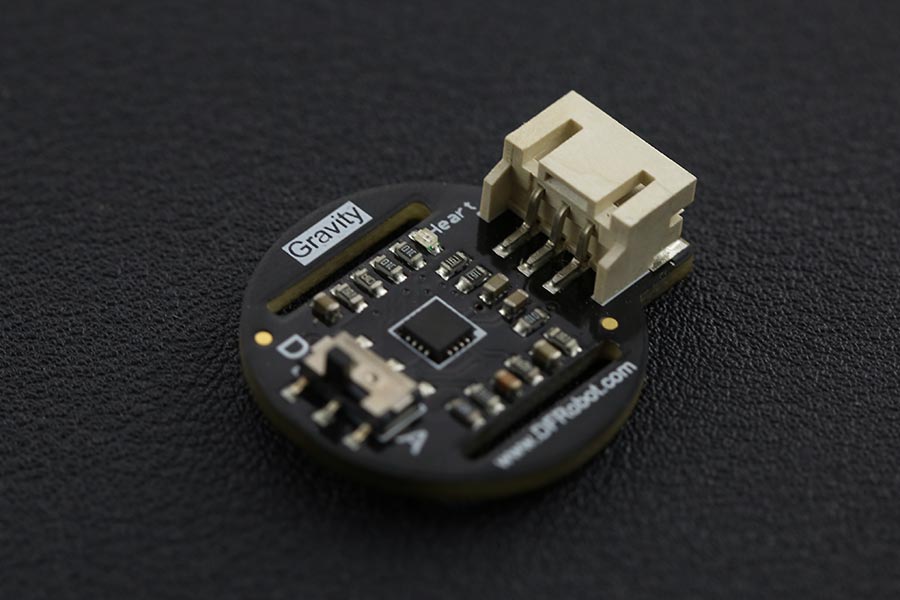
DFRobot正式推出超小型心率传感器,采用光电容积脉搏波描记法(PhotoPlethysmoGraphy,PPG),通过测量血液中血红蛋白随心脏跳动而对氧气吸收的变化量来测量人体心率参数。该方法拥有响应性快,性能稳定,适应性强等特点。模块拥有方波和脉搏波两种信号输出模式,可以通过板载开关去自由切换输出信号。脉搏波将输出一个连续的心率波形,而方波将根据心率的变化输出对应的方波。
新款心率传感器体积只有拇指大小,可以佩戴于手指、手腕、耳垂等皮肤裸露处。另外,板载的Gravity 3-Pin接口也可直接兼容Arduino I/O扩展板,使用简单,平台兼容性好,可广泛应用于手环,腕带等可穿戴饰品的DIY制作。
注意:
- 此为静态心率传感器,测量时请勿随意移动,也勿按压过紧。
- 本品并非专业医疗仪器,不能作为辅助配件参与诊断和治疗。
- 心率传感器背面的薄膜不能撕掉,撕掉后将造成无法修复的损坏!
产品参数
- 供电电压:3.3 - 6V,推荐5V
- 输出电压:模拟量(0 - VCC)/ 数字量(0 / VCC)
- 工作电流:< 10mA
- 尺寸:28mm x 24mm
引脚说明

模式开关:
“A”:脉搏波:模块将根据心率变化输出连续的脉搏波
“D”:方波:根据心率的变化输出对应的方波信号
使用教程
安装方式
模块可以安放在手指,手腕,耳垂等皮肤直接接触处:
 |
 |
|---|---|
 |
 |
接线图

教程1
使用Arduino板测试血氧饱和度值,输出心率值。可以把传感器直接放在手指、手腕等地方。
注:此例程需要把传感器上的开关拨向“D”档
准备
- 硬件
- UNO x1
- 心率传感器 x1
- 杜邦线 若干
- 软件
- Arduino IDE,点击下载Arduino IDE
样例代码
点击下载库文件DFRobot_Heartrate(GitHub)
选择样例代码 DFRobot_Heartrate_Digital_Mode
/*!
  @file DFRobot_Heartrate.h
  @brief DFRobot_Heartrate.h detailed description for Heartrate.cpp

   This is written for the heart rate sensor the company library. Mainly used for real
   time measurement of blood oxygen saturation, based on measured values calculate heart rate values.

  @author linfeng(Musk.lin@dfrobot.com)
  @version  V1.1
  @date  2016-8-16
  @version  V1.0
  @date  2015-12-24
*/
#define heartratePin A1
#include "DFRobot_Heartrate.h"

DFRobot_Heartrate heartrate(DIGITAL_MODE); ///< ANALOG_MODE or DIGITAL_MODE

void setup() {
  Serial.begin(115200);
}

void loop() {
  uint8_t rateValue;
  heartrate.getValue(heartratePin); ///< A1 foot sampled values
  rateValue = heartrate.getRate(); ///< Get heart rate value
  if (rateValue)  {
    Serial.println(rateValue);
  }
  delay(20);
}

/******************************************************************************
  Copyright (C) <2015>  <linfeng>
  This program is free software: you can redistribute it and/or modify
  it under the terms of the GNU General Public License as published by
  the Free Software Foundation, either version 3 of the License, or
  (at your option) any later version.
  This program is distributed in the hope that it will be useful,
  but WITHOUT ANY WARRANTY; without even the implied warranty of
  MERCHANTABILITY or FITNESS FOR A PARTICULAR PURPOSE.  See the
  GNU General Public License for more details.
  You should have received a copy of the GNU General Public License
  along with this program.  If not, see <http://www.gnu.org/licenses/>.
  Contact: Musk.lin@dfrobot.com
 ******************************************************************************/
Mind+(基于Scratch3.0)图形化编程
- 下载及安装软件。下载地址:https://www.mindplus.cc 详细教程:Mind+基础wiki教程-软件下载安装
- 切换到“上传模式”。 详细教程:Mind+基础wiki教程-上传模式编程流程
- “扩展”中选择“主控板”中的“Arduino Uno”,“传感器”中选择“心率传感器”。 详细教程:Mind+基础wiki教程-加载扩展库流程
- 进行编程,程序如下图:
- 菜单“连接设备”,“上传到设备”
- 程序上传完毕后,打开串口即可看到数据输出。详细教程:Mind+基础wiki教程-串口打印
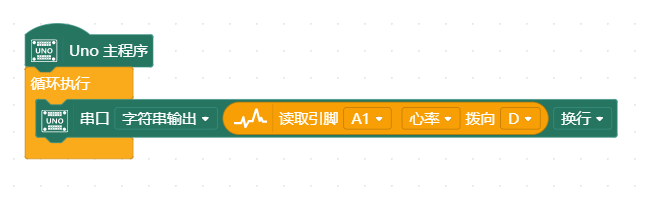
结果
通过串口打印心率值。

教程2
使用Arduino板测试血氧饱和度值,打印心率波形。可以把传感器直接放在手指、手腕等地方。
选择样例代码 DFRobot_Heartrate_Analog_Mode
注:此例程需要把传感器上的开关拨向“A”档
准备
- 硬件
- UNO x1
- 心率传感器 x1
- 杜邦线 若干
- 软件
- Arduino IDE 1.6.6及以上版本,点击下载Arduino IDE
样例代码
/*!
  @file HeartMap.ino
  @brief Print heart rate value

   This is Print heart rate value
  @author linfeng(Musk.lin@dfrobot.com)
  @version  V1.0
  @date  2016-8-16
*/
#define heartPin A1
void setup() {
  Serial.begin(115200);
}
void loop() {
  int heartValue = analogRead(heartPin);
  Serial.println(heartValue);
  delay(20);
}
/******************************************************************************
  Copyright (C) <2015>  <linfeng>
  This program is free software: you can redistribute it and/or modify
  it under the terms of the GNU General Public License as published by
  the Free Software Foundation, either version 3 of the License, or
  (at your option) any later version.
  This program is distributed in the hope that it will be useful,
  but WITHOUT ANY WARRANTY; without even the implied warranty of
  MERCHANTABILITY or FITNESS FOR A PARTICULAR PURPOSE.  See the
  GNU General Public License for more details.
  You should have received a copy of the GNU General Public License
  along with this program.  If not, see <http://www.gnu.org/licenses/>.
  Contact: Musk.lin@dfrobot.com
 ******************************************************************************/
Mind+(基于Scratch3.0)图形化编程
- 下载及安装软件。下载地址:https://www.mindplus.cc 详细教程:Mind+基础wiki教程-软件下载安装
- 切换到“上传模式”。 详细教程:Mind+基础wiki教程-上传模式编程流程
- “扩展”中选择“主控板”中的“Arduino Uno”,“传感器”中选择“心率传感器”。 详细教程:Mind+基础wiki教程-加载扩展库流程
- 进行编程,程序如下图:
- 菜单“连接设备”,“上传到设备”
- 程序上传完毕后,打开串口即可看到数据输出。详细教程:Mind+基础wiki教程-串口打印
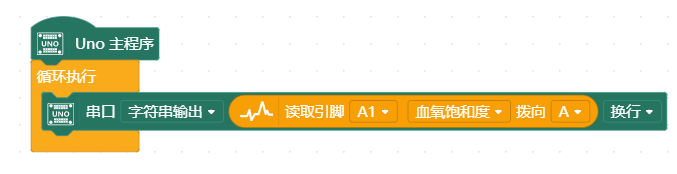
结果
使用Arduino1.6.5以上版本,菜单栏中选择 Tools-> Serial Plotter,通过串口绘图器观察,可以看到血氧波形。

**扩展阅读:心电图 **
教程3
使用Arduino板测试血氧饱和度值,在LCD上输出心率波形。可以把传感器直接放在手指、手腕等地方。 选择样例代码 DFRobot_Heartrate_LCD_Display
** 注:此例程需要把传感器上的开关拨向“A”档 **
准备
效果视频
样例代码
点击下载库文件DFRobot_Heartrate.h和Lcd12864Shield.h
/*!
  @file HeartrateDisplay
  @brief  Waves of blood oxygen saturation and heart rate value is displayed on the LCD

  @brief  Waves of blood oxygen saturation and heart rate value is displayed on the LCD

  @author linfeng(Musk.lin@dfrobot.com)
  @version  V1.1
  @date  2016-8-16
  @version  V1.0
  @date  2015-12-24
*/

#define heartratePin A1
#include "DFRobot_Heartrate.h"
#include "Lcd12864Shield.h"

uint16_t heartrateValue = 0, heartrateValueLast = 0;
uint8_t count;

Lcd12864Shield lcddisplay(10, 9, 8, 13, 11);
DFRobot_Heartrate heartrate(DIGITAL_MODE); ///< ANALOG_MODE or DIGITAL_MODE

char wordDisplay[] = ///< word
{
  0x00, 0x00, 0x01, 0x03, 0x07, 0x0F, 0x1F, 0x3F,
  0x1F, 0x0F, 0x07, 0x03, 0x01, 0x00, 0x00, 0x00,
  0x00, 0x00, 0xC0, 0xE0, 0xE0, 0xE0, 0xC0, 0x80,
  0xC0, 0xE0, 0xE0, 0xE0, 0xC0, 0x00, 0x00, 0x00, ///< ♥
};
char letterDisplay[] = ///< character
{

  0x00, 0xE0, 0x10, 0x08, 0x08, 0x10, 0xE0, 0x00,
  0x00, 0x0F, 0x10, 0x20, 0x20, 0x10, 0x0F, 0x00, ///< 0
  0x00, 0x10, 0x10, 0xF8, 0x00, 0x00, 0x00, 0x00,
  0x00, 0x20, 0x20, 0x3F, 0x20, 0x20, 0x00, 0x00, ///< 1
  0x00, 0x70, 0x08, 0x08, 0x08, 0x88, 0x70, 0x00,
  0x00, 0x30, 0x28, 0x24, 0x22, 0x21, 0x30, 0x00, ///< 2
  0x00, 0x30, 0x08, 0x88, 0x88, 0x48, 0x30, 0x00,
  0x00, 0x18, 0x20, 0x20, 0x20, 0x11, 0x0E, 0x00, ///< 3
  0x00, 0x00, 0xC0, 0x20, 0x10, 0xF8, 0x00, 0x00,
  0x00, 0x07, 0x04, 0x24, 0x24, 0x3F, 0x24, 0x00, ///< 4
  0x00, 0xF8, 0x08, 0x88, 0x88, 0x08, 0x08, 0x00,
  0x00, 0x19, 0x21, 0x20, 0x20, 0x11, 0x0E, 0x00, ///< 5
  0x00, 0xE0, 0x10, 0x88, 0x88, 0x18, 0x00, 0x00,
  0x00, 0x0F, 0x11, 0x20, 0x20, 0x11, 0x0E, 0x00, ///< 6
  0x00, 0x38, 0x08, 0x08, 0xC8, 0x38, 0x08, 0x00,
  0x00, 0x00, 0x00, 0x3F, 0x00, 0x00, 0x00, 0x00, ///< 7
  0x00, 0x70, 0x88, 0x08, 0x08, 0x88, 0x70, 0x00,
  0x00, 0x1C, 0x22, 0x21, 0x21, 0x22, 0x1C, 0x00, ///< 8
  0x00, 0xE0, 0x10, 0x08, 0x08, 0x10, 0xE0, 0x00,
  0x00, 0x00, 0x31, 0x22, 0x22, 0x11, 0x0F, 0x00, ///< 9
  0x40, 0x40, 0x40, 0x40, 0x40, 0x40, 0x40, 0x00,
  0x04, 0x04, 0x04, 0x04, 0x04, 0x04, 0x04, 0x00, ///< =
};


void lcdBegin(void)
{
  lcddisplay.initialLcd(); ///< Enable LCD
  lcddisplay.clearScreen(); ///< Clear LCD
  lcddisplay.drawXLine(48); ///< Draw a horizontal line
  lcddisplay.drawYLine(7); ///< Draw a vertical line
  lcddisplay.drawWord(7, 10, 0, wordDisplay); ///< Displays a word
  lcddisplay.drawLetter(7, 30, 10, letterDisplay); ///< Displays a character
}

void setup() {
  Serial.begin(115200);
  lcdBegin();
}

void loop() {
  unsigned char rateValue;
  heartrateValueLast = heartrateValue;
  heartrateValue = heartrate.getValue(heartratePin);  ///< A1 foot sampled values
  count = heartrate.getCnt();
  if (count)
  {
    lcddisplay.drawYLine(count + 8, heartrateValue / 24, heartrateValueLast / 24); ///< Draw a vertical line,Step 24
  }
  else
  {
    lcddisplay.drawYLine(count + 8, heartrateValue / 24, heartrateValueLast / 24);
  }

  rateValue = heartrate.getRate(); ///< Get heart rate value
  if (rateValue)
  {
    lcddisplay.drawLetter(7, 50, 3, rateValue, letterDisplay); ///< Display values
    Serial.println(rateValue);
  }
  delay(20);
}

/******************************************************************************
  Copyright (C) <2015>  <linfeng>
  This program is free software: you can redistribute it and/or modify
  it under the terms of the GNU General Public License as published by
  the Free Software Foundation, either version 3 of the License, or
  (at your option) any later version.
  This program is distributed in the hope that it will be useful,
  but WITHOUT ANY WARRANTY; without even the implied warranty of
  MERCHANTABILITY or FITNESS FOR A PARTICULAR PURPOSE.  See the
  GNU General Public License for more details.
  You should have received a copy of the GNU General Public License
  along with this program.  If not, see <http://www.gnu.org/licenses/>.
  Contact: Musk.lin@dfrobot.com
 ******************************************************************************/
结果
显示血氧波形,以及心率值。
心跳检测 — 行空板K10
项目功能描述
本项目使用 SEN0203 心率传感器实现心跳检测:利用光电原理检测指尖血液容积变化,随心跳输出高低波动的模拟电压。行空板K10 读取模拟值并在终端打印,可观察到与心跳同步的波形。
软件准备
本项目需加载心率传感器扩展库,步骤如下:
- 打开 MIND+ 软件(V1.8.1 RC1.0 及以上版本)。
- 选择「上传模式」,并添加主控板为「行空板K10」,使用 Type-C 数据线连接行空板K10 与电脑。
- 点击左下角「扩展」→ 在「传感器」分类中找到「心率传感器」(SEN0203)并加载。
- 加载完成后,在积木区可看到「心率传感器初始化」及「读取心率值」等专用积木。
硬件准备
| 器材 | SKU / 型号 | 数量 |
|---|---|---|
| 行空板K10 | DFR0992 | 1 |
| 心率传感器 | SEN0203 | 1 |
| 两头PH2.0-3P白色硅胶绞线 | — | 1 |
| Type-C 数据线 | — | 1 |
连线说明
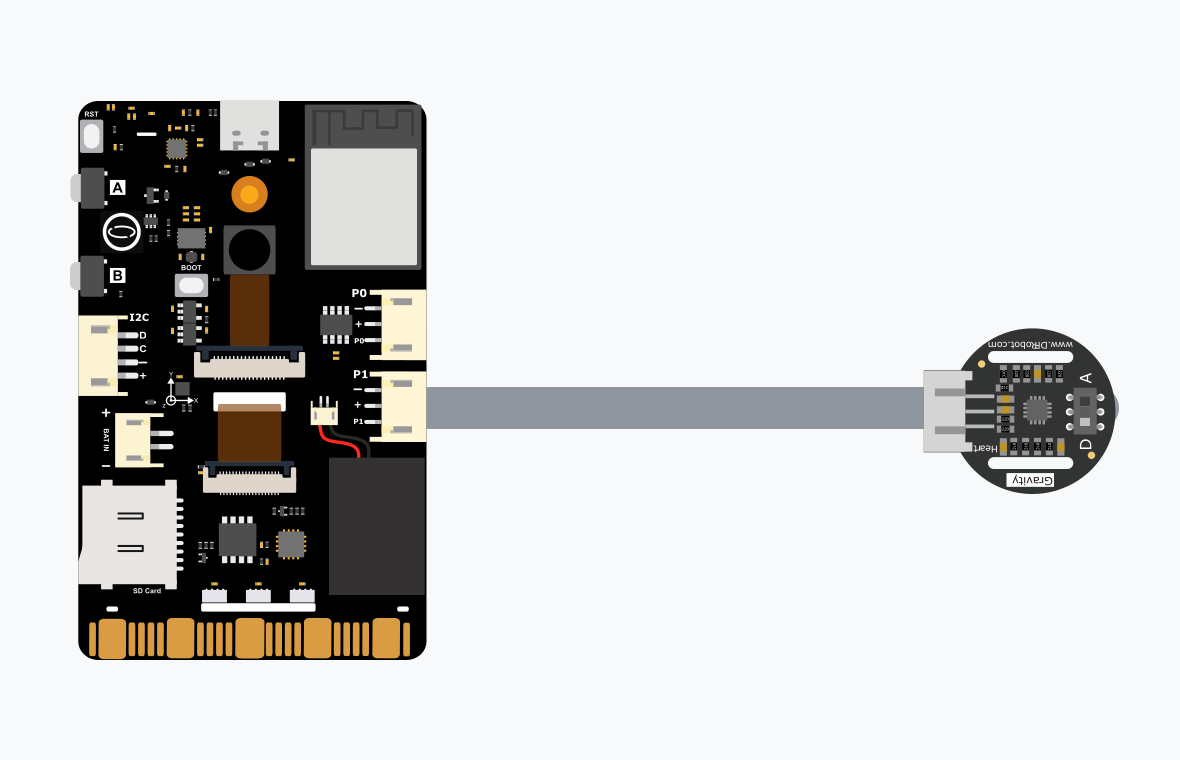
| 模块 | 模块端口引脚 | 扩展板接口 | 注意事项 |
|---|---|---|---|
| 心率传感器 | VCC-GND-Signal | K10 P1 | 手指轻贴绿色传感面 |
示例程序(行空板K10)
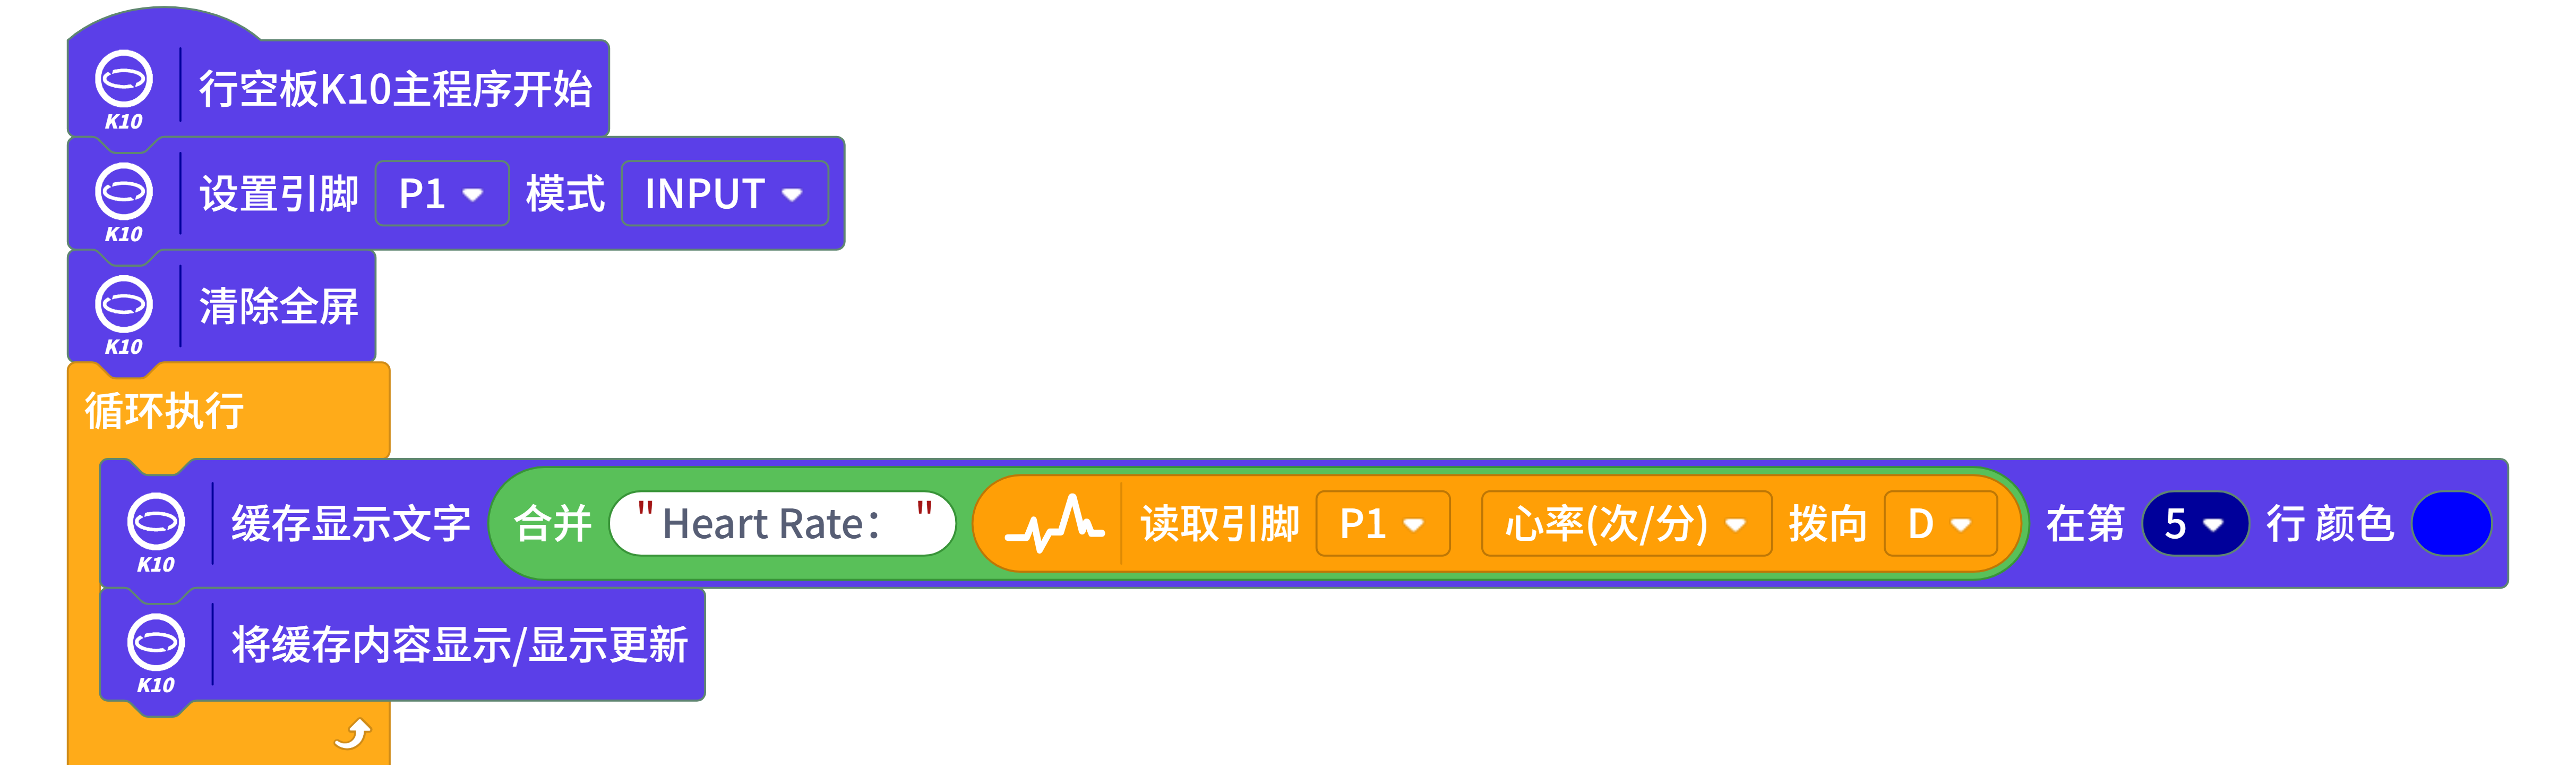
运行效果
将食指贴在绿色传感面上保持静止 , 终端打印的值会随心跳出现周期性起伏(约 1500 ~ 2500 间波动)。
手指必须静止,动则噪声大;若无效请检查连接线是否插在对应的引脚。
注意: 使用前请将心率传感器上的开关拨到 D 档。
常见问题
还没有客户对此产品有任何问题,欢迎通过qq或者论坛联系我们!
- 打开串口监视器没有稳定数值或根本没有数据产生心率传感器使用想要看到稳定的数据
- 最好是接到手指上 并接触压力合适
- 烧录代码后 观察模块上灯闪烁和脉搏跳动一致 再打开串口监视器
- 串口监视器可能不会立刻出现数值 请耐心稍等一会
更多问题及有趣的应用,可以 访问论坛 进行查阅或发帖!
