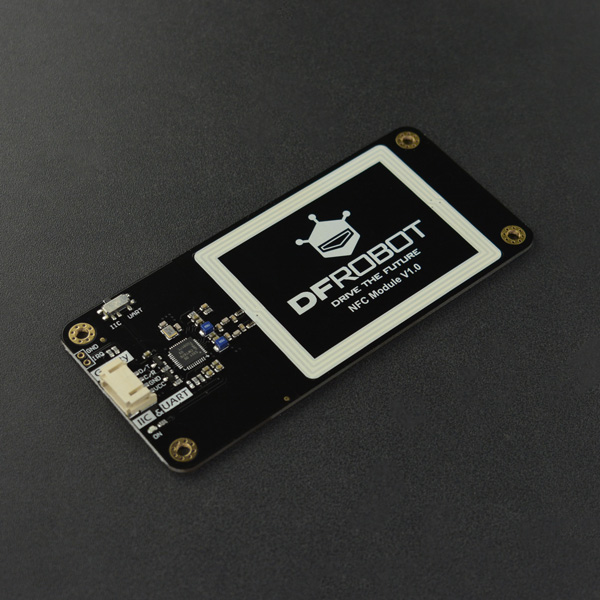
简介
Gravity:UART & I2C NFC近场通讯模块采用NXP PN532进口高集成NFC通信芯片,支持市面上常见的各类MIFARE Classic S50/S70系列(即M1卡)和NTAG21x系列等工作频率在13.56Mhz的NFC电子标签或卡片。在继承之前版本大PCB天线所带来较大通信距离优点的基础上,升级版采用Gravity标准的PH2.0-4P接口,除了让接线更方便,在保留UART的基础上额外复合了I2C,通过开关轻松切换两种不同的接口,使用更灵活。当使用UART串口时,可以利用市面上常见的USB to UART转换器和第三方上位机软件轻松读写操作各类NFC卡。当使用I2C接口时,则可用于Arduino、micro:bit、FireBeetle ESP32、FireBeetle ESP8266等各类3V3/5V主控系统。
近场通讯简介
近场通信(Near Field Communication,NFC),又称近距离无线通信,是一种短距离的高频无线通信技术,允许电子设备之间进行非接触式点对点数据传输(在十厘米内)交换数据。这个技术由免接触式射频识别(RFID)演变而来,并向下兼容RFID,最早由Sony和Philips各自开发成功,主要用于手机等手持设备中提供M2M(Machine to Machine)的通信。由于近场通讯具有天然的安全性,NFC技术被广泛用于POS机移动支付、公交卡、银行卡、门禁卡、饭卡、水卡等多种场合。
特性
- NXP进口高集成NFC通信芯片
- UART & I2C复合接口,使用灵活
- 支持各类主流NFC电子标签或卡片
- 兼容3.3V/5V控制器
应用场景
- 非接触式支付系统
- 蓝牙和WiFi设备的链接
- 分享联系人、照片和视屏等社交分享功能
- 智能手机的NFC应用
技术规格
- 主芯片:NXP PN532
- 供电电压:3.3V ~ 5.5V
- 通信接口:Gravity I2C & UART复合(PH2.0-4P,逻辑电平0-3.3V)
- 串口波特率:115200 bps
- I2C地址:0x48
- 通信频率:13.56MHz
- 最大通信距离:不低于10mm,实际视标签大小而定
- 支持协议
- 读写器模式:支持ISO/IEC 14443A、ISO/IEC 14443B、MIFARE协议、FeliCa协议
- 卡仿真模式:支持ISO 14443A、MIFARE Classic 1K或4K、FeliCa协议
- 点对点通信:ISO/IEC18092,ECM340
- 尺寸:110×50 mm
- 重量:20 g
接口说明
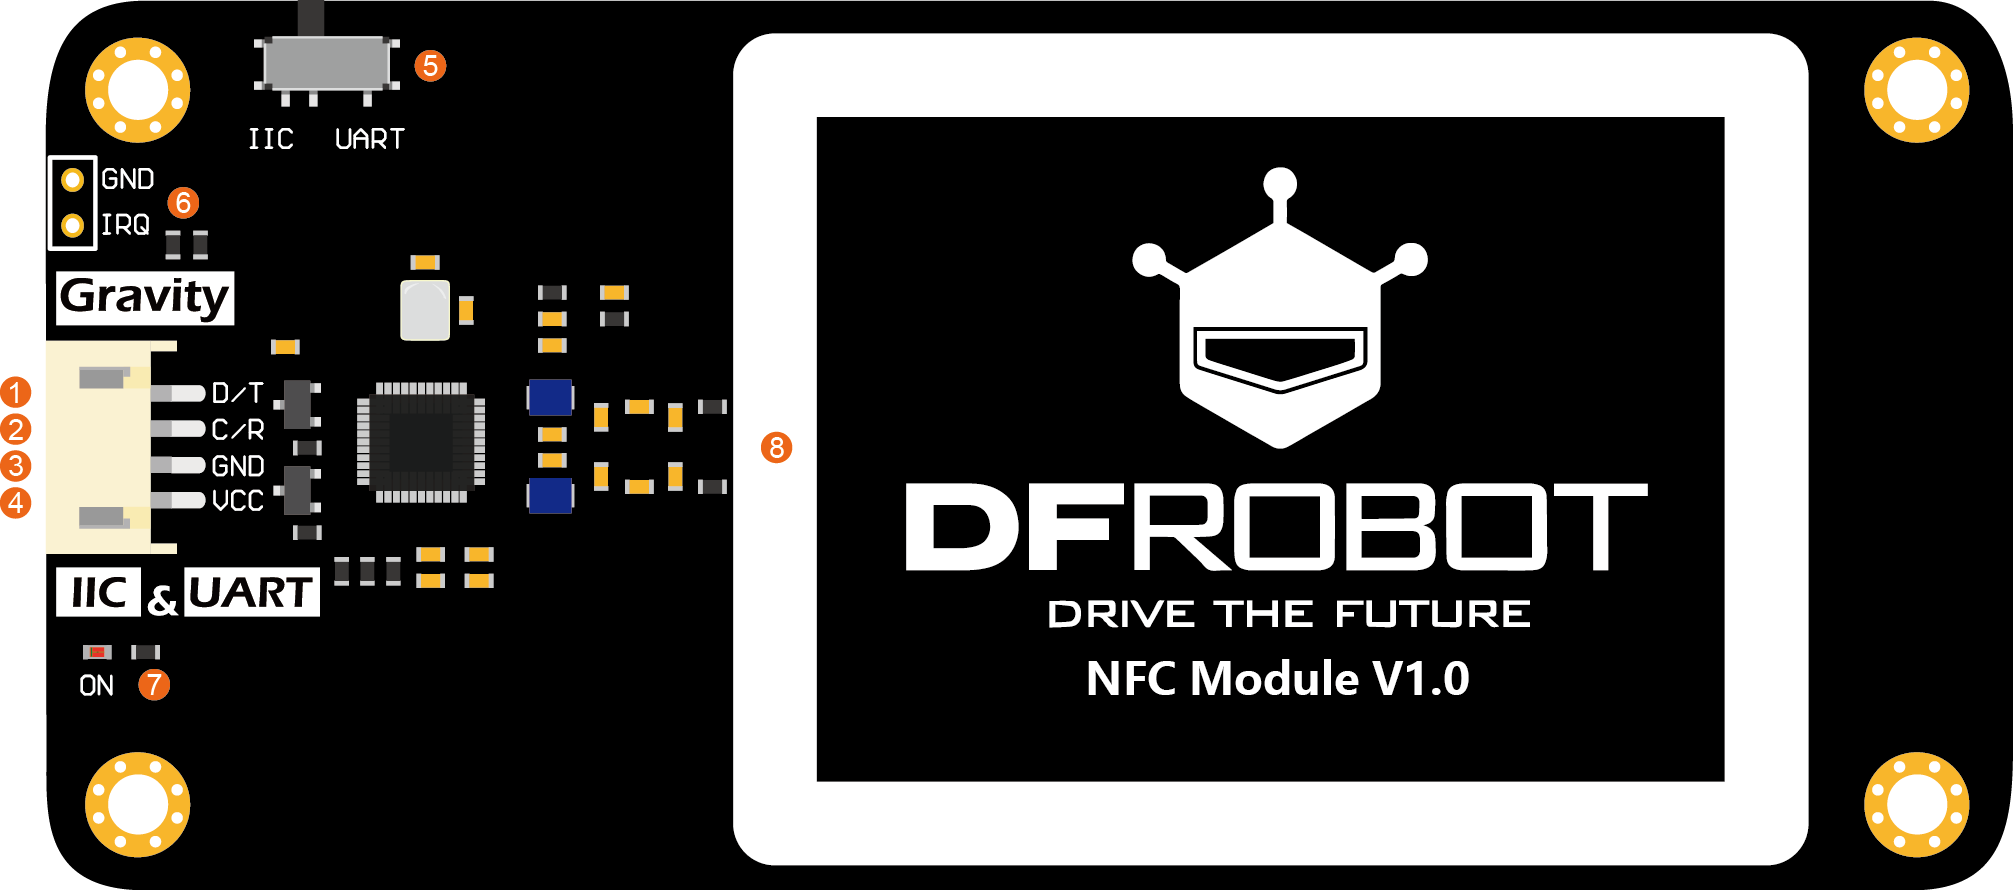
引脚说明
| 标号 | 名称 | 功能描述 |
|---|---|---|
| 1 | D/T | I2C数据线SDA或UART发送端TXD |
| 2 | C/R | I2C时钟线SCL或UART接收端RXD |
| 3 | GND | 电源负极 |
| 4 | VCC | 电源正极(3.3V~5.5V) |
| 5 | / | I2C/UART选择开关 |
| 6 | IRQ | 中断触发引脚IRQ |
| 7 | ON | 电源指示灯(红色) |
| 8 | / | NFC近场通讯天线 |
快速使用
读写S50(M1卡)NFC标签
通过对附送的S50 NFC标签进行读写操作,演示模块的使用方法,步骤如下:
1.首先使用模块对NFC卡写入数据。按照下面第1张连线图将UNO与NFC模块通过IIC相连,开关拨向IIC。
2.下载并安装DFRobot_PN532库,上传下面的样例程序。
#include <DFRobot_PN532.h>

#define  BLOCK_SIZE         16
#define  PN532_IRQ          2
#define  INTERRUPT          1
#define  POLLING            0
// The block to be written
#define  WRITE_BLOCK_NO      2

DFRobot_PN532_IIC  nfc(PN532_IRQ, POLLING);

uint8_t dataWrite[BLOCK_SIZE] = {"Hello World !"};

void setup() {
  Serial.begin(115200);
  Serial.print("Initializing");
  while (!nfc.begin()) {
    Serial.print(".");
    delay (1000);
  }
  Serial.println();
  Serial.println("Waiting for a card......");
}
void loop() {
  // For S50 card/tag, block 1-2, 4-6, 8-10, 12-14... 56-58, 60-62 are for user data
  // You can read/write these blocks freely.
  // Use "MifareClassic_ReadAllMemory.ino" to check all the blocks
  if (nfc.scan()) {
    if (nfc.writeData(WRITE_BLOCK_NO, dataWrite) != 1) {
      Serial.print("Block ");
      Serial.print(WRITE_BLOCK_NO);
      Serial.println(" write failure!");
    }
    else {
      Serial.print("Block ");
      Serial.print(WRITE_BLOCK_NO);
      Serial.println(" write success!");
      Serial.print("Data written(string):");
      Serial.println((char *)dataWrite);
      Serial.print("Data written(HEX):");
      for (int i = 0; i < BLOCK_SIZE; i++) {
        Serial.print(dataWrite[i], HEX);
        Serial.print(" ");
      }
    }
  }
  delay(500);
}
3.打开串口监控器,波特率设为115200。
4.将附送的M1卡放到模块的感应区域,如正确写卡,串口打印提示如下。

5.上传下面的样例程序,读出刚才写在卡里面的信息。
#include <DFRobot_PN532.h>

#define BLOCK_SIZE       16
#define  PN532_IRQ        2
#define  INTERRUPT        1
#define  POLLING          0
// The block to be read
#define  READ_BLOCK_NO    2

DFRobot_PN532_IIC  nfc(PN532_IRQ, POLLING);
uint8_t dataRead[16] = {0};

void setup() {
  Serial.begin(115200);
  Serial.print("Initializing");
  while (!nfc.begin()) {
    Serial.print(".");
    delay (1000);
  }
  Serial.println();
  Serial.println("Waiting for a card......");
}
void loop() {
  // For S50 card/tag, block 1-2, 4-6, 8-10, 12-14... 56-58, 60-62 are for user data
  // You can read/write these blocks freely.
  // Use "MifareClassic_ReadAllMemory.ino" to check all the blocks
  if (nfc.scan()) {
    if (nfc.readData(dataRead, READ_BLOCK_NO) != 1) {
      Serial.print("Block ");
      Serial.print(READ_BLOCK_NO);
      Serial.println(" read failure!");
    }
    else {
      Serial.print("Block ");
      Serial.print(READ_BLOCK_NO);
      Serial.println(" read success!");

      Serial.print("Data read(string):");
      Serial.println((char *)dataRead);
      Serial.print("Data read(HEX):");
      for (int i = 0; i < BLOCK_SIZE; i++) {
        Serial.print(dataRead[i], HEX);
        Serial.print(" ");
        dataRead[i] = 0;
      }
      Serial.println();
    }
    delay(500);
  }
}
6.卡放到模块的感应区域,如正确读卡,程序将会打印刚才写入到卡中的信息。

7.此外使用过程中有以下几点值得注意
- 程序中对M1卡的读写是按**Block(在一些数据手册里也叫作page)**进行的,每次读写一个Block,每个Block有16个字节,共64个Block。部分Block用于存储卡序列号、读写与加密控制字,因此标称为1KB容量的M1卡,实际可供用户读写的空间仅有752 Bytes。实际上所有的NFC卡/标签可供用户使用的空间均少于标称容量,具体可查看不同NFC卡的数据手册中关于存储器组织结构的描述。
- 对于M1卡,可供用户存储数据,随意读写的Block为1-2, 4-6, 8-10, 12-14,..., 56-58, 60-62,共47个Block。样例程序中的宏定义READ_BLOCK_NO或WRITE_BLOCK_NO的值均为2,表明对Block 2进行读写操作。
Arduino使用教程
准备
-
硬件
- Arduino UNO控制板 x 1
- Gravity:UART & I2C NFC近场通讯模块 x 1
- Gravity 4P传感器连接线(或若干杜邦线) x 1
- USB转串口模块(可选) x 1
-
软件:以下软件可二选一
- Arduino IDE (1.0.x或1.8.x), 点击下载Arduino IDE
- Mind+图形化编程, 点击下载Mind+
- DFRobot_PN532库,点击下载PN532库
连线图
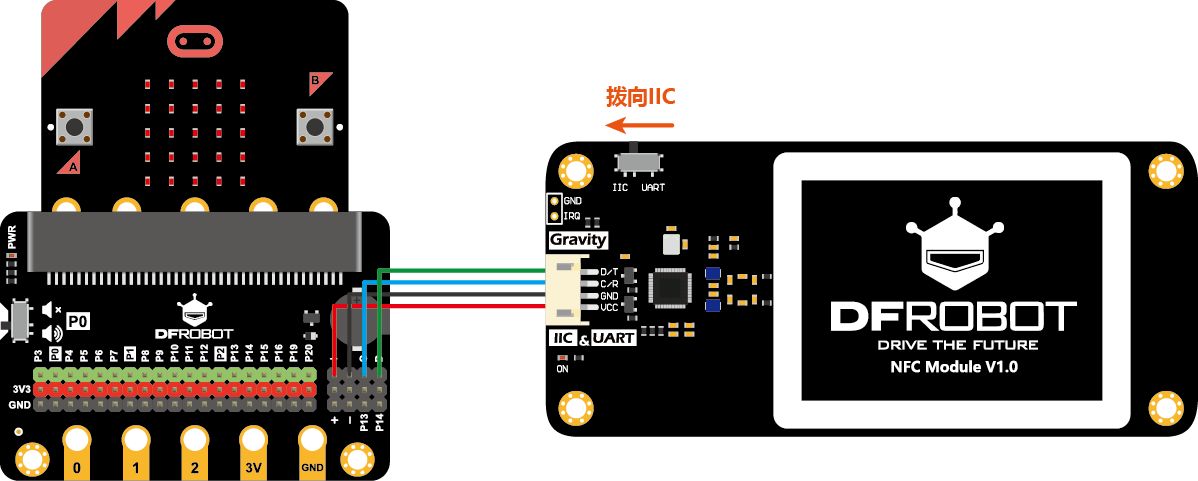
- 使用I2C接口时,将开关向IIC左拨。I2C接口主要用于与各类3.3V/5V主控板通信,通过编程控制。
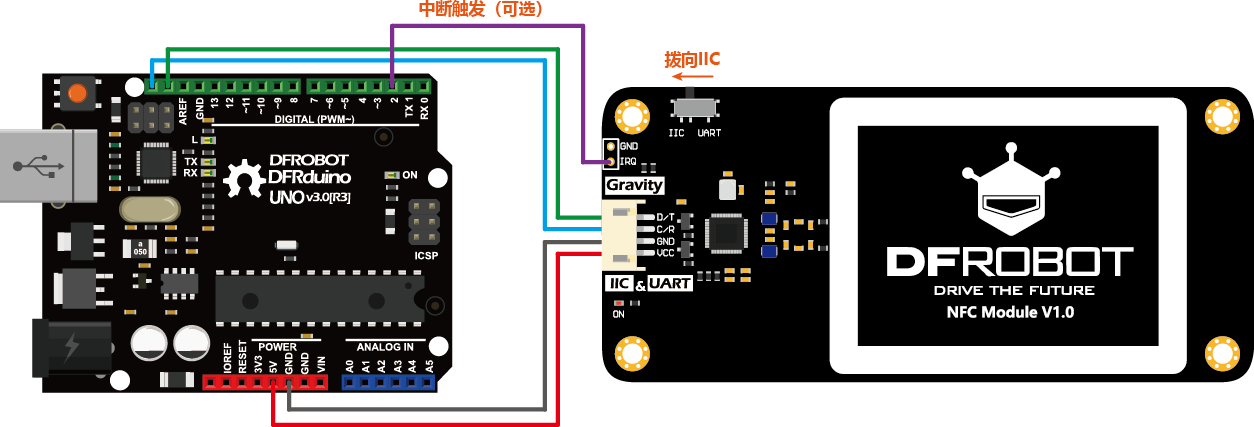
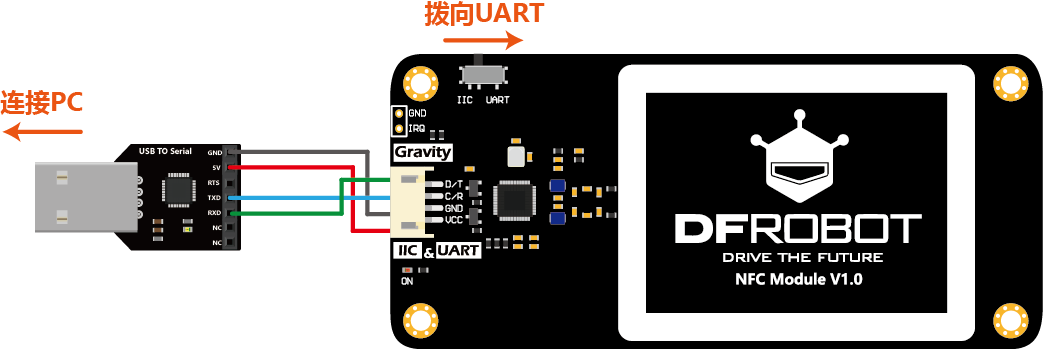
- 使用UART接口时,将开关向UART右拨。UART接口主要用于通过USB转串口模块与上位机通信,实现各类NFC智能标签与卡的读写、复制、生成dump等操作,但也可以与各类3.3V/5V主控板通信,通过编程控制(这里连线图以Arduino Mega2560为例)。注意模块的D/T与USB转串口模块的RXD,C/R与TXD相连。
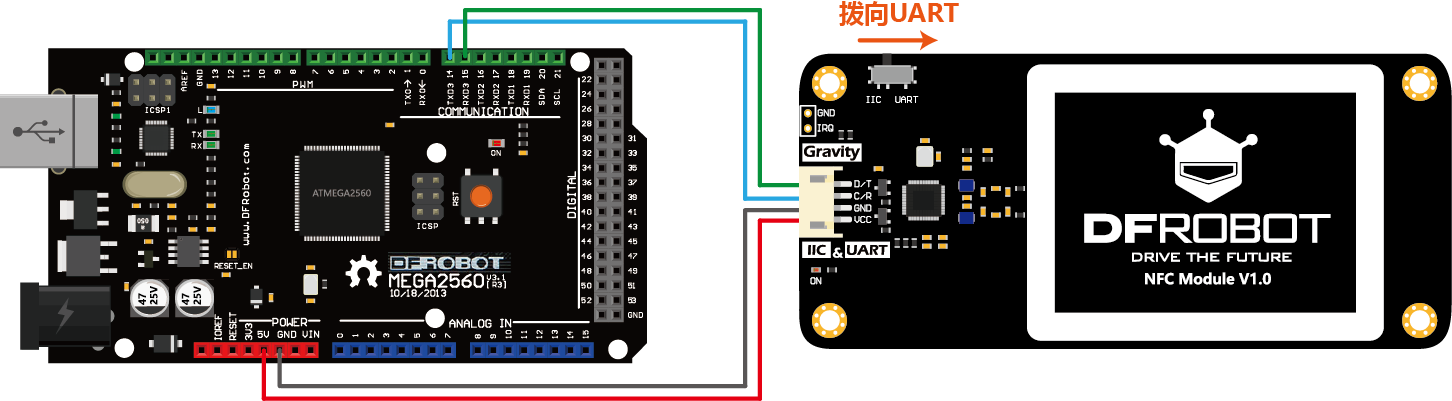
注意:
每次切换接口后,需要复位主控板才能正常通信。
由于UNO仅有一个串口用于与PC通信,而其软串口最高速度仅有38400,无法达到NFC模块串口的115200,因此两者无法通过串口通信,请换用I2C接口。
芯片工作发热属正常情况,应避免覆盖使用影响散热。
样例代码
- 下面3个样例展示了模块对M1卡的基本操作,更多功能见DFRobot_PN532库的样例examples。
读取NFC卡的基本信息
- 按照第1张连线将UNO与NFC模块通过IIC相连,开关拨向IIC。
- 下载并安装DFRobot_PN532库,上传下面的样例程序。
- 打开串口监控,波特率设为115200。
- 将附送的M1卡放到模块的感应区域,观察串口打印的数据。
/*!
    @flie NFC_cardinfo.ino
    @Copyright   [DFRobot](https://www.dfrobot.com), 2016
    @Copyright   GNU Lesser General Public License
    @version  V1.0
    @date  07/03/2019

    @brief This demo runs on the arduino platform.
           Download this demo to read the basic information of the card,
           including UID, manufacturer, storage space, RF technology etc.

           Suported NFC card/tag:
           1.MIFARE Classic S50/S70
           2.NTAG213/215/216
           3.MIFARE Ultralight

    This demo and related libraries are for DFRobot Gravity: UART & I2C NFC Module
    Product(CH): https://www.dfrobot.com.cn/goods-2029.html
    Product(EN): https://www.dfrobot.com/product-1905.html
*/
#include <DFRobot_PN532.h>

#define  BLOCK_SIZE      16
#define  PN532_IRQ      (2)
#define  INTERRUPT      (1)
#define  POLLING        (0)
// Use this line for a breakout or shield with an I2C connection
// Check the card by polling
DFRobot_PN532_IIC  nfc(PN532_IRQ, POLLING);
DFRobot_PN532:: sCard_t NFCcard;

void setup() {

  Serial.begin(115200);
  //Initialize the NFC module
  while (!nfc.begin()) {
    Serial.println("initial failure");
    delay (1000);
  }
  Serial.println("Please place the NFC card/tag on module..... ");
}

void loop() {
  //Scan, write and read NFC card every 2s
  //Print all what is to be written and read

  if (nfc.scan()) {
    //Read the basic information of the card
    NFCcard = nfc.getInformation();
    Serial.println("----------------NFC card/tag information-------------------");
    Serial.print("UID Lenght: "); Serial.println(NFCcard.uidlenght);
    Serial.print("UID: ");
    for (int i = 0; i < NFCcard.uidlenght; i++) {
      Serial.print(NFCcard.uid[i], HEX);
      Serial.print(" ");
    }
    Serial.println("");
    Serial.print("AQTA: "); Serial.print("0x"); Serial.print("0"); Serial.print(NFCcard.AQTA[0], HEX); Serial.print(""); Serial.println(NFCcard.AQTA[1], HEX);
    Serial.print("SAK: "); Serial.print("0x"); Serial.println(NFCcard.SAK, HEX);
    Serial.print("Type: "); Serial.println(NFCcard.cardType);
    Serial.print("Manufacturer:"); Serial.println(NFCcard.Manufacturer);
    Serial.print("RF Technology:"); Serial.println(NFCcard.RFTechnology);
    Serial.print("Memory Size:"); Serial.print(NFCcard.size); Serial.print(" bytes(total)/"); Serial.print(NFCcard.usersize); Serial.println(" bytes(available)");
    Serial.print("Block/Page Size:"); Serial.print(NFCcard.blockSize); Serial.println(" bytes");
    //Serial.print("Sector Size:"); Serial.print(NFCcard.sectorSize); Serial.println(" bytes");
    Serial.print("Number of Blocks/pages:"); Serial.println(NFCcard.blockNumber);
  }
  else {
    //Serial.println("no card!");
  }
  delay(2000);
}
结果
- 显示NFC卡的大小、协议等基本信息。目前支持识别常见的MIFARE Classic S50/S70,NTAG213/215/216和MIFARE Ultralight。

通过IIC读写MIFARE Classic S50 NFC卡(M1卡)
- 按照第1张连线将UNO与NFC模块通过IIC相连,开关拨向IIC。
- 下载并安装DFRobot_PN532库,上传下面的样例程序。
- 打开串口监控,波特率设为115200。
- 将附送的M1卡放到模块的感应区域,观察串口打印的数据。
/*!
    @flie MifareClassic_ReadWrite.ino
    @Copyright   [DFRobot](https://www.dfrobot.com), 2016
    @Copyright   GNU Lesser General Public License
    @version  V1.0
    @date  07/03/2019

    @brief This demo runs on the arduino platform.
           Download this demo to learn how to wirte data to card.
           We can read the data on the card to see if the write is successful.

    This demo and related libraries are for DFRobot Gravity: UART & I2C NFC Module
    Product(CH): https://www.dfrobot.com.cn/goods-2029.html
    Product(EN): https://www.dfrobot.com/product-1905.html
*/
#include <DFRobot_PN532.h>

#define BLOCK_SIZE      16
#define  PN532_IRQ      (2)
#define  INTERRUPT      (1)
#define  POLLING        (0)
//use this line for a breakout or shield with an I2C connection
//check the card by polling
DFRobot_PN532_IIC  nfc(PN532_IRQ, POLLING);
uint8_t dataWrite[BLOCK_SIZE] = {"DFRobot NFC"};
uint8_t dataRead[16] = {0};
DFRobot_PN532:: sCard_t NFCcard;

void setup() {

  Serial.begin(115200);
  while (!nfc.begin()) {
    Serial.println("initial failure");
    delay (1000);
  }
  Serial.println("Waiting for a card......");
}
void loop() {
  //Scan, write and read NFC card every 2s
  //Print all what is to be written and read
  if (nfc.scan()) {
    NFCcard = nfc.getInformation();
    if ((NFCcard.AQTA[1] == 0x02 || NFCcard.AQTA[1] == 0x04)) {
      Serial.print("Data to be written(string):");
      Serial.println((char *)dataWrite);
      Serial.print("Data to be written(HEX):");
      for (int i = 0; i < BLOCK_SIZE; i++) {
        Serial.print(dataWrite[i], HEX);
        Serial.print(" ");
      }
      Serial.println();
      //Write data(16 bytes) to sector 1
      if (nfc.writeData(2, dataWrite) != 1) {
        Serial.println("write failure!");
      }

      //Read sector 1 to verify the write results
      nfc.readData(dataRead, 2);
      Serial.print("Data read(string):");
      Serial.println((char *)dataRead);
      Serial.print("Data read(HEX):");
      for (int i = 0; i < BLOCK_SIZE; i++) {
        Serial.print(dataRead[i], HEX);
        Serial.print(" ");
        dataRead[i] = 0;
      }
      Serial.println();
    }
    else {
      Serial.println("The card type is not mifareclassic...");
    }
  }
  else {
    //Serial.println("no card");
  }
  delay(2000);
}
结果
- 向M1卡其中一个Block写入并读取数据,打印显示将要写入和读取数据的十六进和相对应的字符。

通过IIC中断方式读写MIFARE Classic S50 NFC卡(M1卡)
- 按照第1张连线将Arduino UNO与NFC模块通过IIC相连,开关拨向IIC,模块的IRQ管脚连至UNO的D2。
- 下载并安装DFRobot_PN532库,上传下面的样例程序。
- 打开串口监控,波特率设为115200。
- 将附送的M1卡放到模块的感应区域,观察串口打印的数据。
/*!
    @flie read_S50_INTERRUPT.ino
    @Copyright   [DFRobot](https://www.dfrobot.com), 2016
    @Copyright   GNU Lesser General Public License
    @version  V1.0
    @date  07/03/2019

    @brief This demo runs on the arduino uno platform
           Download this demo to learn how to read data on card and read data by interrupt.

           We can read the data on the card to see if the write is successful

    This demo and related libraries are for DFRobot Gravity: UART & I2C NFC Module
    Product(CH): https://www.dfrobot.com.cn/goods-2029.html
    Product(EN): https://www.dfrobot.com/product-1905.html
*/
#include <DFRobot_PN532.h>

#define BLOCK_SIZE      16
#define  PN532_IRQ      (2)
#define  INTERRUPT      (1)
#define  POLLING        (0)
//use this line for a breakout or shield with an I2C connection
//check the card by interruption
DFRobot_PN532_IIC  nfc(PN532_IRQ, INTERRUPT);
uint8_t dataWrite[BLOCK_SIZE] = {"DFRobot NFC"};
uint8_t dataRead[16] = {0};
DFRobot_PN532:: sCard_t NFCcard;

void setup() {
  Serial.begin(115200);
  while (!nfc.begin()) {
    Serial.println("initial failure");
    delay (1000);
  }
  Serial.println("Waiting for a card......");
}

void loop() {
  //Print all what is to be written and read
  if (nfc.scan() == true) {

    NFCcard = nfc.getInformation();
    if (NFCcard.AQTA[1] == 0x02 || NFCcard.AQTA[1] == 0x04) {
      Serial.print("Data to be written(string):");
      Serial.println((char *)dataWrite);
      Serial.print("Data to be written(HEX):");
      for (int i = 0; i < BLOCK_SIZE; i++) {
        Serial.print(dataWrite[i], HEX);
        Serial.print(" ");
      }
      Serial.println();
      //Write data(16 bytes) to sector 1
      if (nfc.writeData(2, dataWrite) != 1) {
        Serial.println("write failure!");
      }

      //Read sector 1 to verify the write results
      nfc.readData(dataRead, 2);
      Serial.print("Data read(string):");
      Serial.println((char *)dataRead);
      Serial.print("Data read(HEX):");
      for (int i = 0; i < BLOCK_SIZE; i++) {
        //data[i] =  dataRead[i];
        Serial.print(dataRead[i], HEX);
        Serial.print(" ");
        dataRead[i] = 0;
      }
    }
    else {
      Serial.println("The card type is not mifareclassic...");
    }
  }
  else {
    //Serial.println("no card");
  }
  delay(1000);
}
结果
- 向M1卡其中一个Block写入并读取数据,打印显示将要写入和读取数据的十六进和相对应的字符。
通过UART读写MIFARE Classic S50 NFC卡(M1卡)
- 按照第3张连线将MEGA2560与NFC模块通过UART相连,开关拨向UART。
- 下载并安装DFRobot_PN532库,上传下面的样例程序。
- 打开串口监控,波特率设为115200。
- 将附送的M1卡放到模块的感应区域,观察串口打印的数据。
/*!
    @flie read_S50_uart.ino
    @Copyright   [DFRobot](https://www.dfrobot.com), 2016
    @Copyright   GNU Lesser General Public License
    @version  V1.0
    @date  07/03/2019

    @brief This demo runs on the Arduino MEGA2560 platform.
           Download this demo to learn how to read data on card and read data through serial ports.
           Read the data on the card to see if the write is successful.

    This demo and related libraries are for DFRobot Gravity: UART & I2C NFC Module
    Product(CH): https://www.dfrobot.com.cn/goods-2029.html
    Product(EN): https://www.dfrobot.com/product-1905.html
*/
#include <DFRobot_PN532.h>

#define BLOCK_SIZE 16
//Initialize MEGA2560
DFRobot_PN532_UART  nfc;
DFRobot_PN532:: sCard_t NFCcard;

void setup() {
  Serial.begin(115200);
  while (!nfc.begin(&Serial3)) {
    Serial.println("initial failure");
    delay (1000);
  }
  Serial.println("Waiting for a card......");
}

uint8_t dataWrite[BLOCK_SIZE] = {"DFRobot NFC"};   /*Write data page */
uint8_t dataRead[16] = {0};

void loop() {
  //Scan, write and read NFC card every 2s
  //Print all what is to be written and read

  if (nfc.scan() == true) {

    NFCcard = nfc.getInformation();
    if (NFCcard.AQTA[1] == 0x02 || NFCcard.AQTA[1] == 0x04) {
      Serial.print("Data to be written(string):");
      Serial.println((char *)dataWrite);
      Serial.print("Data to be written(HEX):");
      for (int i = 0; i < BLOCK_SIZE; i++) {
        Serial.print(dataWrite[i], HEX);
        Serial.print(" ");
      }
      Serial.println();
      //Write data(16 bytes) to sector 1
      if (nfc.writeData(2, dataWrite) != 1) {
        Serial.println("write failure!");
      }

      //Read sector 1 to verify the write results
      nfc.readData(dataRead, 2);
      Serial.print("Data read(string):");
      Serial.println((char *)dataRead);
      Serial.print("Data read(HEX):");
      for (int i = 0; i < BLOCK_SIZE; i++) {
        //data[i] =  dataRead[i];
        Serial.print(dataRead[i], HEX);
        Serial.print(" ");
      }
    }
    else {
      Serial.println("The card type is not mifareclassic...");
    }
  }
  else {
    //Serial.println("no card");
  }
  delay(2000);
}
结果
- 向M1卡其中一个Block写入并读取数据,打印显示将要写入和读取数据的十六进和相对应的字符。

样例代码(Mind+)
- 打开Mind+图形化编程软件,切换到“上传模式”。(详细教程:Mind+基础wiki教程-上传模式编程流程
- 进行编程,程序如下图:
- “扩展”中选择“主控板”中的“Arduino Uno”,“传感器”中选择“NFC近场通讯模块”。(详细教程:Mind+基础wiki教程-加载扩展库流程
- 单击菜单“连接设备”->“上传到设备”
- 程序上传完毕后,打开串口即可看到数据输出。(Mind+基础wiki教程-串口打印
micro:bit使用教程
准备
-
硬件
- micro:bit编程入门开发板 x 1
- micro:IO Extender I/O扩展板
- Gravity:UART & I2C NFC近场通讯模块 x 1
- Gravity 4P传感器连接线(或若干杜邦线) x 1
-
软件:
- Mind+图形化编程, 点击下载Mind+
连线图
- 使用I2C接口时,将开关向IIC左拨。I2C接口主要用于与各类3.3V/5V主控板通信,通过编程控制。
样例代码(Mind+)
- 打开Mind+图形化编程软件,切换到“上传模式”。(详细教程:Mind+基础wiki教程-上传模式编程流程
- 进行编程,程序如下图:
- “扩展”中选择“主控板”中的“Arduino Uno”,“传感器”中选择“NFC近场通讯模块”。(详细教程:Mind+基础wiki教程-加载扩展库流程
- 单击菜单“连接设备”->“上传到设备”
- 程序上传完毕后,打开串口即可看到数据输出。(Mind+基础wiki教程-串口打印

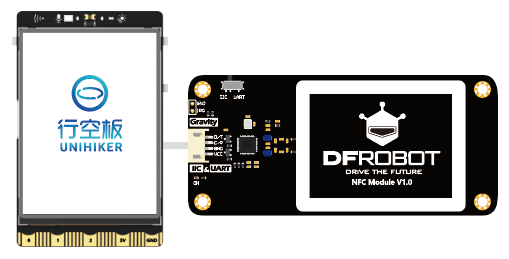
Mind+ Python模式编程(行空板)
Mind+Python模式为完整Python编程,因此需要能运行完整Python的主控板,此处以行空板为例说明
连接图
操作步骤
1、下载及安装官网最新软件。下载地址:https://www.mindplus.cc 详细教程:Mind+基础wiki教程-软件下载安装
2、切换到“Python模式”。“扩展”中选择“官方库”中的“行空板”和“pinpong库”中的”pinpong初始化“和“NFC模块”。切换模式和加载库的详细操作链接
3、进行编程
4、连接行空板,程序点击运行后,可在终端查看数据。行空板官方文档-行空板快速上手教程 (unihiker.com)
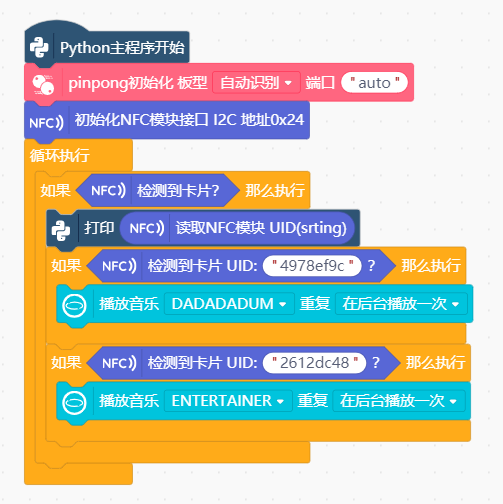
代码编程
以pinpong库为例,行空板官方文档-行空板快速上手教程 (unihiker.com)
#  -*- coding: UTF-8 -*-

# MindPlus
# Python
from pinpong.libs.dfrobot_pn532 import PN532_I2C
from pinpong.extension.unihiker import *
from pinpong.board import Board,Pin
from pinpong.board import Board


Board().begin()
p_nfc = PN532_I2C()
p_nfc.begin()

while True:
    if p_nfc.scan():
        print(p_nfc.read_uid())
        if p_nfc.scan("4978ef9c"):
            buzzer.play(buzzer.DADADADUM,buzzer.OnceInBackground)
        if p_nfc.scan("2612dc48"):
            buzzer.play(buzzer.ENTERTAINER,buzzer.OnceInBackground)
常见问题
| 问题 | 读取卡片没有反应怎么办? |
|---|---|
| 情况1 | 检查传感器上的开关是否对应程序,接线检查是否接错,I2C时SCL对C,SDA对D,UART时Rx对T,Tx对R |
| 情况2 | 模块不要放置在金属表面上,会受到干扰 |
更多问题及有趣的应用,可以 访问论坛 进行查阅或发帖。
