
简介
这款正方形小间距的LED面板可以显示很细腻的图案,彩色,字母等效果。32x32的灯珠,小体积面板,可以让你级联出不同形状的面板,比如级联一个小正方体的形状,做出立体的显示效果,是不是特别有趣?
32x32 RGB LED Matrix - 4mm pitch是一款全彩、高亮度、寿命长、色彩纯正、无污染LED显示模组,此模组采用高分子防火PC塑胶面罩,套件采用具耐高温阻燃特性的pc材料,具有良好的散热性能,确保产品的强度和外形稳定性,高低温工作时均能保持模块之间不会相互挤压变形,使产品可以在恶劣环境下正常使用,.底壳有便于安装的安装孔,面罩不反光,耐紫外线,不褪色。
**注意**:
-
此面板在供电和RAM足够的情况下,可以任意级联,组合成一个更大面积的灯板。当级联数量大于2之后,Arduino UNO的运算能力就稍显不足了,需要使用Mega2560,树莓派或者其他的设备来驱动这块RGB面板
-
如果使用mega,连接方式请参考这里。
技术规格
- 驱动电压:DC 4.8-5.5V
- 平均功耗:小于500W/㎡
- 最大功耗:小于1000w/㎡
- 分辨率:32*32=1024 DOTS
- 可视角度水平:≧160°
- 控制方式:同步控制
- 换幁频率:≧60Hz
- 白平衡亮度:≧1200cd/㎡
- 刷新频率:≧300Hz
- 像素间距:4mm
- 模组尺寸:128mm*128mm/5.04*5.04 inches
- 模组厚度:11mm
- 驱动方式:1/16扫描
- 平均无故障时间:≧5000小时
- 寿命:75000~100000小时
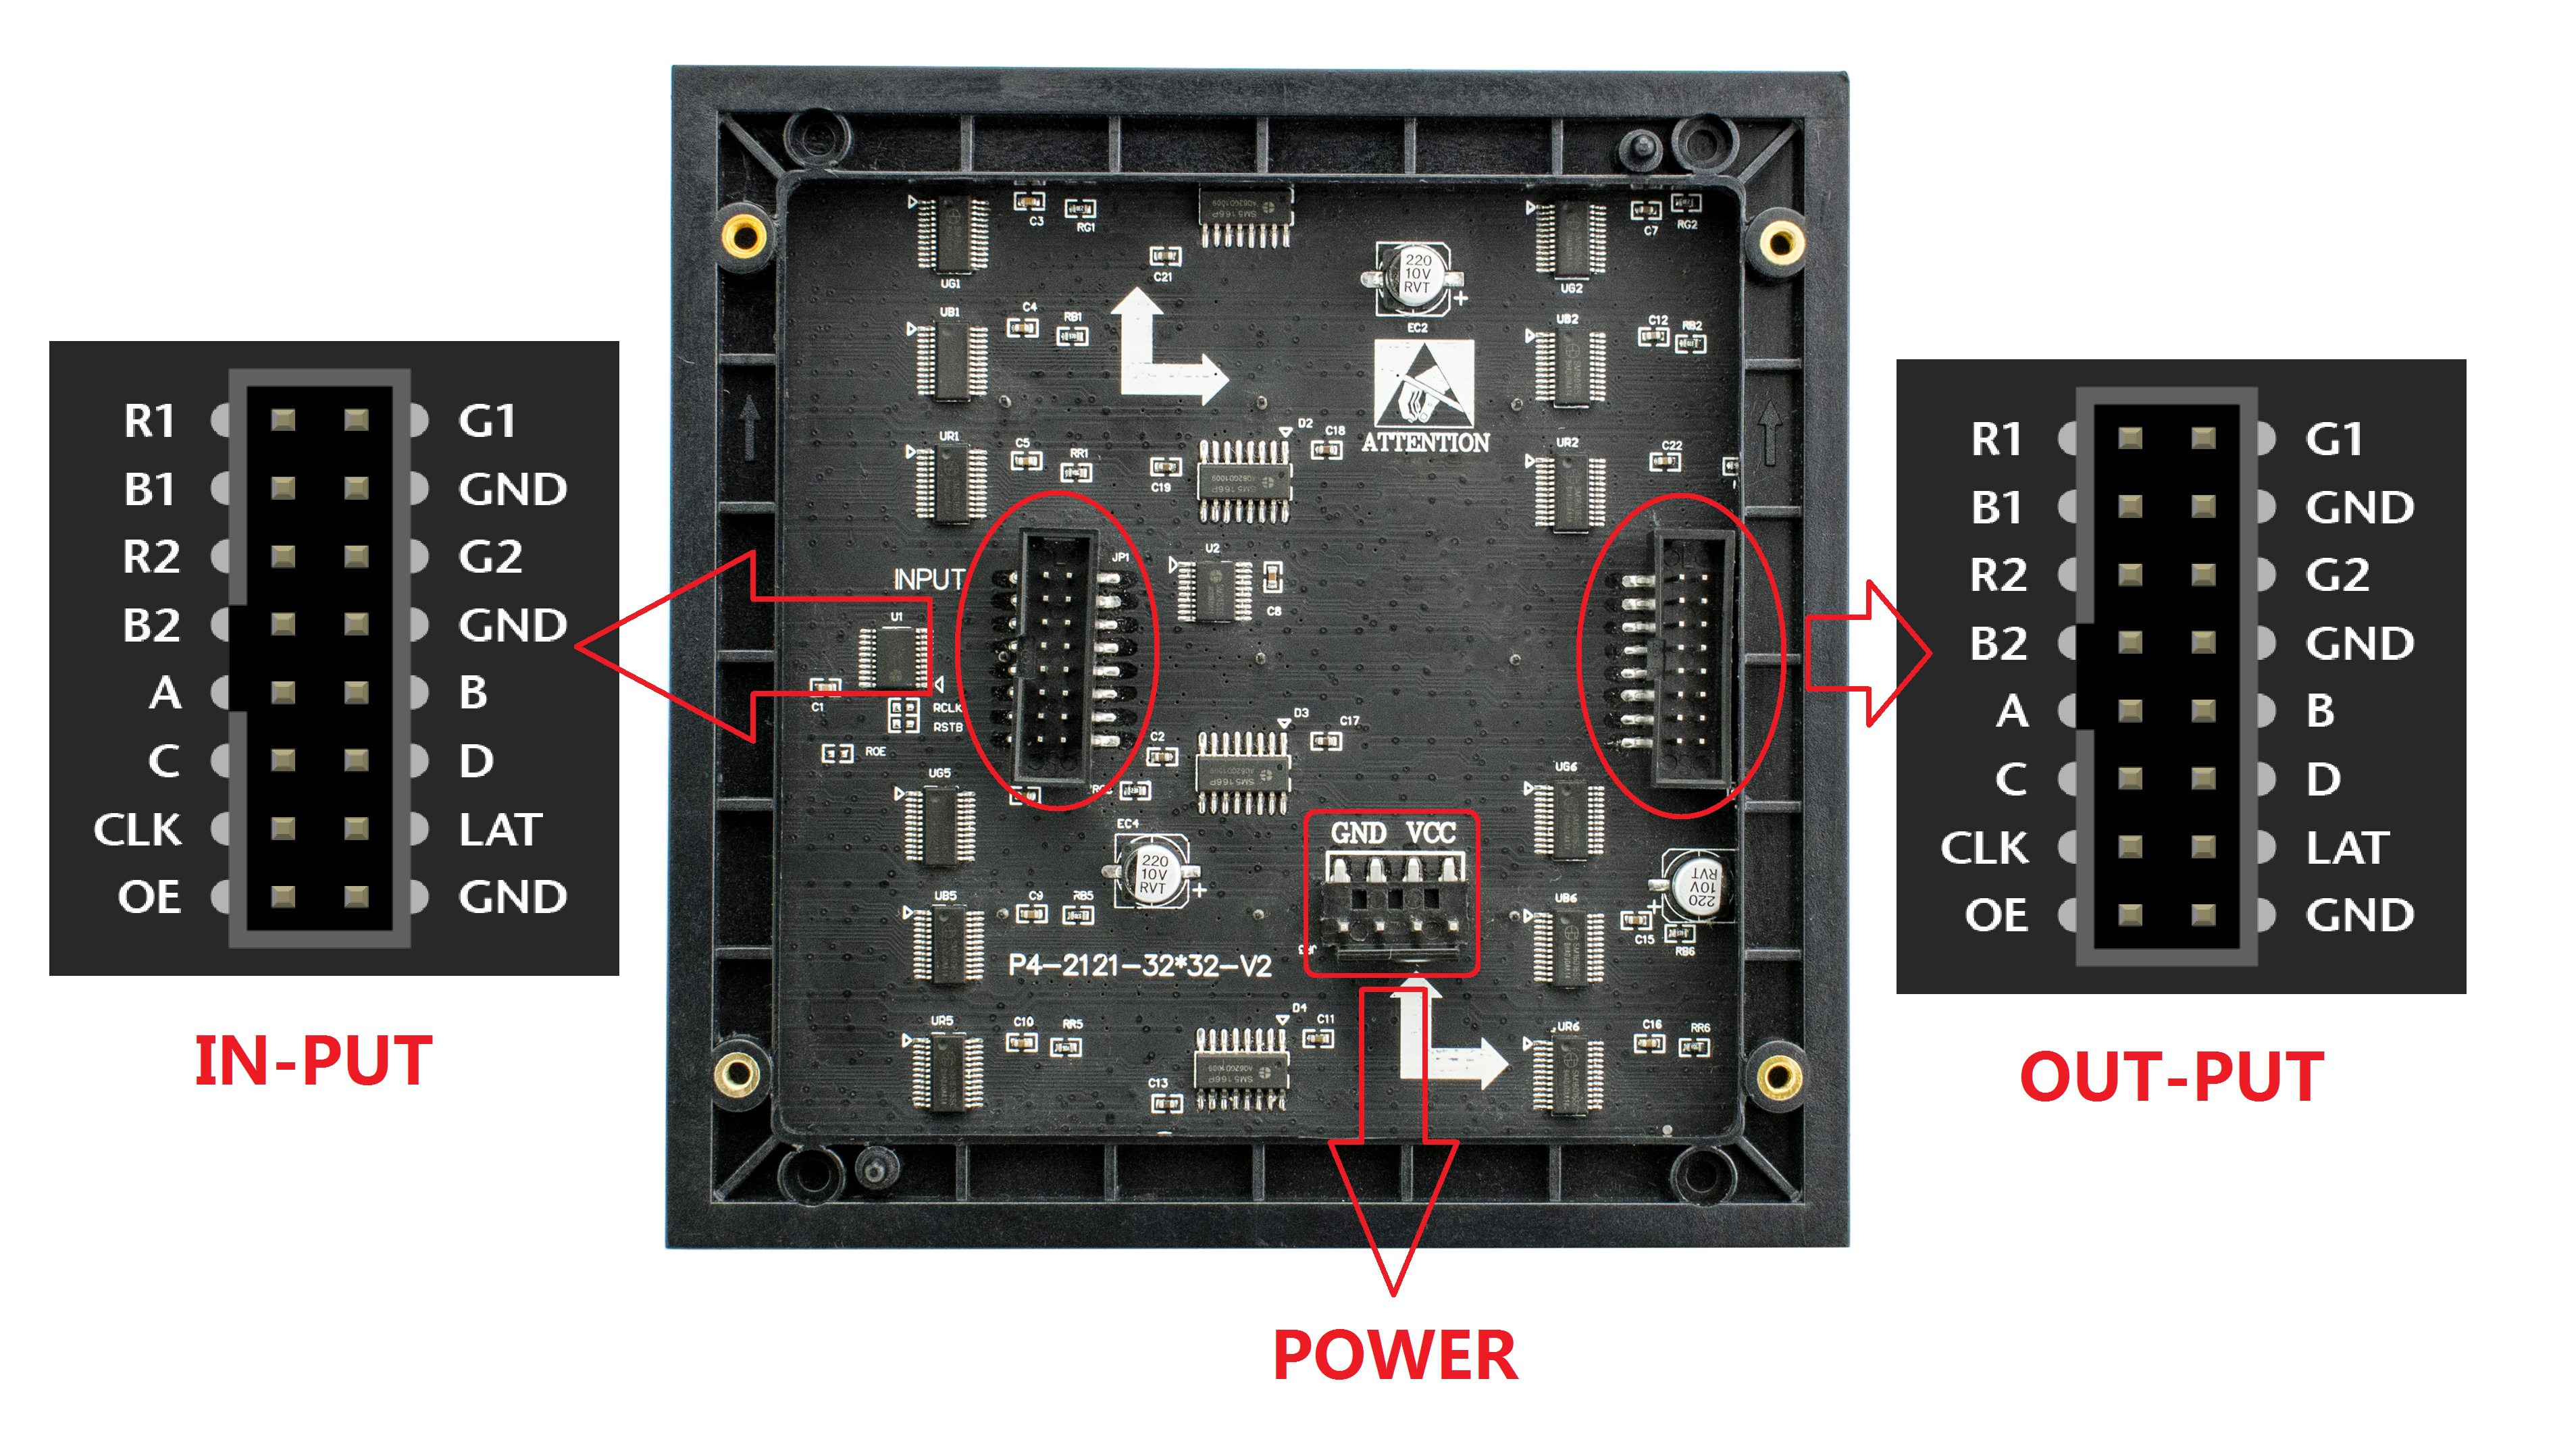
引脚说明
**注意:**IN-PUT和OUT-PUT引脚顺序一样,POWER电源供电5V
| 标号 | 名称 | 功能描述 |
|---|---|---|
| 1 | DR1 | 高位R数据 |
| 2 | DG1 | 高位G数据 |
| 3 | DB1 | 高位B数据 |
| 4 | GND | 地 |
| 5 | DR2 | 低位R数据 |
| 6 | DG2 | 低位G数据 |
| 7 | DB2 | 低位B数据 |
| 8 | GND | 地 |
| 9 | A | A行选择 |
| 10 | B | B行选择 |
| 11 | C | C行选择 |
| 12 | D | D行选择 |
| 13 | CLK | 时钟 |
| 14 | LAT | 锁存 |
| 15 | OE | 输出启用 |
| 16 | GND | 地 |
IN-PUT and OUT-PUT
| 标号 | 名称 | 功能描述 |
|---|---|---|
| 1 | VCC | 5V电源 |
| 2 | VCC | 5V电源 |
| 3 | GND | 地 |
| 4 | GND | 地 |
POWER
使用教程
按照引脚说明连接好硬件,并下载样例代码到UNO中,即可看到漂亮的显示效果。
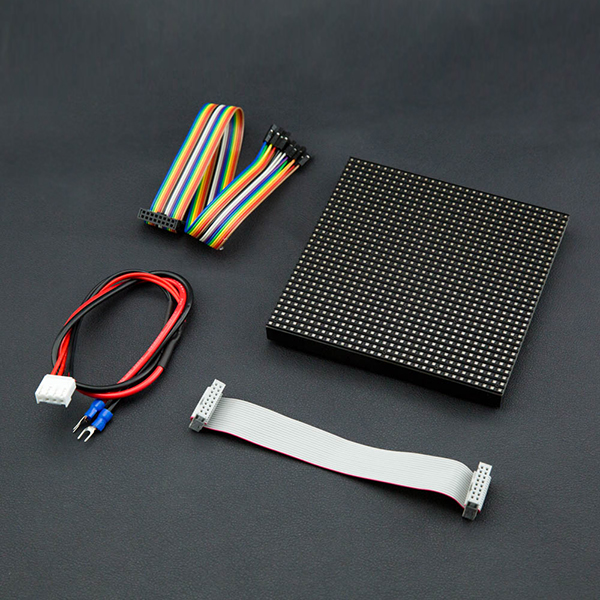
准备
- 硬件
- DFRduino UNO x1
- IO 传感器扩展板 V7.1 x1
- 杜邦线 若干
- 软件
- Arduino IDE, 点击下载Arduino IDE
接线图
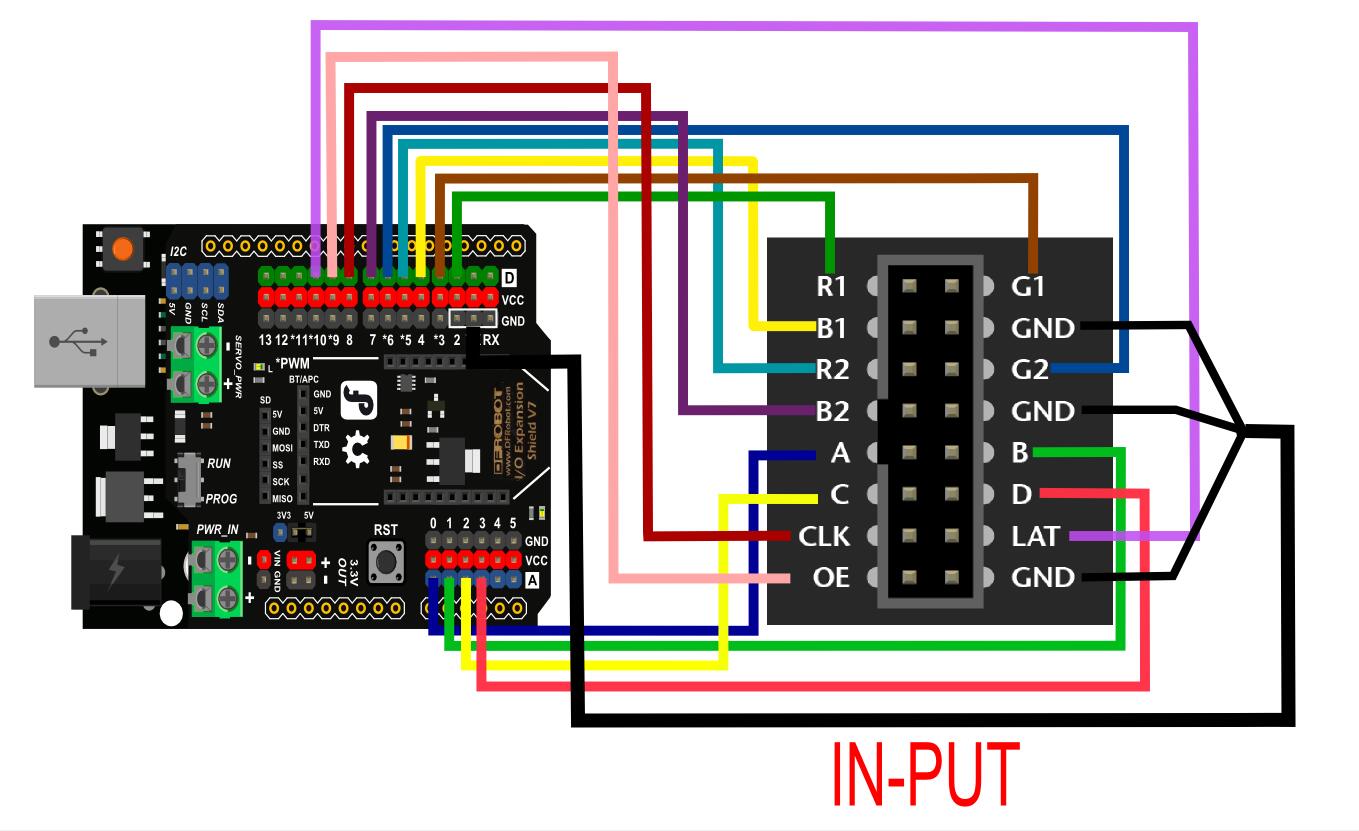
注意:灯板使用时需要外接供电,USB仅5V@500mA输出。
样例代码1
点击下载库文件
TC7258GN芯片使用库:RGB-matrix-Panel.
RUL5358芯片使用库:RGB-matrix-Panel-master.rar
    /***************************************************
    *
    * For 32x32 RGB LED matrix.
    *
    * @author lg.gang
    * @version  V1.0
    * @date  2016-10-28
    *
    * GNU Lesser General Public License.
    * See <https://www.gnu.org/licenses/> for details.
    * All above must be included in any redistribution
    * ****************************************************/

    #include <Adafruit_GFX.h>   // Core graphics library
    #include <RGBmatrixPanel.h> // Hardware-specific library

    // If your 32x32 matrix has the SINGLE HEADER input,
    // use this pinout:
    #define CLK 8  // MUST be on PORTB! (Use pin 11 on Mega)
    #define OE  9
    #define LAT 10
    #define A   A0
    #define B   A1
    #define C   A2
    #define D   A3
    // If your matrix has the DOUBLE HEADER input, use:
    //#define CLK 8  // MUST be on PORTB! (Use pin 11 on Mega)
    //#define LAT 9
    //#define OE  10
    //#define A   A3
    //#define B   A2
    //#define C   A1
    //#define D   A0
    RGBmatrixPanel matrix(A, B, C, D, CLK, LAT, OE, false);

    void setup() {
      int      x, y, hue;
      float    dx, dy, d;
      uint8_t  sat, val;
      uint16_t c;

      matrix.begin();

      for(y=0; y < matrix.width(); y++) {
        dy = 15.5 - (float)y;
        for(x=0; x < matrix.height(); x++) {
          dx = 15.5 - (float)x;
          d  = dx * dx + dy * dy;
          if(d <= (16.5 * 16.5)) { // Inside the circle(ish)?
            hue = (int)((atan2(-dy, dx) + PI) * 1536.0 / (PI * 2.0));
            d = sqrt(d);
            if(d > 15.5) {
              // Do a little pseudo anti-aliasing along perimeter
              sat = 255;
              val = (int)((1.0 - (d - 15.5)) * 255.0 + 0.5);
            } else
            {
              // White at center
              sat = (int)(d / 15.5 * 255.0 + 0.5);
              val = 255;
            }
            c = matrix.ColorHSV(hue, sat, val, true);
          } else {
            c = 0;
          }
          matrix.drawPixel(x, y, c);
        }
      }
    }

    void loop() {
      // do nothing
    }
样例代码2
    /***************************************************
    *
    * For 32x32 RGB LED matrix.
    *
    * @author lg.gang
    * @version  V1.0
    * @date  2016-10-28
    *
    * GNU Lesser General Public License.
    * See <https://www.gnu.org/licenses/> for details.
    * All above must be included in any redistribution
    * ****************************************************/

    #include <Adafruit_GFX.h>   // Core graphics library
    #include <RGBmatrixPanel.h> // Hardware-specific library

    // If your 32x32 matrix has the SINGLE HEADER input,
    // use this pinout:
    #define CLK 8  // MUST be on PORTB! (Use pin 11 on Mega)
    #define OE  9
    #define LAT 10
    #define A   A0
    #define B   A1
    #define C   A2
    #define D   A3
    // If your matrix has the DOUBLE HEADER input, use:
    //#define CLK 8  // MUST be on PORTB! (Use pin 11 on Mega)
    //#define LAT 9
    //#define OE  10
    //#define A   A3
    //#define B   A2
    //#define C   A1
    //#define D   A0
    RGBmatrixPanel matrix(A, B, C, D, CLK, LAT, OE, false);

    void setup() {

      matrix.begin();

      // whew!
    }

    void loop() {
      // fix the screen with red
      matrix.fillRect(0, 0, 32, 32, matrix.Color333(7, 0, 0));
      delay(500);
      // fix the screen with green
      matrix.fillRect(0, 0, 32, 32, matrix.Color333(0, 7, 0));
      delay(500);
      // fix the screen with blue
      matrix.fillRect(0, 0, 32, 32, matrix.Color333(0, 0, 7));
      delay(500);
      // fix the screen with yellow
      matrix.fillRect(0, 0, 32, 32, matrix.Color333(7, 7, 0));
      delay(500);
      // fix the screen with purple
      matrix.fillRect(0, 0, 32, 32, matrix.Color333(7, 0, 7));
      delay(500);
      // fix the screen with cyan
      matrix.fillRect(0, 0, 32, 32, matrix.Color333(0,7, 7));
      delay(500);
      // fix the screen with white
      matrix.fillRect(0, 0, 32, 32, matrix.Color333(3, 3, 3));
      delay(500);

       // fill the screen with 'black'
      matrix.fillScreen(matrix.Color333(0, 0, 0));
      // draw a pixel in solid white
      matrix.drawPixel(0, 0, matrix.Color333(7, 7, 7));
      delay(500);

      // fix the screen with green
      matrix.fillRect(0, 0, 32, 32, matrix.Color333(0, 7, 0));
      delay(500);

      // draw a box in yellow
      matrix.drawRect(0, 0, 32, 32, matrix.Color333(7, 7, 0));
      delay(500);

      // draw an 'X' in red
      matrix.drawLine(0, 0, 31, 31, matrix.Color333(7, 0, 0));
      matrix.drawLine(31, 0, 0, 31, matrix.Color333(7, 0, 0));
      delay(500);

      // draw a blue circle
      matrix.drawCircle(10, 10, 10, matrix.Color333(0, 0, 7));
      delay(500);

      // fill a violet circle
      matrix.fillCircle(21, 21, 10, matrix.Color333(7, 0, 7));
      delay(500);

      // fill the screen with 'black'
      matrix.fillScreen(matrix.Color333(0, 0, 0));

      // draw some text!
      matrix.setCursor(1, 0);    // start at top left, with one pixel of spacing
      matrix.setTextSize(1);     // size 1 == 8 pixels high
      matrix.setTextWrap(false); // Don't wrap at end of line - will do ourselves

      matrix.setTextColor(matrix.Color333(0,7,0));
      matrix.println("green");
      matrix.setTextColor(matrix.Color333(0,7,7));
      matrix.println("robot");

      // print each letter with a rainbow color
      matrix.setTextColor(matrix.Color333(7,0,0));
      matrix.print('3');
      matrix.setTextColor(matrix.Color333(7,4,0));
      matrix.print('2');
      matrix.setTextColor(matrix.Color333(7,7,0));
      matrix.print('x');
      matrix.setTextColor(matrix.Color333(4,7,0));
      matrix.print('3');
      matrix.setTextColor(matrix.Color333(0,7,0));
      matrix.println('2');

      matrix.setTextColor(matrix.Color333(0,7,7));
      matrix.print('*');
      matrix.setTextColor(matrix.Color333(0,4,7));
      matrix.print('R');
      matrix.setTextColor(matrix.Color333(0,0,7));
      matrix.print('G');
      matrix.setTextColor(matrix.Color333(4,0,7));
      matrix.print('B');
      matrix.setTextColor(matrix.Color333(7,0,4));
      matrix.print('*');
      delay(5000);
    }
结果
样列代码1:LED模组会显示一个彩色填充圆
样列代码2:LED模组会轮流显示:全屏红色、全屏绿色、全屏蓝色、全屏黄色、全屏紫色、全屏青色、全屏白色、一个白点、一个黄色的矩形框、一个红色的X、一个蓝色的圆、一个填充紫圆、英文字
常见问题
还没有客户对此产品有任何问题,欢迎通过qq或者论坛联系我们!
更多问题及有趣的应用,可以 访问论坛 进行查阅或发帖。
