简介
NB-IoT是指基于蜂窝的窄带物联网(Narrow Band-Internet of Things)技术。它是IoT领域的一个新兴技术分支,支持低功耗设备在广域网的蜂窝数据连接,也称作低功耗广域网(LPWAN)。NB-IoT工作于授权频谱下,可以直接部署在GSM、UMTS、LTE网络,与现有网络共存,而带宽大约只消耗180KHz。
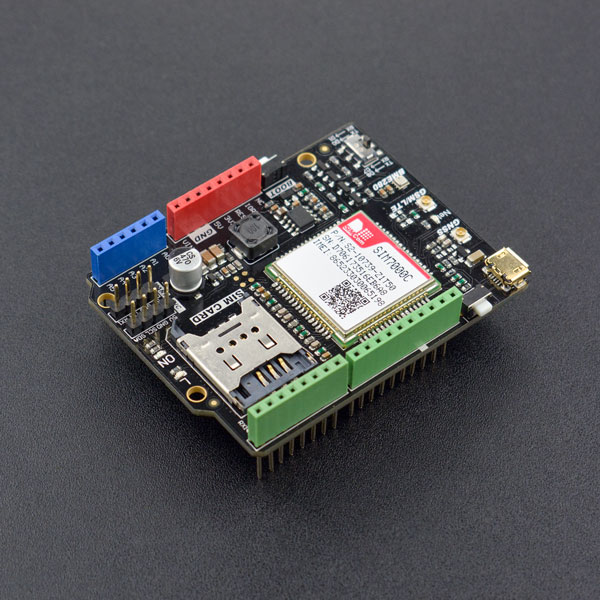
SIM7000 Arduino NB-IoT/LTE/GPRS 扩展板是DFRobot基于SIMCom SIM7000设计的无线通信模块,专为Arduino控制器设计,支持多频LTE-FDD,双频GPRS/EDGE,NB-IoT通信。这是国内第一款将NB-IoT技术引入到开源硬件领域的产品。无论是做原型开发,还是做小批量生产,SIM7000 Arduino NB-IoT/LTE/GPRS 扩展板都是低功耗,低延迟、中等吞吐量应用的最优解决方案。此外SIM7000板载GNSS全球导航卫星系统(Global Navigation Satellite System),支持美国的GPS,俄罗斯的GLONASS,欧洲的Galileo,日本的QZSS以及,中国自主研发的北斗导航系统。非常适用于远程控制,移动追踪,远程抄表,共享单车等物联网应用。
SIM7000 NB-IoT/LTE/GPRS 扩展板同时支持普通SIM卡和NB-IoT专用卡,可以插接普通SIM卡进行打电话、发短信等传统GSM应用,也可以插接NB-IoT专用卡,使用NB-IoT网络进行数据传输。此外扩展板还提供了BME280环境传感器,可以作为NB-IoT项目的原型机开发,可以监测温度,湿度及气压数值。
⚠SIM7000C适用于国内频段,SIM7000E适用于欧洲频段,请根据使用场景,谨慎选择对应产品!
⚠SIM7000系列扩展板在V2.0及后续版本,已去除板载BME280传感器!
性能描述
-
工作电压:5V(注意:模块在连接网络瞬间会消耗大量电流,工作时,需外接电源)
-
输入电压:7~12VDC (VIN端,极限6~20V)
-
通信模组:SIM7000
- Single-Band TDD-LTE B39
- Quad-Band FDD-LTE B1/B3/B5/B8 (SIM7000C)(已上架)
- Quad-Band FDD-LTE B3/B8/B20/B28 (SIM7000E)(已上架)
- GPRS/EDGE 900/1800 MHz
- Output power
- GSM900: 2W
- DCS1800: 1W
- Control Via AT Commands
- Operation temperature: -40℃ to +85℃
- GNSS (GPS, GLONASS, BeiDou, Compass, Galileo, QZSS)
- Firmware update via USB 2.0
-
支持普通SIM卡以及NB-IoT专用卡(注意:请先确认您的SIM频段是否包含在支持频段内)
-
BME280环境传感器(SIM7000系列扩展板在V2.0及后续版本,已去除板载BME280传感器)
- 温度检测范围:-40℃~+85℃,分辨率0.1℃,误差±0.5℃
- 湿度检测范围:0~100%RH,分辨率0.1%RH,误差±2%RH
- 压力检测范围:300~1100hPa
- 湿度测量响应时间:1s
-
工作温度:-30℃ ~ +80℃
-
尺寸:53.4 x 68.6mm
接口说明
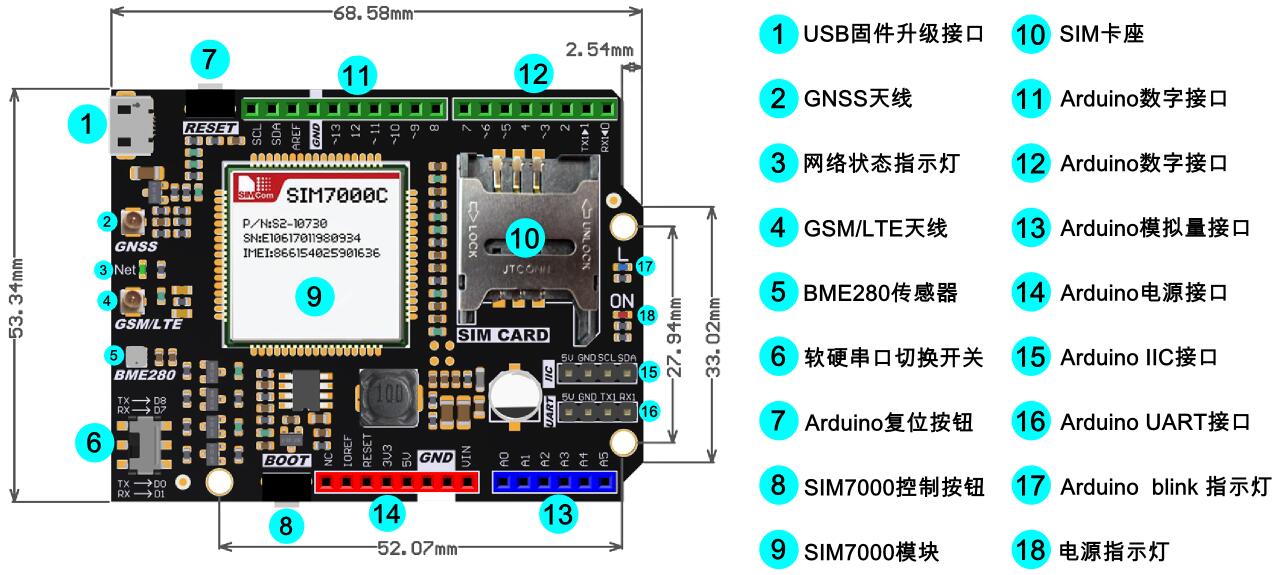
⚠注意:
- 软硬串口切换开关:由于Arduino UNO/Mega等控制器默认D0和D1为硬件串口,与USB端相连。很多需要使用串口的扩展板,在使用时会出现串口冲突的问题,所以特别设计了一个软串口接口,用户可以使用软串口与Arduino进行通信 扩展阅读:Arduino SoftwareSerial Library
- 为了方便程序控制,Boot按键默认引至D12引脚,可以通过拉高D12引脚2秒实现模块的开关机。SIM7000开机后会有2秒左右初始化时间,初始化完成后可正常使用。
使用教程(基于SIM7000库)
准备工作
-
硬件
- 1 x Arduino UNO控制板(可兼容LEONARDO和MEGA,请参考演示程序的注释做出相应改动)
- 1 x SIM7000 Arduino NB-IoT/LTE/GPRS 扩展板
- 1 x 为UNO下载程序的USB线
- 1 x 7V~12V直流电源
-
软件
- Arduino IDE, 点击下载Arduino IDE
- 请先下载DFRobot通用SIM库
- 请先下载NB-IOT SIM7000 Shield库
- 如何安装库文件,点击链接
硬件连接
将扩展板插在Arduino UNO控制器上

样例代码
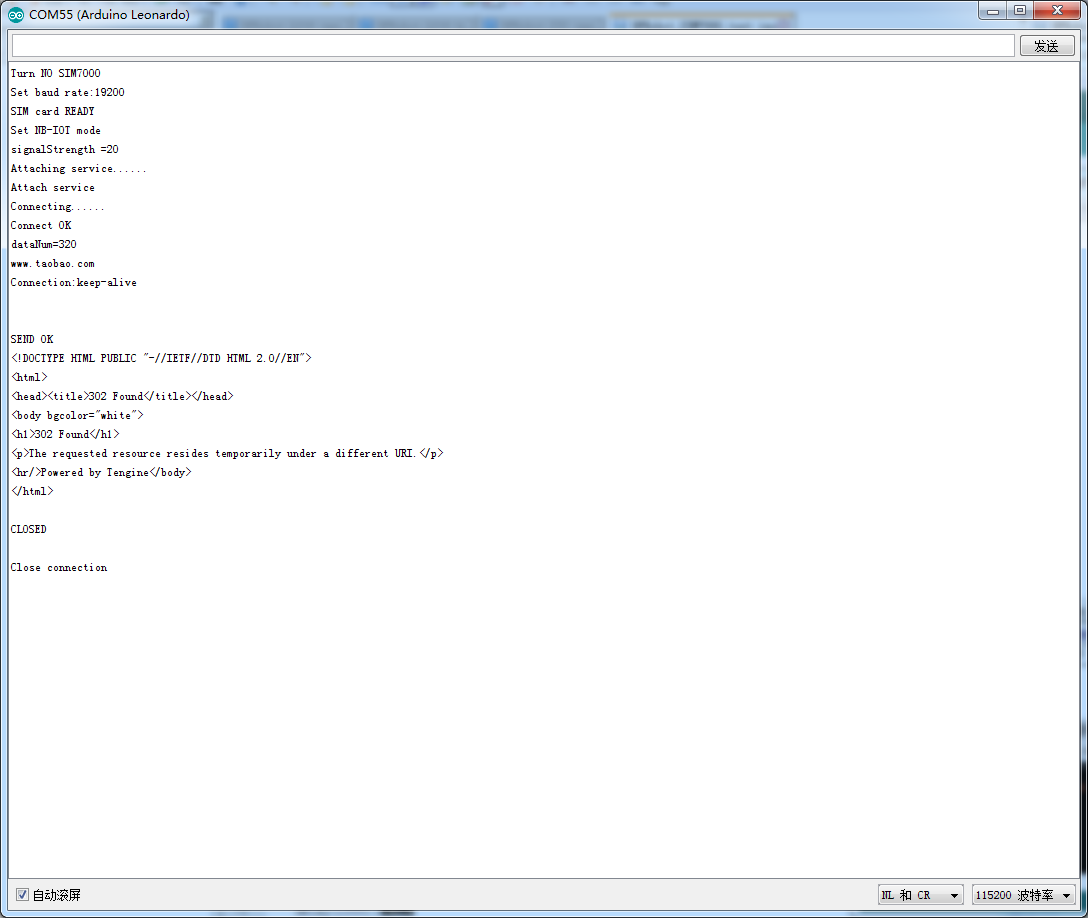
- 由于Arduino UNO 只有一个硬件串口,使用时,推荐使用软串口通信,SIM7000库文件默认使用软串口,请将软硬件串口控制开关切换至TX>D8,RX>D7。
- 程序使用SIM7000通过GPRS连接网站并进行HTTP报文交互。
#include <Wire.h>
#include <DFRobot_SIM7000.h>

#define PIN_TX     7
#define PIN_RX     8
SoftwareSerial     mySerial(PIN_RX, PIN_TX);
DFRobot_SIM7000    sim7000(&mySerial);
static char        buff[350];

void setup() {
  int signalStrength, dataNum;
  Serial.begin(115200);
  mySerial.begin(19200);
  Serial.println("Turn ON SIM7000......");
  if (sim7000.turnON()) {                                            //Turn ON SIM7000
    Serial.println("Turn ON !");
  }
  Serial.println("Set baud rate......");
  if (sim7000.setBaudRate(19200)) {                                  //Set baud rate from 115200 to 19200
    Serial.println("Set baud rate:19200");
  } else {
    Serial.println("Faile to set baud rate");
    while (1);
  }
  Serial.println("Check SIM card......");
  if (sim7000.checkSIMStatus()) {                                    //Check SIM card
    Serial.println("SIM card READY");
  } else {
    Serial.println("SIM card ERROR");
    while (1);
  }
  delay(500);
  Serial.println("Set net mod......");
  if (sim7000.setNetMode(sim7000.eNB)) {                            //Set net mod NB-IOT
    Serial.println("Set NB mode");
  } else {
    Serial.println("Fail to set mode");
  }
  Serial.println("Get signal quality......");
  delay(500);
  signalStrength = sim7000.checkSignalQuality();                    //Check signal quality from (0-30)
  Serial.print("signalStrength =");
  Serial.println(signalStrength);
  delay(500);
  Serial.println("Attaching service......");
  if (sim7000.attacthService()) {                                   //Open the connection
    Serial.println("Attach service");
  } else {
    Serial.println("Fail to Attach service");
    while (1);
  }
  delay(200);
  Serial.println("Connecting......");
  if (sim7000.openNetwork(sim7000.eTCP, "www.taobao.com", 80)) {  //Start Up TCP or UDP Connection
    Serial.println("Connect OK");
  } else {
    Serial.println("Fail to connect");
    while (1);
  }
  sim7000.send("HEAD/HTTP/1.1\r\nHost:www.taobao.com\r\nConnection:keep-alive\r\n\r\n");    //Send Data Through TCP or UDP Connection
  dataNum = sim7000.recv(buff, 350);                                       //Receive data
  Serial.print("dataNum=");
  Serial.println(dataNum);
  Serial.println(buff);
  delay(500);
  if (sim7000.closeNetwork()) {                                            //End the connection
    Serial.println("Close connection");
  } else {
    Serial.println("Fail to close connection");
  }
  delay(2000);
  sim7000.turnOFF();                                                       //Turn OFF SIM7000
}

void loop() {
  delay(1000);
}
- 函数说明:
- 设置软串口,SIM7000采用软串口控制TX为D8 RX为D7。
begin(Stream &s_)
- 使用软件方式开启SIM7000,开启后扩展板上的Net指示灯闪烁,SIM7000有2秒左右初始化时间,初始化成功后函数返回true。
turnON();
- 使用软件方式关闭SIM7000,成功后扩展板上的Net指示灯熄灭。
turnOFF();
- 设置软串口波特率,SIM7000串口默认波特率为115200,使用软串口控制时为避免乱码将波特率设置为19200及以下,成功设置后返回true。(其他可设置值9600,4800,2400,1200)
setBaudRate(int rate);
- 初始化AT指令功能,成功后返回True。
checkSIMStatus();
- 设置网络模式,成功后返回true。可设置模式: GPRS:GPRS模式 NB:NB-IOT模式。
setNet(Net net);
- 检测信号强度,返回值为信号强度。返回值为99时表示无法检测到信号。
checkSignalQuality();
- 打开连接服务,成功后返回true。
attacthService();
- 连接网络,选择连接协议(TCP或者UDP),所连接的域名,端口号,连接成功后返回true。
connect(Protocol ptl,const char *host, int port);
- 数据传输,连接成功后向服务端发送信息,可指定发送信息大小,或直接输入需发送信息。
send(const char *str);
send(void* buf,size_t len);
- 数据接收,接收服务端的信息并存储,可设置最大接收量,和等待时间。返回实际接收字节数。
recv(char* buf,int maxlen,int timeout);
- 断开连接,成功后返回true。
close();
- 程序演示:
使用教程(基于串口AT指令)
准备工作
与上面的教程(基于SIM7000库)保持一致
硬件连接
与上面的教程(基于SIM7000库)保持一致
样例代码
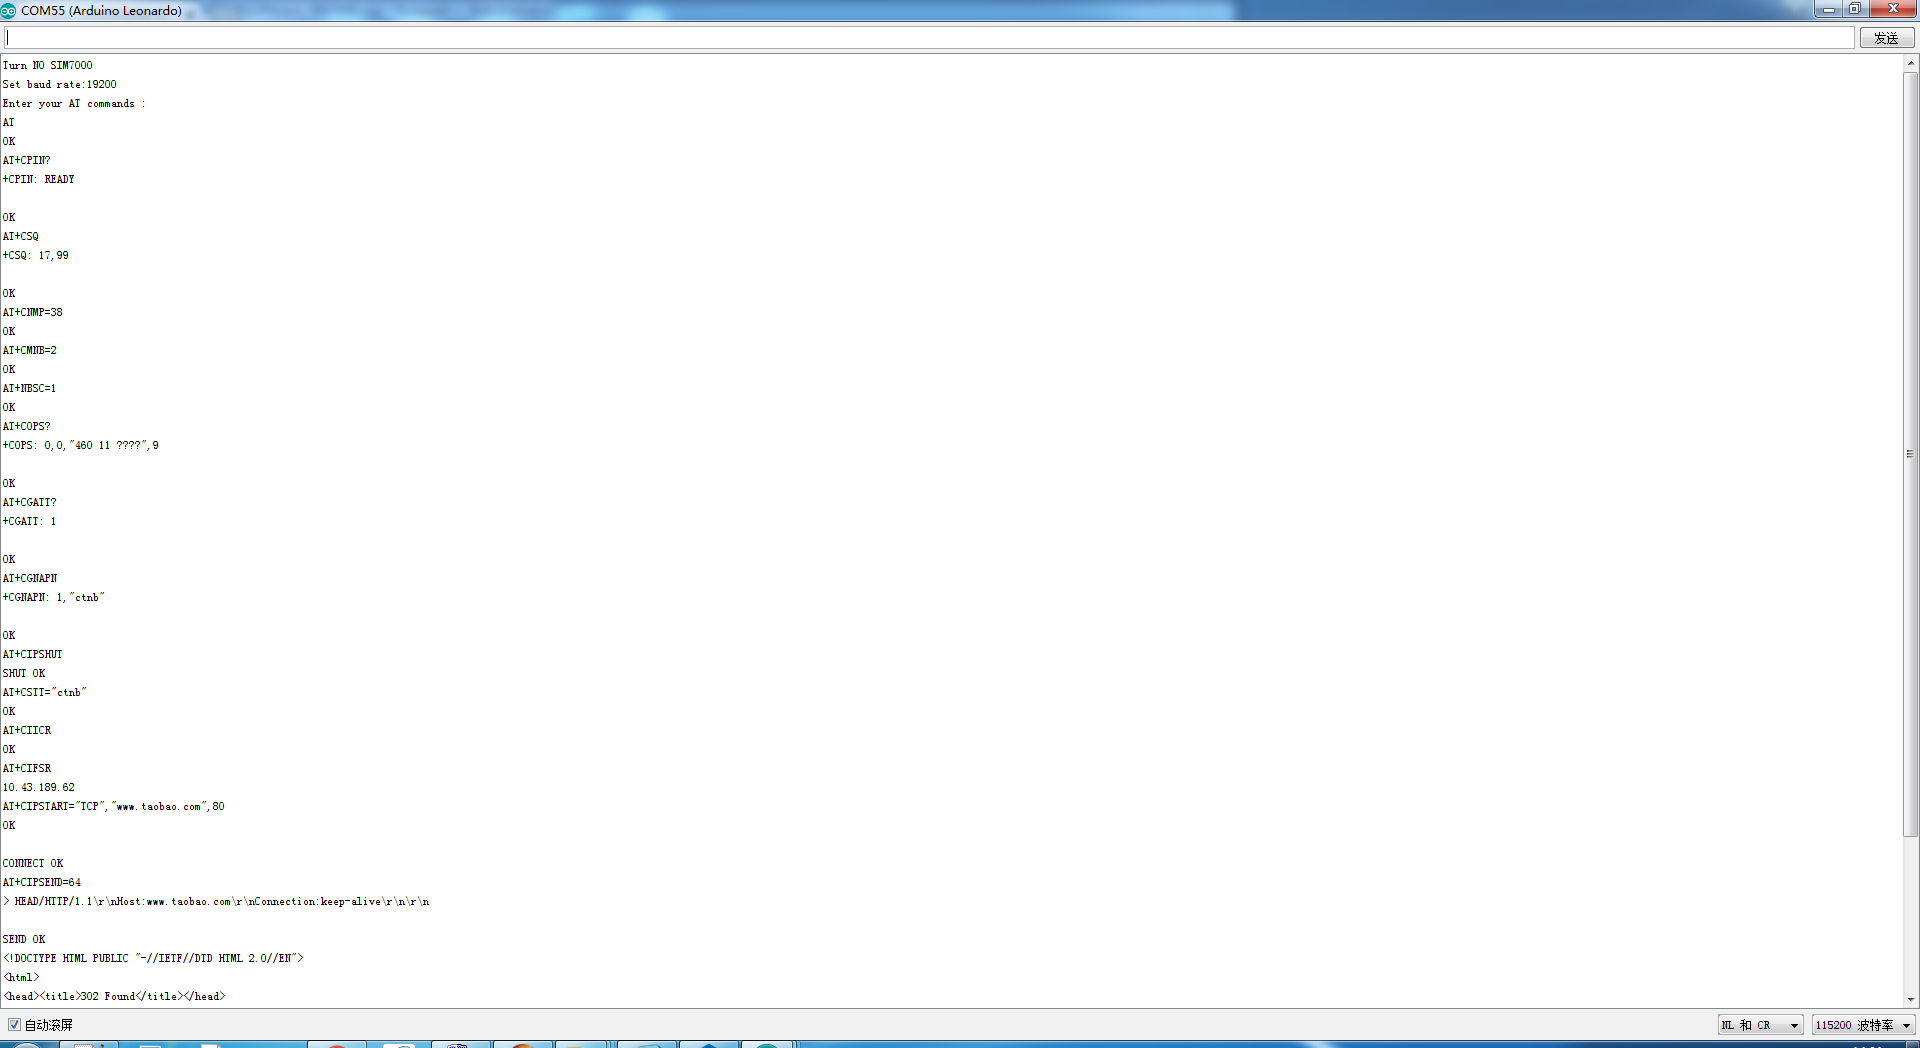
- SIM7000 NB-IoT Shield可使用串口发送AT指令进行控制,SIM7000 NB-IoT Shield串口默认波特率为115200,需先将波特率设置为19200避免乱码。
- AT指令需以回车换行符结尾。代码如下:
 /*
  * File  : DFRobot_SIM7000_ATtest.ino
  * Power : SIM7000 needs 7-12V DC power supply
  * Brief : This example use the serial port to send AT command to control the SIM7000
  *         With initialization completed, we can enter AT command to SIM7000 directly
  * AT command list:
  * https://github.com/DFRobot/binaryfiles/raw/master/DFR0505/doc/SIM7000%20Series_AT%20Command%20Manual_V1.01.pdf
  * Note  : If you use Mega please connect PIN8 PIN10 and set PIN_RX = 10
  *         The AT command must end with CRLF
  */
#include <DFRobot_SIM7000.h>

#define PIN_TX     7
#define PIN_RX     8
SoftwareSerial     mySerial(PIN_RX,PIN_TX);
DFRobot_SIM7000    sim7000(&mySerial);

void setup() {
    Serial.begin(115200);
    mySerial.begin(19200);

    Serial.println("Turn ON SIM7000......");
    if(sim7000.turnON()){                             //Turn ON SIM7000
        Serial.println("Turn ON !");
    }

    Serial.println("Set baud rate......");
    if(sim7000.setBaudRate(19200)){                   //Set baud rate from 115200 to 19200
        Serial.println("Set baud rate:19200");
    }else{
        Serial.println("Faile to set baud rate");
        while(1);
    }

    mySerial.begin(19200);
    Serial.println("For example, if you type AT\\r\\n, OK\\r\\n will be responsed!");
    Serial.println("Enter your AT command :");
}

void loop() {
    mySerial.listen();
    while(mySerial.available()){
        Serial.write(mySerial.read());
    }

    mySerial.flush();
    while(Serial.available()){
        mySerial.write(Serial.read());
    }

    delay(20);
}
运行程序后在Uno串口上输入AT指令,即可完成AT指令直接控制SIM7000。下载AT指令表
- 常用AT指令简介:
- AT+CNMP=?
- 网络制式选择:AT+CNMP=2表示模块自动找网模式,AT+CNMP=13表示锁定 GSM only 使用,AT+CNMP=38 表示锁定“ CAT-M1+NBIoT ”组合使用,AT+CNMP=51 表示锁定“ GSM+CAT-M1+NBIoT ”组合使用
- AT+CMNB=?
- LTE网络制式选择:AT+CMNB=1 设置 CAT-M1 模式, AT+CMNB=2 设置 NBIoT 模式,AT+CMNB=3 设置 CAT-M1 和 NBIoT 组合模式
- AT+CSQ
- 检测信号质量,第一个值表示信号强度,为99时表示无法检测信号,此时无法模块通信。第二个值表示误码率,可能值 0-7:误码率依次增加,>6时难以通信,99:暂时无法检测,不影响通信。
- AT+CGATT?
- 检测网络附着状态,1:已附着,可正常通信。2:未附着,不能通信。
- AT+CSTT
- 开启连接任务。
- AT+CIFSR
- 获取本地IP。
- AT+CIPSTART="ptl","host","port"
- 建立连接,ptl:连接协议(TCP或UDP),host:连接域名,可输入具体域名或IP地址。port:连接端口。连接成功返回CONNECT OK
- AT+CIPSEND="len"
- 发送数据,len:发送数据长度,在返回的“>”后输入发送的数据。
- AT+CIPCLOSE
- 断开当前连接。
- AT+CIPSHUT
- 关闭连接,释放资源。
- AT+CNMP=?
- 程序演示:
使用教程(获取定位)
准备工作
与上面的教程(基于SIM7000库)保持一致
硬件连接
连接有源天线,并在户外使用
样例代码
#include <Wire.h>
#include <DFRobot_SIM7000.h>

DFRobot_SIM7000    sim7000(&mySerial);
SoftwareSerial  mySerial(8, 7);                                    //Set serial

void setup() {
  int signalStrength, dataNum;
  Serial.begin(115200);
  mySerial.begin(19200);

  if (sim7000.turnON()) {                                        //Turn ON SIM7000
    Serial.println("Turn NO SIM7000");
  }
  if (sim7000.setBaudRate(19200)) {                              //Set baud rate from 115200 to 19200
    Serial.println("Set baud rate:19200");
  } else {
    Serial.println("faile to set baud rate");
  }
  while (1) {
    if (sim7000.init()) {                                      //Init SIM7000
      Serial.println("AT command READY");
      break;
    } else {
      Serial.println("AT command ERROR");
      delay(500);
    }
  }
  while (1) {
    if (sim7000.initPos()) {
      Serial.println("Positioning function initialized");
      break;
    } else {
      Serial.println("Fail to init positioning function");
      delay(500);
    }
  }
}

void loop() {
  Serial.println("Enter anything to get positioning ");
  char loge[10];
  readSerial(loge);
  Serial.println("Getting position......");
  if (sim7000.getPosition()) {                                   //Get the current position
    Serial.print("Longtude :");
    Serial.println(sim7000.getLongitude());                    //Get longitude
    Serial.print("Latitude :");
    Serial.println(sim7000.getLatitude());                     //Get latitude
  } else {
    Serial.println("Wrong data try again");
  }
}

int readSerial(char result[]) {
  int i = 0;
  while (1) {
    while (Serial.available() > 0) {
      char inChar = Serial.read();
      if (inChar == '\n') {
        result[i] = '\0';
        Serial.flush();
        return 0;
      }
      if (inChar != '\r') {
        result[i] = inChar;
        i++;
      }
    }
  }
}
- 函数说明:
- 初始化获取定位功能,成功后返回true
initPos();
- 获取当前定位,成功后返回true
getPosition();
- 获取当前经度,东经为正值,西经为负值(-180,180)
getLongitude();
- 获取当前纬度,北纬为正值,南纬为负值(-90,90)
getlatitude();
BME280环境数据监测
SIM7000板载BME280环境监测传感器,默认采用I2C连接方式,使用前请下载Arduino库文件,点击下载
注意:SIM7000系列扩展板在V2.0及后续版本,已去除板载BME280传感器
/*!
       raed_data_i2c.ino

       Download this demo to test read data from bme280, connect sensor through I2C interface
       Data will print on your serial monitor

       Copyright   [DFRobot](https://www.dfrobot.com), 2016
       Copyright   GNU Lesser General Public License

       version  V1.0
       date  12/03/2019
*/

#include "DFRobot_BME280.h"
#include "Wire.h"

typedef DFRobot_BME280_IIC    BME;    // ******** use abbreviations instead of full names ********

/**I2C address is 0x77 when pin SDO is high (BME280 sensor module)*/
/**I2C address is 0x76 when pin SDO is low  (SIM7000)*/
BME   bme(&Wire, 0x76);   // select TwoWire peripheral and set sensor address

#define SEA_LEVEL_PRESSURE    1015.0f

// show last sensor operate status
void printLastOperateStatus(BME::eStatus_t eStatus)
{
  switch (eStatus) {
    case BME::eStatusOK:    Serial.println("everything ok"); break;
    case BME::eStatusErr:   Serial.println("unknow error"); break;
    case BME::eStatusErrDeviceNotDetected:    Serial.println("device not detected"); break;
    case BME::eStatusErrParameter:    Serial.println("parameter error"); break;
    default: Serial.println("unknow status"); break;
  }
}

void setup()
{
  Serial.begin(115200);
  bme.reset();
  Serial.println("bme read data test");
  while (bme.begin() != BME::eStatusOK) {
    Serial.println("bme begin faild");
    printLastOperateStatus(bme.lastOperateStatus);
    delay(2000);
  }
  Serial.println("bme begin success");
  delay(100);
}

void loop()
{
  float   temp = bme.getTemperature();
  uint32_t    press = bme.getPressure();
  float   alti = bme.calAltitude(SEA_LEVEL_PRESSURE, press);
  float   humi = bme.getHumidity();

  Serial.println();
  Serial.println("======== start print ========");
  Serial.print("temperature (unit Celsius): "); Serial.println(temp);
  Serial.print("pressure (unit pa):         "); Serial.println(press);
  Serial.print("altitude (unit meter):      "); Serial.println(alti);
  Serial.print("humidity (unit percent):    "); Serial.println(humi);
  Serial.println("========  end print  ========");

  delay(1000);
}
兼容性测试
| MCU | 测试通过 | 测试失败 | 未测试 | 特别标注 |
|---|---|---|---|---|
| Arduino Uno | √ | |||
| Arduino Leonardo | √ | |||
| Arduino Mega1280 | √ | 短接D8和D10,改代码PIN_RX=10 | ||
| Arduino Mega2560 | √ | 短接D8和D10,改代码PIN_RX=10 |
常见问题
问:烧录示例代码后,串口输出没法初始化?
答:(1)检查是否外部供电7~12V,通过主板DC2.1黑色圆孔供电,或者通过扩展板vin,gnd端口供电。(2)检查是否安装两个天线。(3)检查扩展板上的拨码开关TX>D8,RX>D7(4)查看扩展板上的红色电源指示灯是否常亮,net指示灯是否闪烁(5)检查是否插上nb卡。检查后,按下boot按键重启观察
AT指令使用视频,mega2560接sim7000:https://mc.dfrobot.com.cn/thread-313989-1-1.html#pid523241
更多问题及有趣的应用,可以 访问论坛 进行查阅或发帖。
