简介
- LattePanda RS232扩展板是专为 LattePanda V1 设计的工业级接口扩展板,将CPU的TTL转换为RS232接口。
- 采用金升阳的串口转RS232模块,自带电源隔离和信号隔离。
- 板载DB9接口(公头),可方便的连接各种RS232接口设备。
- 搭配一个DB9公母头转换接头,方便用户适配接口。
- 沉金工艺,既美观,又保证PCB质量。双塑长脚2.0mm排针,保证排针的稳定。
- 随产品附赠12mm六角铜柱与螺丝,保证产品与LP连接的稳定性。
产品参数

- 模块运行电源:+5V
- 符合EIA/TIA-232-F标准
- 数据收发指示灯
- DB9接口(公头)
- 通信波特率高达 115200 bps
- 隔离电压2500VDC
- 工作温度范围:-40℃ to +85℃
- ⚠注意:
不支持热插拔
应用
- 在 Windows 环境下轻松开发和使用 RS232 通信接口(兼容 Linux 环境)
引脚说明

DB9引脚定义
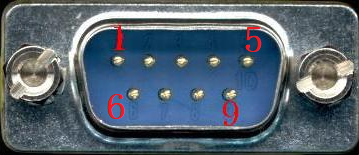
| DB9公头引脚编号 | 引脚定义 |
|---|---|
| 1号脚 | NC |
| 2号脚 | RXD |
| 3号脚 | TXD |
| 4号脚 | NC |
| 5号脚 | GND |
| 6~9号脚 | NC |
LattePanda V1 引脚定义(建议参考 LattePanda 官方wiki)
使用教程
这里演示 LattePanda V1 通过扩展板与 Arduino 通信。
扩展板与 LattePanda V1 插接示意

需使用随包装搭配的铜柱和螺丝固定扩展版与 LattePanda
连线图
准备硬件:
- 一块 Arduino 主控
- 一块 Arduino RS232 扩展板(DFR0258)
- 一块 LattePanda V1
- 一块 LattePanda V1 RS232 接口扩展板(DFR0734)
- 一根 RS232 公公头数据线
准备软件:
接线方式
- 将 Arduino RS232 扩展板插接在Arduino 主控上
- 将 LattePanda V1 RS232 接口扩展板插接在 LattePanda V1 上
- 使用 RS232 数据线将两端连接在一起
如下图:

arduino 烧录如下代码:
void setup() {
  // put your setup code here, to run once:
  Serial.begin(115200);
  while(!Serial);
}

void loop() {
  // put your main code here, to run repeatedly:
  if(Serial.available()>0){
	char a;
	a = Serial.read()+1;
    Serial.print(a); //return all the data that received from LP
  }
}
LattePanda 上打开串口监视器,选择COM1串口,波特率设置115200。
向 Arduino 发送数据会加 1 返回

疑难解答
更多问题及有趣的应用,请访问论坛
