简介
DFRobot Gravity: 模拟pH计V2专门用于测量溶液的pH,衡量溶液的酸碱程度,常用于鱼菜共生、水产养殖、环境水检测等领域。
本产品作为pH计V1的升级版本,极大的改善了用户体验与精度:板载稳压芯片,支持3.3~5.5V的宽电压供电,兼容5V和3.3V主控板;输出信号经硬件滤波,抖动小;配套软件库采用2点校准的方式,能自动识别两种标准液4.0和7.0,简单方便。
本产品配合主控板(如Arduino)与配套的开源软件库,就可迅速搭建出一套pH检测仪,即插即用,无需焊接。DFRobot提供多种水质检测传感器产品,尺寸与接口统一,满足各类水质检测的需求,也适合搭建多参数水质检测仪。
pH是衡量溶液酸碱度的一个值,亦称氢离子浓度指数、酸碱值,是溶液中氢离子活度的一种标度。pH在医学、化学、农业上都有广泛的用途。通常pH是一个介于0~14之间的数,在热力学标准状况下,pH=7的溶液呈中性,pH<7时呈酸性,pH>7时呈碱性。

-
BNC座子与转换板必须保持干燥和清洁,否则会影响输入阻抗,导致测量不准确。如不慎受潮,需烘干处理。
-
转换板不可直接放置在潮湿的平面或半导体平面上,否则会影响输入阻抗,导致测量不准确。建议用尼龙柱固定,让转换板与平面留有一定的距离。
-
pH电极头部的敏感玻璃泡不得与硬物接触,任何破损和擦毛都会使电极失效。
-
测量完毕,转换板断电后,请及时将pH电极与转换板断开连接。pH电极不可长时间接在未供电的转换板上。
技术规格
-
信号转换板(变送板)V2:
- 供电电压:3.3~5.5V
- 输出电压:0~3.0V
- 电极接口:BNC
- 信号接口:PH2.0-3P
- 测量精度:±0.1@25℃
- 板子尺寸:42mm*32mm
-
pH电极:
- 电极类型:实验室级电极
- 检测范围:0~14
- 温度范围:5~60℃
- 零点:7±0.5
- 响应时间:<2min
- 内阻:<250MΩ
- 寿命:>0.5年(与使用频率有关)
- 线缆长度:100cm
引脚说明:
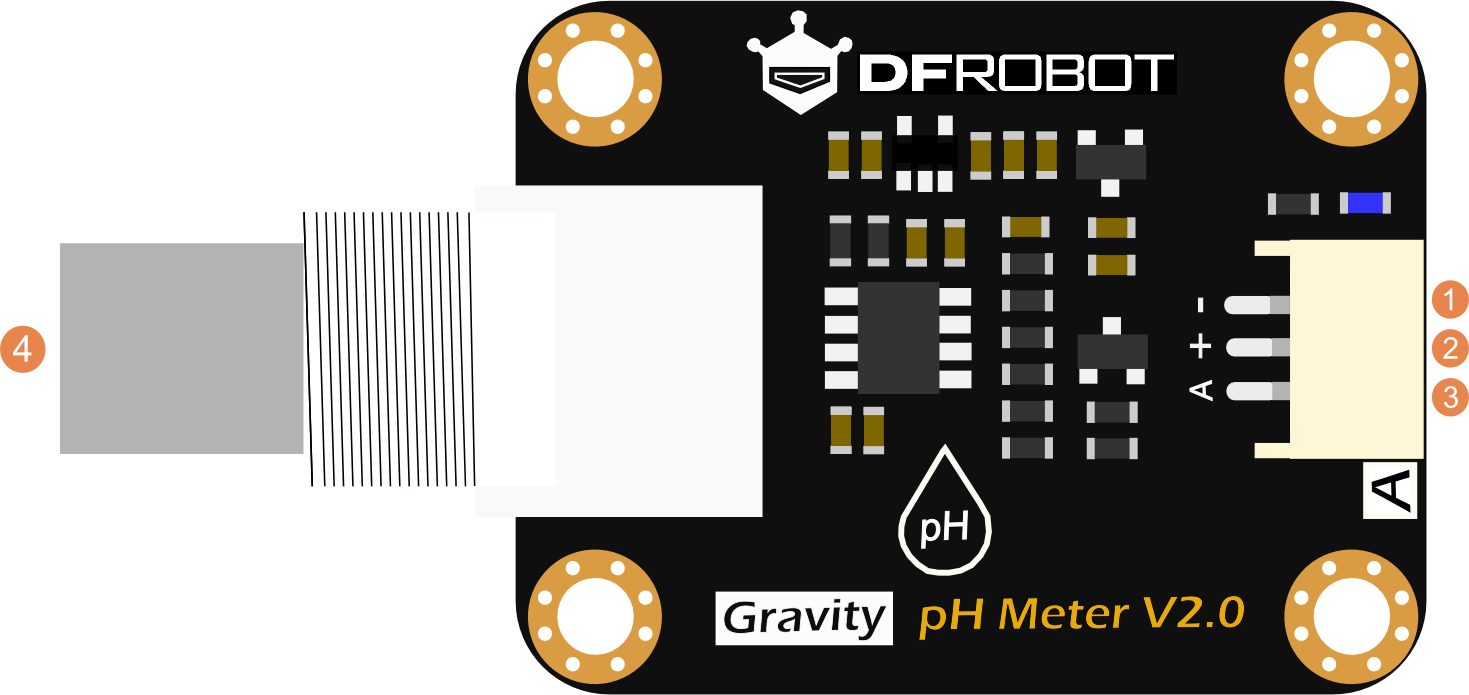
| 标号 | 名称 | 功能描述 |
|---|---|---|
| 1 | - | 供电电源负极(0V) |
| 2 | + | 供电电源正极(3.3~5.5V) |
| 3 | A | 模拟量输出(0~3.0V) |
| 4 | BNC | pH电极接口 |
使用教程
本教程将演示如何使用这款pH计进行校准与测量。请仔细阅读每个步骤。
测量另一种溶液之前,务必清洗好pH电极并用吸纸吸干残余水滴,防止溶液间交错污染。推荐使用蒸馏水清洗pH电极。
准备
- 硬件
- 1 x Arduino UNO主控板(或类似主控板)
- 1 x pH计V2信号转换板(变送板)
- 1 x pH电极
- 1 x 4.0 pH标准液
- 1 x 7.0 pH标准液
- 1 x 模拟传感器连接线(或杜邦线)
- 1 x 被测溶液
- 软件
- Arduino IDE (1.0.x 或1.8.x), 点击下载Arduino IDE
接线图
pH电极使用前,先从保护盖中取出电极, 然后按照如下图所示的方式连线。

校准
为保证测量精度,初次使用的电极,或者使用了一段时间的电极,需要进行校准。
本教程采用2点校准,因此需要4.0和7.0的pH标准液。
下面将详细说明如何进行2点校准。
-
1.上传样例代码至arduino主控板中,上传完毕后,打开串口监视器,即可看到温度与pH。如自行添加了温度传感器,务必写好相应的功能函数代码并调用。
-
2.用蒸馏水清洗电极,然后用吸水纸吸干残余水滴。将pH电极插入到7.0的pH标准液中,轻轻搅拌,等待数值稳定。
-
3.待数值稳定后,即可进行第一点的校准。具体步骤如下:
- 1.在串口监视器中输入enterph指令,进入校准模式。

- 2.输入calph指令进行校准,校准成功与否会有相应的提示。程序会自动识别2种pH标准液:4.0和7.0。本例会自动识别出7.0的pH标准液。

- 3.校准完毕后,输入exitph指令,保存好相关参数并退出校准模式。必须输入exitph指令后,相关参数才能保存下来。

- 4.经过上述步骤,第一点的校准就完成了。下面进行第二点的校准。
-
4.用蒸馏水清洗电极,然后用吸水纸吸干残余水滴。将pH电极插入到4.0的pH准液中,轻轻搅拌,等待数值稳定。
-
5.待数值稳定后,即可进行第二点的校准。与第一点校准步骤一致,具体步骤如下:
1.在串口监视器中输入enterph指令,进入校准模式。

2.输入calph指令进行校准,校准成功与否会有相应的提示。程序会自动识别2种pH标准液:4.0和7.0。本例会自动识别出4.0的pH标准液。

3.校准完毕后,输入exitph指令,保存好相关参数并退出校准模式。必须输入exitph指令后,相关参数才能保存下来。

4.经过上述步骤,第二点的校准就完成了。
- 6.完成上述步骤后,2点校准就完成了,之后就可用于实际的测量。校准过程中的相关参数已经保存至主控板的EEPROM中。
样例代码
请先下载DFRobot_PH库文件,然后安装。如何安装库?
    /*
     * file DFRobot_PH.ino
     * @ https://github.com/DFRobot/DFRobot_PH
     *
     * This is the sample code for Gravity: Analog pH Sensor / Meter Kit V2, SKU:SEN0161-V2
     * In order to guarantee precision, a temperature sensor such as DS18B20 is needed, to execute automatic temperature compensation.
     * You can send commands in the serial monitor to execute the calibration.
     * Serial Commands:
     *   enterph -> enter the calibration mode
     *   calph   -> calibrate with the standard buffer solution, two buffer solutions(4.0 and 7.0) will be automaticlly recognized
     *   exitph  -> save the calibrated parameters and exit from calibration mode
     *
     * Copyright   [DFRobot](https://www.dfrobot.com), 2018
     * Copyright   GNU Lesser General Public License
     *
     * version  V1.0
     * date  2018-04
     */

    #include "DFRobot_PH.h"
    #include <EEPROM.h>

    #define PH_PIN A1
    float voltage,phValue,temperature = 25;
    DFRobot_PH ph;

    void setup()
    {
        Serial.begin(115200);
        ph.begin();
    }

    void loop()
    {
        static unsigned long timepoint = millis();
        if(millis()-timepoint>1000U){                  //time interval: 1s
            timepoint = millis();
            //temperature = readTemperature();         // read your temperature sensor to execute temperature compensation
            voltage = analogRead(PH_PIN)/1024.0*5000;  // read the voltage
            phValue = ph.readPH(voltage,temperature);  // convert voltage to pH with temperature compensation
            Serial.print("temperature:");
            Serial.print(temperature,1);
            Serial.print("^C  pH:");
            Serial.println(phValue,2);
        }
        ph.calibration(voltage,temperature);           // calibration process by Serail CMD
    }

    float readTemperature()
    {
      //add your code here to get the temperature from your temperature sensor
    }
常见问题
***Q1.***pH电极使用多长时间后需要校准?
A.校准的间隔和使用频率有一定关系。通常情况下,一个月校准一次即可。如使用频繁,可一个星期校准一次。校准时,尽量使用新鲜的pH标准液。
***Q2.***校准过程中,是否必须完成2点校准?可否只完成1点校准?
A. 要求不高的情况下,可只用中性标准液(7.0)进行校准,称为单点校准,用来确认pH电极的实际零点,此时斜率采用理论值。然后再用酸性标准液(4.0)进行校准,即可确认pH电极的实际斜率。因此,为了保证测量精度,推荐使用2点校准。
***Q3.***第一次校准时,总是校准失败,或者打印出异常的值,可能是什么原因?
A. 校准时,相关的参数是保存在EEPROM中指定的位置的。如果之前恰好有保存过其他参数到EEPROM中的这个地址,可能会有冲突,导致不能正常校准。可用下述代码,擦除EEPROM中指定位置的内容。运行一次即可,然后重新上传样例代码,再进行校准操作。
 /*
 This code will reset the corresponding EEPROM used by DFRobot Gravity pH Meter V2, SKU: SEN0161-V2.
 When uploaded this code, please open the serial monitor of the Ardino IDE. The correct value of the EEPROM block should be 255.
 */
#include <EEPROM.h>
#define PHADDR 0x00
void setup()
{
  Serial.begin(115200);
  for(int i = 0;i < 8; i++ )
  {
     EEPROM.write(PHADDR+i, 0xFF);// write defaullt value to the EEPROM
     delay(10);
  }
}
void loop()
{
  static int a = 0, value = 0;
  value = EEPROM.read(PHADDR+a);
  Serial.print(PHADDR+a,HEX);
  Serial.print(":");
  Serial.print(value);// print the new value of EEPROM block used by EC meter. The correct is 255.
  Serial.println();
  delay(10);
  a = a + 1;
  if (a == 8)
    while(1);
}
更多问题及有趣的应用,可以 访问论坛 进行查阅或发帖。
pH电极维护事项
-
电极在初次使用或久置不用后重新使用时,需要把电极球泡及砂芯浸在3NKCL溶液中活化8小时。
-
pH电极头部的敏感玻璃泡(在塑料保护栅内)不得与硬物接触,任何破损和擦毛都会使电极失效。
-
测量完毕不用时,应将电极保护盖套上,保护盖内应放少量3mol/L KCL溶液,以保持电极球泡的湿润。
-
电极的引出端(插头),必须保持清洁和干燥,绝对防止输出两端短路,否则将导致测量结果失准或电极失效。
-
电极应避免长期浸在蒸馏水、蛋白质、酸性氟化物溶液中,并防止和有机硅油脂接触。
-
电极经长期使用后,如发现电极的百分理论斜率(PTS)略有降低,则可把电极下端浸泡在4%HF(氢氟酸)中3~5秒钟,用蒸馏水洗净,然后在0.1mol/l HCl溶液中浸泡几小时,用去离子水冲洗干净,使之复新。
-
被测溶液中如含有易污染敏感球泡或堵塞液接界的物质,会使电极钝化,其现象是百分理论斜率(PTS)降低、响应时间长、读数不稳定。为此, 应根据污染物质的性质,以适当溶液清洗,使之复新。
-
选用清洗剂时,如能溶解聚碳酸树脂的清洗液,如四氯化碳,三氯乙烯,四氢呋喃等,则可能把聚碳酸树脂溶解后,沾污敏感玻璃球泡表面,而使电极失效,请慎用!
