产品介绍
为了让你在自己的Arduino项目中运用这一火爆的无线通讯功能,我们特别开发了Arduino兼容的NFC近场通讯模块。该产品100%兼容Arduino设备,运用UART串口进行通讯。你可以运用USB to UART转换器,轻松通过电脑对其进行测试。用户也可根据自己需要,利用引出的管脚改变数据传输方式,如I2C,SPI等。 我们把内置的PCB天线做到了一张银行卡大小,为目前市场上最大,有效提高了NFC的通信距离。
- 读写器模式:支持ISO/IEC 14443A / MIFARE机制
- 读写器模式:支持 FeliCa机制
- 读写器模式:支持ISO/IEC 14443B机制
- 卡操作模式:支持ISO 14443A / MIFARE机制
- 卡操作模式:FeliCa机制 ISO/IEC18092,ECM340点对点
产品应用
- 非接触式支付系统
- 蓝牙和wi-fi设备的链接
- 分享联系人、照片和视屏等社交分享功能
- 智能手机的NFC应用
近场通讯简介
近场通信(Near Field Communication,NFC),又称近距离无线通信,是一种短距离的高频无线通信技术,允许电子设备之间进行非接触式点对点数据传输(在十厘米内)交换数据。这个技术由免接触式射频识别(RFID)演变而来,并向下兼容RFID,最早由Sony和Philips各自开发成功,主要用于手机等手持设备中提供M2M(Machine to Machine)的通信。由于近场通讯具有天然的安全性,因此,NFC技术被认为在手机支付等领域具有很大的应用前景。同时,NFC也因为其相比于其他无线通讯技术较好的安全性被中国物联网校企联盟比作机器之间的“安全对话”。
产品特性
- 工作电压:3.3v或5v
- 通信接口:UART
- 出厂通信波特率:115200 bps
- 高度集成的PN532 NFC芯片
- 支持ISO/IEC 14443A / MIFARE
- 只读写器模式中支持ISO/IEC 14443B
- NFC最大探测距离为20到50mm,视标签的天线大小而定
- 该NFC模块基于13.56MHz频段
代码编程
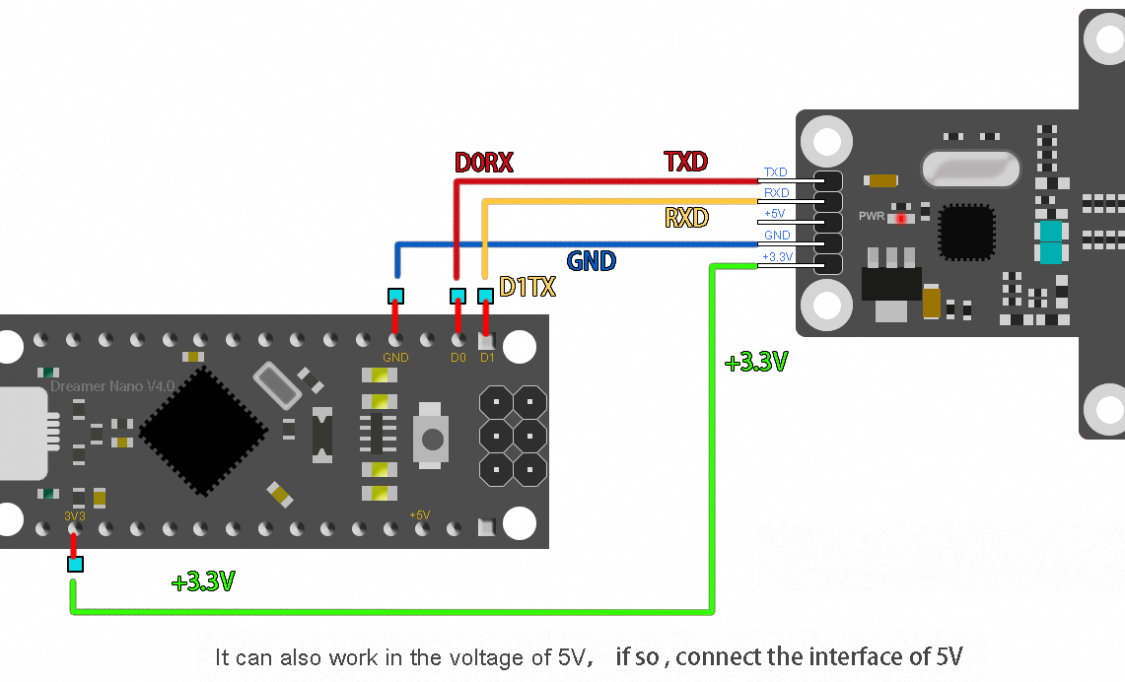
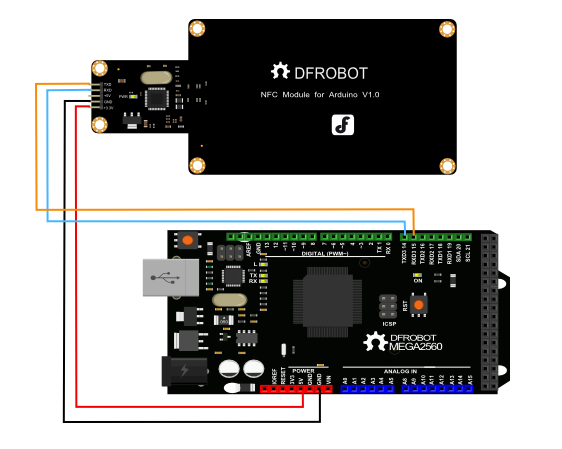
连线图
主控板链接到电脑,下载好程序。再按图接好NFC和控制板(这里用的是Leonardo主控板,UNO没有Serial1,因此注意修改程序,如有不明,请百度查阅相关资料。),当NFC卡靠近NFC模块时,即可通过Arduino串口窗读取NFC卡片信息。
| NFC模块 | Leonardo |
|---|---|
| 3.3V | 3.3V |
| GND | GND |
| TXD | Digital 0(RX1) |
| RXD | Digital 1(TX1) |
| NFC模块 | Mega |
|---|---|
| 3.3V | 3.3V |
| GND | GND |
| TXD | Digital 19(RX1) |
| RXD | Digital 18(TX1) |
样例代码
/*

 # Editor : Adrian
 # Date   : 2013.04.18
 # Ver    : 0.1
 # Product: NFC Module for Arduino
 # SKU    : DFR0231

 # Description:
 # When the a card close to the device , the PC will receive the data
 # Connect the NFC Card's TXD, RXD, GND, +3.3V to leonardo's D0RX, D1TX, GND, +3.3V
 # Or connect the NFC Card's TXD, RXD, GND, +5V to leonardo's D0RX, D1TX, GND, +5V


 PN532 reads the tag by Arduino mega/Leonardo
 command list:

 #wake up reader
 send: 55 55 00 00 00 00 00 00 00 00 00 00 00 00 00 00 ff 03 fd d4 14 01 17 00
 return: 00 00 FF 00 FF 00 00 00 FF 02 FE D5 15 16 00

 #get firmware
 send: 00 00 FF 02 FE D4 02 2A 00
 return: 00 00 FF 00 FF 00 00 00 FF 06 FA D5 03 32 01 06 07 E8 00

 #read the tag
 send: 00 00 FF 04 FC D4 4A 01 00 E1 00
 return: 00 00 FF 00 FF 00 00 00 FF 0C F4 D5 4B 01 01 00 04 08 04 XX XX XX XX 5A 00
 XX is tag.

 */

 //************* start **************

const unsigned char wake[24]={
  0x55, 0x55, 0x00, 0x00, 0x00, 0x00, 0x00, 0x00, 0x00, 0x00, \
0x00, 0x00, 0x00, 0x00, 0x00, 0x00, 0xff, 0x03, 0xfd, 0xd4, 0x14, 0x01, 0x17, 0x00};//wake up NFC module
const unsigned char firmware[9]={
  0x00, 0x00, 0xFF, 0x02, 0xFE, 0xD4, 0x02, 0x2A, 0x00};//
const unsigned char tag[11]={
  0x00, 0x00, 0xFF, 0x04, 0xFC, 0xD4, 0x4A, 0x01, 0x00, 0xE1, 0x00};//detecting tag command
const unsigned char std_ACK[25] = {
  0x00, 0x00, 0xFF, 0x00, 0xFF, 0x00, 0x00, 0x00, 0xFF, 0x0C, \
0xF4, 0xD5, 0x4B, 0x01, 0x01, 0x00, 0x04, 0x08, 0x04, 0x00, 0x00, 0x00, 0x00, 0x4b, 0x00};
unsigned char old_id[5];

unsigned char receive_ACK[25];//Command receiving buffer
//int inByte = 0;               //incoming serial byte buffer

#if defined(ARDUINO) && ARDUINO >= 100
#include "Arduino.h"
#define print1Byte(args) Serial1.write(args)
#define print1lnByte(args)  Serial1.write(args),Serial1.println()
#else
#include "WProgram.h"
#define print1Byte(args) Serial1.print(args,BYTE)
#define print1lnByte(args)  Serial1.println(args,BYTE)
#endif

void setup()
{
  Serial.begin(9600);   // open serial with PC
  Serial1.begin(115200);    //open serial1 with device
  //Serial2.begin(115200);
  wake_card();
  delay(100);
  read_ACK(15);
  delay(100);
  display(15);


}

void loop()
{
  send_tag();
  read_ACK(25);
  delay(100);
  if (!cmp_id ()) {
    if (test_ACK ()) {
      display (25);
      delay (100);
    }
  }
  copy_id ();
}


void copy_id (void)
{//save old id
  int ai, oi;
  for (oi=0, ai=19; oi<5; oi++,ai++) {
    old_id[oi] = receive_ACK[ai];
  }
}


char cmp_id (void)
{//return true if find id is old
  int ai, oi;
  for (oi=0,ai=19; oi<5; oi++,ai++) {
    if (old_id[oi] != receive_ACK[ai])
      return 0;
  }
  return 1;
}


int test_ACK (void)
{// return true if receive_ACK accord with std_ACK
  int i;
  for (i=0; i<19; i++) {
    if (receive_ACK[i] != std_ACK[i])
      return 0;
  }
  return 1;
}


void send_id (void)
{//send id to PC
  int i;
  Serial.print ("ID: ");
  for (i=19; i<= 23; i++) {
    Serial.print (receive_ACK[i], HEX);
    Serial.print (" ");
  }
  Serial.println ();
}


void UART1_Send_Byte(unsigned char command_data)
{//send byte to device
  print1Byte(command_data);
#if defined(ARDUINO) && ARDUINO >= 100
  Serial1.flush();// complete the transmission of outgoing serial data
#endif
}


void UART_Send_Byte(unsigned char command_data)
{//send byte to PC
  Serial.print(command_data,HEX);
  Serial.print(" ");
}


void read_ACK(unsigned char temp)
{//read ACK into reveive_ACK[]
  unsigned char i;
  for(i=0;i<temp;i++) {
    receive_ACK[i]= Serial1.read();
  }
}


void wake_card(void)
{//send wake[] to device
  unsigned char i;
  for(i=0;i<24;i++) //send command
    UART1_Send_Byte(wake[i]);
}


void firmware_version(void)
{//send fireware[] to device
  unsigned char i;
  for(i=0;i<9;i++) //send command
    UART1_Send_Byte(firmware[i]);
}


void send_tag(void)
{//send tag[] to device
  unsigned char i;
  for(i=0;i<11;i++) //send command
    UART1_Send_Byte(tag[i]);
}


void display(unsigned char tem)
{//send receive_ACK[] to PC
  unsigned char i;
  for(i=0;i<tem;i++) //send command
    UART_Send_Byte(receive_ACK[i]);
  Serial.println();
}


//*********** end *************
应用实例
Mind+ 上传模式编程
1、下载及安装软件。下载地址:https://www.mindplus.cc 详细教程:Mind+基础wiki教程-软件下载安装
2、选择“上传模式”或“实时模式”。 详细教程:Mind+基础wiki教程-上传模式编程流程
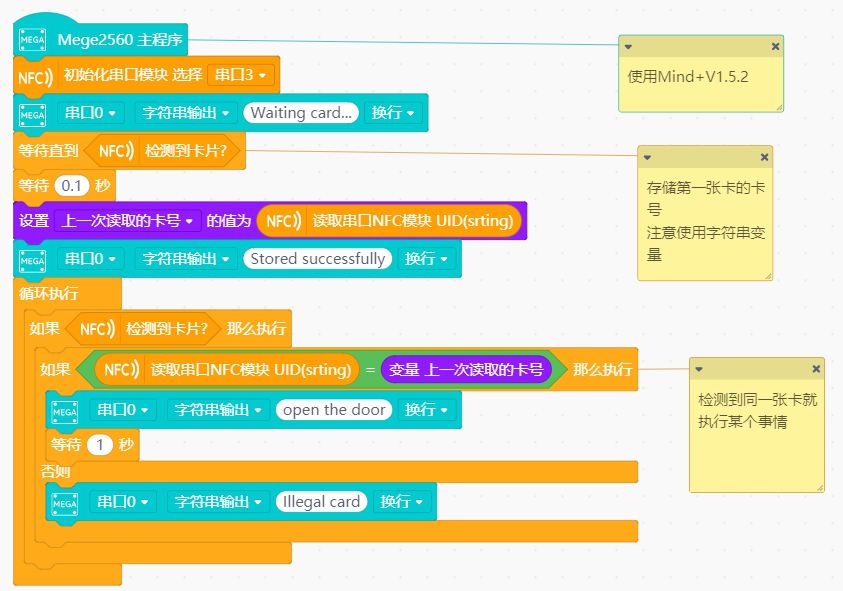
3、“扩展”中选择“主控板”中的“mega2560”。加载“通信模块”中的“nfc模块” 详细教程:Mind+基础wiki教程-加载扩展库流程
4、进行编程。
5、连接mega2560板与电脑,菜单“连接设备”,“上传到设备”
以下样例程序:点此下载
准备
- mega2560主控板 x1 (microbit或esp32板均可)
- nfc模块 x1
- NFC卡片 x2
- A-B usb线 x1
连线图如下:
nfc卡片的tx接到mega2560的COM3的rx(D15),rx接到mega2560的COM3的tx(D14)
读卡
样例1
开机读取一张nfc卡片,之后再次刷刚才的卡和刷其他的卡提示不同的内容
程序
结果

写卡
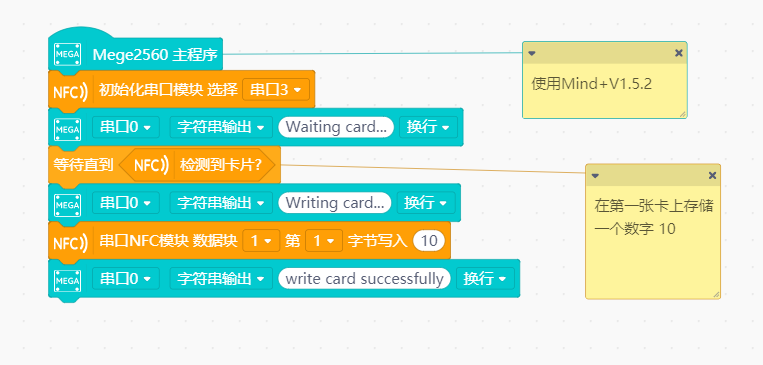
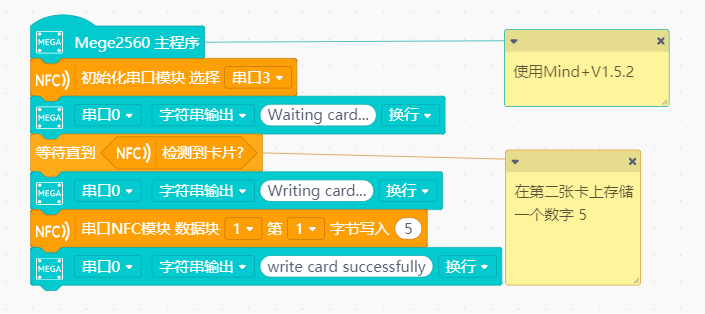
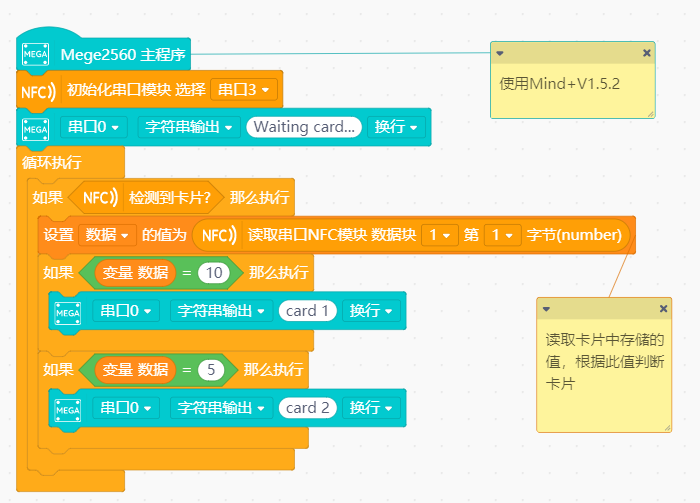
样例2
在两不同的卡中分别存储不同的数据,之后读取此数,根据数据的不同分辨出不同的卡片。
此效果可以将一批NFC卡进行分类处理。
第一步 写卡1
效果

第二步 写卡2
效果
第三步 读卡
效果

