概述
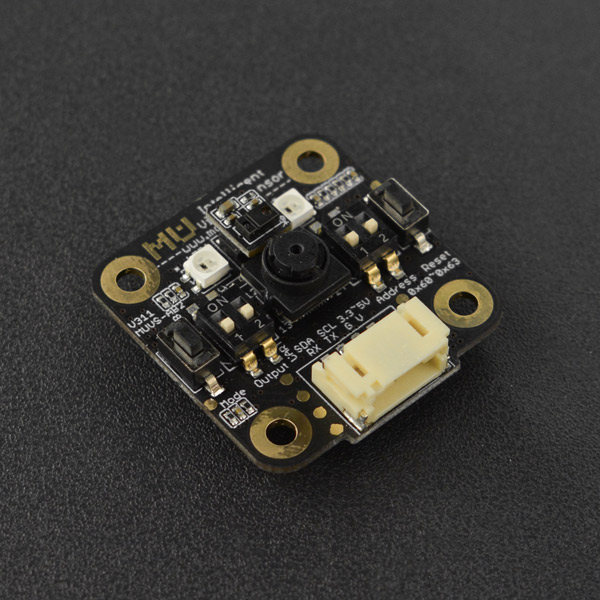
打开智能时代,从视觉开始。一款内置深度学习引擎的图像识别传感器来了,拥有和四枚一元硬币大小相当的小巧体积,采用30W广角镜头,含有多种视觉算法,能够实现机器人自主智能(比如寻球投篮,沿着箭头指示走完规定路线等),让机器人面对环境中的随机事件时能自主触发适合的行为。
传感器可以识别多种目标物体,例如颜色检测,球体检测,人体检测,卡片识别等,检测结果可通过UART或I2C方式进行输出。内置算法均在本地处理,无需联网就可进行图像识别,而且通过板载USB串口即可实现传感器模块的参数设定和固件更新,支持UART,I2C,WIFI通讯方式。适用于Arduino及micro:bit嵌入式平台,提供图形化编程软件Mind+的支持,无论你是哪个平台的创客爱好者,我们都能让你体验到它的能力。
通过小MU视觉传感器可完成一些智能化应用,比如智能打印扫描小车、智能无人车、寻球投篮机器人等,可广泛应用于智能玩具、人工智能教具、创客产品等领域。
图像识别是对光源、色彩、背景、物体移动速度等因素十分敏感的技术,使用环境的差异会对图像检测结果将产生不同的影响,为了获取较好的识别结果:
- 避免在过暗、过亮、强逆光的环境下使用,比如昏暗的房间,具有强烈光亮差别的窗边等;
- 避免让灯光或强烈阳光直射目标物体,避免造成物体反光;
- 避免在彩色灯光或可变换的灯光下使用,稳定均匀的白色是最好的光源;
- 避免正对光源使用;
- 颜色敏感型算法不要在有近似颜色的背景下使用,比如绿色网球不要在绿色地毯上使用;
- 避免在有类似目标物体的环境下使用,避免误报,比如球体检测旁边有一个橙子;
⚠注意:本传感器支持Mind+图形化编程,详细教程见本页面后续章节。
特性
小MU视觉传感器具有如下优点:
- 能够做出丰富多样的视觉课程应用
- 智能打印扫描小车
- 智能无人车
- 寻球投篮机器人等
- 体积小巧,功耗极低
- 易于使用:支持UART,I2C,WIFI通讯方式,适用于Arduino及micro:bit嵌入式平台
- 应用广泛
- 安全可靠,无需网络:所有视觉识别算法都于本地进行处理,无须联网,不受网络状况所限制,无需担忧隐私泄露
产品参数
- 处理器:双核,240MHz
- 摄像头:Omnivision ov7725
- 摄像头分辨率:640x480
- 视场角:90°(对角线)
- 辅助灯:2个LED辅助灯
- 尺寸:3.2cm*3.2cm*1.2cm
- 数据输出接口:UART/I2C
- 供电电压:5V
- 可识别目标
- 人(依据上半身轮廓)
- 球(乒乓球与网球)
- 定制的卡片20张(3组-----5张交通卡片、5张形状、10张数字)
- 颜色(视野内指定位置输出指定颜色,指定颜色输出在视野内的位置)
- 最新开发功能
- wifi图传(模块做为AP)
- 运动轨迹检测(检测手部上下左右运动轨迹,非手势检测)
详细教程见如下文档:
WIFI图传与运动轨迹检测.pdf
引脚说明
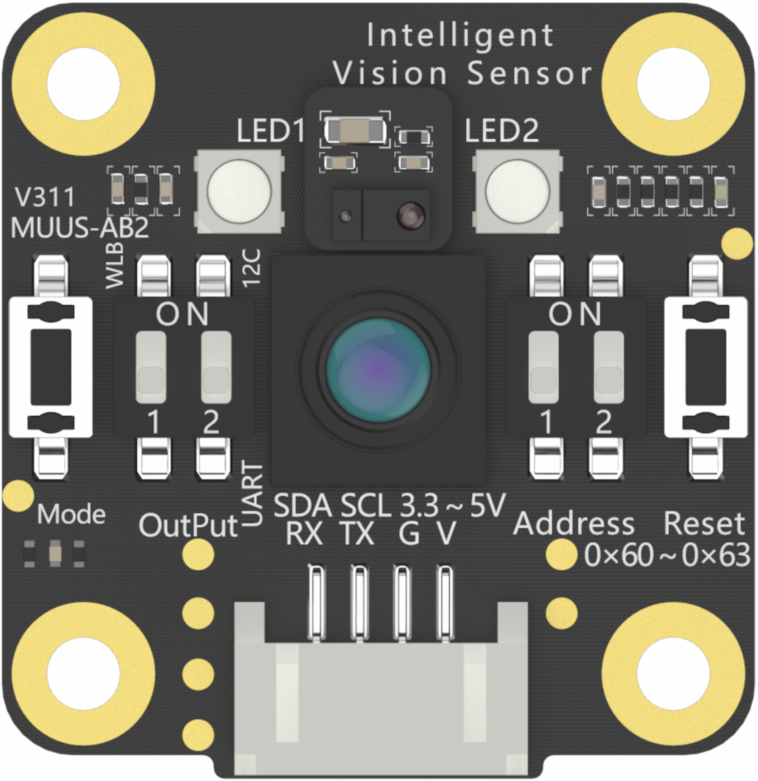
| 编号 | 功能描述 |
|---|---|
| G | 地(GND) |
| V | 电源输入(兼容3.3V和5V) |
| TX | 串口发送端 |
| RX | 串口接收端 |
| SCL | 控制线 |
| SDA | 数据线 |
分类标签
人体识别
无分类标签
球体识别
| 分类标签 | 目标物体 |
|---|---|
| 1 | 2 |
| 橙色乒乓球 | 绿色网球 |
颜色识别
| 分类标签 | 目标物体 | 分类标签 | 目标物体 |
|---|---|---|---|
| 1 | 黑色(深灰色) | 2 | 白色(浅灰色) |
| 3 | 红色 | 4 | 黄色(橙色) |
| 5 | 绿色 | 6 | 青色(蓝绿色) |
| 7 | 蓝色 | 8 | 紫色 |
| 0 | 未知 | / | / |
卡片识别
图形卡片
| 分类标签 | 目标物体 | 分类标签 | 目标物体 |
|---|---|---|---|
| 1 | 对号图案 | 2 | 叉号图案 |
| 3 | 圆形图案 | 4 | 方形图案 |
| 5 | 三角形图案 | 0 | 无效 |
交通卡片
| 分类标签 | 目标物体 | 分类标签 | 目标物体 |
|---|---|---|---|
| 1 | 前进 | 2 | 左转 |
| 3 | 右转 | 4 | 掉头 |
| 5 | 停止 | 0 | 无效 |
数字卡片
| 分类标签 | 目标物体 | 分类标签 | 目标物体 |
|---|---|---|---|
| 1 | 数字1 | 2 | 数字2 |
| 3 | 数字3 | 4 | 数字4 |
| 5 | 数字5 | 6 | 数字6 |
| 7 | 数字7 | 8 | 数字8 |
| 9 | 数字9 | 0 | 数字0 |
输出模式及地址选择
传感器有UART和I2C两种输出模式,不同模式下需通过拨码开关进行调整,开关下方标有Output的为输出模式拨码开关
传感器有4种地址可选择,地址范围为0x60-0x63,该范围内的地址在两种模式下通用,不同地址需通过拨码开关进行调整,开关下方标有Address的为地址拨码开关
输出模式选择
采用 2 位拨码开关来选择信号输出类型,定义见下表:
| 拨码1 | wifi开关 | 拨码2 | 信号输出类型 |
|---|---|---|---|
| 0 | 禁止使用Wifi功能* | 0 | UART通讯方式 |
| 1 | 允许使用Wifi功能* | 1 | I2C通讯方式 |
注1:*所示功能,当前版本尚不具备
注2:向上拨动为1,向下拨动为0
地址选择
采用 2 位拨码开关来选择信号输出类型,定义见下表:
| 拨码1 | 拨码2 | 设备地址 |
|---|---|---|
| 0 | 0 | 0x60 |
| 0 | 1 | 0x61 |
| 1 | 0 | 0x62 |
| 1 | 1 | 0x63 |
注1:UART模式下可使用0x00作为广播地址
注2:向上拨动为1,向下拨动为0
模块通讯协议
协议格式
| 1 | 2 | 3 | 4 | 5 | 6 | 7 |
|---|---|---|---|---|---|---|
| START | LEN | ADDR | CMD | DATA | CHK | END |
START:起始码,始终为0xFF
LEN:长度,从起始码到结束码所有的字节数
ADDR:设备地址,范围0x60~0x63,初次使用默认地址为0x60,特别的:0x00为广播地址,所有设备都会接收
CMD:指令码/应答码
DATA:数据,详见各指令码介绍
CHK:校验码,从START至DATA所有字节累加求和
例:FF 08 60 01 20 03 8B ED 其中8B为校验码,0xFF+0x08+0x60+0x01+0x20+0x03 = 0x8B
END:结束码,始终为0xED
应答码
| 应答正确 | 应答错误 | 未知错误 | 超时错误 | 校验错误 | 长度错误 | 指令错误 | 地址错误 | 参数错误 | 写入错误 |
|---|---|---|---|---|---|---|---|---|---|
| 0xE0 | 0xE1 | 0xE2 | 0xE3 | 0xE4 | 0xE5 | 0xE6 | 0xE7 | 0xE8 | 0xE9 |
指令码
| 写寄存器 | 读寄存器 | 数据报文 | 请求报文 |
|---|---|---|---|
| 0x01 | 0x02 | 0x11 | 0x12 |
以上均是发送指令的代码,操作成功或操作失败会返回相对应的应答码
使用说明
使用步骤
- 设置 Address 地址
- 设置 Output 模式
- 版本校验
- 配置硬件参数
- 配置算法参数
- 读取检测结果
设置地址
通过拨码开关来设定 MU 的设备地址,详见6.2地址选择
设置输出模式
通过拨码开关来设定通讯方式,详见6.1输出模式选择
注:需要在设定完 Address 和 Output 之后再上电,已经上电的则需要按 reset 重启
版本校验
查询 PROTOCOL_VER 和 FIRMWARE_VER 寄存器来判断固件是否与手册一致,不一致则可能导致寄存器功能不同或算法版本区别
设置硬件参数
根据实际应用场景和需求寄存器相应的寄存器参数,主要涉及 CAMERA_CONF1,LED1,LED2 寄存器。
设置算法参数
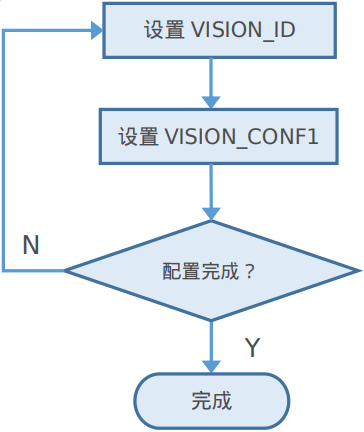
每个算法 VISION_ID 都具有相应的寄存器,在设置算法参数前需要先设置 VISION_ID(即选取识别对象类别)
读取检测结果
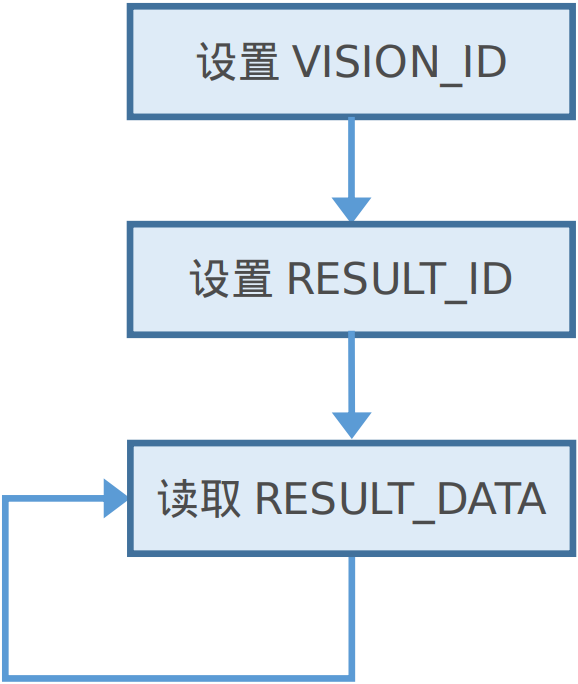
可通过UART或I2C读取检测结果
算法列表
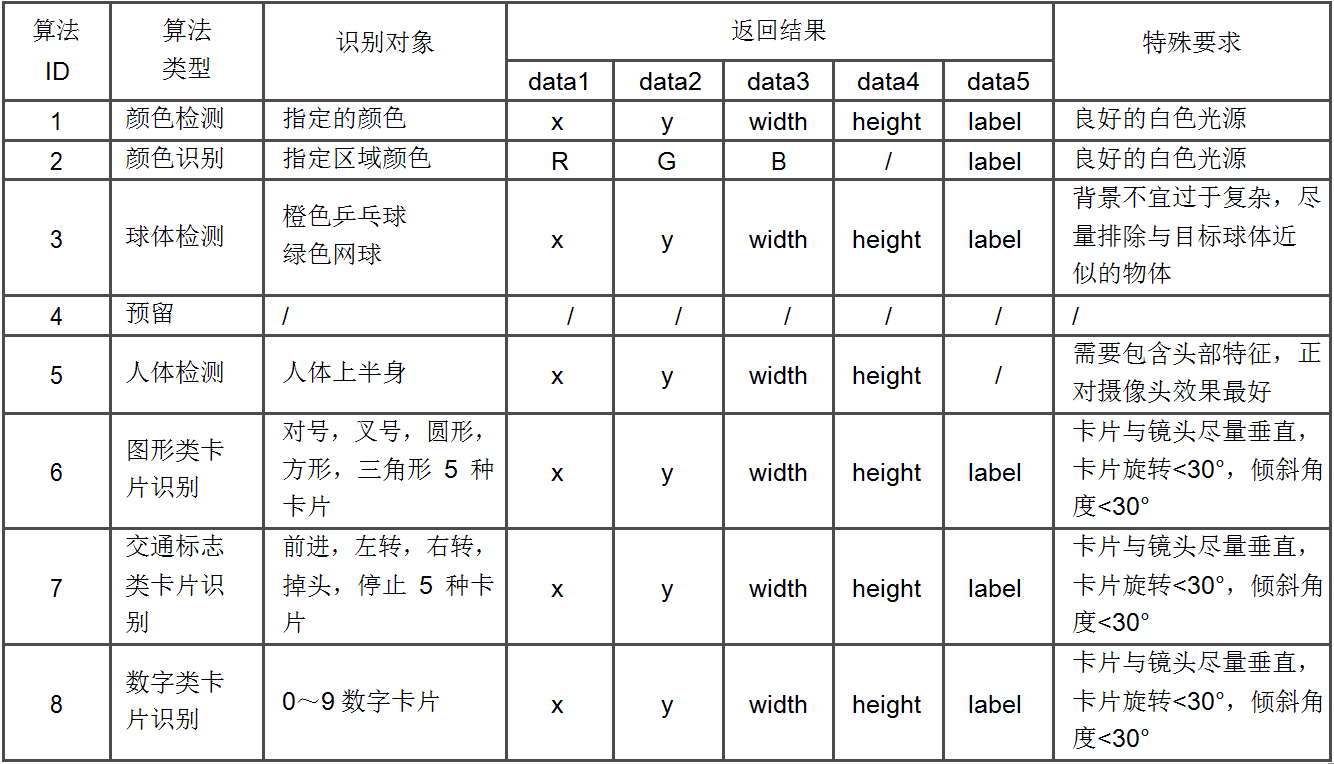
- id:算法类型编号
- num:目标物体数量
- x:水平中心坐标
- y:垂直中心坐标
- width:物体边缘宽度
- height:物体边缘高度
- label:分类标签编号,部分算法适用,详见分类标签
UART模式下Arduino使用教程
准备
- 硬件
- UNO x1
- 小MU视觉传感器 x1
- 连接线 x1
- 软件
- Arduino IDE 点击下载Arduino IDE
点击下载库文件库文件和示例
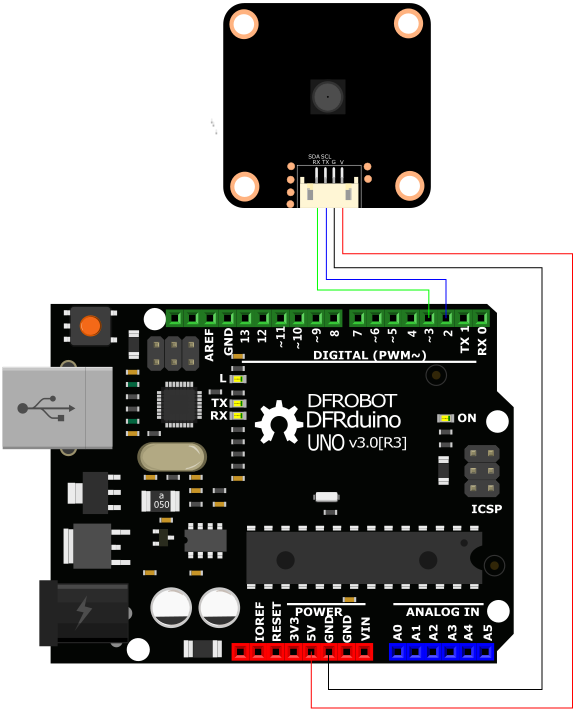
接线图
样例代码
/*!
 * @file getTargetPosition.ino
 * @brief Examples of get target position.
 * @copyright   Copyright (c) 2010 DFRobot Co.Ltd (http://www.dfrobot.com)
 * @license     The MIT license (MIT)
 * @author DFRobot
 * @version  V1.0
 * @date  2023-06-28
 * @https://github.com/DFRobot/DFRobot_MuVisionSensor
 */
#include <DFRobot_MuVisionSensor.h>
#include <Wire.h>
#include <SoftwareSerial.h>

/*
 * Choose communication mode define here:
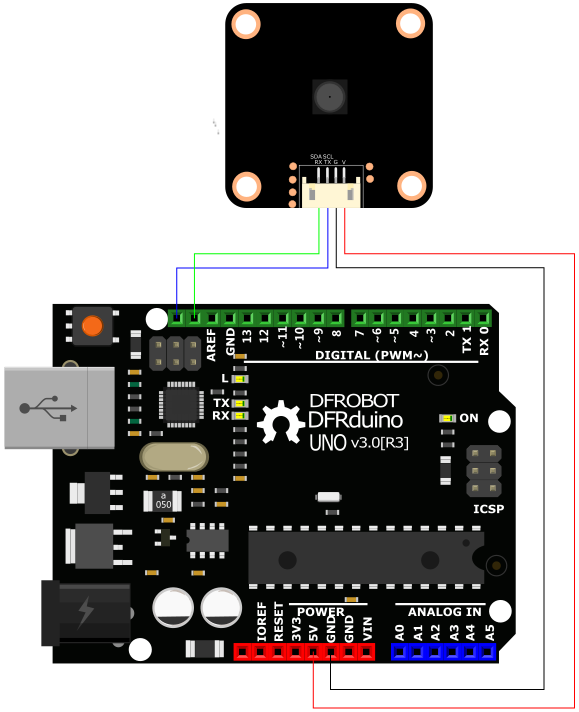
 *    I2C_MODE    : I2C mode, default pin: MU_SDA <==> ARDUINO_SDA, MU_SCL <==> ARDUINO_SCL
 *    SERIAL_MODE : Serial mode, default pin: MU_TX <==> ARDUINO_PIN2, MU_RX <==> ARDUINO_PIN3
 */
//#define I2C_MODE
#define SERIAL_MODE

/*
 * Choose MU address here: 0x60, 0x61, 0x62, 0x63
 */
#define MU_ADDRESS    0x60

/*
 * Change vision type here, VISION_TYPE:VISION_COLOR_DETECT
 *                                      VISION_COLOR_RECOGNITION
 *                                      VISION_BALL_DETECT
 *                                      VISION_BODY_DETECT
 *                                      VISION_SHAPE_CARD_DETECT
 *                                      VISION_TRAFFIC_CARD_DETECT
 *                                      VISION_NUM_CARD_DETECT
 */
#define VISION_TYPE     VISION_BALL_DETECT

#ifdef SERIAL_MODE
#define RX_PIN 2
#define TX_PIN 3
SoftwareSerial mySerial(RX_PIN, TX_PIN);
#endif
DFRobot_MuVisionSensor Mu(MU_ADDRESS);

void setup() {
  // put your setup code here, to run once:
  Serial.begin(9600);
  delay(500);

#ifdef I2C_MODE
  Wire.begin();
  Mu.begin(&Wire);              // initialized MU on I2C port
#elif defined SERIAL_MODE
  mySerial.begin(9600);
  Mu.begin(&mySerial);          // initialized MU on soft serial port
#endif

  Mu.visionBegin(VISION_TYPE);  // enable vision

  if (VISION_TYPE == VISION_COLOR_DETECT
      || VISION_TYPE == VISION_COLOR_RECOGNITION) {
    Mu.cameraSetAwb(kLockWhiteBalance); // lock AWB
    if (VISION_TYPE == VISION_COLOR_RECOGNITION) {
      Mu.write(VISION_TYPE, kXValue, 50);
      Mu.write(VISION_TYPE, kYValue, 50);
      Mu.write(VISION_TYPE, kWidthValue, 5);
      Mu.write(VISION_TYPE, kHeightValue, 5);
    }
  }
}

void loop() {
  // put your main code here, to run repeatedly:
  long timeStart = millis();

  // read result
  if (Mu.getValue(VISION_TYPE, kStatus)) {
    Serial.println("vision detected:");
    switch (VISION_TYPE) {
      case VISION_BALL_DETECT:
      case VISION_BODY_DETECT:
      case VISION_SHAPE_CARD_DETECT:
      case VISION_TRAFFIC_CARD_DETECT:
      case VISION_NUM_CARD_DETECT:
      case VISION_COLOR_DETECT:
        Serial.print("x = ");
        Serial.println(Mu.getValue(VISION_TYPE, kXValue));
        Serial.print("y = ");
        Serial.println(Mu.getValue(VISION_TYPE, kYValue));
        Serial.print("width = ");
        Serial.println(Mu.getValue(VISION_TYPE, kWidthValue));
        Serial.print("height = ");
        Serial.println(Mu.getValue(VISION_TYPE, kHeightValue));
        if (VISION_TYPE != VISION_COLOR_DETECT) {
          Serial.print("label = ");
          Serial.println(Mu.getValue(VISION_TYPE, kLabel));
        } else {
          Serial.print("color = ");
          Serial.println(Mu.getValue(VISION_TYPE, kLabel));
        }
        break;
      case VISION_COLOR_RECOGNITION:
        Serial.print("r = ");
        Serial.println(Mu.getValue(VISION_TYPE, kRValue));
        Serial.print("g = ");
        Serial.println(Mu.getValue(VISION_TYPE, kGValue));
        Serial.print("b = ");
        Serial.println(Mu.getValue(VISION_TYPE, kBValue));
        Serial.print("color = ");
        Serial.println(Mu.getValue(VISION_TYPE, kLabel));
        break;
      default:
        break;
    }
  } else {
    Serial.println("vision undetected.");
  }
  Serial.print("fps = ");
  Serial.println(1000/(millis()-timeStart));
  Serial.println();
}
输出结果:识别颜色时可输出颜色的RGB值及颜色分类标签;识别其它目标时输出其中心坐标值和其所围成的区域大小
上述程序识别的是交通卡片,串口输出信息为卡片中心坐标,卡片外框大小及分类标签(即和识别卡片的下方label数值保持一致),识别其它类型需在程序#define VISION_TYPE处更换识别种类,方能识别其它物体。
I2C模式下Arduino使用教程
准备
- 硬件
- UNO x1
- 小MU视觉传感器 x1
- 连接线 x1
- 软件
- Arduino IDE 点击下载Arduino IDE
接线图
识别球体样例代码(乒乓球和网球)
/*!
 * @file ball.ino
 * @brief Examples of identifying ball.
 * @copyright   Copyright (c) 2010 DFRobot Co.Ltd (http://www.dfrobot.com)
 * @license     The MIT license (MIT)
 * @author [WWZ](Wenzheng.wang@dfrobot.com)
 * @version  V1.0
 * @date  2023-06-28
 * @https://github.com/DFRobot/DFRobot_MuVisionSensor
 */
#include <Wire.h>

#define MU_ADDRESS    0x60
#define PROTOCOL_VER  0x03
#define VISION_ID     0x03      // ball

// register define
#define REG_PROTOCOL_VER  0x01
#define REG_LED1_CONF     0x06
#define REG_LED2_CONF     0x07
#define REG_LED_LEVEL     0x08
#define REG_CAMERA_CONF1  0x10
#define REG_FRAME_CNT     0x1F
#define REG_VISION_ID     0x20
#define REG_VISION_CONF1  0x21
#define REG_PARAM_VALUE5  0x29
#define RESULT_NUM        0x34
#define RESULT_DATA1      0x40
#define RESULT_DATA2      0x41
#define RESULT_DATA3      0x42
#define RESULT_DATA4      0x43
#define RESULT_DATA5      0x44
// color
#define MU_COLOR_BLACK                0x01U
#define MU_COLOR_WHITE                0x02U
#define MU_COLOR_RED                  0x03U
#define MU_COLOR_YELLOW               0x04U
#define MU_COLOR_GREEN                0x05U
#define MU_COLOR_CYAN                 0x06U
#define MU_COLOR_BLUE                 0x07U
#define MU_COLOR_PURPLE               0x08U

int i2cRead8(uint8_t reg) {
  Wire.beginTransmission(MU_ADDRESS);
  Wire.write(reg);
  Wire.endTransmission();

  Wire.requestFrom(MU_ADDRESS, 1);
  return Wire.read();
}
void i2cWrite8(const uint8_t reg, const uint8_t value) {
  Wire.beginTransmission(MU_ADDRESS);
  Wire.write(reg);
  Wire.write(value);
  Wire.endTransmission();
}

uint8_t reg[][2] = {
    { REG_VISION_ID,      VISION_ID }, // set vision type = vision_detect
    { REG_VISION_CONF1,   0x21 }, // vision begin
};
uint8_t frameCountLast = 0;

void setup() {
  // put your setup code here, to run once:
  Serial.begin(9600);
  Wire.begin();
  delay(500);

  if (i2cRead8(REG_PROTOCOL_VER) == PROTOCOL_VER) {
    Serial.println("device initialized.");
  } else {
    Serial.println("fail to initialize device! Please check protocol version.");
  }
  for (uint32_t i = 0; i < sizeof(reg)/2; ++i) {
    i2cWrite8(reg[i][0], reg[i][1]);
  }
}

void loop() {
  // put your main code here, to run repeatedly:
  long timeStart = millis();
  int frameCount = 0;
  // waiting for update
  do {
    frameCount = i2cRead8(REG_FRAME_CNT);
  } while(frameCount == frameCountLast);
  frameCountLast = frameCount;

  i2cWrite8(REG_VISION_ID, VISION_ID);
  // read result
  if (i2cRead8(RESULT_NUM) > 0) {
    Serial.println("ball detected:");
    Serial.print("x = ");
    Serial.println(i2cRead8(RESULT_DATA1));
    Serial.print("y = ");
    Serial.println(i2cRead8(RESULT_DATA2));
    Serial.print("width = ");
    Serial.println(i2cRead8(RESULT_DATA3));
    Serial.print("height = ");
    Serial.println(i2cRead8(RESULT_DATA4));
    Serial.print("label = ");
    switch(i2cRead8(RESULT_DATA5)) {
      case 1:
        Serial.println("Ping-Pong ball");
        break;
      case 2:
        Serial.println("Tennis");
        break;
      default:
        break;
    }
  } else {
    Serial.println("ball undetected.");
  }
  Serial.print("fps = ");
  Serial.println(1000/(millis()-timeStart));
  Serial.println();
}
输出结果:可识别目标球体,通过串口可观察到球体的中心坐标,球体外边框大小,分类标签
识别人体样例代码(依据上半身轮廓)
/*!
 * @file body.ino
 * @brief Examples of identifying body.
 * @copyright   Copyright (c) 2010 DFRobot Co.Ltd (http://www.dfrobot.com)
 * @license     The MIT license (MIT)
 * @author DFRobot
 * @version  V1.0
 * @date  2023-06-28
 * @https://github.com/DFRobot/DFRobot_MuVisionSensor
 */
#include <Wire.h>

#define MU_ADDRESS    0x60
#define PROTOCOL_VER  0x03
#define VISION_ID     0x05      // body

// register define
#define REG_PROTOCOL_VER  0x01
#define REG_LED1_CONF     0x06
#define REG_LED2_CONF     0x07
#define REG_LED_LEVEL     0x08
#define REG_CAMERA_CONF1  0x10
#define REG_FRAME_CNT     0x1F
#define REG_VISION_ID     0x20
#define REG_VISION_CONF1  0x21
#define REG_PARAM_VALUE5  0x29
#define RESULT_NUM        0x34
#define RESULT_DATA1      0x40
#define RESULT_DATA2      0x41
#define RESULT_DATA3      0x42
#define RESULT_DATA4      0x43
#define RESULT_DATA5      0x44
// color
#define MU_COLOR_BLACK                0x01U
#define MU_COLOR_WHITE                0x02U
#define MU_COLOR_RED                  0x03U
#define MU_COLOR_YELLOW               0x04U
#define MU_COLOR_GREEN                0x05U
#define MU_COLOR_CYAN                 0x06U
#define MU_COLOR_BLUE                 0x07U
#define MU_COLOR_PURPLE               0x08U

int i2cRead8(uint8_t reg) {
  Wire.beginTransmission(MU_ADDRESS);
  Wire.write(reg);
  Wire.endTransmission();

  Wire.requestFrom(MU_ADDRESS, 1);
  return Wire.read();
}
void i2cWrite8(const uint8_t reg, const uint8_t value) {
  Wire.beginTransmission(MU_ADDRESS);
  Wire.write(reg);
  Wire.write(value);
  Wire.endTransmission();
}

uint8_t reg[][2] = {
    { REG_VISION_ID,      VISION_ID }, // set vision type = vision_detect
    { REG_VISION_CONF1,   0x21 }, // vision begin
};
uint8_t frameCountLast = 0;

void setup() {
  // put your setup code here, to run once:
  Serial.begin(9600);
  Wire.begin();
  delay(500);

  if (i2cRead8(REG_PROTOCOL_VER) == PROTOCOL_VER) {
    Serial.println("device initialized.");
  } else {
    Serial.println("fail to initialize device! Please check protocol version.");
  }
  for (uint32_t i = 0; i < sizeof(reg)/2; ++i) {
    i2cWrite8(reg[i][0], reg[i][1]);
  }
}

void loop() {
  // put your main code here, to run repeatedly:
  long timeStart = millis();
  int frameCount = 0;
  // waiting for update
  do {
    frameCount = i2cRead8(REG_FRAME_CNT);
  } while(frameCount == frameCountLast);
  frameCountLast = frameCount;

  i2cWrite8(REG_VISION_ID, VISION_ID);
  // read result
  if (i2cRead8(RESULT_NUM) > 0) {
    Serial.println("body detected:");
    Serial.print("x = ");
    Serial.println(i2cRead8(RESULT_DATA1));
    Serial.print("y = ");
    Serial.println(i2cRead8(RESULT_DATA2));
    Serial.print("width = ");
    Serial.println(i2cRead8(RESULT_DATA3));
    Serial.print("height = ");
    Serial.println(i2cRead8(RESULT_DATA4));
  } else {
    Serial.println("body undetected.");
  }
  Serial.print("fps = ");
  Serial.println(1000/(millis()-timeStart));
  Serial.println();
}
输出结果:可识别人体,通过串口可观察到人体的中心坐标和所围成的大小,无分类标签
识别颜色样例代码
/*!
 * @file colorRecognition.ino
 * @brief Examples of color recognition.
 * @copyright   Copyright (c) 2010 DFRobot Co.Ltd (http://www.dfrobot.com)
 * @license     The MIT license (MIT)
 * @author DFRobot
 * @version  V1.0
 * @date  2023-06-28
 * @https://github.com/DFRobot/DFRobot_MuVisionSensor
 */
#include <Wire.h>

#define MU_ADDRESS    0x60
#define PROTOCOL_VER  0x03
#define VISION_ID     0x02

// register define
#define REG_PROTOCOL_VER  0x01
#define REG_LED1_CONF     0x06
#define REG_LED2_CONF     0x07
#define REG_LED_LEVEL     0x08
#define REG_CAMERA_CONF1  0x10
#define REG_FRAME_CNT     0x1F
#define REG_VISION_ID     0x20
#define REG_VISION_CONF1  0x21
#define REG_PARAM_VALUE1  0x25
#define REG_PARAM_VALUE2  0x26
#define REG_PARAM_VALUE3  0x27
#define REG_PARAM_VALUE4  0x28
#define RESULT_NUM        0x34
#define RESULT_DATA1      0x40
#define RESULT_DATA2      0x41
#define RESULT_DATA3      0x42
#define RESULT_DATA5      0x44
// color
#define MU_COLOR_BLACK                0x01U
#define MU_COLOR_WHITE                0x02U
#define MU_COLOR_RED                  0x03U
#define MU_COLOR_YELLOW               0x04U
#define MU_COLOR_GREEN                0x05U
#define MU_COLOR_CYAN                 0x06U
#define MU_COLOR_BLUE                 0x07U
#define MU_COLOR_PURPLE               0x08U

int i2cRead8(uint8_t reg) {
  Wire.beginTransmission(MU_ADDRESS);
  Wire.write(reg);
  Wire.endTransmission();

  Wire.requestFrom(MU_ADDRESS, 1);
  return Wire.read();
}
void i2cWrite8(const uint8_t reg, const uint8_t value) {
  Wire.beginTransmission(MU_ADDRESS);
  Wire.write(reg);
  Wire.write(value);
  Wire.endTransmission();
}

uint8_t reg[][2] = {
//    { REG_LED_LEVEL,      0x00 }, // LED will be closed automatically in this vision type.
//    { REG_LED1_CONF,      0x00 }, // LED1 color
//    { REG_LED2_CONF,      0x00 }, // LED2 color
    { REG_CAMERA_CONF1,   0x30 }, // lock AWB
    { REG_VISION_ID,      VISION_ID }, // set vision type = vision_recognition
    { REG_PARAM_VALUE1,   50 }, // x
    { REG_PARAM_VALUE2,   50 }, // y
//    { REG_PARAM_VALUE3,   5 }, // width
//    { REG_PARAM_VALUE4,   5 }, // height
    { REG_VISION_CONF1,   0x21 }, // vision begin
};
uint8_t frameCountLast = 0;

void setup() {
  // put your setup code here, to run once:
  Serial.begin(9600);
  Wire.begin();
  delay(500);

  if (i2cRead8(REG_PROTOCOL_VER) == PROTOCOL_VER) {
    Serial.println("device initialized.");
  } else {
    Serial.println("fail to initialize device! Please check protocol version.");
  }
  for (uint32_t i = 0; i < sizeof(reg)/2; ++i) {
    i2cWrite8(reg[i][0], reg[i][1]);
  }
  delay(1000); // waiting for AWB lock.
}

void loop() {
  // put your main code here, to run repeatedly:
  long timeStart = millis();
  int frameCount = 0;
  // waiting for update
  do {
    frameCount = i2cRead8(REG_FRAME_CNT);
  } while(frameCount == frameCountLast);
  frameCountLast = frameCount;

  i2cWrite8(REG_VISION_ID, VISION_ID);
  // read result
  if (i2cRead8(RESULT_NUM) > 0) {
    Serial.println("color detected:");
    Serial.print("color = (");
    Serial.print(i2cRead8(RESULT_DATA1));
    Serial.print(",");
    Serial.print(i2cRead8(RESULT_DATA2));
    Serial.print(",");
    Serial.print(i2cRead8(RESULT_DATA3));
    Serial.print(")\nlabel = ");
    switch (i2cRead8(RESULT_DATA5)) {
      case 0:
        Serial.println("unknow color");
        break;
      case 1:
        Serial.println("black");
        break;
      case 2:
        Serial.println("white");
        break;
      case 3:
        Serial.println("red");
        break;
      case 4:
        Serial.println("yellow");
        break;
      case 5:
        Serial.println("green");
        break;
      case 6:
        Serial.println("cyan");
        break;
      case 7:
        Serial.println("blue");
        break;
      case 8:
        Serial.println("violet");
        break;
      default:
        break;
    }
  } else {
    Serial.println("color undetected.");
  }
  Serial.print("fps = ");
  Serial.println(1000/(millis()-timeStart));
  Serial.println();
}
输出结果:可识别相对应的颜色,通过串口可观察到目标区域的颜色 R,G,B 的平均值(0~255)及分类标签
识别卡片样例代码(仅限20张定制卡片)
/*!
 * @file card.ino
 * @brief Examples of identifying card.
 * @copyright   Copyright (c) 2010 DFRobot Co.Ltd (http://www.dfrobot.com)
 * @license     The MIT license (MIT)
 * @author DFRobot
 * @version  V1.0
 * @date  2023-06-28
 * @https://github.com/DFRobot/DFRobot_MuVisionSensor
 */
#include <Wire.h>

#define MU_ADDRESS    0x60
#define PROTOCOL_VER  0x03
#define VISION_ID     0x06      // shape card
//#define VISION_ID     0x07      // traffic card
//#define VISION_ID     0x08      // number card

// register define
#define REG_PROTOCOL_VER  0x01
#define REG_LED1_CONF     0x06
#define REG_LED2_CONF     0x07
#define REG_LED_LEVEL     0x08
#define REG_CAMERA_CONF1  0x10
#define REG_FRAME_CNT     0x1F
#define REG_VISION_ID     0x20
#define REG_VISION_CONF1  0x21
#define REG_PARAM_VALUE5  0x29
#define RESULT_NUM        0x34
#define RESULT_DATA1      0x40
#define RESULT_DATA2      0x41
#define RESULT_DATA3      0x42
#define RESULT_DATA4      0x43
#define RESULT_DATA5      0x44
// color
#define MU_COLOR_BLACK                0x01U
#define MU_COLOR_WHITE                0x02U
#define MU_COLOR_RED                  0x03U
#define MU_COLOR_YELLOW               0x04U
#define MU_COLOR_GREEN                0x05U
#define MU_COLOR_CYAN                 0x06U
#define MU_COLOR_BLUE                 0x07U
#define MU_COLOR_PURPLE               0x08U

int i2cRead8(uint8_t reg) {
  Wire.beginTransmission(MU_ADDRESS);
  Wire.write(reg);
  Wire.endTransmission();

  Wire.requestFrom(MU_ADDRESS, 1);
  return Wire.read();
}
void i2cWrite8(const uint8_t reg, const uint8_t value) {
  Wire.beginTransmission(MU_ADDRESS);
  Wire.write(reg);
  Wire.write(value);
  Wire.endTransmission();
}

uint8_t reg[][2] = {
    { REG_VISION_ID,      VISION_ID }, // set vision type = vision_detect
    { REG_VISION_CONF1,   0x21 }, // vision begin
};
uint8_t frameCountLast = 0;

void setup() {
  // put your setup code here, to run once:
  Serial.begin(9600);
  Wire.begin();
  delay(500);

  if (i2cRead8(REG_PROTOCOL_VER) == PROTOCOL_VER) {
    Serial.println("device initialized.");
  } else {
    Serial.println("fail to initialize device! Please check protocol version.");
  }
  for (uint32_t i = 0; i < sizeof(reg)/2; ++i) {
    i2cWrite8(reg[i][0], reg[i][1]);
  }
}

void loop() {
  // put your main code here, to run repeatedly:
  long timeStart = millis();
  int frameCount = 0;
  // waiting for update
  do {
    frameCount = i2cRead8(REG_FRAME_CNT);
  } while(frameCount == frameCountLast);
  frameCountLast = frameCount;

  i2cWrite8(REG_VISION_ID, VISION_ID);
  // read result
  if (i2cRead8(RESULT_NUM) > 0) {
    Serial.println("card detected:");
    Serial.print("x = ");
    Serial.println(i2cRead8(RESULT_DATA1));
    Serial.print("y = ");
    Serial.println(i2cRead8(RESULT_DATA2));
    Serial.print("width = ");
    Serial.println(i2cRead8(RESULT_DATA3));
    Serial.print("height = ");
    Serial.println(i2cRead8(RESULT_DATA4));
    Serial.print("label = ");
    Serial.println(i2cRead8(RESULT_DATA5));
  } else {
    Serial.println("card undetected.");
  }
  Serial.print("fps = ");
  Serial.println(1000/(millis()-timeStart));
  Serial.println();
}
输出结果:可识别目标卡片,通过串口可观察到卡片中心坐标,卡片外框大小,分类标签
Mind+(基于Scratch3.0)图形化编程
- 下载及安装软件V1.5.6及以上版本。下载地址:https://mindplus.cc 详细教程:Mind+基础wiki教程-软件下载安装
- 切换到“上传模式”。 详细教程:Mind+基础wiki教程-上传模式编程流程
- “扩展”中选择“主控板”或“套件”中的“micro:bit”“掌控板”“麦昆”等你的产品。在“传感器”中搜索“摄像头”,加载“SEN0314 视觉摄像头” 。详细教程:Mind+基础wiki教程-加载扩展库流程
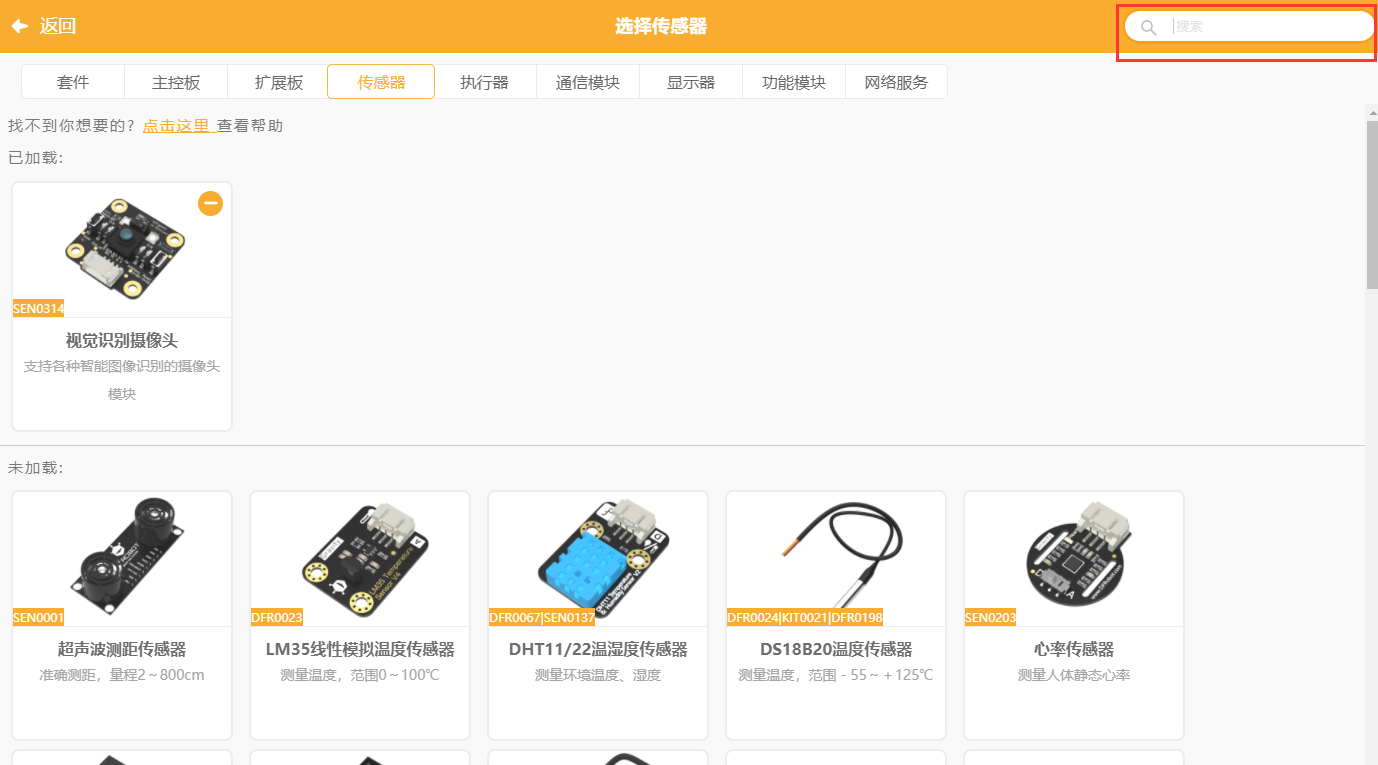
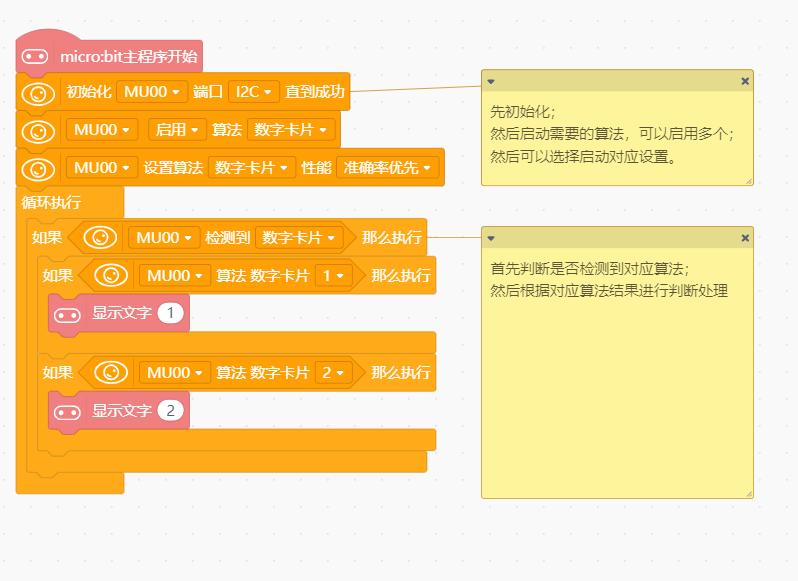
- 根据自己选择的产品,进行编程,如下图以micro:bit为例实现数字识别。
- 菜单“连接设备”,“上传到设备”
- 程序上传完毕后,使用配套的数字卡片对准摄像头,即可看到效果。 注意:output开关拨到1下2上,address开关拨到1下2
下。
更多图形化编程教程
DF创客社区用户提供了大量项目可供大家参考:
-
micro:bit相关应用:
-
掌控板相关应用:
常见问题
***Q1:***为什么找不到教程中的“颜色检测”?
A:从V1.6.0开始,原“颜色检测”的描述改为“色块检测”,因此使用“色块检测”即可。
***Q2:***上传完程序之后摄像头模块为什么没有任何反应?
A:如果使用了“恢复默认设置”可以尝试在这条程序后面跟一条“等待1秒”的程序以使恢复完成,上传完毕之后同时按下主控板和摄像头模块上的复位键复位。
更多问题及有趣的应用,可以 访问论坛 进行查阅或发帖!
