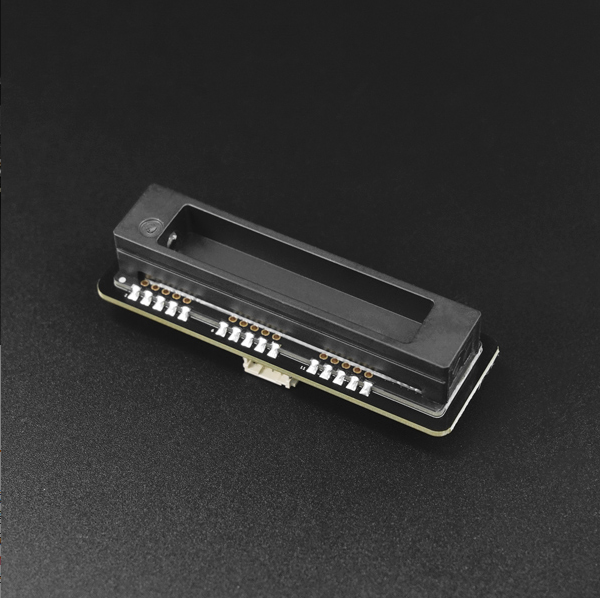
简介
Gravity: 激光甲烷传感器基于可调谐激光气体吸收技术(TDLAS)对甲烷气体进行检测,内部采用对射光路结构,具有优异的气体选择性、无氧气依赖性、寿命长等特点。内置温度传感器,可直接输出温补算法后的甲烷气体数据(%LEL)。同时由于采用了激光检测原理,相较于其他加热丝原理的甲烷传感器更加安全。
板载Gravity接口可输出I2C/UART数据,螺柱垫高设计方便将该传感器固定在任何平面上。
产品特性
- 精度高,提供出厂校准报告
- 交叉敏感度低,只对甲烷气体有反应
- 寿命长(>10年)
规格参数
- 供电电压:3.3-5V
- 工作温度:-13~58℃
- 工作湿度:0~95%R.H(无凝结)
- 工作电流:<300mA
- 预热时间:15s
- 响应时间:T90<15s
引脚说明
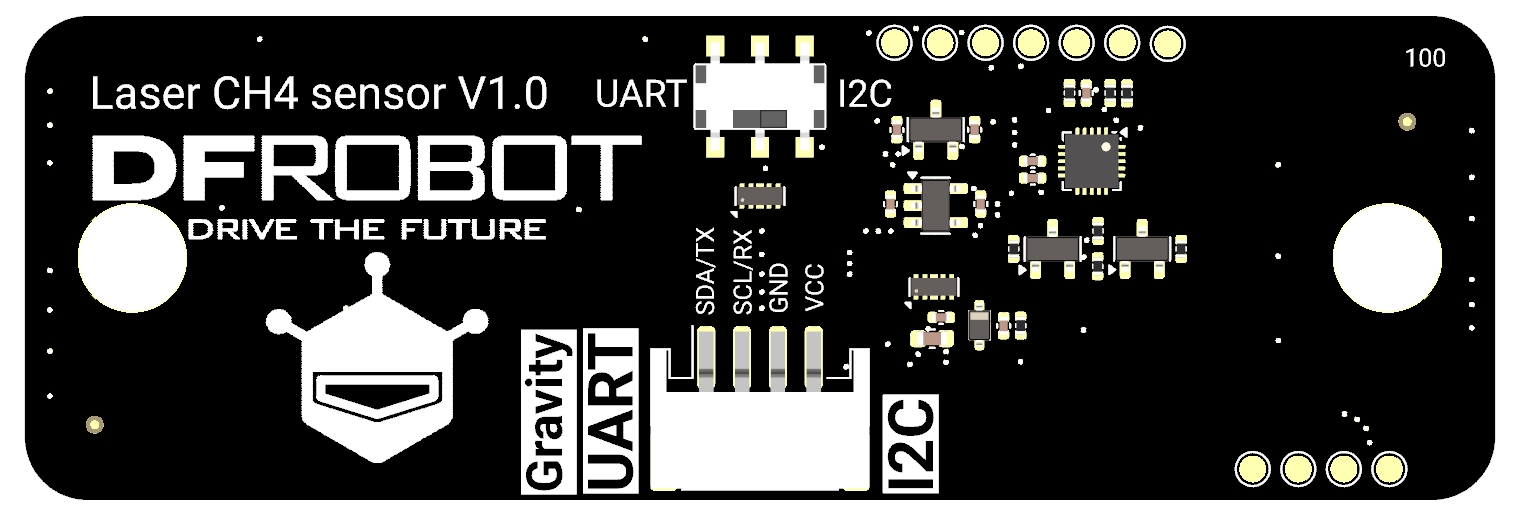
| 引脚 | 功能描述 |
|---|---|
| VCC | DC 3.3V-5.5V输入 |
| GND | GND |
| SCL/TX | I2C时钟线/串行发送 |
| SDA/RX | I2C数据线 /串行接受 |
使用教程
软硬件准备
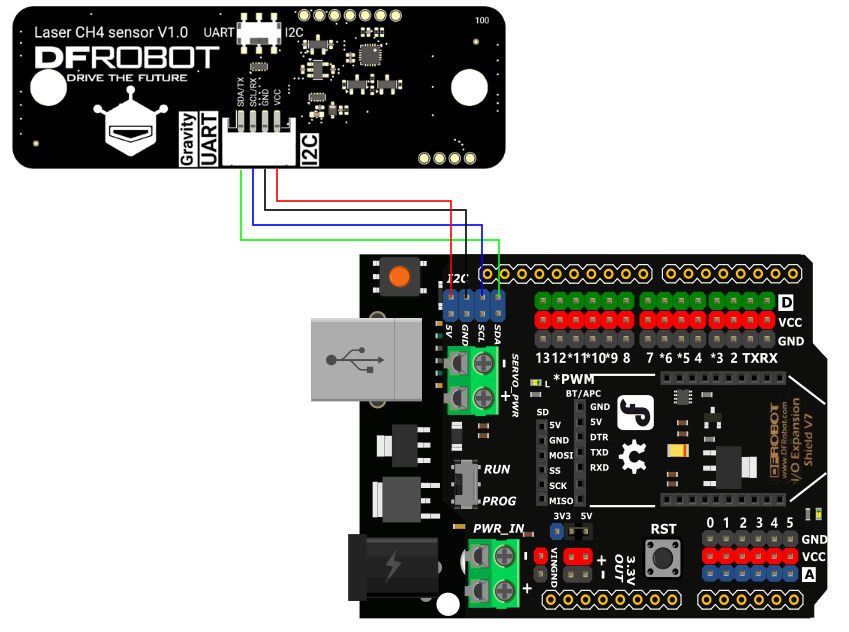
硬件准备
- DFRduino UNO+IO扩展板 (SKU:DFR0216-2) ×1
- Gravity: 激光甲烷传感器(SKU:SEN0654)×1
- Gravity I2C连接线(随Gravity: 激光甲烷传感器附赠)x 1
软件准备
- 下载Arduino IDE: 点击下载Arduino IDE
- 下载DFRobot_MHZ9041A库:DFRobot_MHZ9041A库
- Arduino IDE V1.8.19(或以下)安装库文件: 如何加载库文件
- Arduino IDE V2.0.0(或以上)可直接在库管理中搜索"DFRobot_MHZ9041A"库并安装
接线图
示例代码
- 确认传感器拨码位于I2C处
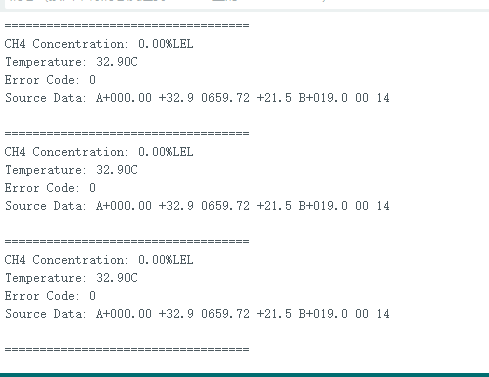
- 烧录以下示例代码后,打开串口监视器等待传感器预热完毕后可看出当前甲烷浓度,环境温度
 /*!
  * @file  get conncentration.ino
  * @brief get ch4 conncentration
  * @copyright Copyright (c) 2025 DFRobot Co.Ltd (http://www.dfrobot.com)
  * @license The MIT License (MIT)
  * @author ZhixinLiu(zhixin.liu@dfrobot.com)
  * @version V1.0.0
  * @date 2025-04-24
  * @url https://github.com/DFRobot/DFRobot_MHZ9041A
  */

#include "DFRobot_MHZ9041A.h"

#define I2C_COMMUNICATION  //use I2C for communication, but use the serial port for communication if the line of codes were masked

#ifdef  I2C_COMMUNICATION
  DFRobot_MHZ9041A_I2C ch4(&Wire ,0x34);
#else
/* -----------------------------------------------------------------------------------------------------
 * |  Sensor  | Connect line | Leonardo/Mega2560/M0 |    UNO    | ESP8266 | ESP32 |  microbit  |   m0  |
 * |   VCC    |=============>|        VCC           |    VCC    |   VCC   |  VCC  |     X      |  vcc  |
 * |   GND    |=============>|        GND           |    GND    |   GND   |  GND  |     X      |  gnd  |
 * |   RX     |=============>|     Serial1 TX1      |     5     |   5/D6  |  D2   |     X      |  tx1  |
 * |   TX     |=============>|     Serial1 RX1      |     4     |   4/D7  |  D3   |     X      |  rx1  |
 * ----------------------------------------------------------------------------------------------------*/
/* Baud rate cannot be changed */
  #if defined(ARDUINO_AVR_UNO) || defined(ESP8266)
    SoftwareSerial mySerial(4, 5);
    DFRobot_MHZ9041A_UART ch4(&mySerial, 115200);
  #elif defined(ESP32)
    DFRobot_MHZ9041A_UART ch4(&Serial1, 115200 ,/*rx*/D2 ,/*tx*/D3);
  #else
    DFRobot_MHZ9041A_UART ch4(&Serial1, 115200);
  #endif
#endif

void setup()
{
  Serial.begin(115200);
  while(!ch4.begin()){
    Serial.println("NO Deivces !");
    delay(1000);
  } Serial.println("Device connected !");

  //ch4.reset();
  ch4.setMode(ePassivityMode); // set Passivity mode
}

void loop()
{
  float ch4Concentration = ch4.getCH4Concentration(); // get CH4 concentration
  float temperature = ch4.getTemperature(); // get temperature
  eFaultCode_t errorCode = ch4.getErrorMsg(); // get error code
  String sourceData = ch4.getSourceData(); // get source data
  Serial.print("CH4 Concentration: ");
  Serial.print(ch4Concentration, 2); // print CH4 concentration
  Serial.println("%LEL");
  Serial.print("Temperature: ");
  Serial.print(temperature, 2); // print temperature
  Serial.println("C");
  Serial.print("Error Code: ");
  Serial.println(errorCode); // print error code
  Serial.print("Source Data: ");
  Serial.println(sourceData); // print source data
  Serial.println("===================================");
  delay(20);
}
结果
打开串口监视器可查看甲烷浓度,模块温度等数据
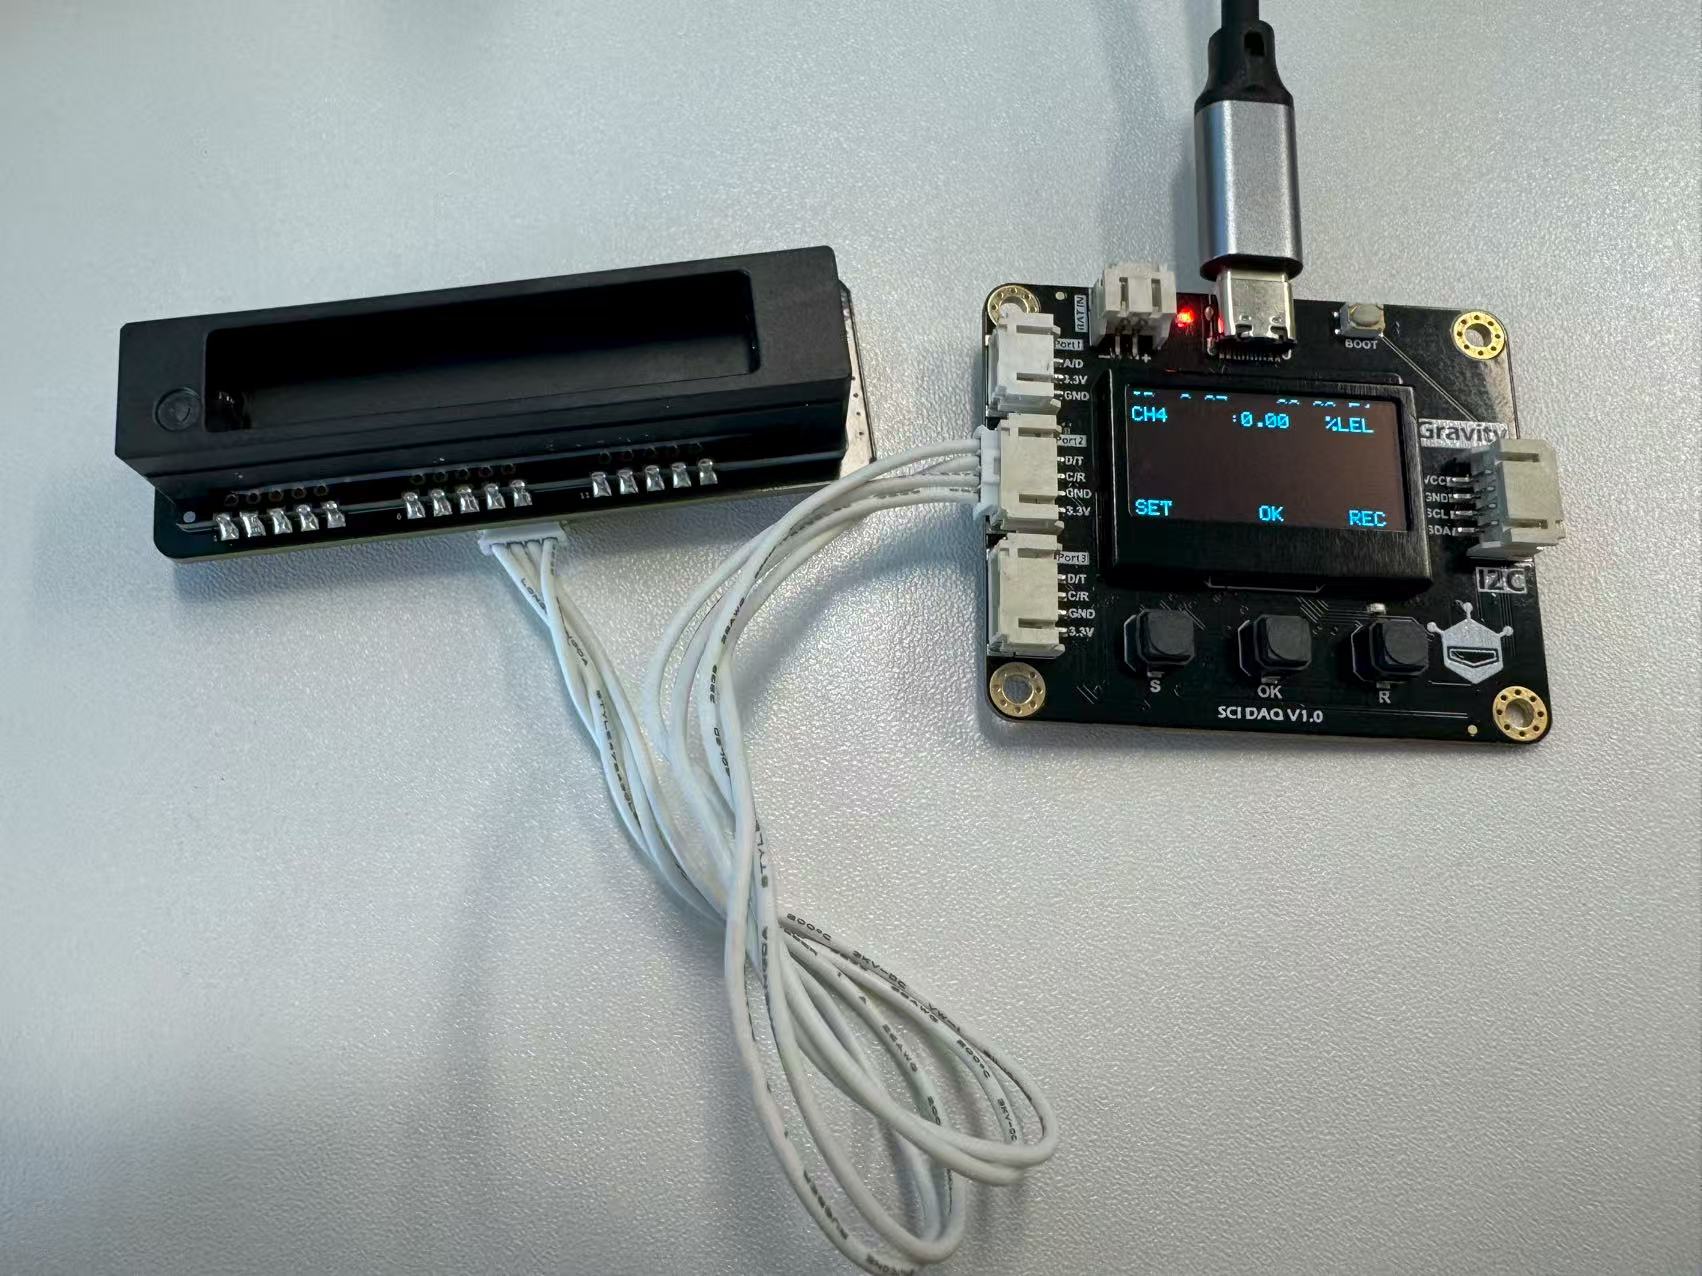
配合Gravity: SCI模块使用教程
硬件准备
- Gravity: SCI 模块 (SKU:DFR0999) x 1
- Gravity: 激光甲烷传感器 x 1
- 双头PH2.0 4PIN线缆(随Gravity: SCI模块附赠) x 1
使用教程
按照此固件升级教程,将Gravity: SCI模块固件升级到V1.0.5以上,即可直接将Gravity: 激光甲烷传感器直接连接到SCI上查看甲烷浓度,免编程进行科学实验探究。
结果
API参数列表
/**
 * @enum eFaultCode_t
 * @brief Types of sensor fault codes
 */
typedef enum {
  eSensorNormal = 0x00,                   // 00 Sensor operating normally
  eTempControlError = 0x01,               // 01 Temperature control error
  eAmbientTempError = 0x02,               // 02 Ambient temperature error
  eAmbientAndTempControlError = 0x03,     // 03 Ambient temperature error & temperature control error
  eLaserSignalWeak = 0x04,                // 04 Weak laser signal
  eAmbientAndSignalWeakError = 0x06,      // 06 Ambient temperature error & weak laser signal
  eLaserSignalError = 0x10,               // 16 Laser signal error
  eAmbientAndSignalError = 0x12,          // 18 Ambient temperature error & laser signal error
} eFaultCode_t;

/**
 * @enum eModuleMode_t
 * @brief sensor work mode
 */
typedef enum {
  ePassivityMode = 0x00,
  eActiveMode = 0x01,
} eWorkMode_t;

/**
 * @fn setMode
 * @brief Set the working mode
 * @param mode Working mode
 * @note 0x00: Active mode, 0x01: Passive mode
 * @return null
 */
void setMode(eWorkMode_t mode);

/**
 * @fn getSourceData
 * @brief Get raw sensor data
 * @return Raw data string, up to 43 bytes in length
 */
String getSourceData(void);

/**
 * @fn getCH4Concentration
 * @brief Get methane (CH4) concentration
 * @return CH4 concentration value, two decimal places, the second digit is always 0, unit: %LEL
 */
float getCH4Concentration(void);

/**
 * @fn getTemperature
 * @brief Get ambient temperature
 * @return Temperature in degrees Celsius
 */
float getTemperature(void);

/**
 * @fn getErrorMsg
 * @brief Get error code information
 * @return Error code
 */
eFaultCode_t getErrorMsg(void);

/**
 * @fn getActiveData
 * @brief Get raw data in active reporting mode
 * @return Raw data string in active mode
 */
String getActiveData(void);

/**
 * @fn reset
 * @brief Reset the onboard methane sensor; hold the reset pin low for 2 seconds to complete the reset
 * @return null
 */
void reset(void);

/**
 * @fn setDeviceID
 * @brief Set the module address,range 0x03~0x7F
 * @return Returns 1 if successful, otherwise returns 0
 */
bool setDeviceID(uint8_t id);

/**
 * @fn getDeviceID
 * @brief Get the module address
 * @return Module address
 */
uint8_t getDeviceID(void);
常见问题
更多资料
WIKI文档修改历史
| 文档版本号 | 修改时间 | 修改人 | 修改内容 |
|---|---|---|---|
| V1.0 | 2025.4.27 | 叶紫彬 | 第一版发布 |
产品修改历史
| 产品版本号 | 修改时间 | 修改人 | 产品修改内容 |
|---|---|---|---|
| V1.0 | 2025.4.27 | 叶紫彬 | 第一版发布 |
