1.产品简介
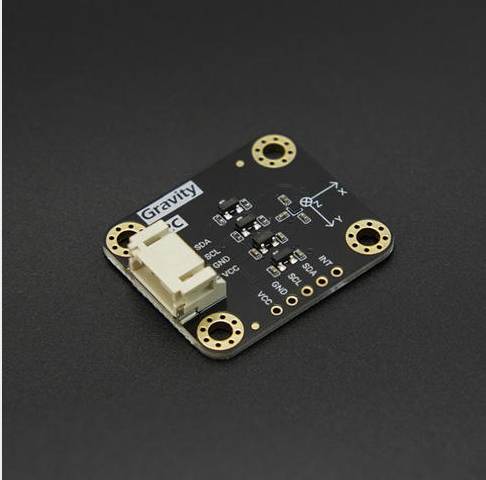
这款BMM350 三轴数字地磁传感器。可测量三个空间轴上的磁场强度,具有低功耗(200uA),低噪声(190nT rms@xy轴 450nT rms@z轴),高量程(±2000μT),高采样率(400~25/16Hz,可选)的特点。
其采用了TMR(隧道磁阻)技术,并具有独特的场冲击恢复功能。此功能使该设备对外部磁场具有很强的鲁棒性,从而在周遭磁场的冲击下始终确保高精度。
可用于室内外导航与定位,电子罗盘,AR/VR设备应用开发。
2.产品特性
-
1个可编程中断引脚
-
低功耗(200uA)
-
低噪声(190nT rms@xy轴 450nT rms@z轴)
-
高量程(±2000μT)
3.应用场景
- 无人机
- 指南针/电子罗盘
- 室内/室外导航
- 头部运动追踪
- 增强现实
- 倾斜补偿的电子地图
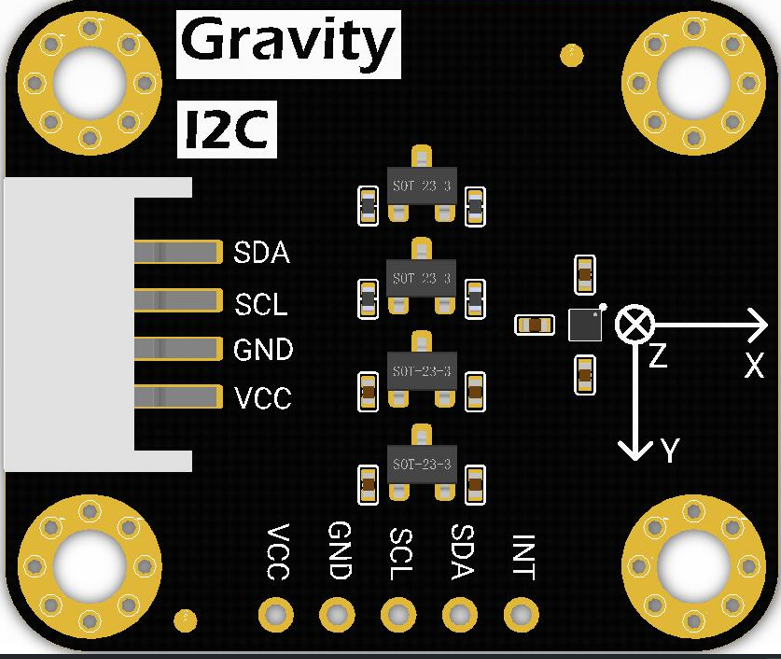
4.引脚排列图

| 引脚 | 功能描述 |
|---|---|
| VCC | DC3.3V-5V |
| GND | 接地 |
| SCL | I2C时钟线 |
| SDA | I2C数据线 |
| INT | 中断引脚 |
5.规格参数
- 供电电压:3.3V-5V
- 正常工作温度范围:-40~85°C
- 接口协议:I2C
- 分辨率:0.1uT
- 零度漂移:±40uT/±2uT(软件优化后)
- 非线性:< 1%FS
- 磁力测量范围:±2000μT
- 工作电流:200uA(Normal mode)
- 低噪声:190nT rms@xy轴 450nT rms@z轴
- 精度:30uT水平磁场分量 ±2.5°
- 启动时间:3ms
6.尺寸图

7.使用教程
7.1 硬件准备
-
FireBeetle ESP32-E主控板 (SKU:DFR0654) ×1
-
BMM350三轴磁力计传感器(SKU:SEN0529)×1
-
杜邦线 若干
7.2 软件准备
- 下载Arduino IDE: 点击下载Arduino IDE
- 安装SDK:点击进入FireBeetle ESP32-E主控板 WIKI页面 查找SDK安装教程
- 下载Arduino库:DFRobot_BMM350库文件下载,
- 关于如何安装库文件: 如何加载库文件
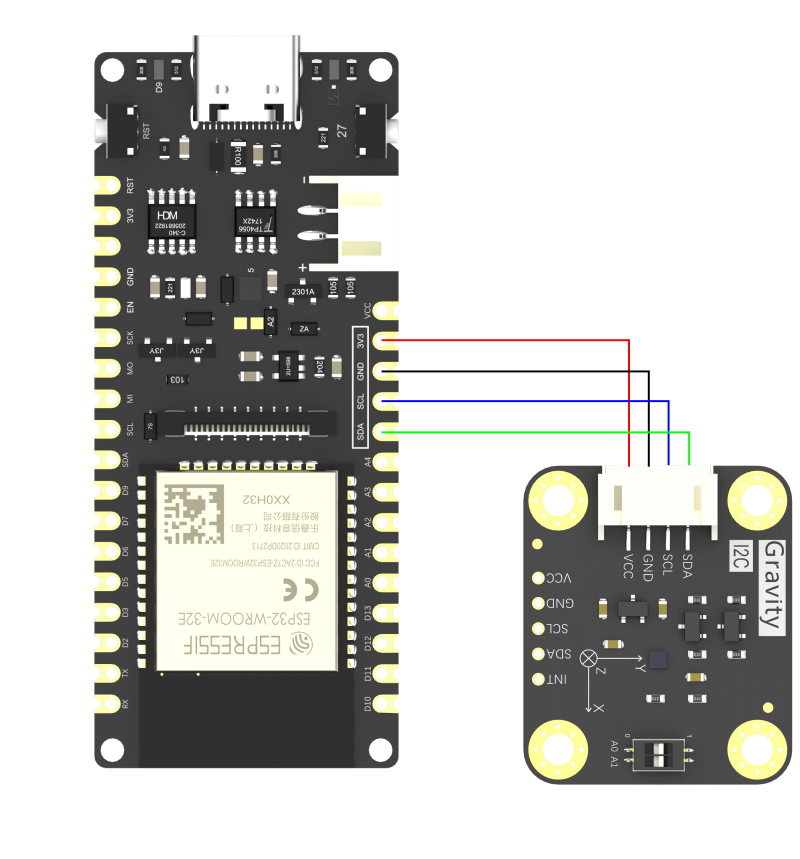
7.3 硬件连接

Gravity I2C BMM350模块:VCC---(连接)---ESP32-E主控:3V3;
Gravity I2C BMM350模块:GND---(连接)---ESP32-E主控:GND;
Gravity I2C BMM350模块:SCL---(连接)---ESP32-E主控:SCL;
Gravity I2C BMM350模块:SDA---(连接)---ESP32-E主控:SDA;
7.4 演示代码
样例代码
- 样例代码1-获取配置状态(getAllState.ino)
- 样例代码2-获取三轴地磁数据、罗盘角度(getGeomagneticData.ino)
- 样例代码3-阈值中断功能(thresholdInterrupt.ino)
样例代码1-获取配置状态(getAllState.ino)
- 烧录程序
 /*!
  * @file  getAllState.ino
  * @brief Get all the config status, self test status; the sensor turns to sleep mode from normal mode after reset
  * @n Experimental phenomenon: serial print the sensor config information and the self-test information
  * @copyright   Copyright (c) 2010 DFRobot Co.Ltd (http://www.dfrobot.com)
  * @license     The MIT License (MIT)
  * @author      [GDuang](yonglei.ren@dfrobot.com)
  * @version     V1.0.0
  * @date        2024-05-06
  * @url         https://github.com/dfrobot/DFRobot_BMM350
  */
#include "DFRobot_BMM350.h"

DFRobot_BMM350_I2C bmm350(&Wire, 0x14);

void setup()
{
  Serial.begin(115200);
  while(!Serial);
  while(bmm350.begin()){
    Serial.println("bmm350 init failed, Please try again!");
    delay(1000);
  } Serial.println("bmm350 init success!");

  /**!
   * 传感器自检,返回字符串表示自检结果
   */
  Serial.println(bmm350.selfTest());

  /**!
   * 设置传感器运行模式
   * opMode:
   *   BMM350_SUSPEND_MODE      // suspend mode: Suspend mode is the default power mode of BMM350 after the chip is powered, Current consumption in suspend mode is minimal,
   *                               so, this mode is useful for periods when data conversion is not needed. Read and write of all registers is possible.
   *   BMM350_NORMAL_MODE       // normal mode  Get geomagnetic data normally.
   *   BMM350_FORCED_MODE       // forced mode  Single measurement, the sensor restores to suspend mode when the measurement is done.
   *   BMM350_FORCED_MODE_FAST  // To reach ODR = 200Hz is only possible by using FM_ FAST.
   */
  bmm350.setOperationMode(BMM350_NORMAL_MODE);

  /**!
   * 设置预设模式,方便用户配置传感器以获取地磁数据(获取地磁数据的默认速率为 12.5Hz)。
   * presetMode:
   *   BMM350_PRESETMODE_LOWPOWER      // Low power mode, get a fraction of data and take the mean value.
   *   BMM350_PRESETMODE_REGULAR       // Regular mode, get a number of data and take the mean value.
   *   BMM350_PRESETMODE_ENHANCED      // Enhanced mode, get a plenty of data and take the mean value.
   *   BMM350_PRESETMODE_HIGHACCURACY  // High accuracy mode, get a huge number of take and draw the mean value.
   */
  bmm350.setPresetMode(BMM350_PRESETMODE_HIGHACCURACY);

  /**!
   * 设置获取地磁数据的速率,速率越高,速度越快(无延迟功能)
   * rate:
   *   BMM350_DATA_RATE_1_5625HZ
   *   BMM350_DATA_RATE_3_125HZ
   *   BMM350_DATA_RATE_6_25HZ
   *   BMM350_DATA_RATE_12_5HZ   (default rate)
   *   BMM350_DATA_RATE_25HZ
   *   BMM350_DATA_RATE_50HZ
   *   BMM350_DATA_RATE_100HZ
   *   BMM350_DATA_RATE_200HZ
   *   BMM350_DATA_RATE_400HZ
   */
  bmm350.setRate(BMM350_DATA_RATE_25HZ);

  /**!
   * 启用 x 轴、y 轴和 z 轴的测量,默认为启用,无需配置,禁用时 x、y 和 z 轴的地磁数据将不准确。
   * 如果要配置更多参数,请参阅 .h 文件中的 setMeasurementXYZ() 函数。
   */
  bmm350.setMeasurementXYZ();

  /**!
   * 获取配置数据速率单位: Hz
   */
  float rate = bmm350.getRate();
  Serial.print("rate is "); Serial.print(rate); Serial.println(" HZ");

  /**!
   * 获取 x 轴、y 轴和 z 轴的测量状态,并以字符串形式返回测量状态
   */
  Serial.println(bmm350.getMeasurementStateXYZ());

  /**!
   * 获取传感器运行模式,以字符串形式返回传感器运行状态
   */
  Serial.println(bmm350.getOperationMode());

  /**!
   * 软件复位后,进入suspend模式。
   */
  bmm350.softReset();
}

void loop()
{
  /**!
   * 获取传感器运行模式,以字符串形式返回传感器运行状态
   */
  Serial.println(bmm350.getOperationMode());
  delay(3000);
}
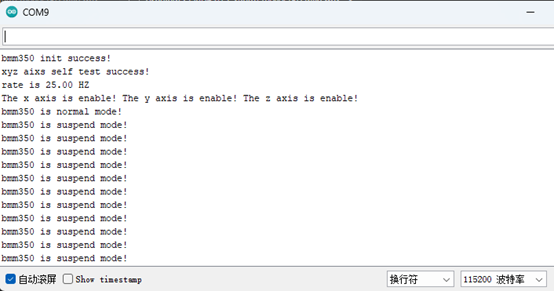
结果
烧录示例程序,串口打印出传感器目前的配置状态

样例代码2-获取三轴地磁数据、罗盘角度(getGeomagneticData.ino)
- 烧录程序
如您所处环境电磁干扰较多。即XY轴电磁影响都很大的话,即使是校准也很难判断罗盘方位。建议在一个电磁干扰较少的环境下执行校准以及电子罗盘测量。
 /*!
  * @file  getGeomagneticData.ino
  * @brief Get the geomagnetic data at 3 axis (x, y, z), get the compass degree
  * @n "Compass Degree", the angle formed when the needle rotates counterclockwise from the current position to the true north
  * @n Experimental phenomenon: serial print the geomagnetic data of x-axis, y-axis and z-axis and the compass degree
  * @copyright   Copyright (c) 2010 DFRobot Co.Ltd (http://www.dfrobot.com)
  * @license     The MIT License (MIT)
  * @author      [GDuang](yonglei.ren@dfrobot.com)
  * @version     V1.0.0
  * @date        2024-05-06
  * @url         https://github.com/dfrobot/DFRobot_BMM350
  */
#include "DFRobot_BMM350.h"

DFRobot_BMM350_I2C bmm350(&Wire, 0x14);

void setup()
{
  Serial.begin(115200);
  while(!Serial);
  while(bmm350.begin()){
    Serial.println("bmm350 init failed, Please try again!");
    delay(1000);
  } Serial.println("bmm350 init success!");

  //Normal
  bmm350.setOperationMode(BMM350_NORMAL_MODE);

  /**!
   * Set preset mode, make it easier for users to configure sensor to get geomagnetic data (The default rate for obtaining geomagnetic data is 12.5Hz)
   * presetMode:
   *   BMM350_PRESETMODE_LOWPOWER      // Low power mode, get a fraction of data and take the mean value.
   *   BMM350_PRESETMODE_REGULAR       // Regular mode, get a number of data and take the mean value.
   *   BMM350_PRESETMODE_ENHANCED      // Enhanced mode, get a plenty of data and take the mean value.
   *   BMM350_PRESETMODE_HIGHACCURACY  // High accuracy mode, get a huge number of take and draw the mean value.
   */
  bmm350.setPresetMode(BMM350_PRESETMODE_HIGHACCURACY);

  /**!
   * Set the rate of obtaining geomagnetic data, the higher, the faster(without delay function)
   * rate:
   *   BMM350_DATA_RATE_1_5625HZ
   *   BMM350_DATA_RATE_3_125HZ
   *   BMM350_DATA_RATE_6_25HZ
   *   BMM350_DATA_RATE_12_5HZ   (default rate)
   *   BMM350_DATA_RATE_25HZ
   *   BMM350_DATA_RATE_50HZ
   *   BMM350_DATA_RATE_100HZ
   *   BMM350_DATA_RATE_200HZ
   *   BMM350_DATA_RATE_400HZ
   */
  bmm350.setRate(BMM350_DATA_RATE_25HZ);

  /**!
   * Enable the measurement at x-axis, y-axis and z-axis, default to be enabled, no config required, the geomagnetic data at x, y and z will be inaccurate when disabled.
   * Refer to setMeasurementXYZ() function in the .h file if you want to configure more parameters.
   */
  bmm350.setMeasurementXYZ();
}

void loop()
{
  sBmm350MagData_t magData = bmm350.getGeomagneticData();
  Serial.print("mag x = "); Serial.print(magData.x); Serial.println(" uT");
  Serial.print("mag y = "); Serial.print(magData.y); Serial.println(" uT");
  Serial.print("mag z = "); Serial.print(magData.z); Serial.println(" uT");

  // float type data
  //Serial.print("mag x = "); Serial.print(magData.float_x); Serial.println(" uT");
  //Serial.print("mag y = "); Serial.print(magData.float_y); Serial.println(" uT");
  //Serial.print("mag z = "); Serial.print(magData.float_z); Serial.println(" uT");

  float compassDegree = bmm350.getCompassDegree();
  Serial.print("the angle between the pointing direction and north (counterclockwise) is:");
  Serial.println(compassDegree);
  Serial.println("--------------------------------");
  delay(3000);
}
结果
烧录示例程序,串口打印出传感器获取的地磁数据和罗盘角度数据

样例代码3-阈值中断功能(thresholdInterrupt.ino)
- 烧录程序
  /*!
  * @file  thresholdInterrupt.ino
  * @brief Set the interrupt to be triggered when beyond/below threshold, when the interrupt at a axis occur, the relevant data will be printed in the serial port.
  * @n Experimental phenomenon: when the geomagnetic data at 3 axis (x, y, z) beyond/below threshold, serial print the geomagnetic data, unit (uT)
  * @n Experimental phenomenon: the main controller interrupt will be triggered by level change caused by INT pin interrupt, then the geomagnetic data can be obtained
  * @copyright   Copyright (c) 2010 DFRobot Co.Ltd (http://www.dfrobot.com)
  * @license     The MIT License (MIT)
  * @author      [GDuang](yonglei.ren@dfrobot.com)
  * @version     V1.0.0
  * @date        2024-05-06
  * @url         https://github.com/dfrobot/DFRobot_BMM350
  */
#include "DFRobot_BMM350.h"

DFRobot_BMM350_I2C bmm350(&Wire, 0x14);

volatile uint8_t interruptFlag = 0;
void myInterrupt(void)
{
  interruptFlag = 1;    // Interrupt flag
  #if defined(ESP32) || defined(ESP8266) || defined(ARDUINO_SAM_ZERO)
    detachInterrupt(13);   // Detach interrupt
  #else
    detachInterrupt(0);   // Detach interrupt
  #endif
}

void setup()
{
  Serial.begin(115200);
  while(!Serial);
  delay(5000);
  while(bmm350.begin()){
    Serial.println("bmm350 init failed, Please try again!");
    delay(1000);
  } Serial.println("bmm350 init success!");

  /**!
   * Set sensor operation mode
   * opMode:
   *   BMM350_SUSPEND_MODE      // suspend mode: Suspend mode is the default power mode of BMM350 after the chip is powered, Current consumption in suspend mode is minimal,
   *                               so, this mode is useful for periods when data conversion is not needed. Read and write of all registers is possible.
   *   BMM350_NORMAL_MODE       // normal mode  Get geomagnetic data normally.
   *   BMM350_FORCED_MODE       // forced mode  Single measurement, the sensor restores to suspend mode when the measurement is done.
   *   BMM350_FORCED_MODE_FAST  // To reach ODR = 200Hz is only possible by using FM_ FAST.
   */
  bmm350.setOperationMode(BMM350_NORMAL_MODE);

  /**!
   * Set preset mode, make it easier for users to configure sensor to get geomagnetic data (The default rate for obtaining geomagnetic data is 12.5Hz)
   * presetMode:
   *   BMM350_PRESETMODE_LOWPOWER      // Low power mode, get a fraction of data and take the mean value.
   *   BMM350_PRESETMODE_REGULAR       // Regular mode, get a number of data and take the mean value.
   *   BMM350_PRESETMODE_ENHANCED      // Enhanced mode, get a plenty of data and take the mean value.
   *   BMM350_PRESETMODE_HIGHACCURACY  // High accuracy mode, get a huge number of take and draw the mean value.
   */
  bmm350.setPresetMode(BMM350_PRESETMODE_HIGHACCURACY);

  /**!
   * Set the rate of obtaining geomagnetic data, the higher, the faster(without delay function)
   * rate:
   *   BMM350_DATA_RATE_1_5625HZ
   *   BMM350_DATA_RATE_3_125HZ
   *   BMM350_DATA_RATE_6_25HZ
   *   BMM350_DATA_RATE_12_5HZ   (default rate)
   *   BMM350_DATA_RATE_25HZ
   *   BMM350_DATA_RATE_50HZ
   *   BMM350_DATA_RATE_100HZ
   *   BMM350_DATA_RATE_200HZ
   *   BMM350_DATA_RATE_400HZ
   */
  bmm350.setRate(BMM350_DATA_RATE_25HZ);

  /**!
   * Enable the measurement at x-axis, y-axis and z-axis, default to be enabled, no config required, the geomagnetic data at x, y and z will be inaccurate when disabled.
   * Refer to setMeasurementXYZ() function in the .h file if you want to configure more parameters.
   */
  bmm350.setMeasurementXYZ();

  /*!
   * HIGH_THRESHOLD_INTERRUPT:超出设置阈值范围才会触发中断
   * 4:该参数为16倍参数,比如将这个参数设置为1,那么地磁参数超过16的时候就会触发中断
   * BMM350_ACTIVE_HIGH:中断引脚设置为高电平触发
   */
  bmm350.setThresholdInterrupt(HIGH_THRESHOLD_INTERRUPT, 4, BMM350_ACTIVE_HIGH);

#if defined(ESP32) || defined(ESP8266)
  /**!
    Select according to the set DADY pin polarity
      INPUT_PULLUP    // Low polarity, set pin 13 to pull-up input
      INPUT_PULLDOWN  // High polarity, set pin 13 to pull-down input
    interput io
      All pins can be used. Pin 13 is recommended
  */
  pinMode(/*Pin */13 ,INPUT_PULLUP);
  attachInterrupt(/*interput io*/13, myInterrupt, ONLOW);
#elif defined(ARDUINO_SAM_ZERO)
  pinMode(/*Pin */13 ,INPUT_PULLUP);
  attachInterrupt(/*interput io*/13, myInterrupt, LOW);
#else
  /**!    The Correspondence Table of AVR Series Arduino Interrupt Pins And Terminal Numbers
   * ---------------------------------------------------------------------------------------
   * |                                        |    Pin       | 2  | 3  |                   |
   * |    Uno, Nano, Mini, other 328-based    |--------------------------------------------|
   * |                                        | Interrupt No | 0  | 1  |                   |
   * |-------------------------------------------------------------------------------------|
   * |                                        |    Pin       | 2  | 3  | 21 | 20 | 19 | 18 |
   * |               Mega2560                 |--------------------------------------------|
   * |                                        | Interrupt No | 0  | 1  | 2  | 3  | 4  | 5  |
   * |-------------------------------------------------------------------------------------|
   * |                                        |    Pin       | 3  | 2  | 0  | 1  | 7  |    |
   * |    Leonardo, other 32u4-based          |--------------------------------------------|
   * |                                        | Interrupt No | 0  | 1  | 2  | 3  | 4  |    |
   * |--------------------------------------------------------------------------------------
   */

  /**!    The Correspondence Table of micro:bit Interrupt Pins And Terminal Numbers
   * ---------------------------------------------------------------------------------------------------------------------------------------------
   * |             micro:bit                       | DigitalPin |P0-P20 can be used as an external interrupt                                     |
   * |  (When using as an external interrupt,      |---------------------------------------------------------------------------------------------|
   * |no need to set it to input mode with pinMode)|Interrupt No|Interrupt number is a pin digital value, such as P0 interrupt number 0, P1 is 1 |
   * |-------------------------------------------------------------------------------------------------------------------------------------------|
   */
  /**!
       Select according to the set DADY pin polarity
      INPUT_PULLUP    // Low polarity, set pin 2 to pull-up input
   */
  pinMode(/*Pin */2 ,INPUT_PULLUP);

  /**!
    Set the pin to interrupt mode
    // Open the external interrupt 0, connect INT1/2 to the digital pin of the main control:
      function
        callback function
      state
        LOW            // When the pin is at low level, the interrupt occur, enter interrupt function
  */
  attachInterrupt(/*Interrupt No*/0, /*function*/myInterrupt ,/*state*/LOW );
#endif

}

void loop()
{
  /**!
   * Get the data that threshold interrupt occured and interrupt status (get the data ready status through software)
   *    Returns the structure for storing geomagnetic data, the structure stores the data of 3 axis and interrupt status,
   *    No interrupt triggered when the data at x-axis, y-axis and z-axis is NO_DATA
   *    Refer to .h file if you want to check interrupt status.
   */
  /*
  sBmm350ThresholdData_t thresholdData = bmm350.getThresholdData();
  if(thresholdData.mag_x != NO_DATA){
    Serial.print("mag x = "); Serial.print(thresholdData.mag_x); Serial.println(" uT");
  }
  if(thresholdData.mag_y != NO_DATA){
    Serial.print("mag y = "); Serial.print(thresholdData.mag_y); Serial.println(" uT");
  }
  if(thresholdData.mag_z != NO_DATA){
    Serial.print("mag z = "); Serial.print(thresholdData.mag_z); Serial.println(" uT");
  }
  Serial.println();
  */

  /**!
    When the interrupt occur in INT IO, get the threshold interrupt data (get the threshold interrupt status through hardware)
  */
  if(interruptFlag == 1){
    sBmm350ThresholdData_t thresholdData = bmm350.getThresholdData();
    if(thresholdData.mag_x != NO_DATA){
      Serial.print("mag x = "); Serial.print(thresholdData.mag_x); Serial.println(" uT");
    }
    if(thresholdData.mag_y != NO_DATA){
      Serial.print("mag y = "); Serial.print(thresholdData.mag_y); Serial.println(" uT");
    }
    if(thresholdData.mag_z != NO_DATA){
      Serial.print("mag z = "); Serial.print(thresholdData.mag_z); Serial.println(" uT");
    }
    Serial.println();
    interruptFlag = 0;
    #if defined(ESP32) || defined(ESP8266)
      attachInterrupt(13, myInterrupt, ONLOW);
    #elif defined(ARDUINO_SAM_ZERO)
      attachInterrupt(13, myInterrupt, LOW);
    #else
      attachInterrupt(0, myInterrupt, LOW);
    #endif

  }
  delay(3000);
}
结果
烧录示例程序,将磁性物质靠近传感器,串口打印变化数据

8. API函数
  /**
   * @fn softReset
   * @brief 软件复位,软件复位后先恢复为挂起模式
   */
  void softReset(void);

  /**
   * @fn setOperationMode
   * @brief 设置传感器的执行模式
   * @param opMode mode
   * @n BMM350_SUSPEND_MODE       挂起模式:挂起模式是芯片上电后BMM350的默认电源模式,在挂起模式下电流消耗最小,因此该模式适用于不需要数据转换的时期(所有寄存器的读写都是可能的)
   * @n BMM350_NORMAL_MODE        常规模式: 获取地磁数据
   * @n BMM350_FORCED_MODE        强制模式: 单次测量,测量完成后传感器恢复到暂停模式
   * @n BMM350_FORCED_MODE_FAST   只有使用FM_FAST时,ODR才能达到200Hz
   */
  void setOperationMode(uint8_t opMode);

  /**
   * @fn getOperationMode
   * @brief 获取传感器的执行模式
   * @return result 返回字符串为传感器的执行模式
   */
  String getOperationMode(void);

  /**
   * @fn setPresetMode
   * @brief 设置预置模式,使用户更简单的配置传感器来获取地磁数据(默认的采集速率为12.5Hz)
   * @param presetMode
   * @n BMM350_PRESETMODE_LOWPOWER       低功率模式,获取少量的数据 取均值
   * @n BMM350_PRESETMODE_REGULAR        普通模式,获取中量数据 取均值
   * @n BMM350_PRESETMODE_ENHANCED       增强模式,获取大量数据 取均值
   * @n BMM350_PRESETMODE_HIGHACCURACY   高精度模式,获取超大量数据 取均值
   */
  void setPresetMode(uint8_t presetMode, uint8_t rate = BMM350_DATA_RATE_12_5HZ);

  /**
   * @fn setRate
   * @brief 设置获取地磁数据的速率,速率越大获取越快(不加延时函数)
   * @param rate
   * @n BMM350_DATA_RATE_1_5625HZ
   * @n BMM350_DATA_RATE_3_125HZ
   * @n BMM350_DATA_RATE_6_25HZ
   * @n BMM350_DATA_RATE_12_5HZ  (默认速率)
   * @n BMM350_DATA_RATE_25HZ
   * @n BMM350_DATA_RATE_50HZ
   * @n BMM350_DATA_RATE_100HZ
   * @n BMM350_DATA_RATE_200HZ
   * @n BMM350_DATA_RATE_400HZ
   */
  void setRate(uint8_t rate);

  /**
   * @fn getRate
   * @brief 获取配置的数据速率 单位:HZ
   * @return rate
   */
  uint8_t getRate(void);

  /**
   * @fn selfTest
   * @brief 传感器自测,返回值表明自检结果
   * @param testMode:
   * @n     eBMM350_SELF_TEST_NORMAL               常规自检,检查x轴、y轴、z轴是否接通或短路
   * @return result 返回的字符串为自测的结果
   */
  String selfTest(eBMM350_SELFTEST testMode = eBMM350_SELF_TEST_NORMAL);

  /**
   * @fn setMeasurementXYZ
   * @brief 使能x y z 轴的测量,默认设置为使能,禁止后xyz轴的地磁数据不准确
   * @param en_x
   * @n   BMM350_X_EN        使能 x 轴的测量
   * @n   BMM350_X_DIS       禁止 x 轴的测量
   * @param en_y
   * @n   BMM350_Y_EN        使能 y 轴的测量
   * @n   BMM350_Y_DIS       禁止 y 轴的测量
   * @param en_z
   * @n   BMM350_Z_EN        使能 z 轴的测量
   * @n   BMM350_Z_DIS       禁止 z 轴的测量
   */
  void setMeasurementXYZ(enum bmm350_x_axis_en_dis en_x = BMM350_X_EN, enum bmm350_y_axis_en_dis en_y = BMM350_Y_EN, enum bmm350_z_axis_en_dis en_z = BMM350_Z_EN);

  /**
   * @fn getMeasurementStateXYZ
   * @brief 获取 x y z 轴的使能状态
   * @return result 返回字符串为使能的状态
   */
  String getMeasurementStateXYZ(void);

  /**
   * @fn getGeomagneticData
   * @brief 获取x y z 三轴的地磁数据
   * @return 地磁的数据的结构体,单位:微特斯拉(uT)
   */
  sBmm350MagData_t getGeomagneticData(void);

  /**
   * @fn getCompassDegree
   * @brief 获取罗盘方向
   * @return 罗盘方向 (0° - 360°)
   * @n      0° = North, 90° = East, 180° = South, 270° = West.
   */
  float getCompassDegree(void);

  /**
   * @fn setDataReadyPin
   * @brief 使能或者禁止数据准备中断引脚
   * @n 使能后有数据来临DRDY引脚跳变
   * @n 禁止后有数据来临DRDY不进行跳变
   * @n 高极性:高电平为活动电平,默认为低电平,触发中断时电平变为高
   * @n 低极性:低电平为活动电平,默认为高电平,触发中断时电平变为低
   * @param modes
   * @n     BMM350_ENABLE_INTERRUPT        使能DRDY
   * @n     BMM350_DISABLE_INTERRUPT       禁止DRDY
   * @param polarity
   * @n     BMM350_ACTIVE_HIGH      高极性
   * @n     BMM350_ACTIVE_LOW       低极性
   */
  void setDataReadyPin(uint8_t modes, uint8_t polarity=POLARITY_HIGH);

  /**
   * @fn getDataReadyState
   * @brief 获取数据准备的状态,用来判断数据是否准备好
   * @return status
   * @n true  数据准备好了
   * @n false 数据没有准备好
   */
  bool getDataReadyState(void);

  /**
   * @fn setThresholdInterrupt(uint8_t modes, int8_t threshold, uint8_t polarity)
   * @brief 设置阈值中断,当某个通道的地磁值高/低于阈值时触发中断
   * @n     高极性:高电平为活动电平,默认为低电平,触发中断时电平变为高
   * @n     低极性:低电平为活动电平,默认为高电平,触发中断时电平变为低
   * @param modes
   * @n     LOW_THRESHOLD_INTERRUPT       低阈值中断模式
   * @n     HIGH_THRESHOLD_INTERRUPT      高阈值中断模式
   * @param  threshold
   * @n     阈值,默认扩大16倍,例如:低阈值模式下传入阈值1,实际低于16的地磁数据都会触发中断
   * @param polarity
   * @n     POLARITY_HIGH      高极性
   * @n     POLARITY_LOW       低极性
   */
  void setThresholdInterrupt(uint8_t modes, int8_t threshold, enum bmm350_intr_polarity polarity);

  /**
   * @fn getThresholdData
   * @brief 获取发生阈值中断的数据
   * @return 返回存放地磁数据的结构体,结构体存放三轴当数据和中断状态,
   * @n xyz轴的数据为 NO_DATA 时,未触发中断
   * @n mag_x、mag_y、mag_z 存放地磁数据
   * @n interrupt_x、interrupt_y、interrupt_z 存放轴中断状态
   */
  sBmm350ThresholdData_t getThresholdData(void);
9. 更多资料
10. 常见问题
Q1:为什么有时候获取的数据范围超过量程?
A1:BMM350 是可以处理超过检测范围的数值的,但如果超出量程,则零点漂移/精度无法保证。其量程即每个轴的绝对值之和应小于此值。即,SQRT(Hx^2 + Hy^2 + Hz^2) = 2000uT
可以参考上方的BMM350 datasheet的5.3小节。
Q2:为什么电子罗盘不准,比如当传感器转动90度的时候,代码只显示转动了60度?
A2:电子罗盘是通过BMM350反馈的地磁数据进行二次计算的,并不是直接从BMM350中取得的原始数据。所以罗盘角度容易收到外部电磁场的干扰而不准确。
如果您的使用环境电磁场较为固定,我们也为您提供了电子罗盘校准教程,您可以修改代码,补偿电子罗盘角度从而获取更加稳定的数值。
每当您的使用环境电磁场发生较大改变,我们都建议您重新执行一次校准。
WIKI文档修改历史
| 文档版本号 | 修改时间 | 修改人 | 修改内容 |
|---|---|---|---|
| V1.0 | 2024.05.22 | 叶紫彬 | 第一版发布 |
| V1.1 | 2025.08.22 | 叶紫彬 | 增加电子罗盘校准说明 |
产品修改历史
| 产品版本号 | 修改时间 | 修改人 | 产品修改内容 |
|---|---|---|---|
| V1.0 | 2024.05.22 | 叶紫彬 | 第一版发布 |

