1. 简介
该Wiki为FireBeetle-ESP32-S3的进阶教程
如需了解FireBeetle-ESP32-S3简介及硬件详情,点击此处
如需了解FireBeetle-ESP32-S3基础教程,点击此处
如需了解Arduino基础,点击此处
2. ESP32-S3屏幕驱动
GDI显示屏接口,使用18pin-FPC线连接屏幕,使用屏幕更加便捷。
支持所有GDI接口的显示屏,如下面这些:
- 1.54" 240x240 IPS广视角TFT显示屏
- 1.8”128x160 IPS TFT LCD 显示屏
- 2.0" 320x240 IPS广视角TFT显示屏
- 2.8" 320x240 IPS TFT电阻触摸显示屏
- 3.5" 480x320 IPS TFT电容触摸显示屏
- 1.51”OLED 透明屏幕
| FPC PINS | FireBeetle ESP32-S3 PINS | Description |
|---|---|---|
| VCC | 3V3 | 3.3V |
| LCD_BL | 21/D13 | 背光 |
| GND | GND | GND |
| SCLK | 17/SCK | SPI时钟 |
| MOSI | 15/MOSI | 主机输出,从机输入 |
| MISO | 16/MISO | 主机输入,从机输出 |
| LCD_DC | 3/D2 | 数据/命令 |
| LCD_RST | 38/D3 | 复位 |
| LCD_CS | 18/D6 | TFT片选 |
| SD_CS | 9/D7 | SD卡片选 |
| FCS | 7/D6 | 字库片选 |
| TCS | 12/D12 | 触摸片选 |
| SCL | 2/SCL | I2C时钟 |
| SDA | 1/SDA | I2C数据 |
| INT | 13/D11 | INT |
| BUSY | 14/D10 | 防撕裂引脚 |
| X1 | NC | 自定义引脚1 |
| X2 | NC | 自定义引脚2 |
示例
该示例为驱动1.8”128x160 IPS TFT LCD 显示屏
使用前请下载DFRobot_GDL库文件
#include "DFRobot_GDL.h"

#define TFT_DC  3
#define TFT_CS  18
#define TFT_RST 38

DFRobot_ST7735_128x160_HW_SPI screen(/*dc=*/TFT_DC,/*cs=*/TFT_CS,/*rst=*/TFT_RST);
/* M0 mainboard DMA transfer */
//DFRobot_ST7735_128x160_DMA_SPI screen(/*dc=*/TFT_DC,/*cs=*/TFT_CS,/*rst=*/TFT_RST);


void setup() {
  Serial.begin(115200);
  screen.begin();
}

void loop(){
    testLine();
    testFastLines(COLOR_RGB565_PURPLE,COLOR_RGB565_YELLOW);
    testRects(COLOR_RGB565_BLACK,COLOR_RGB565_WHITE);
    testRoundRects();
    testCircles(24,COLOR_RGB565_BLUE);
    testTriangles(COLOR_RGB565_YELLOW);
    testPrint();
}


void testLine(){
  uint16_t color = 0x00FF;
  screen.fillScreen(COLOR_RGB565_BLACK);
  for (int16_t x=0; x < screen.width(); x+=6) {
    screen.drawLine(/*x0=*/screen.width()/*Screen width*//2, /*y0=*/screen.height()/*Screen height*//2, /*x1=*/x, /*y1=*/0, /*c=*/color+=0x0700);
  }
  for (int16_t y=0; y < screen.height(); y+=6) {
    screen.drawLine(screen.width()/2, screen.height()/2, screen.width(), y, color+=0x0700);
  }

  for (int16_t x = screen.width(); x >= 0; x-=6) {
    screen.drawLine(screen.width()/2, screen.height()/2, x,screen.height(), color+=0x0700);
  }

  for (int16_t y = screen.height(); y >= 0; y-=6) {
    screen.drawLine(screen.width()/2, screen.height()/2, 0, y, color+=0x0700);
  }
}

void testFastLines(uint16_t color1, uint16_t color2) {
  for (int16_t y=0; y < screen.height(); y+=4) {
    screen.drawFastHLine(/*x=*/0, /*y=*/y, /*w=*/screen.width(),/*c=*/color2);
    delay(10);
  }

  for(int16_t x=0; x < screen.width(); x+=3) {
    screen.drawFastVLine(/*x=*/x, /*y=*/0, /*h=*/screen.height(), /*c=*/color1);
    delay(10);
  }
}

void testRects(uint16_t color1, uint16_t color2) {
    screen.fillScreen(COLOR_RGB565_BLACK);
    int16_t x=screen.width()-12;
    for (; x > 100; x-=screen.width()/40) {
      screen.drawRect(/*x=*/screen.width()/2 -x/2, /*y=*/screen.height()/2 -x/2 , /*w=*/x, /*h=*/x, /*color=*/color2+=0x0F00);
      delay(100);
    }

    screen.fillRect(/*x=*/screen.width()/2 -x/2, /*y=*/screen.height()/2 -x/2 , /*w=*/x, /*h=*/x, /*color=*/color2);
    delay(100);
    for(; x > 6; x-=screen.width()/40){
      screen.drawRect(screen.width()/2 -x/2, screen.height()/2 -x/2 , x, x, color1);
      delay(100);
    }
}

void testRoundRects() {
  screen.fillScreen(COLOR_RGB565_BLACK);
  int color = 0xF00F;
  int i;
  int x = 0;
  int y = 0;
  int w = screen.width()-3;
  int h = screen.height()-3;
  for(i = 0 ; i <= 10; i+=2) {
    screen.drawRoundRect(/*x0=*/x, /*y0=*/y, /*w=*/w, /*h=*/h, /*radius=*/20, /*color=*/color);
    x+=5;
    y+=5;
    w-=10;
    h-=10;
    color+=0x0100;
    delay(50);
  }
  for(i = 0 ; i <= 10; i+=2) {
    screen.fillRoundRect(/*x0=*/x, /*y0=*/y, /*w=*/w, /*h=*/h, /*radius=*/10, /*color=*/color);
    x+=5;
    y+=5;
    w-=10;
    h-=10;
    color+=0x0500;
    delay(50);
  }
}

void testCircles(uint8_t radius, uint16_t color) {
  screen.fillScreen(COLOR_RGB565_BLACK);
  for (int16_t x=radius; x <=screen.width()-radius; x+=radius*2) {
    for (int16_t y=radius; y <=screen.height()-radius; y+=radius*2) {
      screen.drawCircle(/*x0=*/x, /*y0=*/y, /*r=*/radius, /*color=*/color);
        if(x == y ||x == -y ||x == y + 2*radius)
          screen.fillCircle(/*x0=*/x, /*y0=*/y, /*r=*/radius, /*color=*/color);
       color += 800;
       delay(100);
    }
  }
}

void testTriangles(uint16_t color){
  screen.fillScreen(COLOR_RGB565_BLACK);

  for (int16_t i=0; i <=screen.width(); i+=24)
    screen.drawTriangle(/*x0=*/i,/*y0=*/0,/*x1=*/0,/*y1=*/screen.height()-i,/*x2=*/screen.width()-i,/*y2=*/screen.height(), /*color=*/color);

  for (int16_t i=0; i <screen.width(); i+=24)
    screen.drawTriangle(screen.width(),i*4/3,0,screen.height()-i*4/3,i,0, color);

  for (int16_t i=0; i <screen.width(); i+=24)
    screen.drawTriangle(screen.width(),i*4/3,i,0,screen.width()-i,screen.height(), color);

  color = COLOR_RGB565_RED;
  for (int16_t i=0; i <=screen.width(); i+=24)
    screen.fillTriangle(/*x0=*/i,/*y0=*/0,/*x1=*/0,/*y1=*/screen.height()-i,/*x2=*/screen.width()-i,/*y2=*/screen.height(), /*color=*/color+=100);

  for (int16_t i=0; i <screen.width(); i+=24)
    screen.fillTriangle(screen.width(),i*4/3,0,screen.height()-i*4/3,i,0, color+=100);

  for (int16_t i=0; i <screen.width(); i+=24)
    screen.fillTriangle(screen.width(),i*4/3,i,0,screen.width()-i,screen.height(), color+=100);
}

void testPrint() {
  int16_t color = 0x00FF;
  screen.setTextWrap(false);
  screen.fillScreen(COLOR_RGB565_BLACK);
  screen.setCursor(0, 50);
  screen.setTextColor(color+=0x3000);
  screen.setTextSize(0);
  screen.println("Hello World!");
  screen.setTextColor(color+=0x3000);
  screen.setTextSize(1);
  screen.println("Hello World!");
  screen.setTextColor(color+=0x3000);
  screen.setTextSize(2);
  screen.println("Hello World!");
  screen.setTextColor(color+=0x3000);
  screen.setTextSize(3);
  screen.println("Hello World!");
  screen.setTextColor(color+=0x3000)
  screen.setTextSize(4);
  screen.println("Hello!");
  screen.setTextSize(5);
  screen.print("Hello!");
  delay(2000);
  screen.setCursor(0, 0);
  screen.fillScreen(COLOR_RGB565_BLACK);
  screen.setTextSize(2);
  screen.setTextColor(color+=0x3000);
  screen.print("a = ");
  screen.setTextColor(color+=0x3000);
  int a = 1234;
  screen.println(a, 1);
  screen.setTextColor(color+=0x3000);
  screen.print(8675309, HEX);
  screen.println("this is HEX!");
  screen.println("");
  screen.setTextColor(color+=0x0F00);
  screen.println("running for: ");
  screen.setTextColor(color+=0x0F00);
  screen.print(millis());
  screen.setTextColor(color+=0x0F00);
  screen.println("/1000 seconds.");
  char text[] = "Hi DFRobot!";
  screen.setTextColor(color+=0x0F00);
  screen.setTextWrap(true);
  screen.setTextSize(3);
  screen.println(text);
  //screen.setFonts((const gdl_Font_t *)SIMKAIFont18ptBitmaps);
  screen.println(text);
  delay(2000);
}
3. ESP32-S3蓝牙收发
3.1 ESP32-S3与手机蓝牙通信
使用该实例演示ESP32-S3与手机之间的数据传输,如果需要修改或使用数据,只需更改数据接收部分或数据发送部分代码
/*
    Video: https://www.youtube.com/watch?v=oCMOYS71NIU
    Based on Neil Kolban example for IDF: https://github.com/nkolban/esp32-snippets/blob/master/cpp_utils/tests/BLE%20Tests/SampleNotify.cpp
    Ported to Arduino ESP32 by Evandro Copercini

   Create a BLE server that, once we receive a connection, will send periodic notifications.
   The service advertises itself as: 6E400001-B5A3-F393-E0A9-E50E24DCCA9E
   Has a characteristic of: 6E400002-B5A3-F393-E0A9-E50E24DCCA9E - used for receiving data with "WRITE"
   Has a characteristic of: 6E400003-B5A3-F393-E0A9-E50E24DCCA9E - used to send data with  "NOTIFY"

   The design of creating the BLE server is:
   1. Create a BLE Server
   2. Create a BLE Service
   3. Create a BLE Characteristic on the Service
   4. Create a BLE Descriptor on the characteristic
   5. Start the service.
   6. Start advertising.

*/

/* 该示例演示了蓝牙数据透传,烧录代码,打开串口监视器,打开手机的BLE调试助手
 * 1.即可看见ESP32-S3发送的数据--见APP使用图
 * 2.通过BLE调试助手的输入框可向ESP32-S3发送数据--见APP使用图
 * 该示例由BLE_uart示例更改而来
 */

#include <BLEDevice.h>
#include <BLEServer.h>
#include <BLEUtils.h>
#include <BLE2902.h>

BLEServer *pServer = NULL;
BLECharacteristic * pTxCharacteristic;
bool deviceConnected = false;
uint8_t txValue = 0;

// See the following for generating UUIDs:
// https://www.uuidgenerator.net/

#define SERVICE_UUID           "6E400001-B5A3-F393-E0A9-E50E24DCCA9E" // UART service UUID
#define CHARACTERISTIC_UUID_RX "6E400002-B5A3-F393-E0A9-E50E24DCCA9E"
#define CHARACTERISTIC_UUID_TX "6E400003-B5A3-F393-E0A9-E50E24DCCA9E"


//蓝牙连接/断开处理。当有连接/断开事件发生时自动触发
class MyServerCallbacks: public BLEServerCallbacks {
    void onConnect(BLEServer* pServer) {   //当蓝牙连接时会执行该函数
      Serial.println("蓝牙已连接");
	  deviceConnected = true;
    };

    void onDisconnect(BLEServer* pServer) {  //当蓝牙断开连接时会执行该函数
      Serial.println("蓝牙已断开");
	  deviceConnected = false;
      delay(500); // give the bluetooth stack the chance to get things ready
      pServer->startAdvertising(); // restart advertising

    }
};

/****************数据接收部分*************/
/****************************************/
//蓝牙接收数据处理。当收到数据时自动触发
class MyCallbacks: public BLECharacteristicCallbacks {
    void onWrite(BLECharacteristic *pCharacteristic) {
      String rxValue = pCharacteristic->getValue();//接收数据,并赋给rxValue

	  //if(rxValue == "ON"){Serial.println("开灯");}   //判断接收的字符是否为"ON"

	  if (rxValue.length() > 0) {
        Serial.println("*********");
        Serial.print("Received Value: ");
        for (int i = 0; i < rxValue.length(); i++){
          Serial.print(rxValue[i]);
        }
        Serial.println();
        Serial.println("*********");
      }
    }
};
/***************************************/
/****************************************/


void setup() {
  Serial.begin(115200);
  BLEBegin();  //初始化蓝牙

}

void loop() {
/****************数据发送部分*************/
/****************************************/
  if (deviceConnected) {  //如果有蓝牙连接,就发送数据
    pTxCharacteristic->setValue("Hello");  //发送字符串
    pTxCharacteristic->notify();
    delay(10); // bluetooth stack will go into congestion, if too many packets are sent

    pTxCharacteristic->setValue("DFRobot");  //发送字符串
    pTxCharacteristic->notify();
    delay(10); // bluetooth stack will go into congestion, if too many packets are sent
  }
/****************************************/
/****************************************/
}


void BLEBegin(){
  // Create the BLE Device
  BLEDevice::init(/*BLE名称*/"UART Service");

  // Create the BLE Server
  pServer = BLEDevice::createServer();
  pServer->setCallbacks(new MyServerCallbacks());

  // Create the BLE Service
  BLEService *pService = pServer->createService(SERVICE_UUID);

  // Create a BLE Characteristic
  pTxCharacteristic = pService->createCharacteristic(
                    CHARACTERISTIC_UUID_TX,
                    BLECharacteristic::PROPERTY_NOTIFY
                  );

  pTxCharacteristic->addDescriptor(new BLE2902());

  BLECharacteristic * pRxCharacteristic = pService->createCharacteristic(
                      CHARACTERISTIC_UUID_RX,
                      BLECharacteristic::PROPERTY_WRITE
                    );

  pRxCharacteristic->setCallbacks(new MyCallbacks());

  // Start the service
  pService->start();

  // Start advertising
  pServer->getAdvertising()->start();
  Serial.println("Waiting a client connection to notify...");
}
3.2 两个ESP32-S3蓝牙通讯
使用该实例演示ESP32-S3与ESP32-S3之间的数据传输,如果需要修改或使用数据,只需更改数据接收部分或数据发送部分代码
主机代码
/**
 * A BLE client example that is rich in capabilities.
 * There is a lot new capabilities implemented.
 * author unknown
 * updated by chegewara
 */

#include "BLEDevice.h"
//#include "BLEScan.h"

// The remote service we wish to connect to.
static BLEUUID serviceUUID("4fafc201-1fb5-459e-8fcc-c5c9c331914b");
// The characteristic of the remote service we are interested in.
static BLEUUID    charTXUUID("beb5483e-36e1-4688-b7f5-ea07361b26a8");

static BLEUUID    charRXUUID("beb5483f-36e1-4688-b7f5-ea07361b26a8");

static boolean doConnect = false;
static boolean connected = false;
static boolean doScan = false;
static BLERemoteCharacteristic* pTXRemoteCharacteristic;
static BLERemoteCharacteristic* pRXRemoteCharacteristic;
static BLEAdvertisedDevice* myDevice;


/****************数据接收部分*************/
/****************************************/
//蓝牙接收数据处理,当收到数据时自动触发
static void notifyCallback(BLERemoteCharacteristic* pBLERemoteCharacteristic, uint8_t* pData, size_t length, bool isNotify) {  //传入uint8_t* pData用于存放数据
    String BLEData = "";
    for(int i = 0; i < length; i++)  //
      BLEData += (char)pData[i];
    Serial.println("*********");
    Serial.print("Received Value: ");
    Serial.println(BLEData);
    Serial.println("*********");

    //if(BLEData == "ON"){Serial.println("开灯");}  //判断接收的字符是否为"ON"

    //Serial.print("Notify callback for characteristic ");
    //Serial.print(pBLERemoteCharacteristic->getUUID().toString().c_str());
    //Serial.print(" of data length ");
    //Serial.println(length);
}
/****************************************/
/****************************************/

//蓝牙连接/断开处理。当有连接/断开事件发生时自动触发
class MyClientCallback : public BLEClientCallbacks {
  void onConnect(BLEClient* pclient) {
  }

  void onDisconnect(BLEClient* pclient) {
    connected = false;
    Serial.println("onDisconnect");
  }
};


/**
 * Scan for BLE servers and find the first one that advertises the service we are looking for.
 */
 //蓝牙扫描处理事件。当开启扫描时自动触发
class MyAdvertisedDeviceCallbacks: public BLEAdvertisedDeviceCallbacks {
 /**
   * Called for each advertising BLE server.
   */
  void onResult(BLEAdvertisedDevice advertisedDevice) {
    //Serial.print("BLE Advertised Device found: ");
    //Serial.println(advertisedDevice.toString().c_str());

    // We have found a device, let us now see if it contains the service we are looking for.
    if (advertisedDevice.haveServiceUUID() && advertisedDevice.isAdvertisingService(serviceUUID)) {
      BLEDevice::getScan()->stop();
      myDevice = new BLEAdvertisedDevice(advertisedDevice);
      doConnect = true;
      doScan = true;

    } // Found our server
  } // onResult
}; // MyAdvertisedDeviceCallbacks


void setup() {
  Serial.begin(115200);
  Serial.println("Starting Arduino BLE Client application...");
  bleBegin();

}

void loop() {
  // If the flag "doConnect" is true then we have scanned for and found the desired
  // BLE Server with which we wish to connect.  Now we connect to it.  Once we are
  // connected we set the connected flag to be true.
  if (doConnect == true) {
    if (connectToServer()) {
      Serial.println("We are now connected to the BLE Server.");
    } else {
      Serial.println("We have failed to connect to the server; there is nothin more we will do.");
    }
    doConnect = false;
  }
/****************数据发送部分*************/
/****************************************/
  if (connected) {  //当连接到蓝牙从机时发送数据
    pTXRemoteCharacteristic->writeValue("我是主机");
    pTXRemoteCharacteristic->writeValue("Hello client");
  }
  if(!connected){  //当没有连接到蓝牙从机时重新扫描
    BLEDevice::getScan()->start(5,false);  // this is just example to start scan after disconnect, most likely there is better way to do it in arduino
  }
/****************************************/
/****************************************/
  delay(1000);
}


void bleBegin()
{
  BLEDevice::init("");

  // Retrieve a Scanner and set the callback we want to use to be informed when we
  // have detected a new device.  Specify that we want active scanning and start the
  // scan to run for 5 seconds.
  BLEScan* pBLEScan = BLEDevice::getScan();
  pBLEScan->setAdvertisedDeviceCallbacks(new MyAdvertisedDeviceCallbacks());//扫描处理函数
  pBLEScan->setInterval(1349);//设置扫描间隔时间
  pBLEScan->setWindow(449);//主动扫描时间
  pBLEScan->setActiveScan(true);
  pBLEScan->start(5, false);//扫描时间,单位秒
  }


//蓝牙连接处理
bool connectToServer() {
    Serial.print("Forming a connection to ");
    Serial.println(myDevice->getAddress().toString().c_str());

    BLEClient*  pClient  = BLEDevice::createClient();
    Serial.println(" - Created client");

    pClient->setClientCallbacks(new MyClientCallback());

    // Connect to the remove BLE Server.
    pClient->connect(myDevice);  // if you pass BLEAdvertisedDevice instead of address, it will be recognized type of peer device address (public or private)
    Serial.println(" - Connected to server");
    pClient->setMTU(517); //set client to request maximum MTU from server (default is 23 otherwise)

    // Obtain a reference to the service we are after in the remote BLE server.
    BLERemoteService* pRemoteService = pClient->getService(serviceUUID);
    if (pRemoteService == nullptr) {
      Serial.print("Failed to find our service UUID: ");
      Serial.println(serviceUUID.toString().c_str());
      pClient->disconnect();
      return false;
    }
    Serial.println(" - Found our service");


    // Obtain a reference to the characteristic in the service of the remote BLE server.
    pTXRemoteCharacteristic = pRemoteService->getCharacteristic(charTXUUID);
    if (pTXRemoteCharacteristic == nullptr) {
      Serial.print("Failed to find our characteristic UUID: ");
      Serial.println(charTXUUID.toString().c_str());
      pClient->disconnect();
      return false;
    }
    pRXRemoteCharacteristic = pRemoteService->getCharacteristic(charRXUUID);
    if (pRXRemoteCharacteristic == nullptr) {
      Serial.print("Failed to find our characteristic UUID: ");
      Serial.println(charRXUUID.toString().c_str());
      pClient->disconnect();
      return false;
    }
    Serial.println(" - Found our characteristic");

    if(pRXRemoteCharacteristic->canNotify())
      pRXRemoteCharacteristic->registerForNotify(notifyCallback);

    connected = true;
    return true;
}
从机代码
/*
    Based on Neil Kolban example for IDF: https://github.com/nkolban/esp32-snippets/blob/master/cpp_utils/tests/BLE%20Tests/SampleServer.cpp
    Ported to Arduino ESP32 by Evandro Copercini
    updates by chegewara
*/

#include <BLEDevice.h>
#include <BLEUtils.h>
#include <BLEServer.h>
#include <BLE2902.h>

// See the following for generating UUIDs:
// https://www.uuidgenerator.net/

#define SERVICE_UUID        "4fafc201-1fb5-459e-8fcc-c5c9c331914b"
#define CHARACTERISTIC_UUID_RX "beb5483e-36e1-4688-b7f5-ea07361b26a8"
#define CHARACTERISTIC_UUID_TX "beb5483f-36e1-4688-b7f5-ea07361b26a8"
uint8_t txValue = 0;
bool deviceConnected = false;
BLECharacteristic *pTxCharacteristic;


//蓝牙连接/断开处理。当有连接/断开事件发生时自动触发
class MyServerCallbacks: public BLEServerCallbacks {
    void onConnect(BLEServer* pServer) {   //当蓝牙连接时会执行该函数
      Serial.println("蓝牙已连接");
	  deviceConnected = true;
    };

    void onDisconnect(BLEServer* pServer) {  //当蓝牙断开连接时会执行该函数
        Serial.println("蓝牙已断开");
		deviceConnected = false;
        delay(500); // give the bluetooth stack the chance to get things ready
        BLEDevice::startAdvertising(); // restart advertising
    }
};
/****************数据接收部分*************/
/****************************************/
//蓝牙接收数据处理。当收到数据时自动触发
class MyCallbacks: public BLECharacteristicCallbacks {
    void onWrite(BLECharacteristic *pCharacteristic) {
      String rxValue = pCharacteristic->getValue();  //使用rxValue接收数据

      //if(rxValue == "ON"){Serial.println("开灯");}   //判断接收的字符是否为"ON"

      if (rxValue.length() > 0) {
        Serial.println("*********");
        Serial.print("Received Value: ");
        for (int i = 0; i < rxValue.length(); i++)
		      Serial.print(rxValue[i]);    //将接收的数据打印出来

        Serial.println();
        Serial.println("*********");
      }
    }
};
/****************************************/
/****************************************/

void setup() {
  Serial.begin(115200);
  Serial.println("Starting BLE work!");
  bleBegin();
}

/****************数据发送部分*************/
/****************************************/
void loop() {
  if(deviceConnected){  //当有设备连接时发送数据
    pTxCharacteristic->setValue("我是从机");
    pTxCharacteristic->notify();

    pTxCharacteristic->setValue("Hello Sever");
    pTxCharacteristic->notify();
  }
  /****************************************/
  /****************************************/
  delay(1000);
}


void bleBegin()
{
  BLEDevice::init(/*BLE名称*/"Long name works now");
  BLEServer *pServer = BLEDevice::createServer();
  pServer->setCallbacks(new MyServerCallbacks());
  BLEService *pService = pServer->createService(SERVICE_UUID);
  BLECharacteristic *pRxCharacteristic = pService->createCharacteristic(
                                         CHARACTERISTIC_UUID_RX,
                                         BLECharacteristic::PROPERTY_WRITE
                                       );
  pRxCharacteristic->setCallbacks(new MyCallbacks());

 pTxCharacteristic = pService->createCharacteristic(
                                         CHARACTERISTIC_UUID_TX,
                                         BLECharacteristic::PROPERTY_NOTIFY
                                       );
 pTxCharacteristic->addDescriptor(new BLE2902());

  pService->start();
  // BLEAdvertising *pAdvertising = pServer->getAdvertising();  // this still is working for backward compatibility
  BLEAdvertising *pAdvertising = BLEDevice::getAdvertising();
  pAdvertising->addServiceUUID(SERVICE_UUID);
  pAdvertising->setScanResponse(true);
  pAdvertising->setMinPreferred(0x06);  // functions that help with iPhone connections issue
  pAdvertising->setMinPreferred(0x12);
  BLEDevice::startAdvertising();

  }
4. WIFI控制LED
ESP32-S3具有WIFI功能,以下示例使用ESP32-S3创建了一个wifi服务器,使用客户端连接到该服务器,控制LED的亮灭
步骤
1.连接到WIFI"ESP32 S3",输入WIFI密码:12345678
2.访问网址 http://192.168.4.1/ON 来打开灯 访问 http://192.168.4.1/OFF 来关闭灯
3.在访问后通过点击上下 here 来便捷控制灯的亮灭而不需要输入网址进行
代码
/*
步骤:
1.连接到WIFI”ESP32 S3“,已设置WIFI密码:12345678
2.访问网址 http://192.168.4.1/ON 来打开灯 访问 http://192.168.4.1/OFF 来关闭灯
3.在访问后通过点击上下 here 来便捷控制灯的亮灭
*/

#include <WiFi.h>
#include <WiFiClient.h>
#include <WiFiAP.h>

#define myLED 21 //设置引脚21为LED引脚
// 设置WIFI名称以及密码
const char *ssid = "ESP32 S3";//WIFI名称
const char *password = "12345678";//密码

WiFiServer server(80);//网页服务端口默认为80


void setup() {
  pinMode(myLED, OUTPUT);

  Serial.begin(115200);
  Serial.println();
  Serial.println("Configuring access point...");

  //如果想要无密码开放网络请删除password
  WiFi.softAP(ssid, password);
  IPAddress myIP = WiFi.softAPIP();
  Serial.print("AP IP address: ");
  Serial.println(myIP);
  server.begin();

  Serial.println("Server started");
}

void loop() {
  WiFiClient client = server.available();   // 检测等待连接

  if (client) {                             // 检测是否连接
    Serial.println("New Client.");
    String currentLine = "";                // 创建String变量来保存数据
    while (client.connected()) {            // 保持连接时一直循环
      if (client.available()) {             // 检测连接是否有数据
        char c = client.read();             // 读取接收的数据
        //Serial.write(c);                    // 打印在串行监视器
        if (c == '\n') {                    // 如果读取的是换行符

          //结尾用换行符提醒结束
          if (currentLine.length() == 0) {
            client.println("HTTP/1.1 200 OK");
            client.println("Content-type:text/html");
            client.println();
             //将字符与here连接
            client.print("Click <a href=\"/ON\">here</a> to turn ON the LED.<br>");
            client.print("Click <a href=\"/OFF\">here</a> to turn OFF the LED.<br>");

            // HTTP响应为空行
            client.println();
            // 跳出循环
            break;
          } else {    // 如果有一个换行符就清除变量缓存的数据
            currentLine = "";
          }
        } else if (c != '\r') {  // 如果获得回车以外的字符
          currentLine += c;      // 获得的字符添加到变量末尾
        }

        // 检查是否获得/ON或者/OFF
        if (currentLine.endsWith("/ON")) {
          digitalWrite(myLED, HIGH);               //得到/ON时打开灯
        }
        if (currentLine.endsWith("/OFF")) {
          digitalWrite(myLED, LOW);                //得到/OFF时关闭灯
        }
      }
    }
    // 关闭连接
    client.stop();
    Serial.println("Client Disconnected.");
  }
}
结果
使用手机连接该wifi,通过浏览器访问192.168.4.1,如图所示显示ip地址为192.168.4.1,服务已开启
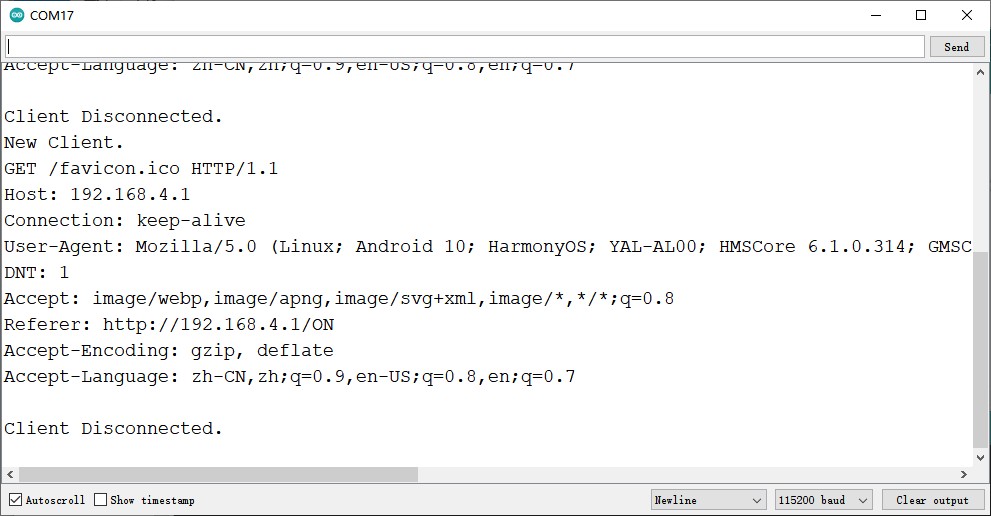
使用浏览器访问该ip地址得到如下图所示

成员函数
-
WiFiServer server()
说明:设置服务器端口 -
softAP(ssid,password)
说明:将WiFi配置为AP模式,并设置名称以及密码
参数:- ssid: AP模式的wifi名字
- password: ap模式的wifi密码
-
server.available()
说明:检测服务端口是否有连接(WIFI是否连接) -
client.connected()
说明:检测连接状态
返回值:true/false -
client.available()
说明:检测连接WIFI是否有数据输入 -
client.read()
说明:读取WIFI接收数据 -
currentLine.endsWith()
说明:检测是否获得括号内容 -
client.stop()
说明:断开连接
5. ESP-NOW数据传输
ESP-NOW是乐鑫开发的终端数据传输、无连接的快速通讯技术,适用于智能灯、遥控控制、传感器数据回传等场景。
5.1 获取控制器MAC地址
烧录该代码,打开串口即可看到设备MAC地址
#include "WiFi.h"

void setup(){
  Serial.begin(115200);
  WiFi.mode(WIFI_MODE_STA);
}

void loop(){
  Serial.println(WiFi.macAddress());
  delay(1000);
}
5.2 收发数据
填写MAC地址后烧录代码,可实现两个设备间相互收发数据
#include <esp_now.h>
#include <WiFi.h>

//MAC
uint8_t MAC1[] = {0xFF, 0xFF, 0xFF, 0xFF, 0xFF, 0xFF};

typedef struct struct_message {
  char a[16];
  int b;
  float c;
  bool d;
} struct_message;

struct_message sendData;
struct_message recvData;

esp_now_peer_info_t peerInfo;

//发送回调函数
void OnDataSent(const uint8_t *mac_addr, esp_now_send_status_t status) {
  if(status == ESP_NOW_SEND_SUCCESS){
    Serial.println("Send_Success");
  }else{
    Serial.println("Send_Fail");
  }
}

//接收回调函数
void OnDataRecv(const esp_now_recv_info_t *info, const uint8_t *Data, int len) {
  memcpy(&recvData, Data, sizeof(recvData));
  Serial.print("Bytes received: ");
  Serial.println(len);
  Serial.println(recvData.a);
  Serial.println(recvData.b);
  Serial.println(recvData.c);
  Serial.println(recvData.d);
  Serial.println("---------");
}

void setup() {
  Serial.begin(115200);
  WiFi.mode(WIFI_STA);

  //Init ESP-NOW
  if (esp_now_init() != ESP_OK) {
    Serial.println("Error initializing");
    return;
  }

  //注册发送回调函数
  esp_now_register_send_cb(OnDataSent);

  peerInfo.channel = 0;
  peerInfo.encrypt = false;
  //注册MAC1设备
  memcpy(peerInfo.peer_addr, MAC1, 6);
  if (esp_now_add_peer(&peerInfo) != ESP_OK){
    Serial.println("Failed to add peer");
    return;
  }

  //注册接收回调函数
  esp_now_register_recv_cb(OnDataRecv);
}

void loop() {
  strcpy(sendData.a, "DFRobot");
  sendData.b = 10;
  sendData.c = 9.9;
  sendData.d = true;

  esp_err_t result = esp_now_send(MAC1, (uint8_t *)&sendData, sizeof(sendData));

  if (result == ESP_OK) {
    Serial.println("Send success");
  }
  else {
    Serial.println("Send Fail");
  }
  delay(2000);
}
5.3 给多个设备发送数据
填写MAC地址后烧录代码,可同时给多个设备发送数据
#include <esp_now.h>
#include <WiFi.h>

//MAC
uint8_t MAC1[] = {0xAA, 0xAA, 0xAA, 0xAA, 0xAA, 0xAA};
uint8_t MAC2[] = {0xBB, 0xBB, 0xBB, 0xBB, 0xBB, 0xBB};

typedef struct struct_message {
  uint8_t ID;
  int data;
} struct_message;

struct_message sendData;
struct_message recvData;

esp_now_peer_info_t peerInfo;

// Callback when data is sent   发送回调函数
void OnDataSent(const uint8_t *mac_addr, esp_now_send_status_t status) {
  if(status == ESP_NOW_SEND_SUCCESS){
    Serial.println("Send Success");
  }else{
    Serial.println("Send Fail");
  }
}

// Callback when data is received   接收回调函数
void OnDataRecv(const esp_now_recv_info_t *info, const uint8_t *Data, int len) {
  memcpy(&recvData, Data, sizeof(recvData));
  Serial.print("Bytes received: ");
  Serial.println(len);
  Serial.println(recvData.ID);
  Serial.println(recvData.data);
  Serial.println("---------");
}

void setup() {
  Serial.begin(115200);
  WiFi.mode(WIFI_STA);

  //Init ESP-NOW
  if (esp_now_init() != ESP_OK) {
    Serial.println("Error initializing");
    return;
  }

  //注册发送回调函数
  esp_now_register_send_cb(OnDataSent);

  peerInfo.channel = 0;
  peerInfo.encrypt = false;
  //注册MAC1设备
  memcpy(peerInfo.peer_addr, MAC1, 6);
  if (esp_now_add_peer(&peerInfo) != ESP_OK){
    Serial.println("Failed to add peer");
    return;
  }
  //注册MAC2设备
  memcpy(peerInfo.peer_addr, MAC2, 6);
  if (esp_now_add_peer(&peerInfo) != ESP_OK){
    Serial.println("Failed to add peer");
    return;
  }

  //注册接收回调函数
  esp_now_register_recv_cb(OnDataRecv);
}

void loop() {
  sendData.ID = 0;
  sendData.data = 10;

  //向所有注册设备发送信息
  esp_err_t result = esp_now_send(0, (uint8_t *)&sendData, sizeof(sendData));
  if (result == ESP_OK) {
    Serial.println("Send success");
  }
  else {
    Serial.println("Send Fail");
  }
  //向指定MAC设备发送信息
  //esp_err_t result = esp_now_send(MAC1, (uint8_t *)&sendData, sizeof(sendData));
  //if (result == ESP_OK) {
  //  Serial.println("Send success");
  //}
  //else {
  //  Serial.println("Send Fail");
  //}
  delay(2000);
}
6. 应用示例拓展
6.1 OLED显示测量温湿度
通过该示例,你可以将获取温湿度信息并显示到OLED屏幕上
您还需准备
1.您需要先安装SHT3x库
关于如何安装库点击这里
2.接线图
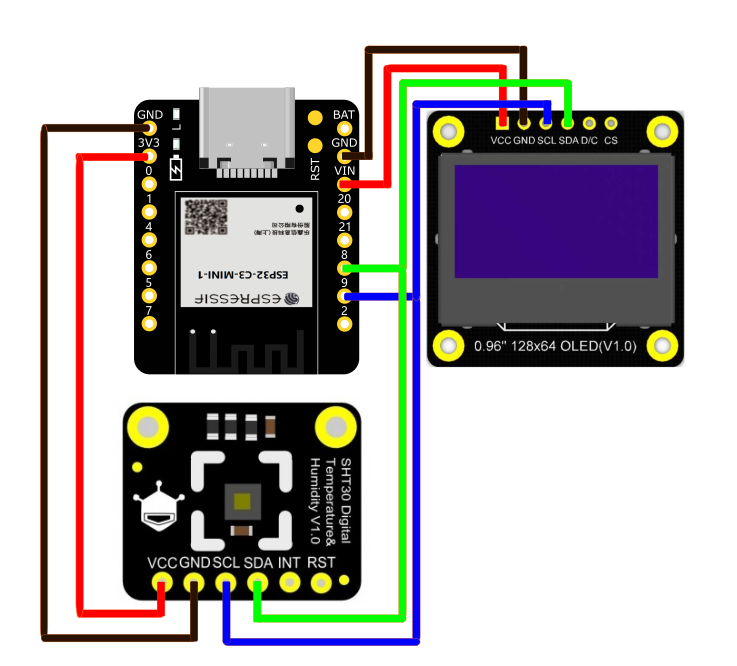
代码
#include <Arduino.h>
#include <U8g2lib.h> //导入字库
//#include <SPI.h>
#include <Wire.h>

#include <DFRobot_SHT3x.h>

/*
---显示屏硬件I2C接口---
U8G2_R0 不旋转,横向,绘制方向从左到右
U8G2_R1 顺时针旋转90度,绘制方向从上到下
U8G2_R2 顺时针旋转180度,绘制方向从右到左
U8G2_R3 顺时针旋转270度,绘制方向从下到上
U8G2_MIRROR 正常显示镜像内容(v2.6.x版本以上使用)   注意:U8G2_MIRROR需要与setFlipMode()配搭使用.
U8x8_PIN_NONE 表示引脚为空,不会使用复位引脚
---显示屏硬件SPI接口---
cs 按引脚接上即可(引脚可自己选择)
dc 按引脚接上即可(引脚可自己选择)
*/
U8G2_SSD1306_128X64_NONAME_F_HW_I2C u8g2(/* rotation=*/U8G2_R0, /* reset=*/ U8X8_PIN_NONE);

//当ADR接VDD时可选择0x45当ADR接GND时可选择0x44
//默认为0x45,RST(复位脚)不用连接
DFRobot_SHT3x sht3x(&Wire,/*address=*/0x45,/*RST=*/4);

//使用SPI需要注释上方代码,使用下方代码
//DFRobot_SHT3x   sht3x;

void setup() {
  Serial.begin(115200);
  u8g2.begin();
  u8g2.setFontPosTop();//使用drawStr显示字符串时,默认标准为显示字符的左下角坐标。本函数的功能可理解为将坐标位置改为显示字符串的左上角为坐标标准。
  //初始化传感器
  while (sht3x.begin() != 0) {
        Serial.println("Failed to Initialize the chip, please confirm the wire connection");
        delay(1000);
      }
      Serial.print("Chip serial number");
      Serial.println(sht3x.readSerialNumber());
      if(!sht3x.softReset()){
         Serial.println("Failed to Initialize the chip....");
       }
}

void loop() {
  //清理屏幕
  u8g2.clearBuffer();
  //将温度、湿度读取赋值用于显示
  float   temp = sht3x.getTemperatureC();
  float   humi = sht3x.getHumidityRH();
  //显示温度
  u8g2.setFont(u8g2_font_osb18_tf);    // 选择字体以及大小(见官方)
  u8g2.drawStr(5,10,"Temp");//在指定位置写出字符
  u8g2.setFont(u8g2_font_t0_18b_tr);
  u8g2.setCursor(75, 15);//显示从该位置开始
  u8g2.print(temp);
  //显示湿度
  u8g2.setFont(u8g2_font_osb18_tf);
  u8g2.drawStr(5,40,"Humi");
  u8g2.setFont(u8g2_font_t0_18b_tr);
  u8g2.setCursor(75, 45);
  u8g2.print(humi);
  u8g2.sendBuffer();
  delay(1000);
}
结果
成员函数
-
u8g2.drawStr(x,y,"Temp")
说明:指定屏幕位置显示自定义内容
参数:- X、Y: 开始写的坐标(显示字体从左下角向右上角显示)
- "Temp": 可填英文和数字
-
u8g2.setCursor(x,y)和u8g2.print()
说明:搭配使用,前者为显示开始位置,后者同Arduino的print相同作用
参数:- X、Y: 开始写的坐标(显示字体从左下角向右上角显示)
6.2 WIFI获取温湿度
通过该示例,可进一步学会局域网下Wifi的信息传递,你可以学会如何访问局域网下的IP地址来获得在另一处的SHT30的温湿度传感器状态
您还需准备
- FermionSHT30温湿度传感器 x1 (或使用相同SHT3x代码库其它SHT温湿度传感器)
- 杜邦线 若干
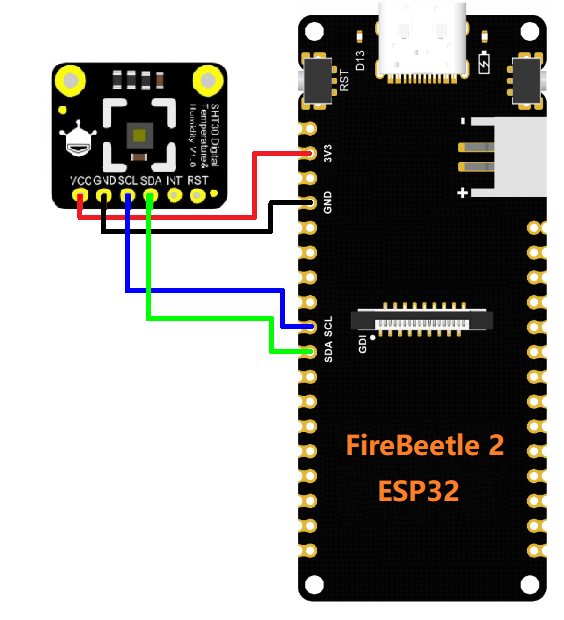
您还需要按照示例9.1中步骤安装传感器库以及将其与ESP32连接。
接线图
步骤
1.连接到WIFI”ESP32 S3“,已设置WIFI密码:12345678
2.访问网址 http://192.168.4.1/GET 来获取局域网中的温湿度信息
3.在温湿度显示网页您可以通过刷新来更新传感器的数据
代码
/*
本示例是SHT30连接上ESPC3通过局域网获取温湿度
*/

#include <WiFi.h>
#include <WiFiClient.h>
#include <WiFiAP.h>
#include <DFRobot_SHT3x.h>
//当ADR接VDD时可选择0x45当ADR接GND时可选择0x44
//默认为0x45,RST(复位脚)不用连接
DFRobot_SHT3x sht3x(&Wire,/*address=*/0x45,/*RST=*/4);

//使用SPI需要注释上方代码,使用下方代码
//DFRobot_SHT3x   sht3x;

// 设置WIFI名称以及密码
const char *ssid = "ESP32 S3";//WIFI名称
const char *password = "12345678";//密码

WiFiServer server(80);//网页服务端口默认为80

// 显示上次传感器状态反馈状态

void setup() {
  //pinMode(myLED, OUTPUT);

  Serial.begin(115200);
  Serial.println();
  Serial.println("Configuring access point...");

  //如果想要无密码开放网络请删除password
  WiFi.softAP(ssid, password);
  IPAddress myIP = WiFi.softAPIP();
  Serial.print("AP IP address: ");
  Serial.println(myIP);
  server.begin();

  Serial.println("Server started");
  //初始化传感器
  while (sht3x.begin() != 0) {
        Serial.println("Failed to Initialize the chip, please confirm the wire connection");
        delay(1000);
      }
      Serial.print("Chip serial number");
      Serial.println(sht3x.readSerialNumber());
      if(!sht3x.softReset()){
         Serial.println("Failed to Initialize the chip....");
       }
}

void loop() {

WiFiClient client = server.available();   // 检测等待连接

  if (client) {                             // 检测是否连接
    Serial.println("New Client.");
    String currentLine = "";                // 创建String变量来保存数据
    while (client.connected()) {            // 保持连接时一直循环
      if (client.available()) {             // 检测连接是否有数据
        char c = client.read();             // 读取接收的数据
        //Serial.write(c);                    // 打印在串行监视器
        if (c == '\n') {                    // 如果读取的是换行符

          //清除掉缓存的内容
          if (currentLine.length() == 0) {
            client.print(" ");
            break;
          } else {    // 如果有一个换行符就清除变量缓存的数据
            currentLine = "";
          }
        } else if (c != '\r') {  // 如果获得回车以外的字符
          currentLine += c;      // 获得的字符添加到变量末尾
        }

        // 检查是否有/GET在末尾
        if (currentLine.endsWith("/GET")) {
             //把温度、湿度读出
             float   temp = sht3x.getTemperatureC();
             float   humi = sht3x.getHumidityRH();
             //打印在网页
             client.print("temp (C): "); client.println(temp);
             client.print("humi (%RH): "); client.println(humi);
        }
      }
    }
    // 关闭连接
    client.stop();
    Serial.println("Client Disconnected.");
  }
  }
结果
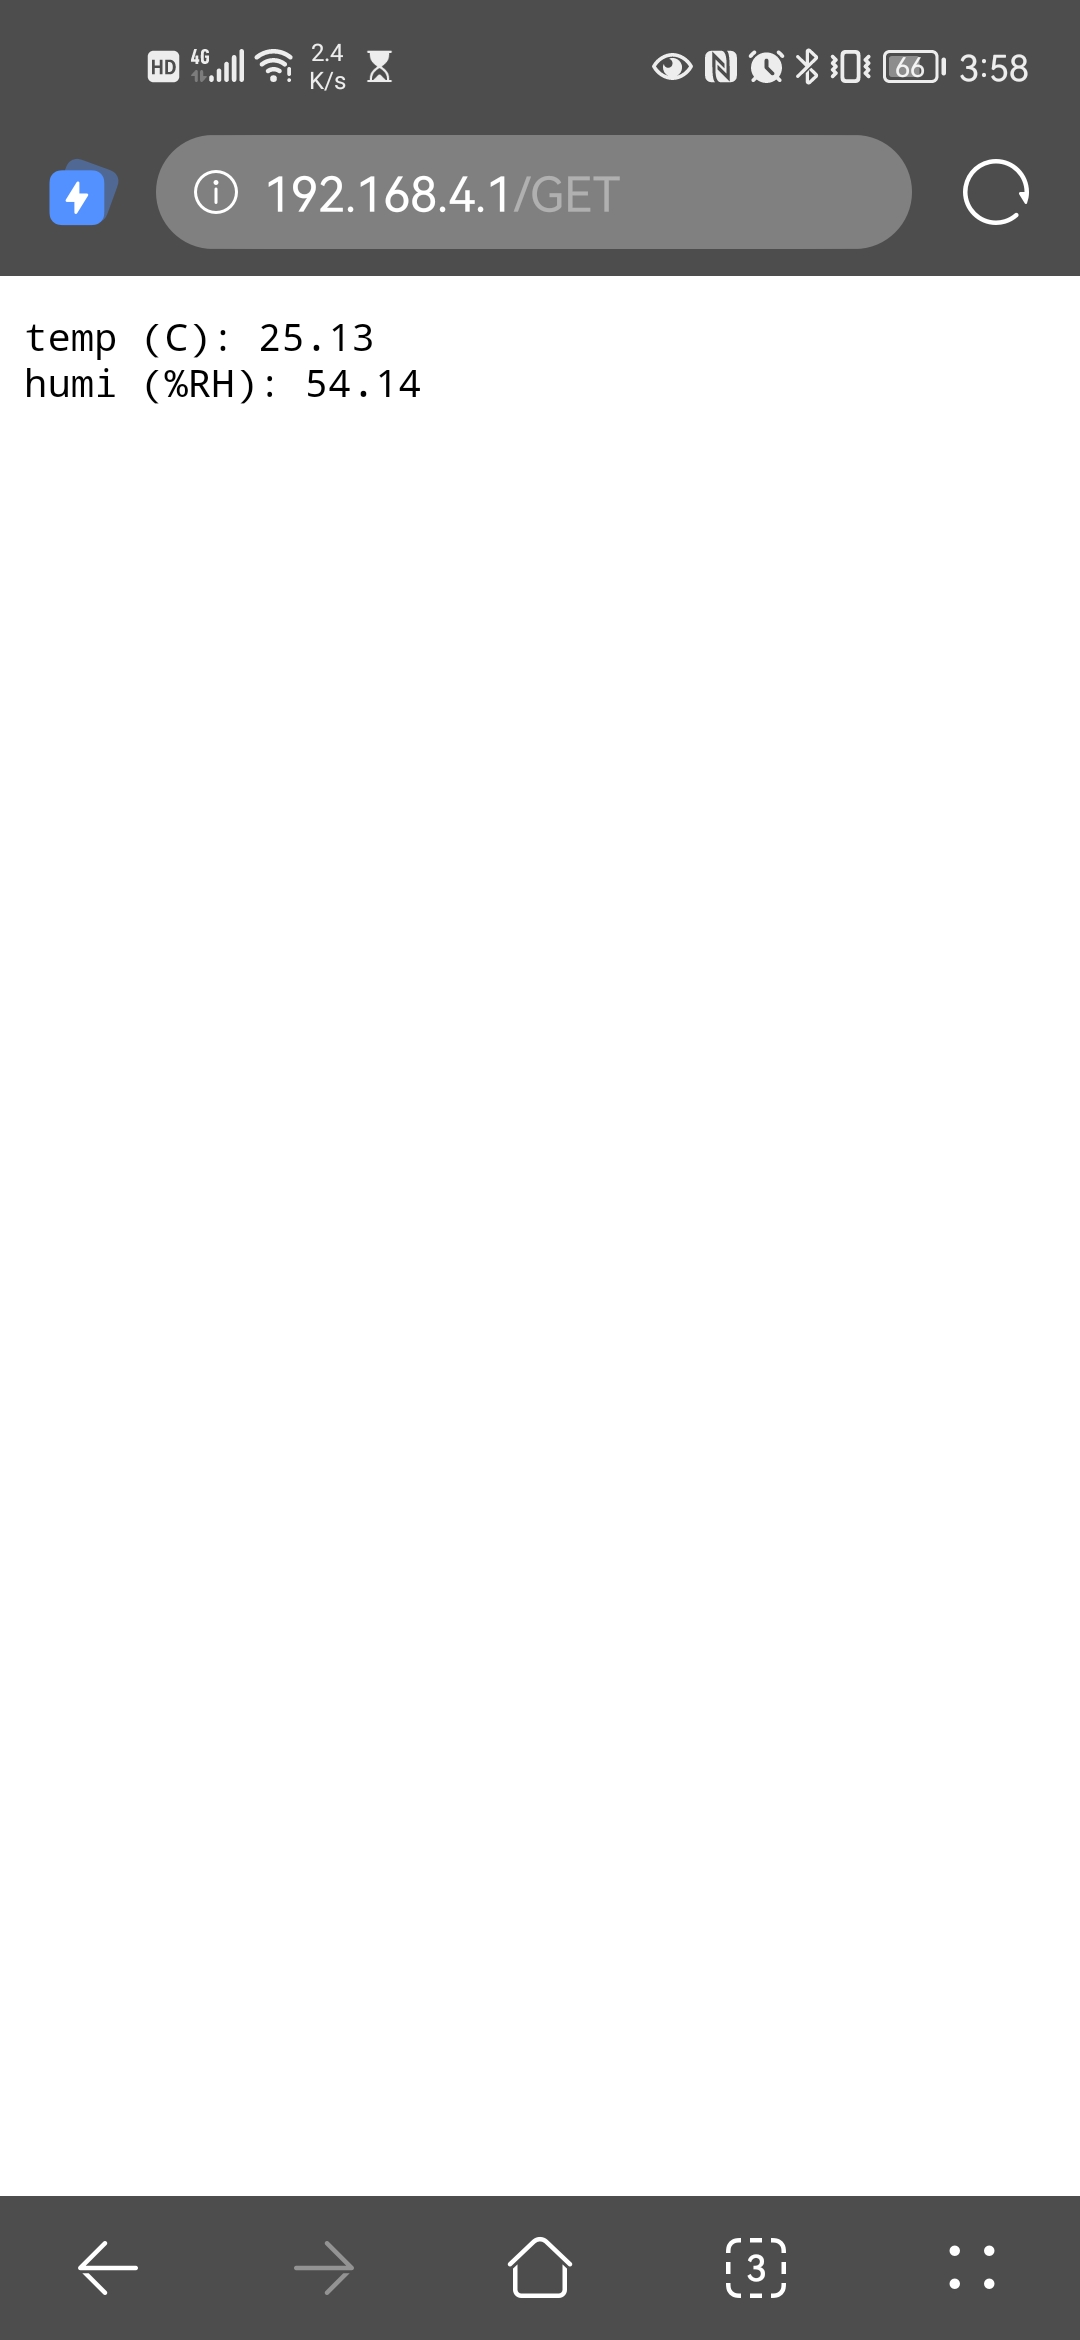
您可以通过手机,电脑等访问网址以获得如下结果(局域网下的温湿度传感器的温湿度)。
成员函数
-
WiFi.softAP(ssid, password)
说明:类似将设置好的WIFI账号密码开热点
参数:- ssid: WIFI名
- password: WIFI密码
-
WiFi.softAPIP()
说明:WIFI的IP地址
6.3 WIFI获取网络时间
本实例演示了从网络时间服务器获取时间,并使用ESP32自带的RTC时钟保持时间更新
本示例来自CSDN博主「Naisu Xu」,原文链接:https://blog.csdn.net/Naisu_kun/article/details/115627629
#include <WiFi.h>

const char *ssid = "********";    //WIFI名称
const char *password = "********"; //WIFI密码

const char *ntpServer = "pool.ntp.org";
const long gmtOffset_sec = 8 * 3600;
const int daylightOffset_sec = 0;

void printLocalTime()
{
    struct tm timeinfo;
    if (!getLocalTime(&timeinfo))
    {
        Serial.println("Failed to obtain time");
        return;
    }
    Serial.println(&timeinfo, "%F %T %A"); // 格式化输出
}

void setup()
{
    Serial.begin(115200);
    Serial.println();

    WiFi.begin(ssid, password);
    while (WiFi.status() != WL_CONNECTED)
    {
        delay(500);
        Serial.print(".");
    }
    Serial.println("WiFi connected!");

    // 从网络时间服务器上获取并设置时间
    // 获取成功后芯片会使用RTC时钟保持时间的更新
    configTime(gmtOffset_sec, daylightOffset_sec, ntpServer);
    printLocalTime();

    WiFi.disconnect(true);
    WiFi.mode(WIFI_OFF);
    Serial.println("WiFi disconnected!");
}

void loop()
{
    delay(1000);
    printLocalTime();
}
struct tm结构体
struct tm {
int tm_sec; // 秒,取值0~59;
int tm_min; // 分,取值0~59;
int tm_hour; // 时,取值0~23;
int tm_mday; // 月中的日期,取值1~31;
int tm_mon; // 月,取值0~11;
int tm_year; // 年,其值等于实际年份减去1900;
int tm_wday; // 星期,取值0~6,0为周日,1为周一,依此类推;
int tm_yday; // 年中的日期,取值0~365,0代表1月1日,1代表1月2日,依此类推;
int tm_isdst; // 夏令时标识符,实行夏令时的时候,tm_isdst为正;不实行夏令时的进候,tm_isdst为0;不了解情况时,tm_isdst()为负
};
struct tm结构体格式化输出
| 格式化字符 | 输出 |
|---|---|
| %a | 星期几的简写 |
| %A | 星期几的全称 |
| %b | 月份的简写 |
| %B | 月份的全称 |
| %c | 标准的日期的时间串 |
| %C | 年份的后两位数字 |
| %d | 十进制表示的每月的第几天 |
| %D | 月/天/年 |
| %e | 在两字符域中,十进制表示的每月的第几天 |
| %F | 年-月-日 |
| %g | 年份的后两位数字,使用基于周的年 |
| %G | 年分,使用基于周的年 |
| %h | 简写的月份名 |
| %H | 24小时制的小时 |
| %I | 12小时制的小时 |
| %j | 十进制表示的每年的第几天 |
| %m | 十进制表示的月份 |
| %M | 十时制表示的分钟数 |
| %p | 本地的AM或PM的等价显示 |
| %r | 12小时的时间 |
| %R | 显示小时和分钟:hh:mm |
| %S | 十进制的秒数 |
| %t | 水平制表符 |
| %T | 显示时分秒:hh:mm:ss |
| %u | 每周的第几天,星期一为第一天 (值从0到6,星期一为0) |
| %U | 第年的第几周,把星期日做为第一天(值从0到53) |
| %V | 每年的第几周,使用基于周的年 |
| %w | 十进制表示的星期几(值从0到6,星期天为0) |
| %W | 每年的第几周,把星期一做为第一天(值从0到53) |
| %x | 标准的日期串 |
| %X | 标准的时间串 |
| %y | 不带世纪的十进制年份(值从0到99) |
| %Y | 带世纪部分的十进制年份 |
| %z | 时区名称,如果不能得到时区名称则返回空字符 |
6.4 WIFI获取天气
本示例用于让你学会如何获取天气信息并让你体会HTTP中获取的信息通过Json提取数据并打印的
- 烧录代码前我们进行以下几个步骤
1.您需要安装Arduino_JSON库。通过 Arduino IDE Tools -> Manage Libraries 中输入 Arduino_JSON 并安装该库
2.注册OpenWeather的账号以获取我们想要的天气信息 打开浏览器并转到 https://openweathermap.org/appid/ 按注册按钮并创建一个免费帐户。
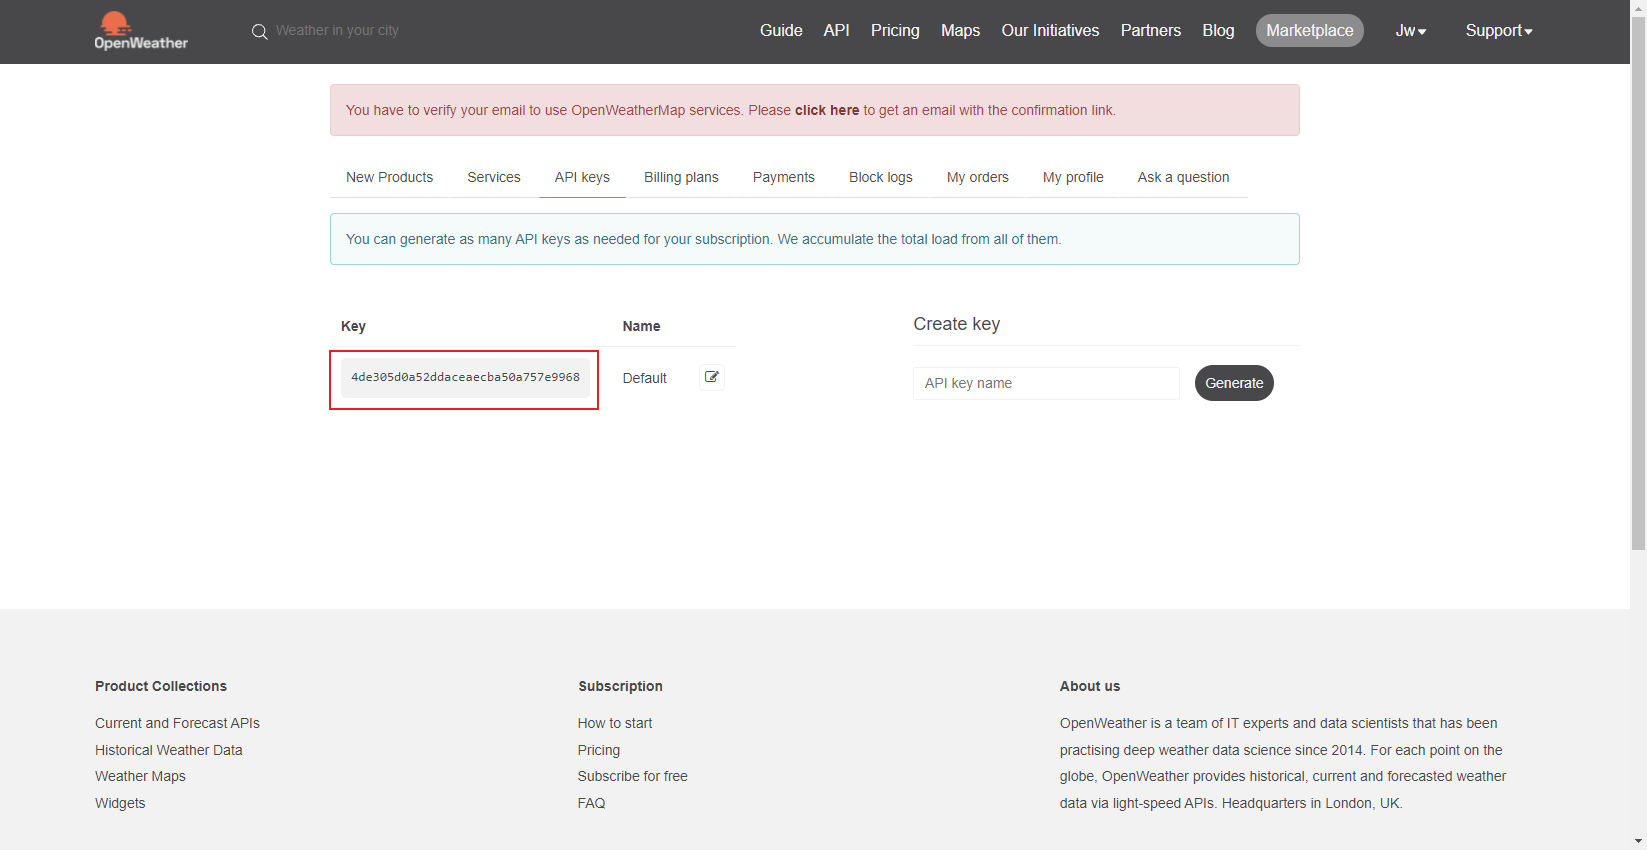
点击 My API Keys 进入获取API界面
复制这里的Key(这个Key是你从OpenWeather上获取天气信息的唯一钥匙)
你可以将Key填入以下URL并填写城市名以及它的国家以获取城市天气信息
http://api.openweathermap.org/data/2.5/weather?q=yourCityName,yourCountryCode&APPID=yourAPIkey
下面做个示例更换yourCityName你想要的数据的城市(比如成都),yourCountryCode与该城市的国家代码(比如CN),填入yourAPIkey就是前面获得的API密钥,下面为中国成都加上API后的URL:
http://api.openweathermap.org/data/2.5/weather?q=ChengDu,CN&APPID=4de305d0a52ddaceaecba50a757e9968
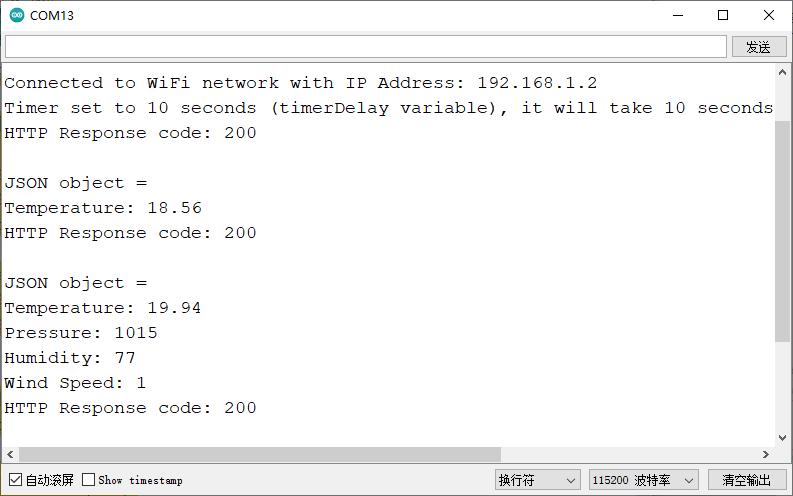
将你的 URL 复制到您的浏览器中将返回一组与您当地天气相对应的信息。编写本教程的那天,我们获得了以下有关中国成都的天气的信息。
代码
/*
该示例通过学习以了解如何获得天气信息
*/

#include <WiFi.h>
#include <HTTPClient.h>
#include <Arduino_JSON.h>

//修改WIFI名称以及密码
const char* ssid = "******";//WIFI名称
const char* password = "******";//WIFI密码

//填入你获得的API Key
String openWeatherMapApiKey = "4de305d0a52ddaceaecba50a757e9968";
//示例:
//String openWeatherMapApiKey = "4de305d0a52ddaceaecba50a757e9968";

// 填写你的城市名以及国家简写
String city = "ChengDu";
String countryCode = "CN";

//示例:
//String city = "ChengDu";
//String countryCode = "CN";

//设置获取信息的间隔时间,以下用于测试所以设置为10秒
//您应当根据你需要获取数据的网站,规定时间内访问数据的次数上限来限制访问时间的最小间隔
unsigned long lastTime = 0;
//设置每10分钟获得一次天气数据
//unsigned long timerDelay = 600000;
//设置每10秒获得一次天气数据
unsigned long timerDelay = 10000;

String jsonBuffer;

void setup() {
  Serial.begin(115200);
  WiFi.begin(ssid, password);
  Serial.println("Connecting");

  //判断WIFI是否连接
  while(WiFi.status() != WL_CONNECTED) {
    delay(500);
    Serial.print(".");
  }
  Serial.println("");
  Serial.print("Connected to WiFi network with IP Address: ");
  Serial.println(WiFi.localIP());
  Serial.println("Timer set to 10 seconds (timerDelay variable), it will take 10 seconds before publishing the first reading.");
}

void loop() {
  //发送HTTP获取请求
  if ((millis() - lastTime) > timerDelay) {
    //检测WIFI是否已经连接
    if(WiFi.status()== WL_CONNECTED){
      String serverPath = "http://api.openweathermap.org/data/2.5/weather?q=" + city + "," + countryCode + "&APPID=" + openWeatherMapApiKey;

      //将组合好的URL放入httpGETRequest函数中通过HTTP获取请求以获得文本
      jsonBuffer = httpGETRequest(serverPath.c_str());
      Serial.println(jsonBuffer);

      //将解析的Json对象值储存在Jsonu缓冲区中
      JSONVar myObject = JSON.parse(jsonBuffer);

      //判断解析是否成功
      if (JSON.typeof(myObject) == "undefined") {
        Serial.println("Parsing input failed!");
        return;
      }

      Serial.print("JSON object = ");
      Serial.println(myObject);
      Serial.print("Temperature: ");
      //获取到的温度其实是开氏度。
      //开氏度 = 摄氏度+273.15
      double c = myObject["main"]["temp"];
      c = c-273.15;
      Serial.println(c);
      Serial.print("Pressure: ");
      //myObject["main"]["pressure"]前为{}前的引号内容,后为读取哪一个引号后数据
      Serial.println(myObject["main"]["pressure"]);
      Serial.print("Humidity: ");
      Serial.println(myObject["main"]["humidity"]);
      Serial.print("Wind Speed: ");
      Serial.println(myObject["wind"]["speed"]);
    }
    else {
      Serial.println("WiFi Disconnected");
    }
    lastTime = millis();
  }
}

String httpGETRequest(const char* serverName) {
  WiFiClient client;
  HTTPClient http;

  //连接网址
  http.begin(client, serverName);

  //发送HTTP站点请求
  int httpResponseCode = http.GET();

  //该数组用于储存获得的数据
  String payload = "{}";

  //将获得的数据放入数组
  if (httpResponseCode>0) {
    Serial.print("HTTP Response code: ");
    Serial.println(httpResponseCode);
    payload = http.getString();
  }
  else {
    Serial.print("Error code: ");
    Serial.println(httpResponseCode);
  }

  //释放资源
  http.end();

  //返回获得的数据用于Json处理
  return payload;
}
结果
成员函数
-
httpGETRequest(serverPath.c_str());
说明:解析获取的对象 -
JSON.typeof(myObject)
说明:判断对象是否为已被解析的格式
6.5 阿里云IoT
什么是阿里云
阿里云IoT致力于实现万物互联的美好世界,为生态合作伙伴提供基于云端一体化、安全物联网基础平台等,在通过该平台高效连接,管理设备的同时,其开放能力使合作伙伴更高效、低成本地构建各种创新的物联网应用场景。
阿里云物联网平台为设备提供安全可靠的连接通信能力,向下连接海量设备,支撑设备数据采集上云;向上提供云端API,指令数据通过API调用下发至设备端,实现远程控制。
此外阿里云IoT还提供了丰富的开发服务,用户可以直接在该平台上搭建Web可视化、移动应用、服务开发等开发服务,这降低了物联网项目开发的难度,有了它,用户无需任何专业的开发技巧也可开发自己的项目。
- 阿里云IOT请点击这里了解具体详情,使用时需将示例中的#include "DFRobot_Aliyun.h"替换为#include "DFRobot_Iot.h"
7. SmartConfig 一键配网+自动重连
通过该代码可使用乐鑫的ESP-TOUCH进行一键配网。
点击下载安卓版
IOS版请在App Store搜索Espressif Esptouch
#include <WiFi.h>

void SmartConfig()
{
  WiFi.mode(WIFI_STA);
  Serial.println("\r\nWait for Smartconfig...");
  WiFi.beginSmartConfig();
  while (1)
  {
    Serial.print(".");
    delay(500);                   // wait for a second
    if (WiFi.smartConfigDone())
    {
      Serial.println("SmartConfig Success");
      Serial.printf("SSID:%s\r\n", WiFi.SSID().c_str());
      Serial.printf("PSW:%s\r\n", WiFi.psk().c_str());
      break;
    }
  }
}

bool AutoConfig()
{
    WiFi.begin();
    for (int i = 0; i < 20; i++)
    {
        int wstatus = WiFi.status();
        if (wstatus == WL_CONNECTED)
        {
            Serial.println("WIFI SmartConfig Success");
            Serial.printf("SSID:%s", WiFi.SSID().c_str());
            Serial.printf(", PSW:%s\r\n", WiFi.psk().c_str());
            Serial.print("LocalIP:");
            Serial.print(WiFi.localIP());
            Serial.print(" ,GateIP:");
            Serial.println(WiFi.gatewayIP());
            return true;
        }
        else
        {
            Serial.print("WIFI AutoConfig Waiting......");
            Serial.println(wstatus);
            delay(1000);
        }
    }
    Serial.println("WIFI AutoConfig Faild!" );
    return false;
}

void setup() {
  Serial.begin(115200);
  delay(100);
  if (!AutoConfig())
  {
      SmartConfig();
  }
}

void loop() {

}
8. 摄像头使用
使用摄像头前请先下载AXP313A库
注意: 仅V1.0硬件版本需要使用AXP313A库
AXP313A库常用API
  /**
   * @fn enum
   * @brief 选择不同摄像头
   */
  typedef enum{
    eOV2640,
    e0V7725
  }eCamera_t;

  /**
   * @fn enableCameraPower
   * @brief 使能摄像头电源
   * @param camera 摄像头选择
   * @return NONE
   */
  void enableCameraPower(eCamera_t camera);

  /**
   * @fn disablePower
   * @brief 关闭摄像头电源
   * @return NONE
   */
  void disablePower(void);

  /**
   * @fn enum
   * @brief 选择关机电平时间
   */
  typedef enum{
    eTime6s,
    eTime10s
  }eShutdownKeyLevelTime_t;

  /**
   * @fn setShutdownKeyLevelTime
   * @brief 设置关机按键电平时间
   * @param offLevelTime 关机按键电平时间
   * @return NONE
   */
  void setShutdownKeyLevelTime(eShutdownKeyLevelTime_t offLevelTime);
1.在arduino IDE中选择File->Examples->ESP32->Camera->CameraWebServer示例
2.使用下面的代码替换CameraWebServer中的代码(注意:需要填入WIFI账号密码)
注意:
- 仅V1.0硬件版本需要使用AXP313A库,V1.1硬件版本及以上可直接选择CameraWebServer示例,“Select camera model”为“CAMERA_MODEL_DFRobot_FireBeetle2_ESP32S3”即可
- 如果出现"init error”,请给模块断电后重新上电
#include "esp_camera.h"
#include <WiFi.h>
#include "DFRobot_AXP313A.h"

//
// WARNING!!! PSRAM IC required for UXGA resolution and high JPEG quality
//            Ensure ESP32 Wrover Module or other board with PSRAM is selected
//            Partial images will be transmitted if image exceeds buffer size
//
//            You must select partition scheme from the board menu that has at least 3MB APP space.
//            Face Recognition is DISABLED for ESP32 and ESP32-S2, because it takes up from 15
//            seconds to process single frame. Face Detection is ENABLED if PSRAM is enabled as well

// ===================
// Select camera model
// ===================
//#define CAMERA_MODEL_WROVER_KIT // Has PSRAM
//#define CAMERA_MODEL_ESP_EYE  // Has PSRAM
//#define CAMERA_MODEL_ESP32S3_EYE // Has PSRAM
//#define CAMERA_MODEL_M5STACK_PSRAM // Has PSRAM
//#define CAMERA_MODEL_M5STACK_V2_PSRAM // M5Camera version B Has PSRAM
//#define CAMERA_MODEL_M5STACK_WIDE // Has PSRAM
//#define CAMERA_MODEL_M5STACK_ESP32CAM // No PSRAM
//#define CAMERA_MODEL_M5STACK_UNITCAM // No PSRAM
//#define CAMERA_MODEL_M5STACK_CAMS3_UNIT  // Has PSRAM
//#define CAMERA_MODEL_AI_THINKER // Has PSRAM
//#define CAMERA_MODEL_TTGO_T_JOURNAL // No PSRAM
//#define CAMERA_MODEL_XIAO_ESP32S3 // Has PSRAM
// ** Espressif Internal Boards **
//#define CAMERA_MODEL_ESP32_CAM_BOARD
//#define CAMERA_MODEL_ESP32S2_CAM_BOARD
//#define CAMERA_MODEL_ESP32S3_CAM_LCD
#define CAMERA_MODEL_DFRobot_FireBeetle2_ESP32S3 // Has PSRAM
//#define CAMERA_MODEL_DFRobot_Romeo_ESP32S3 // Has PSRAM
#include "camera_pins.h"

// ===========================
// Enter your WiFi credentials
// ===========================
const char *ssid = "**********";
const char *password = "**********";

void startCameraServer();
void setupLedFlash(int pin);

DFRobot_AXP313A axp;

void setup() {
  Serial.begin(115200);
  Serial.setDebugOutput(true);
  Serial.println();

  while(axp.begin() != 0){
    Serial.println("init error");
    delay(1000);
  }
  axp.enableCameraPower(axp.eOV2640);//设置摄像头供电

  camera_config_t config;
  config.ledc_channel = LEDC_CHANNEL_0;
  config.ledc_timer = LEDC_TIMER_0;
  config.pin_d0 = Y2_GPIO_NUM;
  config.pin_d1 = Y3_GPIO_NUM;
  config.pin_d2 = Y4_GPIO_NUM;
  config.pin_d3 = Y5_GPIO_NUM;
  config.pin_d4 = Y6_GPIO_NUM;
  config.pin_d5 = Y7_GPIO_NUM;
  config.pin_d6 = Y8_GPIO_NUM;
  config.pin_d7 = Y9_GPIO_NUM;
  config.pin_xclk = XCLK_GPIO_NUM;
  config.pin_pclk = PCLK_GPIO_NUM;
  config.pin_vsync = VSYNC_GPIO_NUM;
  config.pin_href = HREF_GPIO_NUM;
  config.pin_sccb_sda = SIOD_GPIO_NUM;
  config.pin_sccb_scl = SIOC_GPIO_NUM;
  config.pin_pwdn = PWDN_GPIO_NUM;
  config.pin_reset = RESET_GPIO_NUM;
  config.xclk_freq_hz = 20000000;
  config.frame_size = FRAMESIZE_UXGA;
  config.pixel_format = PIXFORMAT_JPEG;  // for streaming
  //config.pixel_format = PIXFORMAT_RGB565; // for face detection/recognition
  config.grab_mode = CAMERA_GRAB_WHEN_EMPTY;
  config.fb_location = CAMERA_FB_IN_PSRAM;
  config.jpeg_quality = 12;
  config.fb_count = 1;

  // if PSRAM IC present, init with UXGA resolution and higher JPEG quality
  //                      for larger pre-allocated frame buffer.
  if (config.pixel_format == PIXFORMAT_JPEG) {
    if (psramFound()) {
      config.jpeg_quality = 10;
      config.fb_count = 2;
      config.grab_mode = CAMERA_GRAB_LATEST;
    } else {
      // Limit the frame size when PSRAM is not available
      config.frame_size = FRAMESIZE_SVGA;
      config.fb_location = CAMERA_FB_IN_DRAM;
    }
  } else {
    // Best option for face detection/recognition
    config.frame_size = FRAMESIZE_240X240;
#if CONFIG_IDF_TARGET_ESP32S3
    config.fb_count = 2;
#endif
  }

#if defined(CAMERA_MODEL_ESP_EYE)
  pinMode(13, INPUT_PULLUP);
  pinMode(14, INPUT_PULLUP);
#endif

  // camera init
  esp_err_t err = esp_camera_init(&config);
  if (err != ESP_OK) {
    Serial.printf("Camera init failed with error 0x%x", err);
    return;
  }

  sensor_t *s = esp_camera_sensor_get();
  // initial sensors are flipped vertically and colors are a bit saturated
  if (s->id.PID == OV3660_PID) {
    s->set_vflip(s, 1);        // flip it back
    s->set_brightness(s, 1);   // up the brightness just a bit
    s->set_saturation(s, -2);  // lower the saturation
  }
  // drop down frame size for higher initial frame rate
  if (config.pixel_format == PIXFORMAT_JPEG) {
    s->set_framesize(s, FRAMESIZE_QVGA);
  }

#if defined(CAMERA_MODEL_M5STACK_WIDE) || defined(CAMERA_MODEL_M5STACK_ESP32CAM)
  s->set_vflip(s, 1);
  s->set_hmirror(s, 1);
#endif

#if defined(CAMERA_MODEL_ESP32S3_EYE)
  s->set_vflip(s, 1);
#endif

// Setup LED FLash if LED pin is defined in camera_pins.h
#if defined(LED_GPIO_NUM)
  setupLedFlash(LED_GPIO_NUM);
#endif

  WiFi.begin(ssid, password);
  WiFi.setSleep(false);

  Serial.print("WiFi connecting");
  while (WiFi.status() != WL_CONNECTED) {
    delay(500);
    Serial.print(".");
  }
  Serial.println("");
  Serial.println("WiFi connected");

  startCameraServer();

  Serial.print("Camera Ready! Use 'http://");
  Serial.print(WiFi.localIP());
  Serial.println("' to connect");
}

void loop() {
  // Do nothing. Everything is done in another task by the web server
  delay(10000);
}
3.填入WIFI信息,烧录代码,打开串口,查看IP
4.在浏览器中输入IP地址即可进入摄像头设置
常见问题
烧录报错
原因
-
如果Loop中延时过短或者不加延时会导致烧录超时

-
错误的调用一些函数会导致计算机不能识别USB

解决办法
- 按住BOOT,再按下RST,然后松开两个按键,再烧录。
串口无打印
解决办法
- 检查USB CDC是否处于Enable状态
- 使用其他的串口调试助手查看打印信息
更多问题及有趣的应用,可以 访问论坛 进行查阅或发帖。
