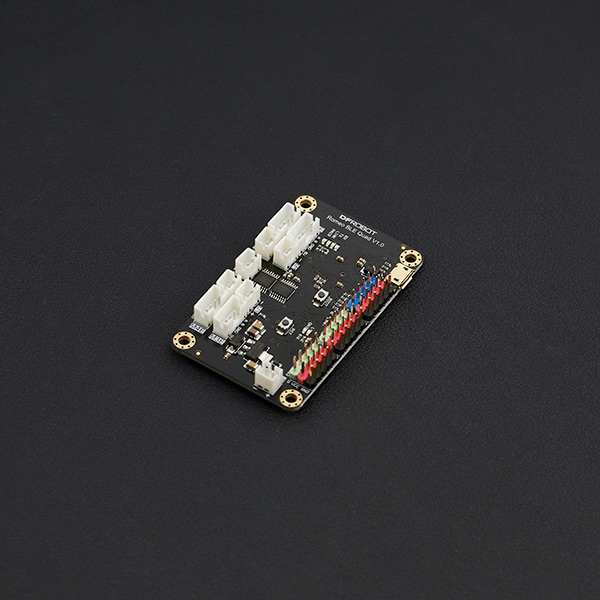
简介
Romeo BLE Quad 是基于Bluno M3的二次设计版本,继承Bluno系列的全部特性,支持蓝牙无线编程,无线通信和手机无线控制功能。同时Romeo BLE Quad还增加了四路电机驱动,配合板载的编码器接口,可直接实现机器人PID闭环反馈控制。并且主控器还外扩了Gravity 3Pin管脚接口,可直插Gravity系列传感器模块,方便实用,体积小巧。
Romeo BLE Quad相比其他的Romeo机器人主控拥有更加强大的处理性能,这全都得益于它与众不同的处理核心。32位主控器相比传统的Arduino UNO 8位单片机,在性能上拥有显著的优势,但它的开发环境较为复杂,开发难度也相对较高。而Romeo BLE Quad不同于以往其他的32位主控,在保留了其强大性能的同时,也兼容了Arduino的简单方便的使用方法。极大的降低了它的使用难度。
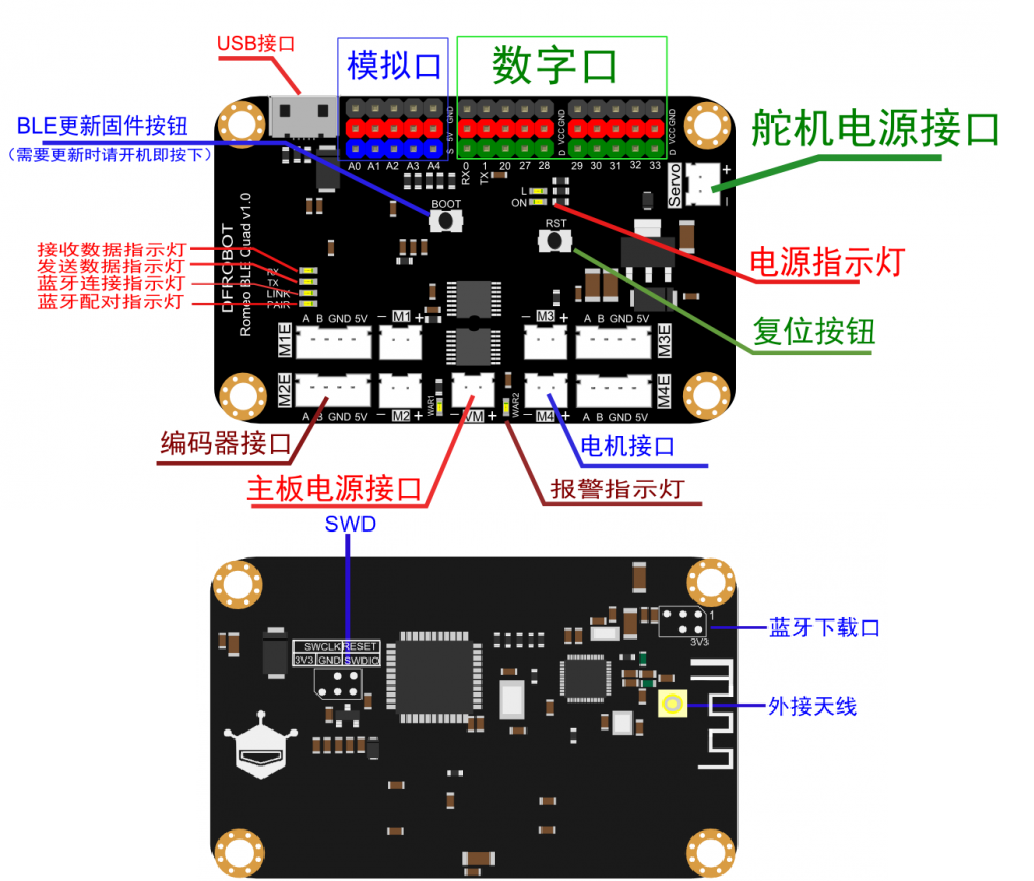
Romeo BLE Quad外扩10个数字管脚和5个模拟管脚,管脚与电机驱动相互独立,无冲突。支持舵机外部供电,保证系统能够稳定运行。主控器板载电源管理系统,支持USB和外接电源自动切换,可直连USB供电或7-10v的宽电压供电,并支持传统STM32 SWD编程调试。
注意:Romeo BLE Quad I/O口工作电压为3.3V,使用前请先阅读引脚说明,切勿直接外接5V设备,以免损坏芯片管脚。
产品参数
- 微控制器: STM32 F103RET6
- 时钟速度: 72MHz
- 蓝牙芯片: TI CC2540 (蓝牙4.0)
- 通信距离: 30 m
- 直流电机:4路
- 工作电压: 3.3V
- 输入电压: 5V(USB)/7~10V
- 支持USB与外接供电自动切换
- 数字IO口: 10
- 模拟输入: 5
- I2C/IIC: 默认为SDA (30)和SCL(29),软件I2C可以指定任意两个数字口作为I2C的SDA和SCL
- SRAM: 64K
- Flash: 512K
- 默认用户代码空间:492K
- 默认用户数据空间:20K
- 串口2个:Serial1、Serial3
- Serial1 0 (Rx1) 和 1 (Tx1)
- Serial3 30(Rx3) 和 29(Tx3)
- 尺寸: 67 x 42 (mm)
- 重量: 54g
注意:Romeo BLE Quad的串口是从Serial1开始的,Serial1负责USB通信和蓝牙通信,使用串口监视器或者蓝牙通信时,需要把代码中的**Serial**改为**Serial1**
电机驱动芯片HR8833参数
- 双通道H桥电流控制电机驱动器
- 驱动两路直流电机
- 1500mA驱动输出(单路)
- 宽电压供电2.7V-10.8V
引脚说明
| 电机 | 电机控制IO口1 | 电机控制IO口2 | 编码器接口A | 编码器接口B |
|---|---|---|---|---|
| M1 | 8 | 23 | 12 | 11 |
| M2 | 7 | 9 | 2 | 3 |
| M3 | 24 | 14 | 5 | 26 |
| M4 | 4 | 25 | 35 | 36 |
数字IO口使用表
注:Romeo BLE Quad 采用了两块HR8833电机驱动,驱动方式与常规的L298稍有不同,具体逻辑可见(SKU:DRI0040)Motor driver-HR8833 双路直流电机驱动模块
Romeo BLE Quad PID调速时将使用快速衰减模式(已封装在库中,仅需了解):
正转:电机控制器脚1为低,电机控制脚2为PWM输出
反转:电机控制器脚2为低,电机控制脚1为PWM输出
特别注意:Romeo BLE Quad I/O口工作电压为3.3V,使用前请先阅读引脚说明,切勿直接外接5V设备,以免损坏芯片管脚。
3.3V only:D20, D27, D28
5V兼容:D0, D1, D29, D30, D31, D32, D33
模拟管脚A0~A4都配有5V分压电阻,所以当外部输入为0~5V时,输出0~1023模拟量
使用教程
Arduino 环境搭建
在正式使用Romeo BLE Quad前,我们需要安装它的编译环境,由于Romeo BLE Quad是Bluno M3的二次开发版,我们可以把他看做为“Bluno M3 + Bluno M3扩展板 + 2 x HR8833电机驱动”的集成板,管脚映射和定义上与Bluno M3保持了一致,请参考Bluno M3编译环境篇:
Bluno M3 V2.2 安装开发环境\快速入门
电机PID调速
本教程将使用JS02 L型带编码器电机为例,设置速度时应考虑几个重要参数:
- 采样周期setSampleTime(本例为100(ms),即0.1s)
- 采样周期内正交编码器所计的个数motorSpeed(设定:200)
- 电机编码器极数(本例为16)
- 电机减速比(本例为120)
例如:当电机编码器为16极时,编码器转一圈增量为16*2=32。假设编码器得到200个脉冲数时,则编码器速度为200÷0.1(s)÷32 = 62.5 r/s = 62.5*60 r/min =3750r/min,则电机速度为3750/120=31.25r/min。
- 本例程把大部分功能都已经封装在库内了,有时需要修改打印内容,可以在Motor.cpp第241行中修改。如下图所示

准备
- 硬件
- Romeo BLE Quad x1
- 微型直流带编码器L型减速电机 x4
- 杜邦线 若干
- 软件
接线图
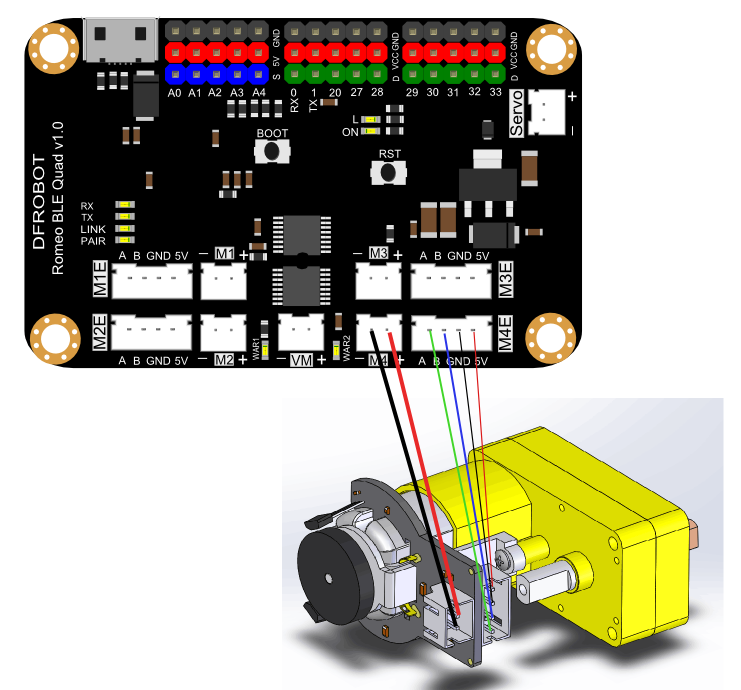
注:本图只以M4为例子,其他M1、M2、M3的连接方式和M4是相同的
样例代码
点击下载库文件例程和Motor.h库文件和PID_V1.h库文件
/*!
* @file RemeoBLEQuadDrive.ino
* @brief RemeoBLEQuadDrive.ino PID control system of DC motor
*
*  RemeoBLEQuadDrive.ino Use PID control 4 way DC motor direction and speed
*
* @author linfeng(490289303@qq.com)
* @version  V1.0
* @date  2016-4-14
*/

#include "PID_v1.h"
#include "Motor.h"

Motor motor[4];
int motorSpeed[4] = {-200,200,400,-400};/*Set 4 speed motor*/
/* Speed=motorSpeed/(32*(setSampleTime/1000))(r/s) */
const int motorDirPin[4][2] = { //Forward, Backward
/*Motor-driven IO ports*/
  {8,23},
  {7,9},
  {24,14},
  {4,25}
};


//const double motorPidParam[3]={0.6,1,0.03};/*DC MOTOR,Yellow??180degree*/
//const double motorPidParam[3]={1.5,1,0.05};/*DC MOTOR,Yellow??90 degree*/
const double motorPidParam[3]={1.2,0.8,0.05};/*Encoder V1.0,160rd/min ;19500/min; 32:1,Kr=3.5*/
void setup( void )
{
  Serial1.begin(115200);
     for(int i=0;i<4;i++){
        motor[i].setPid(motorPidParam[0],motorPidParam[1],motorPidParam[2]);/*Tuning PID parameters*/
        motor[i].setPin(motorDirPin[i][0],motorDirPin[i][1]);/*Configure IO ports*/
        motor[i].setSampleTime(100);/*Sets the sampling period*/
                motor[i].setChannel(i);/*Sets the motor channel */
        motor[i].ready();/*Motor enable*/
                motor[i].setSpeed(motorSpeed[i]);/*Set motor speed*/
    }
}

void loop( void )
{
    for(int i = 0; i < 4; i++){
        motor[i].calibrate();/*motor PID calibrate*/
    }

}
/******************************************************************************
  Copyright (C) <2016>  <linfeng>
  This program is free software: you can redistribute it and/or modify
  it under the terms of the GNU General Public License as published by
  the Free Software Foundation, either version 3 of the License, or
  (at your option) any later version.
  This program is distributed in the hope that it will be useful,
  but WITHOUT ANY WARRANTY; without even the implied warranty of
  MERCHANTABILITY or FITNESS FOR A PARTICULAR PURPOSE.  See the
  GNU General Public License for more details.
  You should have received a copy of the GNU General Public License
  along with this program.  If not, see <http://www.gnu.org/licenses/>.
  Contact: 490289303@qq.com
 ******************************************************************************/
结果
电机按照设置的速度和方向运行。
疑难解答
更多问题及有趣的应用,可以 访问论坛 进行查阅或发帖!
更多
- 原理图
- Bluno M3产品维库
- Bluno M3 V2.2 安装开发环境 (注意:Romeo BLE Quad 基于Bluno M3 V2.2硬件版本设计)
- HR8833 产品维库
