
重量传感器套件
简介
重量传感器是一个比较实用、贴近生活场景的传感器,通过获取物体的重量信息能够制作很多有趣的应用,例如家用电子秤、日用品余量报警、物联网称台等。DFRobot商城中已经有了重量传感器和HX711信号转接模块,但是由于结构搭建难度较大,很多无法搭建结构的朋友不能使用这款传感器。
这款重量传感器套件,降低了结构搭建难度,让任何人都能够快速的制作出一个电子称台获取物体的重量信息。另外,由于每个人的安装方式、使用习惯不同,所以传感器需要校准,传统的方法是需要使用单独的校准代码去获取校准值,为优化这一问题,本套件中的信号转接板中内置了校准算法,可一键校准重量信息,无需再运行单独的代码进行校准。
注:传感器最大量程为1kg,请勿过多的超出量程,否则会永久性的损坏传感器,导致数据不准
特性
- Arduino系列主控兼容、micro:bit兼容、ESP32和掌控板系列、树莓派兼容
- 支持Mind+图形化编程
- Gravity I2C通信方式,兼容3.3V和5V
- 搭配支架套件,快速搭建
- 按键一键校准重量/软件API校准重量
- 按键一键“去皮”/软件API“去皮”
应用场景
- 简易电子秤
- 日用品余量报警
- 物联网称台
项目实例:牛奶自动购买机
技术规格
-
测量范围:1g-1000g
-
工作电压:3.3V~5V
-
工作电流:<20mA
-
AD转换芯片:HX711
-
合成误差: < ±0.2% g
-
组装后整体尺寸:120X100X30mm
-
信号转接板尺寸:31x37mm
-
通信方式:I2C
-
I2C地址:0x64/0x65/0x660x67
修改地址后传感器断电重启后生效
| A0 | A1 | 地址 |
|---|---|---|
| 0 | 0 | 0X64 |
| 1 | 0 | 0X65 |
| 0 | 1 | 0X66 |
| 1 | 1 | 0X67 |
引脚及按键
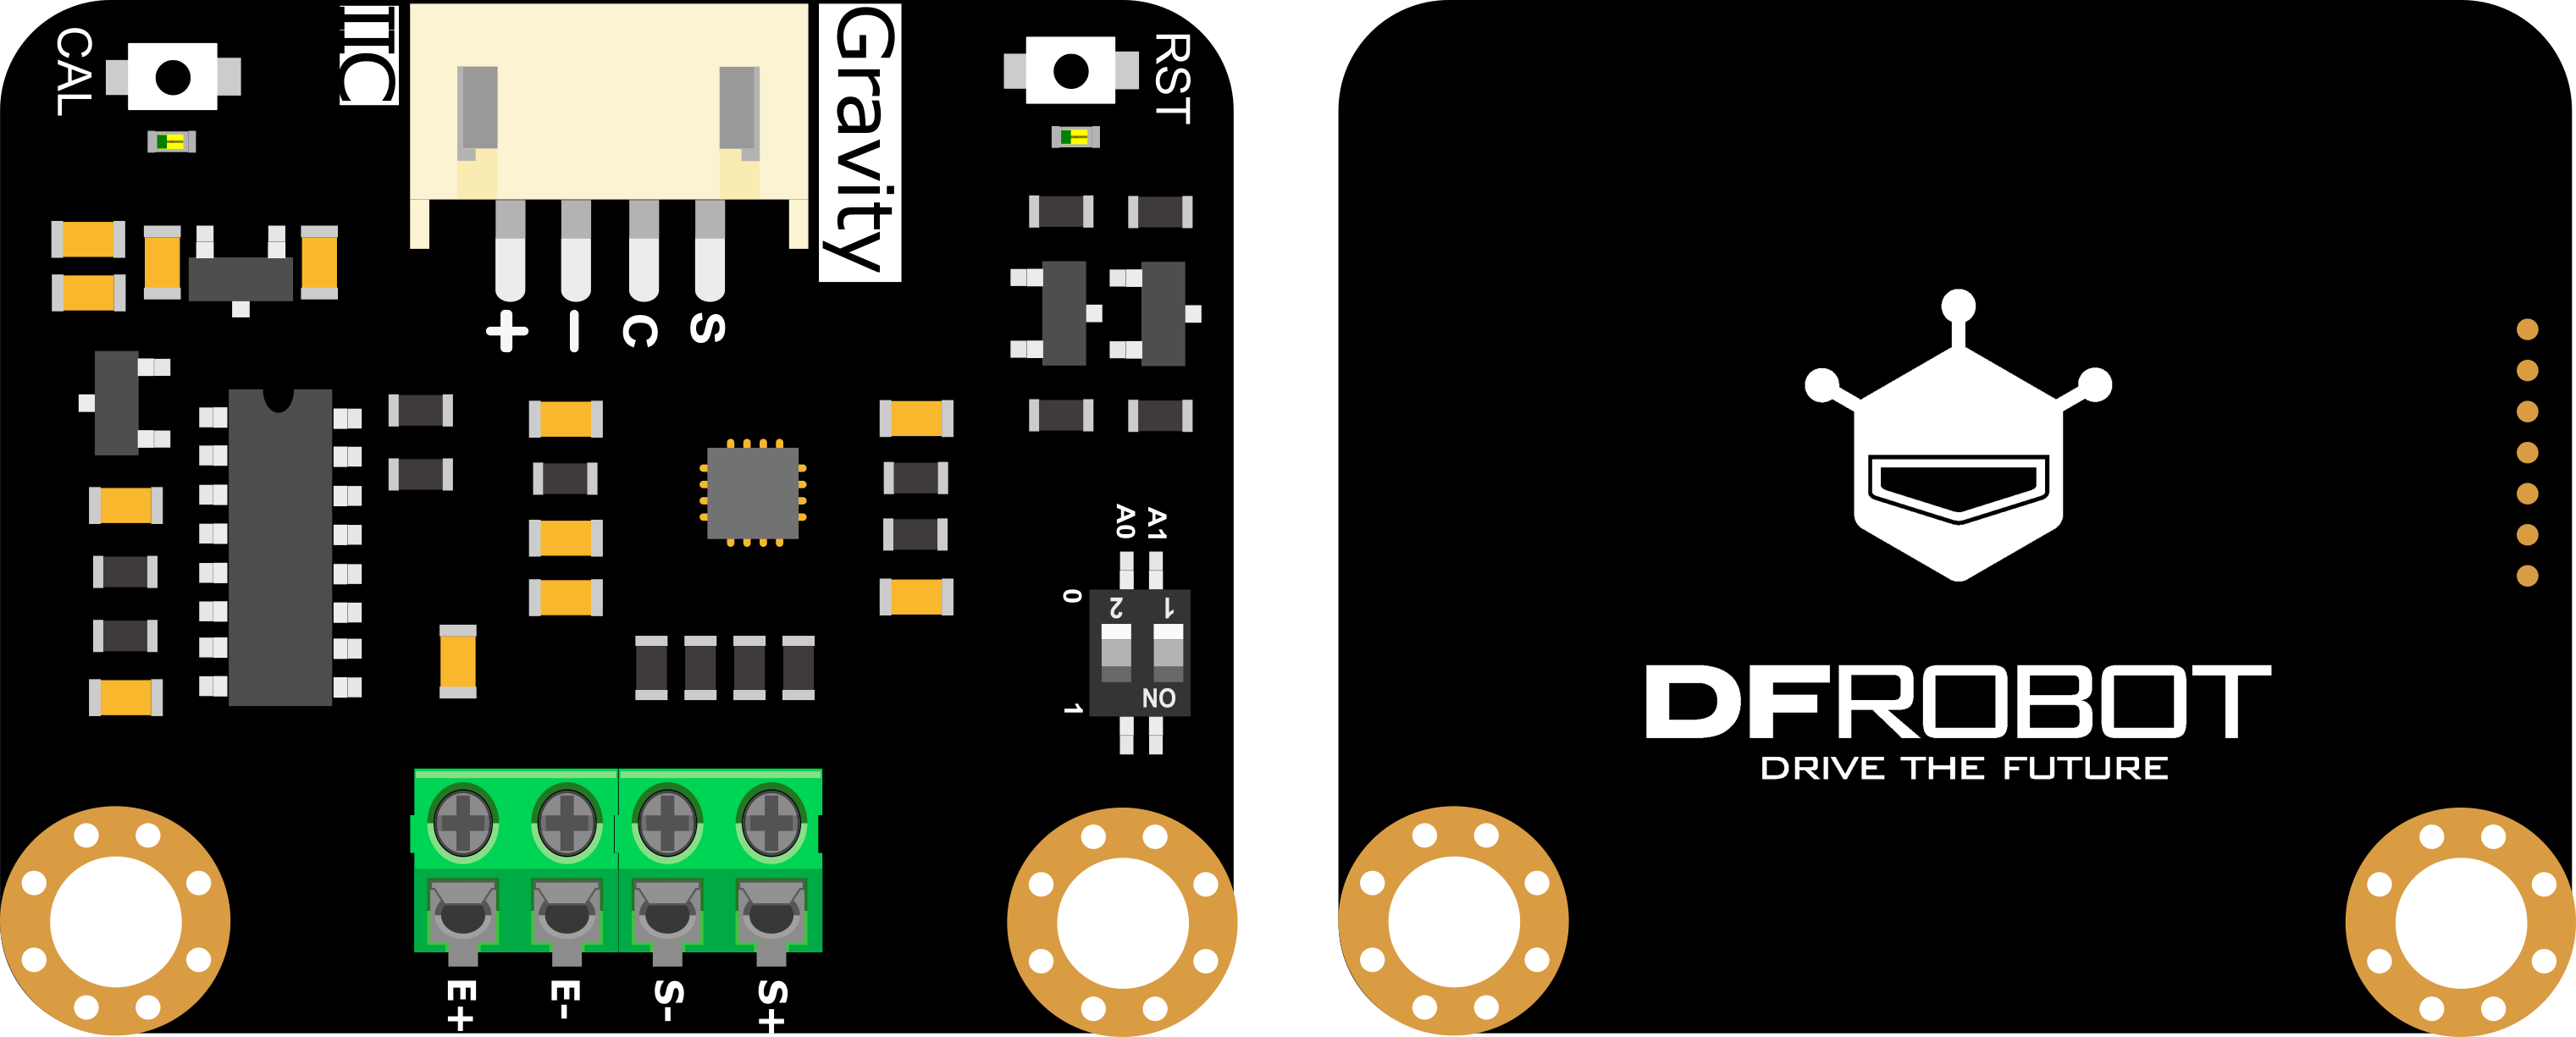
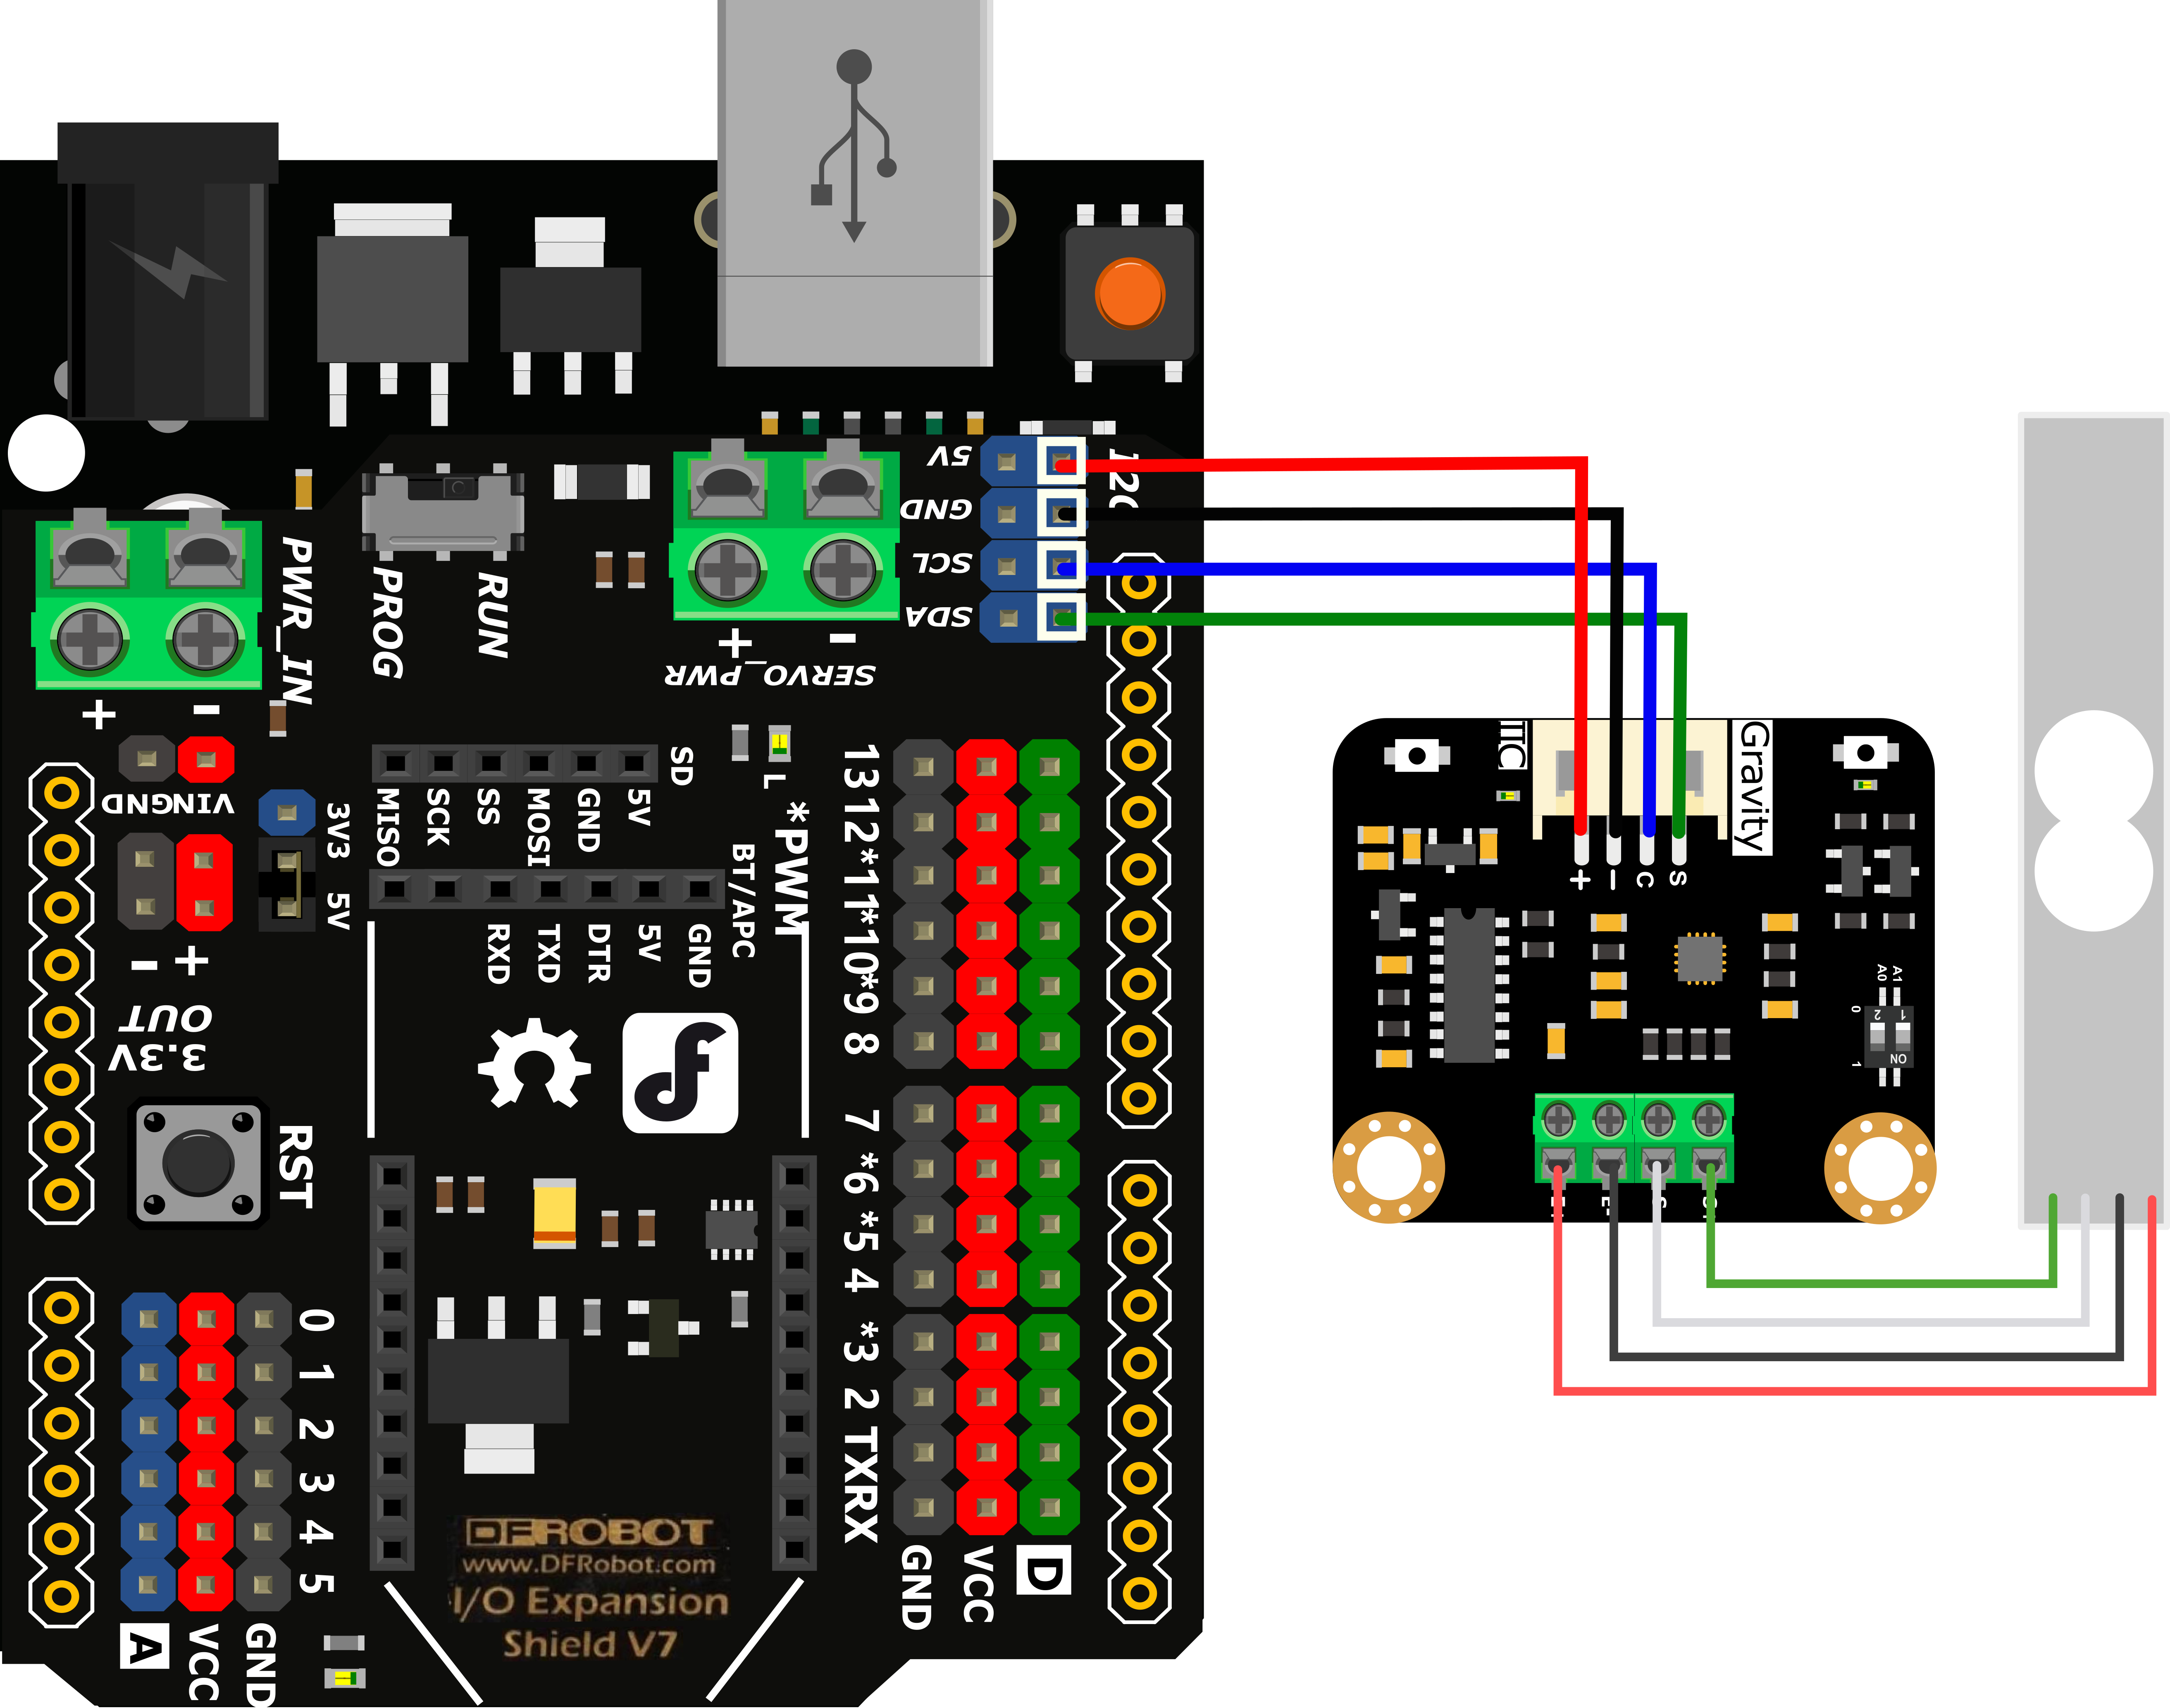
| 序号 | 名称 | 功能描述 | 序号 | 名称 | 功能描述 |
|---|---|---|---|---|---|
| 1 | VCC | 正极 | 6 | E+ | 传感器红色线 |
| 2 | GND | 公共地 | 7 | E- | 传感器黑色线 |
| 3 | SCL | I2C时钟线 | 8 | S- | 传感器白色线 |
| 4 | SDA | I2C数据线 | 9 | S+ | 传感器绿色线 |
| 5 | CAL按键 | 自动校准 | 10 | RST按键 | 去皮 |
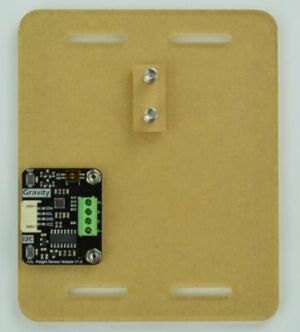
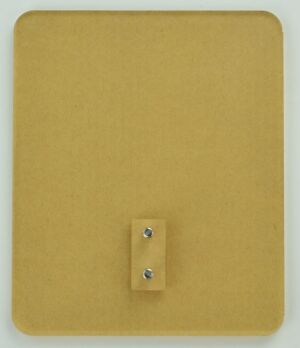
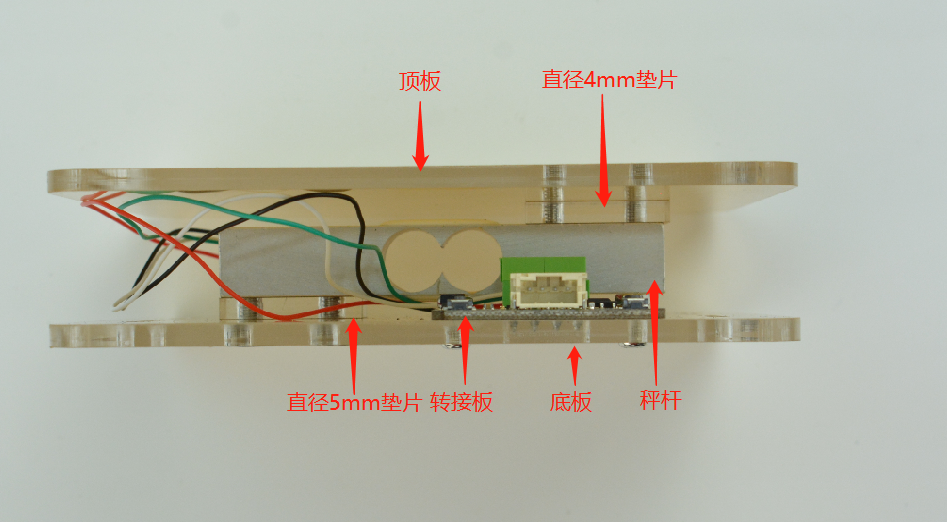
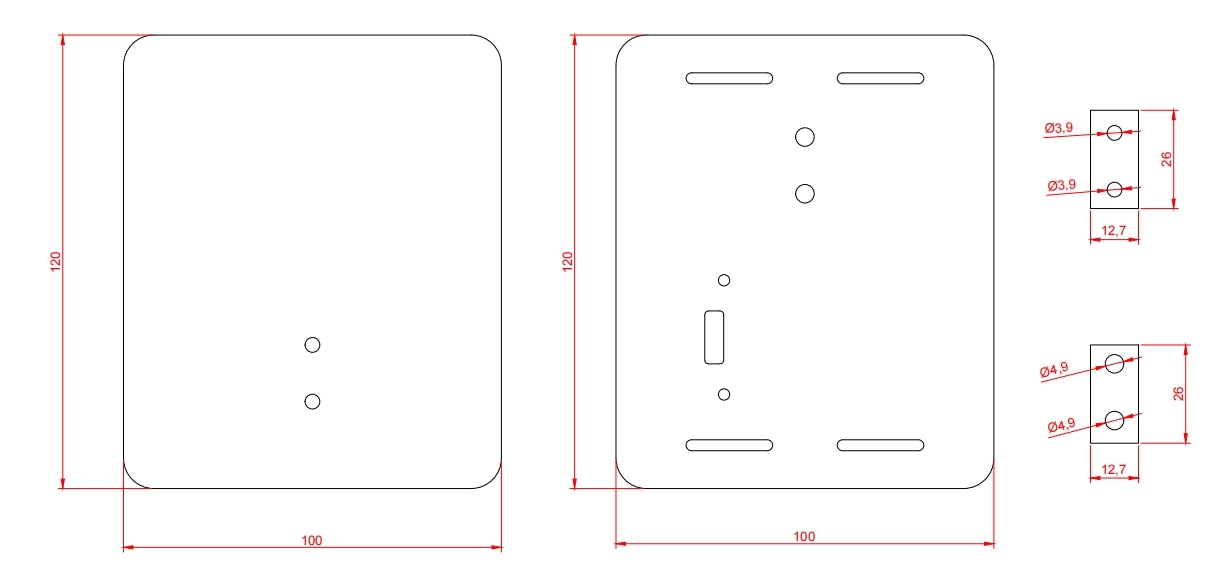
组装步骤
- step1.将转接板通过3MM螺丝固定在底座上,将5mm螺丝穿过底板和孔径为5mm的垫片,如下图:
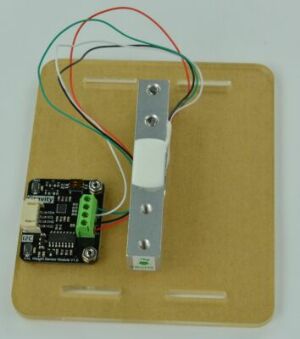
- step2.将秤杆和垫片固定在底座上,连接信号板和秤杆,注意绿色箭头的贴纸要向下。
- step3.将4mm螺丝穿过顶板和孔径为4mm的垫片。
- step4.将顶板和垫片固定在秤杆上,最后在底板贴上垫片即可。
API说明
  /*!
   * @brief Constructor
   * @param pWire I2c controller
   * @param addr  I2C address(0x64/0x65/0x660x67)
   */
  DFRobot_HX711_I2C(TwoWire * pWire = &Wire,uint8_t addr = HX711_I2C_ADDR);

  /**
   * @brief 初始化函数
   * @return 如果初始化成功则返回1,否则返回错误码。
   */
  int begin(void);

  /**
   * @brief 获取物体重量信息
   * @param 取平均值的次数
   * @return 返回获取的重量值,单位:g
   */
  float readWeight(uint8_t times = 12);

  /**
   * @brief 获取校准值(获取按键校准或enableCal()函数的校准值)
   * @return 返回获取的校准值
   */
  float getCalibration();

  /**
   * @brief 设置/更新校准值
   * @param 数值
   */
  void  setCalibration(float value);

  /**
   * @brief 设置重量传感器模块自动校准时的触发阈值(g)
   * @param 阈值数据
   */
  void  setThreshold(uint16_t threshold);

  /**
   * @brief 设置重量传感器模块自动校准时的校准重量(g)
   * @param 重量数据
   */
  void  setCalWeight(uint16_t triWeight);

  /**
   * @brief 启动校准(软件方式)
   */
  void enableCal();

  /**
   * @brief 去皮(软件方式)
   */
  void peel();

  /**
   * @brief 等待传感器校准完成
   * @return 校正完成返回:True
   *         校正失败返回:False
   */
  bool getCalFlag();
接线图
Arduino使用教程
准备
-
硬件
-
软件
- Arduino IDE,点击下载Arduino IDE
- 点击下载DFRobot_HX711_I2C库文件.关于如何安装库文件,点击链接
快速使用
-
step1.安装好套件,清空传感器上其他物体(如外加托盘可保留托盘)
-
step2.按照接线图正确连接传感器,并上传示例代码,上传成功后打开串口监视器,波特率调节为9600
-
step3.放上要称重的物体。在打开串口监视器时arduino会自动复位进行清零,因此必须严格按照以上步骤操作
-
在工作时,您可以随时按下板子上的CAL键进行校准。完成校准后,系统会直接输出经过校准的重量,并将校准值存储在传感器转接板的内存中。具体的操作流程请查看按键校准。
-
在重启或复位后,系统会使用默认的校准值进行重量计算。如果您希望系统按照上一次校准后的数值进行重量计算,可以使用 MyScale.setCalibration(MyScale.getCalibration()) 函数。运行此函数将会读取上一次校准后存储在转接板中的数值,并将其应用于系统,以取代默认的校准值。
#include <DFRobot_HX711_I2C.h>

//DFRobot_HX711_I2C MyScale(&Wire,/*addr=*/0x64);
DFRobot_HX711_I2C MyScale;

float Weight = 0;

void setup() {
  Serial.begin(9600);
  while (!MyScale.begin()) {
    Serial.println("The initialization of the chip is failed, please confirm whether the chip connection is correct");
    delay(1000);
  }

  MyScale.setCalibration(MyScale.getCalibration());//如果希望在重启或复位后使用校准过的值进行重量计算,可以调用此函数。否则,系统将会按照默认值进行重量计算
  delay(1000);
}

void loop() {
  Weight = MyScale.readWeight();
  Serial.print("weight is: ");
  Serial.print(Weight);
  Serial.println(" g");
  delay(1000);
}
按键校准
-
按键校准方式,可以在传感器工作的任意时刻进行校准,校准步骤如下:
-
step1.安装好套件,清空传感器上其他物体(如外加托盘可保留托盘)
-
step2.按照接线图正确连接传感器,并上传示例代码,上传成功后打开串口监视器,波特率调节为9600
-
step3.按下板子的cal按键,cal旁边的指示灯会亮起,此时进入等待校准状态
-
step4.在5S内往称台上放一个重100g的物体(100g为默认值,可修改),放上物体1S后cal灯会熄灭,此时进入校准状态,校准完成后指示灯会闪烁三次并熄灭
(物体放上后会有1S的延时防抖动时间,所以不要着急,物体放好后在校准完成之前不要触碰)
-
注意:若按下cal键后,5S内没有放上物体,则指示灯会持续点亮5S并在5S后熄灭,此次校准无效,如果一直失败,请查看FAQ中的Q6 传送门
-
在打开串口监视器时arduino会自动复位进行清零,因此必须严格按照以上步骤操作
-
**在重启或复位后,系统会使用默认的校准值进行重量计算。如果您希望系统按照上一次校准后的数值进行重量计算,可以使用 MyScale.setCalibration(MyScale.getCalibration()) 函数。运行此函数将会读取上一次校准后存储在转接板中的数值,并将其应用于系统,以取代默认的校准值。
#include <DFRobot_HX711_I2C.h>**
- 提示:DFRduino UNO R3 + IO 传感器扩展板V7.1重量刚好为50g
#include <DFRobot_HX711_I2C.h>

//DFRobot_HX711_I2C MyScale(&Wire,/*addr=*/0x64);
DFRobot_HX711_I2C MyScale;

float Weight = 0;

void setup() {
  Serial.begin(9600);
  while (!MyScale.begin()) {
    Serial.println("The initialization of the chip is failed, please confirm whether the chip connection is correct");
    delay(1000);
  }

  MyScale.setCalWeight(100);

  MyScale.setThreshold(10);

  Serial.print("the calibration value of the sensor is: ");
  Serial.println(MyScale.getCalibration());
  MyScale.setCalibration(MyScale.getCalibration());//将校准值更新为上一次校准的值,不更新则为系统默认值
  delay(1000);
}

void loop() {
  Weight = MyScale.readWeight();
  Serial.print("weight is: ");
  if(Weight > 0.5){
    Serial.print(Weight, 1);
  }
  else{
    Serial.print(0, 1);
  }
  Serial.println(" g");
  delay(1000);
}
软件校准
-
软件校准方式,通过enableCal()函数实现软件校准(按键校准方式,可以在传感器工作的任意时刻进行校准,方法请看上一步)
-
step1.安装好套件,清空传感器上除秤面以外其他物体
-
step2.按照接线图正确连接传感器,并上传示例代码,上传成功后打开串口监视器,波特率调节为9600
-
step3.等待板子上的CAL灯亮起或根据串口打印的信息提示,往称台上放一个重100g的物体(100g为默认值,可修改)
-
step4.等待几秒后即可输出校准后的重量值
-
注意:在打开串口监视器时arduino会自动复位进行清零,因此必须严格按照以上步骤操作
#include <DFRobot_HX711_I2C.h>

//DFRobot_HX711_I2C MyScale(&Wire,/*addr=*/0x64);
DFRobot_HX711_I2C MyScale;

void setup() {
  Serial.begin(9600);
  while (!MyScale.begin()) {
    Serial.println("The initialization of the chip is failed, please confirm whether the chip connection is correct");
    delay(1000);
  }

  MyScale.setCalWeight(100);

  MyScale.setThreshold(10);

  //Start sensor calibration
  Serial.println("Please put the object within 5S");
  MyScale.enableCal();
  long time1 = millis();
  //Wait for sensor calibration to complete
  while(!MyScale.getCalFlag()){
       delay(1000);
       if((millis()-time1) > 7000){
          Serial.println("The calibration failed this time, and no object is detected within 5S. The last calibration value will be used.");
          break;
       }
  }
  //Obtain the calibration value. The accurate calibration value can be obtained after the calibration operation is completed
  Serial.print("the calibration value of the sensor is: ");
  Serial.println(MyScale.getCalibration());
  MyScale.setCalibration(MyScale.getCalibration());
}

void loop(){
  float Weight = MyScale.readWeight();
  Serial.print("weight is: ");
  Serial.print(Weight);
  Serial.println(" g");
  delay(1000);
}
Mind+使用教程
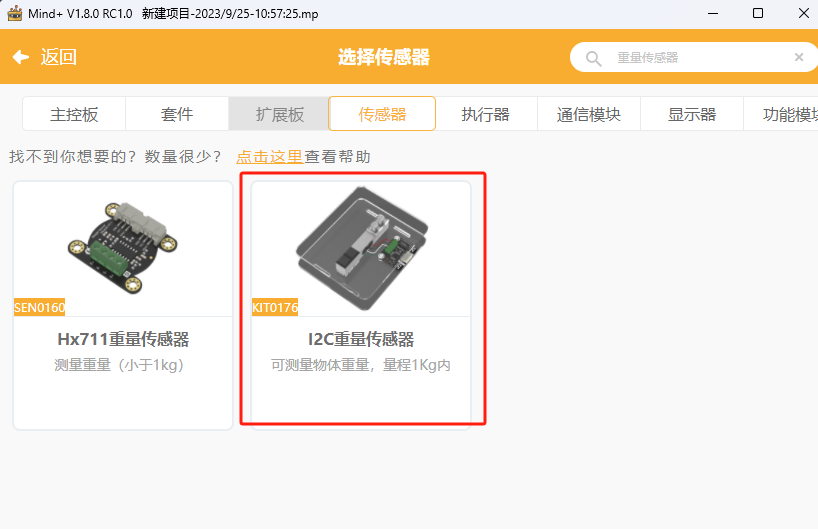
加载传感器
- 扩展-传感器-搜索“重量传感器”
1.快速使用
- step1.安装好套件,清空传感器上其他物体(如外加托盘可保留托盘)
- step2.按照接线图正确连接传感器,并上传示例代码,上传成功后打开串口监视器
- step3.放上要称重的物体。在打开串口监视器时arduino会自动复位进行清零,因此必须严格按照以上步骤操作
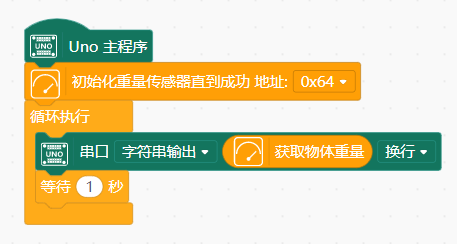
运行后,可获得未经校准的重量值。
2.按键校准
-
按键校准方式,可以在传感器工作的任意时刻进行校准,校准步骤如下:
-
step1.安装好套件,清空传感器上其他物体(如外加托盘可保留托盘)
-
step2.按照接线图正确连接传感器,并上传示例代码,上传成功后打开串口监视器
-
step3.按下板子的cal按键,cal旁边的指示灯会亮起,此时进入等待校准状态
-
step4.在5S内往称台上放一个重100g的物体(100g为默认值,可修改),放上物体1S后cal灯会熄灭,此时进入校准状态,校准完成后指示灯会闪烁三次并熄灭
(物体放上后会有1S的延时防抖动时间,所以不要着急,物体放好后在校准完成之前不要触碰)
-
注意:若按下cal键后,5S内没有放上物体,则指示灯会持续点亮5S并在5S后熄灭,此次校准无效,如果一直失败,请查看FAQ中的Q6 传送门
-
在打开串口监视器时arduino会自动复位进行清零,因此必须严格按照以上步骤操作
您可以修改代码中的参数以完成校准,运行并完成校准操作后,输出的即为校准后的重量值。
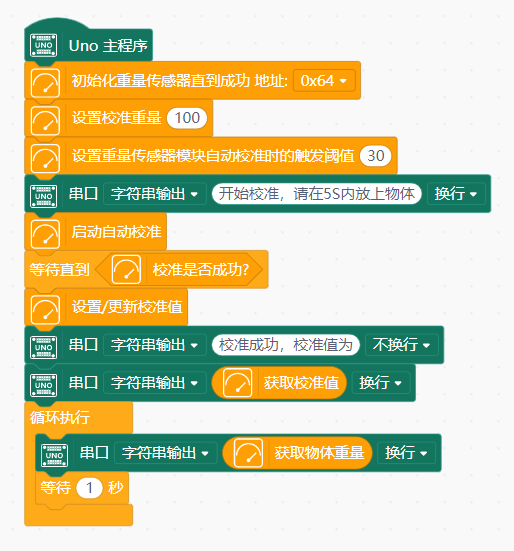
3.软件校准
软件校准可以通过编程积木来触发校准,与按键校准效果相同,只是触发校准的方式不同,若无软件校准的需求则直接使用按键校准即可
-
step1.安装好套件,清空传感器上除秤面以外其他物体
-
step2.按照接线图正确连接传感器,并上传示例代码,上传成功后打开串口监视器
-
step3.等待板子上的CAL灯亮起或根据串口打印的信息提示,往称台上放一个重100g的物体(100g为默认值,可修改)
-
step4.等待几秒后即可输出校准后的重量值
-
注意:在打开串口监视器时arduino会自动复位进行清零,因此必须严格按照以上步骤操作
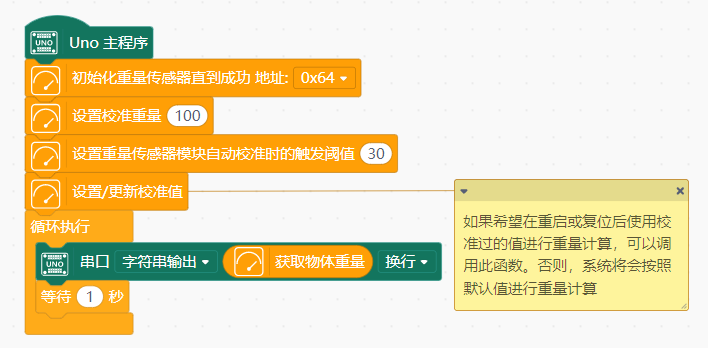
4.获取校准后的重量值
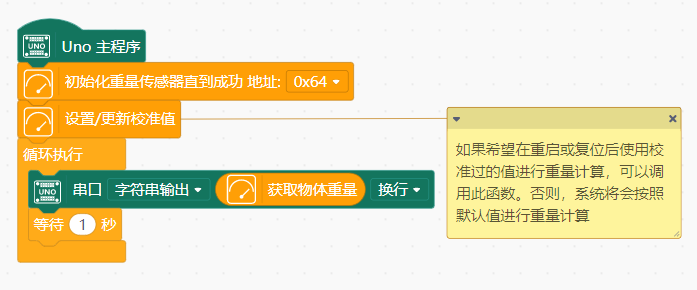
运行此代码后可获得校准后的重量值,且再次复位或断电重启后也会按照上一次的校准值进行计算。此代码也可以在系统运行的任意时刻使用按键进行再次校准,与2.按键校准不同的地方在于此代码中简化掉了一些用于校准的配置积木。
兼容性
| MCU | Work Well | Work Wrong | Untested | Remarks |
| Arduino uno | √ | |||
| FireBeetle-ESP8266 | √ | |||
| FireBeetle-ESP32 | √ | |||
| 掌控板 | √ | |||
| 树莓派 | √ | |||
| microbit | √ |
FAQ
-
在校准和测量时,物体放在称面中间位置附近会获得最准确的数据
-
按下rst键后,不管传感器上放了多重的物体,传感器都会清零当前重量值,后面再放上的物体重量会从0开始累积,实现“去皮”功能
-
Arduino每次复位/重启后,或打开串口监视器时,系统都会默认“去皮”一次
-
传感器校准方法为:往传感器上放一个已知重量的物体,然后“告诉”传感器这个物体的重量是多少,这时传感器就会进行校准(单点校准)
Q1:如何显示负的重量信息。
A:将代码中的loop函数替换
void loop() {
  Serial.print("weight is: ");
  Serial.print(MyScale.readWeight(), 1);
  Serial.println(" g");
  delay(1000);
}
| Q2:如何判断自动校准是否成功。 | |
| A:成功后校准按键上方的指示灯会闪烁三下并熄灭,如果熄灭前没有闪烁三下则表示没有校准成功。 | |
| Q3:自动校准成功后输出的重量信息有较小误差(<0.5g)。 | |
| A:有时候物体放不稳会造成有很小的误差,再校准一次即可。 | |
| Q4:自动校准成功后输出的重量信息有较大误差(>3g),而且进行了多次校准每次校准成功后输出的重量信息都有较大误差。 | |
| A:请检查传感器(秤杆)的四根引线不要有过多缠绕,缠绕过多会影响数据。确保秤面已经放平。 | |
| Q5:如何确定校准物体的重量应该为多大。 | |
| A:取中间值,例如使用时测量范围大约为0-600g,那么校准物体重量最好选择300g(其他重量也可以,中间值是理想值)。 | |
| Q6:为什么在校准100g物体时,放上了100g物体后没有启动校准,一直校准失败。 | |
| A:校准时需要有一个“触发重量”,按下校准键,传感器检测到有东西放上去并且超过“触发重量”时才会开始校准。在第一次使用时,因为没有校准,所以放上100g的物体传感器读到的数据可能只有5g,这时需要降低MyScale.setThreshold(10)的值(30改为5或更低),然后重新上传代码。 | |
| Q7:不管放不放物体,传感器输出数据一直为0。 | |
| A:这是由于在Arduino完成复位前就将物体放在秤面上所导致的。解决办法:将秤面上物体取下,按一下Arduino的复位键或者传感器的rst键,重新放上物体即可正常使用。 | |
| Q8:为什么使用setCalibration()函数设置了校准值为2000,而使用getCalibration()函数察看当前的校准值却不是2000。 | |
| A:getCalibration()函数只能获取按键校准或enableCal()函数的校准值,无法获取通过setCalibration()函数设置的校准值 |
