简介
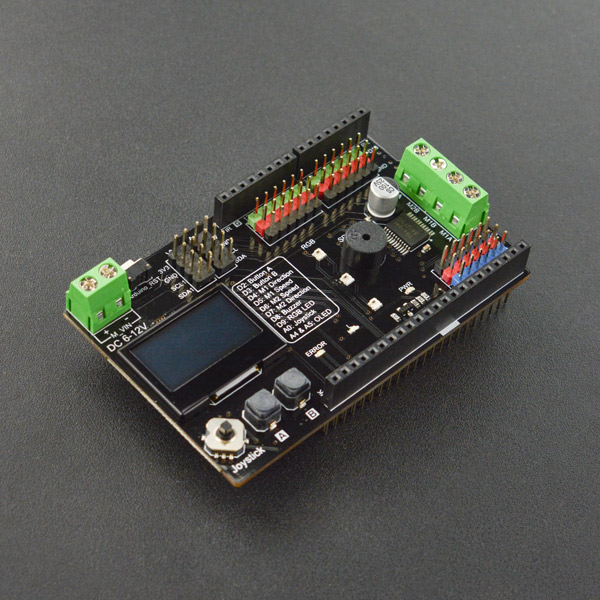
虚怀若谷,厚德载物。厚物——虚谷号第一块多功能扩展板,外扩虚谷号通用I/O管脚,兼容DFRobot Gravity 3-Pin传感器接口,可外接众多传感器及模组。围绕国家“新时代,新课标,新课堂”课改要求,针对学校电子信息课实际教学场景,主打编程教学体验。
虚谷号是中国电子学会创客教育专家委员会针对中国创客教育现状设计的一块符合中国情的开源硬件控制器。满足现有的基础教育需求,兼容市场主流开源硬件,集Arduino,树莓派,micro:bit等优点于一身,兼具高性能与高性价比。虚谷号面向人工智能教育,采用中国芯片,打造中国版开源硬件——虚怀若谷,包容一切!
厚物扩展板,集成一组双路电机驱动,0.96英寸OLED12864显示屏,无源蜂鸣器及一列RGB全彩LED灯,满足现场教学应用及比赛场景设计。支持电机外接供电,满足机器人等应用场景;OLED既可作为Linux调试窗口,又可作为传感器数据显示来用;蜂鸣器及RGB全彩LED灯可贴合实际交通信号指示灯场景,满足课程教学应用。板载五向开关及A/B按键设计,可作程序调试开关使用。
特性
- 双路电机驱动
- OLED显示
- 一列三个RGB LED
- 蜂鸣器提醒
- 五向开关及A/B调试按钮
- 兼容Gravity传感器
技术规格
- 兼容主板:虚谷号
- 工作电压:3.3V/5V兼容
- 电机驱动:TB6612FNG
- 驱动电流:1.2A连续电流;2A/3.2A启动电流(连续脉冲/单脉冲)
- 电机外接供电:<12V
- OLED屏幕尺寸:0.96英寸
- OLED屏幕分辨率:128x64
- 无源蜂鸣器
- RGB LED x3
- 五向开关按键(A0口)
- A/B按键调试按键(默认下拉)
- 尺寸:53.5*85.5mm
引脚说明
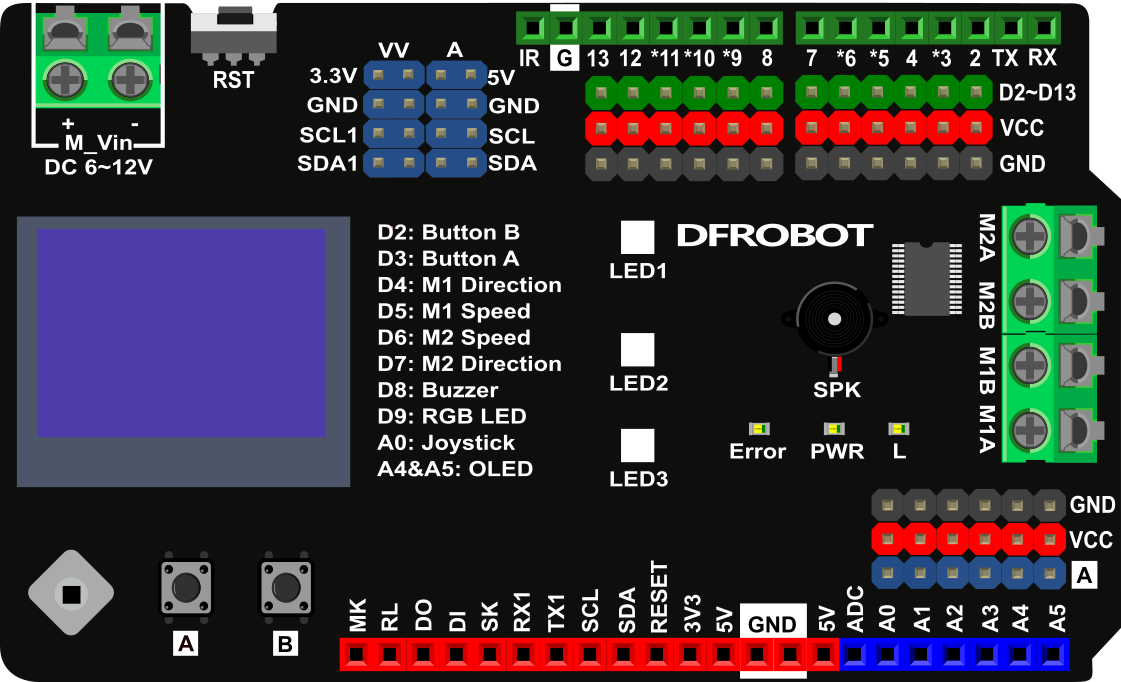
| 管脚 | 名称 | 功能描述 |
|---|---|---|
| D2 | 按键 A | 默认下拉,如需使用中断或者D2管脚,请将背面的焊锡熔断 |
| D3 | 按键 B | 默认下拉,如需使用中断或者D3管脚,请将背面的焊锡熔断 |
| D4 | M1 方向控制 | 高低电平代表正反转 |
| D5 | M1 速度控制 | 0~255 PWM速度控制 |
| D6 | M2 速度控制 | 0~255 PWM速度控制 |
| D7 | M2 方向控制 | 高低电平代表正反转 |
| D8 | 无源蜂鸣器 | 音乐播放 |
| D9 | RGB全彩LED | RGB LED灯,请注意设置亮度 |
| A0 | Joystick | 五向开关 |
| A4&A5 | OLED12864 | IIC地址 0x3C |
使用教程
本教程会对扩展板基础功能做必要的解释和说明。
准备
- 硬件
- 1 x 虚谷号控制板
- 1 x 厚物扩展板
- 软件
- Arduino IDE(虚谷号自带)
将厚物扩展板插到虚谷号上,虚谷号通电(推荐5V@2A USB供电)。
功能清单
点亮OLED屏幕
厚物扩展板的板载OLED屏幕采用I2C通信方式,地址:0x3C,内部硬件连接到Arduino I2C口:SDA&SCL(A4&A5),又通过电平转换芯片同时连接到虚谷号I2C口(SCL1&SDA1),既可以作为传感器数据显示屏,又可作为系统调试窗口使用。
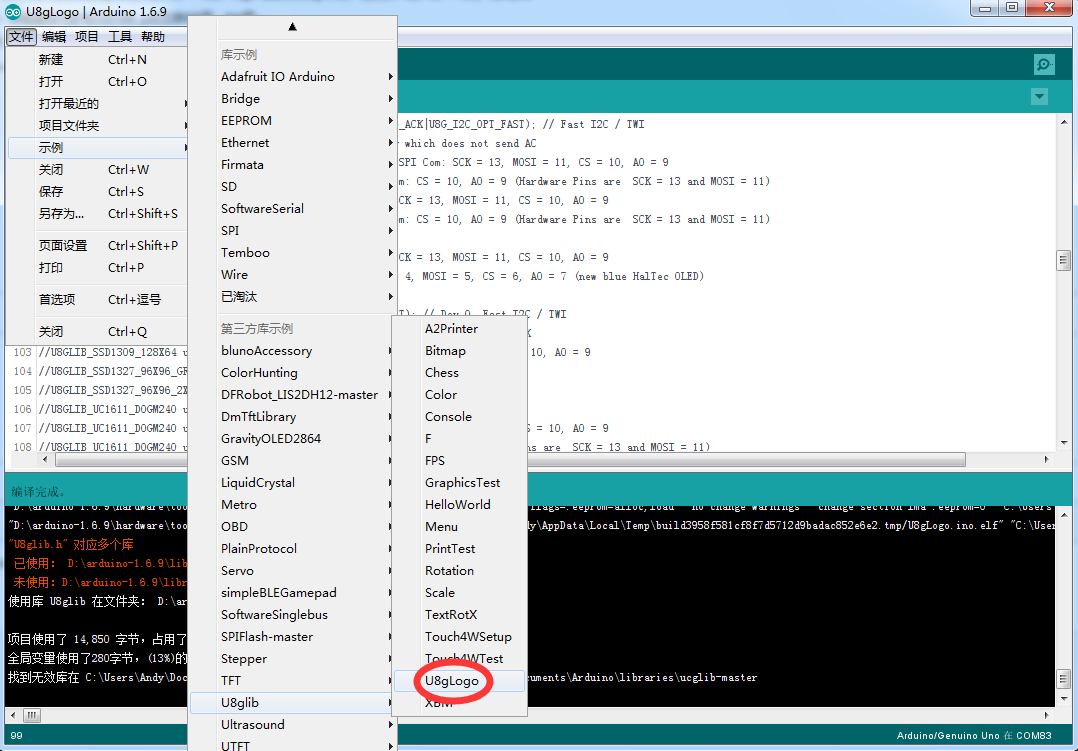
打开文件->示例->U8glib->U8gLogo,如下图所示:
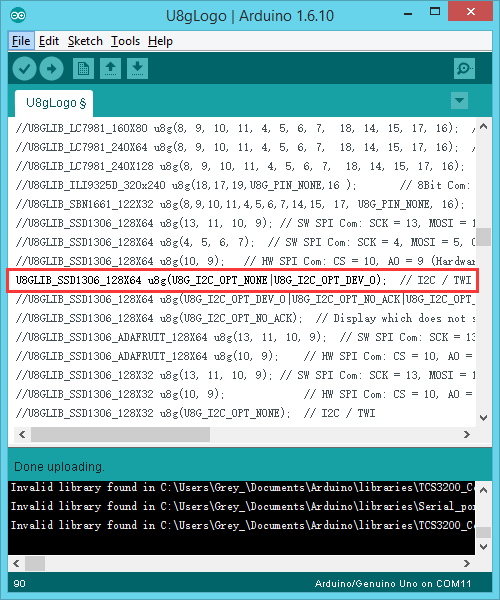
选择 U8GLIB_SSD1306_128X64 u8g(U8G_I2C_OPT_NONE | U8G_I2C_OPT_DEV_0); // I2C / TWI 取消注释,如下图所示:
源码如下:
/*

      U8gLogo.pde

      Put the U8GLIB logo on the display.

      >>> Before compiling: Please remove comment from the constructor of the
      >>> connected graphics display (see below).

      Universal 8bit Graphics Library, https://github.com/olikraus/u8glib/

      Copyright (c) 2012, olikraus@gmail.com
      All rights reserved.

      Redistribution and use in source and binary forms, with or without modification,
      are permitted provided that the following conditions are met:

        Redistributions of source code must retain the above copyright notice, this list
        of conditions and the following disclaimer.

        Redistributions in binary form must reproduce the above copyright notice, this
        list of conditions and the following disclaimer in the documentation and/or other
        materials provided with the distribution.

      THIS SOFTWARE IS PROVIDED BY THE COPYRIGHT HOLDERS AND
      CONTRIBUTORS "AS IS" AND ANY EXPRESS OR IMPLIED WARRANTIES,
      INCLUDING, BUT NOT LIMITED TO, THE IMPLIED WARRANTIES OF
      MERCHANTABILITY AND FITNESS FOR A PARTICULAR PURPOSE ARE
      DISCLAIMED. IN NO EVENT SHALL THE COPYRIGHT HOLDER OR
      CONTRIBUTORS BE LIABLE FOR ANY DIRECT, INDIRECT, INCIDENTAL,
      SPECIAL, EXEMPLARY, OR CONSEQUENTIAL DAMAGES (INCLUDING, BUT
      NOT LIMITED TO, PROCUREMENT OF SUBSTITUTE GOODS OR SERVICES;
      LOSS OF USE, DATA, OR PROFITS; OR BUSINESS INTERRUPTION) HOWEVER
      CAUSED AND ON ANY THEORY OF LIABILITY, WHETHER IN CONTRACT,
      STRICT LIABILITY, OR TORT (INCLUDING NEGLIGENCE OR OTHERWISE)
      ARISING IN ANY WAY OUT OF THE USE OF THIS SOFTWARE, EVEN IF
      ADVISED OF THE POSSIBILITY OF SUCH DAMAGE.

*/

#include "U8glib.h"

U8GLIB_SSD1306_128X64 u8g(U8G_I2C_OPT_NONE | U8G_I2C_OPT_DEV_0);    // I2C / TWI

//#define MINI_LOGO

void drawColorBox(void)
{
  u8g_uint_t w, h;
  u8g_uint_t r, g, b;

  w = u8g.getWidth() / 32;
  h = u8g.getHeight() / 8;
  for ( b = 0; b < 4; b++ )
    for ( g = 0; g < 8; g++ )
      for ( r = 0; r < 8; r++ )
      {
        u8g.setColorIndex((r << 5) |  (g << 2) | b );
        u8g.drawBox(g * w + b * w * 8, r * h, w, h);
      }
}

void drawLogo(uint8_t d)
{
#ifdef MINI_LOGO
  u8g.setFont(u8g_font_gdr17r);
  u8g.drawStr(0 + d, 22 + d, "U");
  u8g.setFont(u8g_font_gdr20n);
  u8g.drawStr90(17 + d, 8 + d, "8");
  u8g.setFont(u8g_font_gdr17r);
  u8g.drawStr(39 + d, 22 + d, "g");

  u8g.drawHLine(2 + d, 25 + d, 34);
  u8g.drawVLine(32 + d, 22 + d, 12);
#else
  u8g.setFont(u8g_font_gdr25r);
  u8g.drawStr(0 + d, 30 + d, "U");
  u8g.setFont(u8g_font_gdr30n);
  u8g.drawStr90(23 + d, 10 + d, "8");
  u8g.setFont(u8g_font_gdr25r);
  u8g.drawStr(53 + d, 30 + d, "g");

  u8g.drawHLine(2 + d, 35 + d, 47);
  u8g.drawVLine(45 + d, 32 + d, 12);
#endif
}

void drawURL(void)
{
#ifndef MINI_LOGO
  u8g.setFont(u8g_font_4x6);
  if ( u8g.getHeight() < 59 )
  {
    u8g.drawStr(53, 9, "code.google.com");
    u8g.drawStr(77, 18, "/p/u8glib");
  }
  else
  {
    u8g.drawStr(1, 54, "code.google.com/p/u8glib");
  }
#endif
}


void draw(void) {
  if ( u8g.getMode() == U8G_MODE_R3G3B2 ) {
    drawColorBox();
  }
  u8g.setColorIndex(1);
  if ( U8G_MODE_GET_BITS_PER_PIXEL(u8g.getMode()) > 1 ) {
    drawLogo(2);
    u8g.setColorIndex(2);
    drawLogo(1);
    u8g.setColorIndex(3);
  }
  drawLogo(0);
  drawURL();

}

void setup(void) {
  // flip screen, if required
  //u8g.setRot180();
}

void loop(void) {

  // picture loop
  u8g.firstPage();
  do {
    draw();
    u8g.setColorIndex(1);
  } while ( u8g.nextPage() );

  // rebuild the picture after some delay
  delay(200);
}
U8glib作为一个多功能显示库,有许多独特的功能,包括现实图片和打印数据,更多功能,可查看样例U8glib > Examples.
RGB全彩LED灯
厚物扩展板采用WS2812 RGB全彩LED灯珠,内部硬件连接到Arduino D9管脚,可通过Adafruit Neopixel灯带库来驱动
点击下载库文件:Adafruit_NeoPixel库文件。如何安装库?
#include <Adafruit_NeoPixel.h>
#ifdef __AVR__
#include <avr/power.h>
#endif

#define PIN 9        //注意修改LED驱动管脚!!!

// Parameter 1 = number of pixels in strip
// Parameter 2 = Arduino pin number (most are valid)
// Parameter 3 = pixel type flags, add together as needed:
//   NEO_KHZ800  800 KHz bitstream (most NeoPixel products w/WS2812 LEDs)
//   NEO_KHZ400  400 KHz (classic 'v1' (not v2) FLORA pixels, WS2811 drivers)
//   NEO_GRB     Pixels are wired for GRB bitstream (most NeoPixel products)
//   NEO_RGB     Pixels are wired for RGB bitstream (v1 FLORA pixels, not v2)
//   NEO_RGBW    Pixels are wired for RGBW bitstream (NeoPixel RGBW products)
Adafruit_NeoPixel strip = Adafruit_NeoPixel(64, PIN, NEO_GRB + NEO_KHZ800);

// IMPORTANT: To reduce NeoPixel burnout risk, add 1000 uF capacitor across
// pixel power leads, add 300 - 500 Ohm resistor on first pixel's data input
// and minimize distance between Arduino and first pixel.  Avoid connecting
// on a live circuit...if you must, connect GND first.

void setup() {
  // This is for Trinket 5V 16MHz, you can remove these three lines if you are not using a Trinket
#if defined (__AVR_ATtiny85__)
  if (F_CPU == 16000000) clock_prescale_set(clock_div_1);
#endif
  // End of trinket special code


  strip.begin();
  strip.show(); // Initialize all pixels to 'off'
}

void loop() {
  // Some example procedures showing how to display to the pixels:
  //colorWipe(strip.Color(255, 0, 0), 50); // Red
  // colorWipe(strip.Color(0, 255, 0), 50); // Green
  //colorWipe(strip.Color(0, 0, 255), 50); // Blue
  //colorWipe(strip.Color(0, 0, 0, 255), 50); // White RGBW
  // Send a theater pixel chase in...
  // theaterChase(strip.Color(127, 127, 127), 50); // White
  //theaterChase(strip.Color(127, 0, 0), 50); // Red
  //theaterChase(strip.Color(0, 0, 127), 50); // Blue

  rainbow(20);
  //rainbowCycle(20);
  //theaterChaseRainbow(50);
}

// Fill the dots one after the other with a color
void colorWipe(uint32_t c, uint8_t wait) {
  for (uint16_t i = 0; i < strip.numPixels(); i++) {
    strip.setPixelColor(i, c);
    strip.show();
    delay(wait);
  }
}

void rainbow(uint8_t wait) {
  uint16_t i, j;

  for (j = 0; j < 256; j++) {
    for (i = 0; i < strip.numPixels(); i++) {
      strip.setPixelColor(i, Wheel((i + j) & 255));
    }
    strip.show();
    delay(wait);
  }
}

// Slightly different, this makes the rainbow equally distributed throughout
void rainbowCycle(uint8_t wait) {
  uint16_t i, j;

  for (j = 0; j < 256 * 5; j++) { // 5 cycles of all colors on wheel
    for (i = 0; i < strip.numPixels(); i++) {
      strip.setPixelColor(i, Wheel(((i * 256 / strip.numPixels()) + j) & 255));
    }
    strip.show();
    delay(wait);
  }
}

//Theatre-style crawling lights.
void theaterChase(uint32_t c, uint8_t wait) {
  for (int j = 0; j < 10; j++) { //do 10 cycles of chasing
    for (int q = 0; q < 3; q++) {
      for (uint16_t i = 0; i < strip.numPixels(); i = i + 3) {
        strip.setPixelColor(i + q, c);  //turn every third pixel on
      }
      strip.show();

      delay(wait);

      for (uint16_t i = 0; i < strip.numPixels(); i = i + 3) {
        strip.setPixelColor(i + q, 0);      //turn every third pixel off
      }
    }
  }
}

//Theatre-style crawling lights with rainbow effect
void theaterChaseRainbow(uint8_t wait) {
  for (int j = 0; j < 256; j++) {   // cycle all 256 colors in the wheel
    for (int q = 0; q < 3; q++) {
      for (uint16_t i = 0; i < strip.numPixels(); i = i + 3) {
        strip.setPixelColor(i + q, Wheel( (i + j) % 255)); //turn every third pixel on
      }
      strip.show();

      delay(wait);

      for (uint16_t i = 0; i < strip.numPixels(); i = i + 3) {
        strip.setPixelColor(i + q, 0);      //turn every third pixel off
      }
    }
  }
}

// Input a value 0 to 255 to get a color value.
// The colours are a transition r - g - b - back to r.
uint32_t Wheel(byte WheelPos) {
  WheelPos = 255 - WheelPos;
  if (WheelPos < 85) {
    return strip.Color(255 - WheelPos * 3, 0, WheelPos * 3);
  }
  if (WheelPos < 170) {
    WheelPos -= 85;
    return strip.Color(0, WheelPos * 3, 255 - WheelPos * 3);
  }
  WheelPos -= 170;
  return strip.Color(WheelPos * 3, 255 - WheelPos * 3, 0);
}
无源蜂鸣器
厚物扩展板采用无源蜂鸣器,内部硬件连接到Arduino D8管脚,可用于播放音乐,以下是儿歌“两只老虎”的音乐(网友分享)。
#define C_0  -1
#define C_1  262
#define C_2  294
#define C_3  330
#define C_4  350
#define C_5  393
#define C_6  441
#define C_7  495

//音符数组
int yinfu[] =
{
  C_1, C_2, C_3, C_1,
  C_1, C_2, C_3, C_1,
  C_3, C_4, C_5,
  C_3, C_4, C_5,
  C_5, C_6, C_5, C_4, C_3, C_1,
  C_5, C_6, C_5, C_4, C_3, C_1,
  C_1, C_5, C_1,
  C_1, C_5, C_1,
};
//音拍数组,每一行代表4拍
float yinpai[] =
{
  1, 1, 1, 1,
  1, 1, 1, 1,
  1, 1, 2,
  1, 1, 2,
  0.75, 0.25, 0.75, 0.25, 1, 1,
  0.75, 0.25, 0.75, 0.25, 1, 1,
  1, 1, 2,
  1, 1, 2
};
int length;//音符数量
int tonepin = 8; //8号输出口


void setup() {
  // put your setup code here, to run once:
  pinMode(tonepin, OUTPUT);
  length = sizeof(yinfu) / sizeof(yinfu[0]);

}
int t;
void loop() {
  // put your main code here, to run repeatedly:
  for (t = 0; t < length; t++)
  {
    tone(tonepin, yinfu[t]); //发出声音
    delay(400 * yinpai[t]); //发音时间,用户可自调
    noTone(tonepin);    //停止发声
  }
  delay(3000);
}
按键
**五向开关:**内部硬件连接至Arduino A0管脚,通过读取模拟值来检测是否有按键按下,所以其他传感器请不要使用这个管脚,会出现数据不准确等问题。
int adc_key_val[5] = { 20, 150, 900, 950, 1000 };       //定义一个数组 存放模拟键值比较值
int NUM_KEYS = 5;
int adc_key_in;
int key = -1;
int oldkey = -1;

void setup() {
  pinMode(13, OUTPUT);  //LED13用来测试是否有按键按下
  Serial.begin(9600); //波特率为9600bps
}

void loop() {
  adc_key_in = analogRead(0);    // 读取模拟口0的值
  digitalWrite(13, LOW);
  key = get_key(adc_key_in);  //调用判断按键程序

  if (key != oldkey) {  // 判断是否有新键按下
    delay(50);  // 延时去抖
    adc_key_in = analogRead(0);    // 再次读模拟口0
    key = get_key(adc_key_in);    //调用判断按键程序
    if (key != oldkey)    {
      oldkey = key;
      if (key >= 0) {
        digitalWrite(13, HIGH);
        switch (key) {        // 确认有键按下,就通过串口发送数组相应字符
          case 0: Serial.println("Left");
            break;
          case 1: Serial.println("Middle");
            break;
          case 2: Serial.println("Down");
            break;
          case 3: Serial.println("Right");
            break;
          case 4: Serial.println("Up");
            break;
        }
      }
    }
  }
  delay(100);
}

// 该函数判断是哪个按键被按下,返回该按键序号
int get_key(unsigned int input) {
  int k;
  for (k = 0; k < NUM_KEYS; k++) {
    if (input < adc_key_val[k]) {    //循环对比比较值,判断是否有键按下,有返回键号
      return k;
    }
  }
  if (k >= NUM_KEYS)k = -1;  //  //没有键按下k =-1
  return k;
}
A/B按键: 内部硬件连接至Arduino D2/D3管脚,默认按键下拉低电平,如需使用中断或者D2/D3管脚,请将背面的焊锡熔断,若需要重新使用按键,只需要重新焊锡即可。
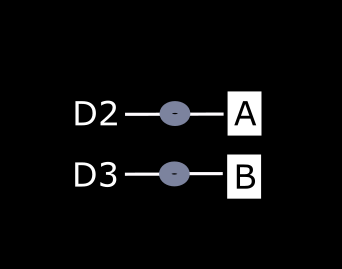
int buttonPinA = 2;     // 定义按键A  pin 2
int buttonPinB = 3;     // 定义按键B  pin 3

int buttonStateA = 0;     //初始化按键A状态
int buttonStateB = 0;     //初始化按键B状态

void setup() {
  pinMode(buttonPinA, INPUT);  //初始化按键A为输入
  pinMode(buttonPinB, INPUT);  //初始化按键B为输入
  Serial.begin(9600);
}

void loop() {
  buttonStateA = digitalRead(buttonPinA);  //读取按键A的状态,按下按键,BSA置高
  buttonStateB = digitalRead(buttonPinB);  //读取按键B的状态,按下按键,BSB置高

  if (buttonStateA == HIGH) {      //判断是否为高
    Serial.println("Button A Pressed");
  }
  if (buttonStateB == HIGH) {      //判断是否为高
    Serial.println("Button B Pressed");
  }
  delay(200);                     //延迟0.2s
}
当按下按键的时候,输入为HIGH,也就是数值为1,当松开按键的时候,输入为LOW,也就是数值为0。
电机驱动 ⚠需外接电源至M_Vin口⚠
虚谷扩展板采用一块TB6612小型电机驱动IC来驱动双路直流电机,内部硬件连接至Arduino D4、D5、D6、D7,其中D4和D7作为方向控制管脚,高低电平控制正反转,D5和D6作为速度控制管脚,通过输出PWM信号来控制电机转速的目的。注意:电机由于本身内阻的存在,都会存在一个最小启动电压,所以每次PWM输出会有一个最小启动值,若小于这个数值,电机无法转动,并且会伴有电流声。
int E1 = 5;
int M1 = 4;
int E2 = 6;
int M2 = 7;
void setup()
{
  pinMode(M1, OUTPUT);
  pinMode(M2, OUTPUT);
}
void loop()
{
  int value;
  for (value = 0 ; value <= 255; value += 5)
  {
    digitalWrite(M1, HIGH);   //M1正转
    digitalWrite(M2, HIGH);   //M2正转
    analogWrite(E1, value);   //PWM调速
    analogWrite(E2, value);   //PWM调速
    delay(30);
  }
}
上述代码中用了一个非常简单的For循环,拉高了M1和M2管脚,指定了一个方向,让PWM数值从小到大,速度从慢到快。
常见问题
还没有客户对此产品有任何问题,欢迎通过qq或者论坛联系我们!
更多问题及有趣的应用,可以 访问论坛 进行查阅或发帖。
