简介
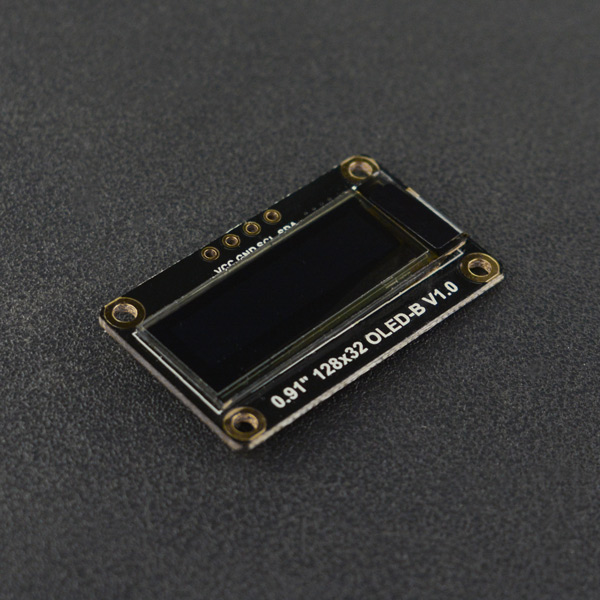
这款OLED显示器具有体积小巧、接线简单、功耗较低的特点;它的屏幕尺寸为0.91英寸的OLED显示屏,分辨率为128x32像素;采用了IIC的接口,它的工作电压为3.3-5V,全屏的最大功耗为25Ma左右;模块的长度不超过33MM,宽度不超过20MM。
它可以适用于可穿戴显示设备、传感器数值显示、图形显示或者简单动画显示、字体或者歌词显示(MP3)等。
产品参数
- 工作电压:3.3V~5V
- 显示颜色:白色像素点
- 像素个数:128列 × 32行
- 接口方式:I2C
- 驱动芯片:SSD1306
- 亮度:180 (Typ) cd/m2
- 全屏点亮功耗:约25mA(3.3V)25mA(5V)
- 全屏熄灭功耗:约2mA(3.3V)2mA(5V)
- 工作温度:-30℃~+70℃
- 显示面积:22.38×5.58 mm
- 安装孔直径:2 mm
- 尺寸:33x20 mm
- 重量:2.7 g
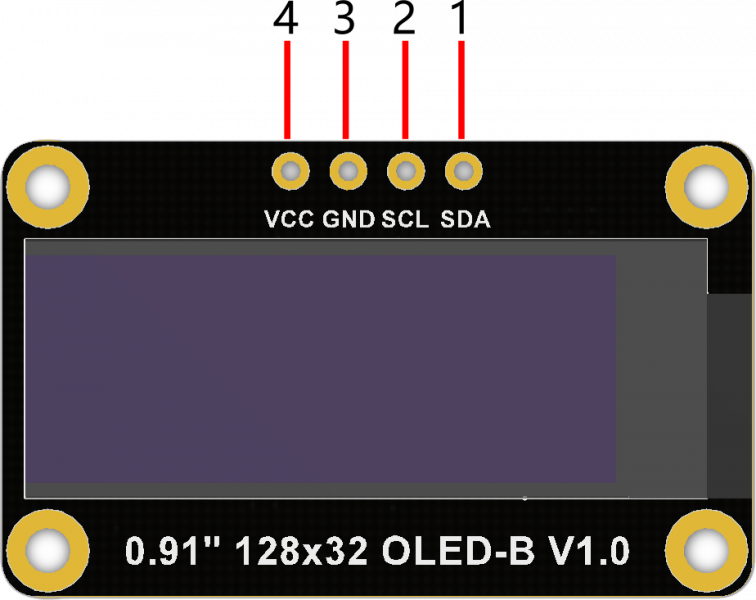
引脚说明
| 标号 | 名称 | 功能描述 |
|---|---|---|
| 1 | SDA | 数据线 |
| 2 | SCL | 时钟线 |
| 3 | GND | 接地线 |
| 4 | VCC | 正极 |
使用教程
注意:
1.IIC地址为0x3C
2.建议使用Arduino1.8.9及以上版本
3.在焊接时,尽量让焊盘上的排针或者排线与安装孔保持距离。
准备
- 硬件
- 1 x Arduino UNO控制板
- 1 x 0.91" 128x32 OLED-A
- 若干杜邦线
- 软件
- Arduino IDE, 点击下载Arduino IDE
- 0.91" 128x32 OLED-A u8g2库文件和示例程序
- 0.91" 128x32 OLED-A DFRobot_GDL库文件和示例程序(暂未发布)
关于如何安装库文件,点击链接
u8g2 API接口函数,点击链接了解详情
u8g2 字体参数列表,点击链接了解详情
DFRobot_GDL API接口函数,点击链接了解详情
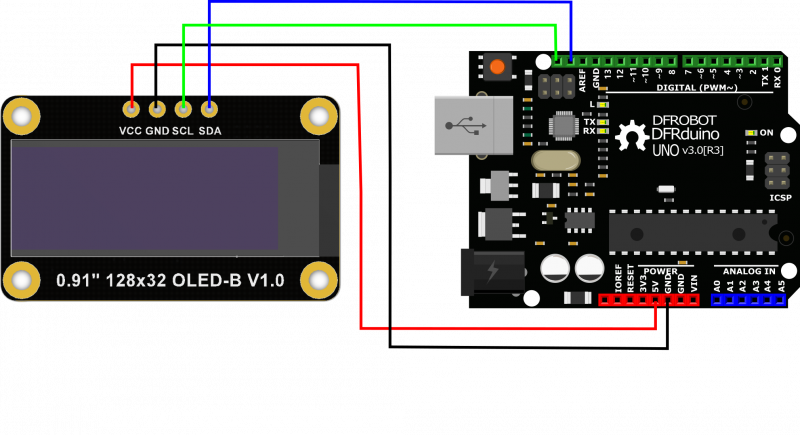
接线图
Arduino 连接图
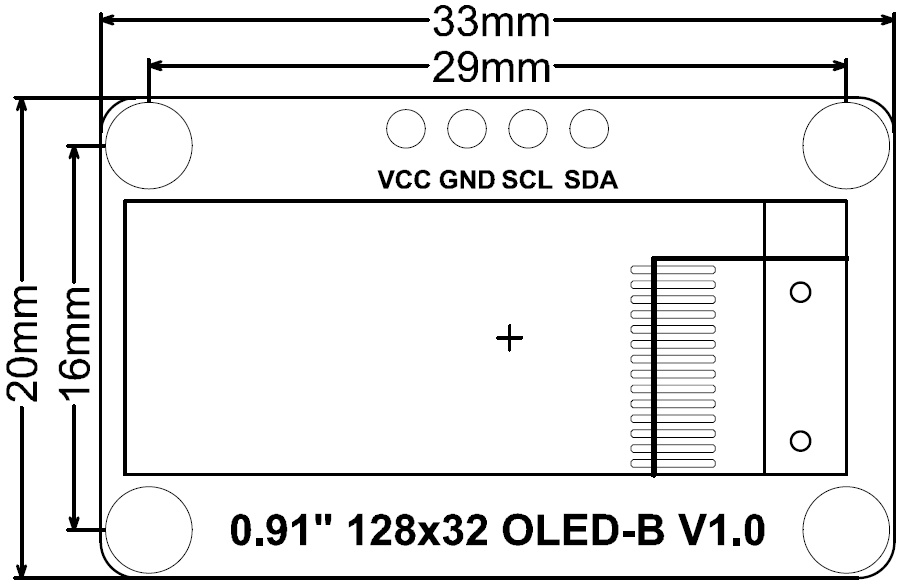
尺寸图
- 模块尺寸:33.00x20.00mm
- 安装孔间距:29mm,16mm
- 安装孔尺寸:2.0mm
样例代码1-语言、字体的显示
注意:
样例代码在example -> DFRobot_Demo -> 0.91 inch OLED12832-SSD1306文件夹内。
1.U8G2支持多国语言模式:支持中文、英文、日文、韩文等多种语言。
2.支持多种字体:U8G2支持多种像素大小的字体和图标,用户可以根据自己的需求去选择。
/*!
 * @file Language.ino
 * @brief U8G2中多种语言的显示
 * @n 演示中文、英文、韩文、日文的“hello world!”
 * @n U8G2字体GitHub连接:https://github.com/olikraus/u8g2/wiki/fntlistall
 *
 * @copyright  Copyright (c) 2010 DFRobot Co.Ltd (http://www.dfrobot.com)
 * @licence     The MIT License (MIT)
 * @author [Ajax](Ajax.zhong@dfrobot.com)
 * @version  V1.0
 * @date  2019-11-29
 * @get from https://www.dfrobot.com
 * @url https://github.com/DFRobot/U8g2_Arduino
*/
#include <Arduino.h>
#include <U8g2lib.h>

#include <Wire.h>

/*
 *IIC构造函数
 *@param  rotation:	U8G2_R0 不旋转,横向,绘制方向从左到右
		                U8G2_R1 顺时针旋转90度,绘制方向从上到下
			            U8G2_R2 顺时针旋转180度,绘制方向从右到左
			            U8G2_R3 顺时针旋转270度,绘制方向从下到上
			            U8G2_MIRROR 正常显示镜像内容(v2.6.x版本以上使用)   注意:U8G2_MIRROR需要与setFlipMode()配搭使用.
 *@param reset:U8x8_PIN_NONE 表示引脚为空,不会使用复位引脚
 *
*/
U8G2_SSD1306_128X32_UNIVISION_F_HW_I2C u8g2(U8G2_R0, /* reset=*/ U8X8_PIN_NONE);  //M0/ESP32/ESP8266/mega2560/Uno/Leonardo

void setup(void) {
  u8g2.begin();    //初始化函数
  u8g2.enableUTF8Print();		// 为Arduino print()函数启用UTF8支持
}

void loop(void)
{
  /*
   *字库占用的内存较大,谨慎使用。若只需显示固定几个字,可自行获得汉字编码,
   *通过drawXBM的方法去显示;或者使用内存更大的主控
   *中文字库:需要使用比Leonardo内存更大的主控
   *日文字库:需要使用比UNO内存更大的主控
   *韩文字库:由于Arduino现有版本的INO文件无法支持显示韩文字符,但是在屏幕上可以正常显示
  */
  u8g2.setFont(u8g2_font_unifont_t_chinese2);  //对“你好世界”的所有字形使用chinese2
  //u8g2.setFont(u8g2_font_b10_t_japanese1);  // 日语中已经包含了所有“こんにちは世界”的字形1:Lerning 1-6级
  //u8g2.setFont(u8g2_font_unifont_t_korean1);  // 日语中已经包含了所有“안녕하세요세계”的字形:Lerning 1-2级

  /*@brief 设置所有字符串或字形的绘制方向setFontDirection(uint8_t dir)
   *@param dir=0,旋转0度
				 dir=1,旋转90度
				 dir=2,旋转180度
				 dir=3,旋转270度
   *@param 设置字体方向后,要重新设置光标位置才能正常显示;如果不懂可以参考API的解释
  */
  u8g2.setFontDirection(0);

  /*
   * firstPage方法会把当前页码位置变成0
   * 修改内容处于firstPage和nextPage之间,每次都是重新渲染所有内容
   * 该方法消耗的ram空间,比sendBuffer消耗的ram空间要少
  */

  u8g2.firstPage();
  do {
    u8g2.setCursor(/* x=*/0, /* y=*/15);    //定义打印功能的光标,打印 功能的任何输出都将在此位置开始
    u8g2.print("Hello World!");
    u8g2.setCursor(0, 30);
    u8g2.print("你好世界");		// Chinese "Hello World"
    //u8g2.print("こんにちは世界");		// Japanese "Hello World"
    //u8g2.print("안녕하세요 세계");   // Korean "Hello World"
  } while ( u8g2.nextPage() );
  delay(1000);
}
结果
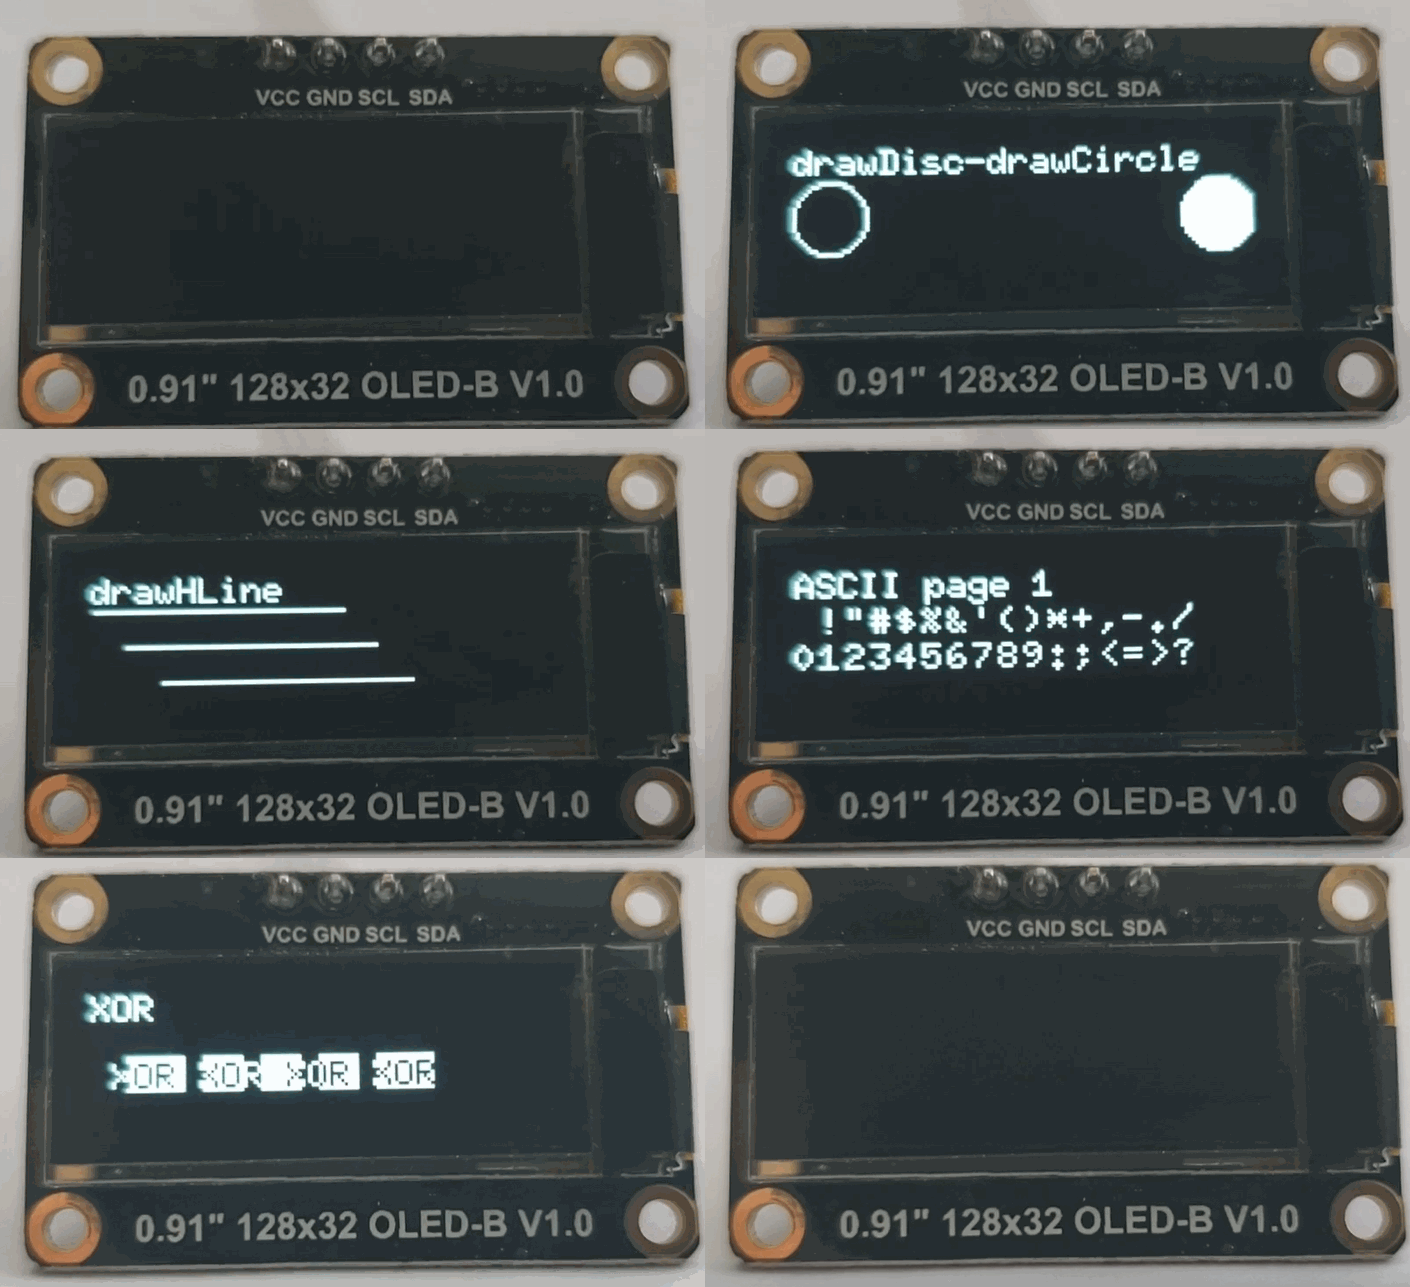
样例代码2 - 图形显示
U8g2支持多种方式的画图形,例如长方形、圆形、椭圆、三角形等
/*

  GraphicsTest.ino

  Universal 8bit Graphics Library (https://github.com/olikraus/u8g2/)

  Copyright (c) 2016, olikraus@gmail.com
  All rights reserved.

  Modify by [Ajax](Ajax.zhong@dfrobot.com)
  url https://github.com/DFRobot/U8g2_Arduino
  2019-11-29

*/
#include <Arduino.h>
#include <U8g2lib.h>

#include <Wire.h>


/*
  U8g2lib Example Overview:
    Frame Buffer Examples: clearBuffer/sendBuffer. Fast, but may not work with all Arduino boards because of RAM consumption
    Page Buffer Examples: firstPage/nextPage. Less RAM usage, should work with all Arduino boards.
    U8x8 Text Only Example: No RAM usage, direct communication with display controller. No graphics, 8x8 Text only.

*/

// Please UNCOMMENT one of the contructor lines below
// U8g2 Contructor List (Frame Buffer)
// The complete list is available here: https://github.com/olikraus/u8g2/wiki/u8g2setupcpp
// Please update the pin numbers according to your setup. Use U8X8_PIN_NONE if the reset pin is not connected

U8G2_SSD1306_128X32_UNIVISION_F_HW_I2C u8g2(U8G2_R0, /* reset=*/ U8X8_PIN_NONE); //  M0/ESP32/ESP8266/mega2560/Uno/Leonardo

void u8g2_prepare(void) {
  u8g2.setFont(u8g2_font_6x10_tf);	//设置字体为"u8g2_font_6x10_tf"
  u8g2.setFontRefHeightExtendedText();//Ascent will be the largest ascent of "A", "1" or "(" of the current font. Descent will be the descent of "g" or "(" of the current font.
  u8g2.setDrawColor(1);		//定义所有绘图功能的位值(颜色索引)。所有绘图功能都会将显示存储器更改为该位值。默认值为1。
  u8g2.setFontPosTop();	/*使用drawStr显示字符串时,默认标准为显示字符的左下角坐标。
                          本函数的功能可理解为将坐标位置改为显示字符串的左上角为坐标标准。*/
  u8g2.setFontDirection(0);	//设置屏幕方向:0--为正常显示
}

/*
 * 绘制边框主题
*/
void u8g2_box_title(uint8_t a) {
  u8g2.drawStr( 10+a*2, 5, "U8g2");//绘制字符串“U8g2”
  u8g2.drawStr( 10, 20, "GraphicsTest");
  u8g2.drawFrame(0,0,u8g2.getDisplayWidth(),u8g2.getDisplayHeight() );//在坐标为(0,0)的位置开始绘制一个宽度w和高度h的空框
}

/*
 * 绘制实心方形和空心方形
*/
void u8g2_box_frame(uint8_t a) {
  u8g2.drawStr(0,0,"drawBox-drawFrame");
  u8g2.drawBox(5+a,9,50,10); //在坐标为(5+a,9)的位置开始绘制一个宽度w和高度h的实心方形
  u8g2.drawFrame(5+a,20,50,10);//在坐标为(5+a,20)的位置开始绘制一个宽度w和高度h的空心方形
}

/*
 * 绘制实心圆和空心圆
*/
void u8g2_circle_disc(uint8_t a){
  u8g2.drawStr(0,0,"drawDisc-drawCircle");
  u8g2.drawCircle(10+a,20,10);  //在位置(10+a,20)绘制一个半径为10的实心圆
  u8g2.drawDisc(118-a,20,10);   //在位置(118-a,20)绘制一个半径为10的空心圆
}

/*
 * 绘制实心圆和空心圆
*/
void u8g2_RBox_RFrame(uint8_t a){
  u8g2.drawStr(0,0,"drawRBox-drawRFrame");
  u8g2.drawRBox(5+a,9,30,20,a+1);   //在位置(5+a,9)开始绘制宽度为40,高度为30一个具有半径为a+1的圆形边缘的框(空心)。
  u8g2.drawRFrame(90-a,9,30,20,a+1);  //在位置(90-a,9)开始绘制宽度为25,高度为40一个具有半径为a+1的圆形边缘的框(实心)。
}

/*
 * 绘制射线
*/
void u8g2_Hline(uint8_t a){
  u8g2.drawStr(0,0,"drawHLine");
  u8g2.drawHLine(1,10,40+a*5); //在坐标为(1,10)画一条射线
  u8g2.drawHLine(10,20,40+a*5);
  u8g2.drawHLine(20,30,40+a*5);
}

/*
 * 绘制线段
*/
void u8g2_line(uint8_t a){
  u8g2.drawStr(0,0,"drawLine");
  u8g2.drawLine(10+a,10,80-a,32); //在两点之间画一条线。(参数为两点坐标)
  u8g2.drawLine(10+a*2,10,80-a*2,32);
  u8g2.drawLine(10+a*3,10,80-a*3,32);
  u8g2.drawLine(10+a*4,10,80-a*4,32);
}

/*
 * 绘制实心三角形和空心三角形
*/
void u8g2_triangle(uint8_t a) {
  uint16_t offset = a;
  u8g2.drawStr( 0, 0, "drawTriangle");
  u8g2.drawTriangle(14,7, 45,30, 10,40);  //绘制一个三角形(实心多边形)。(参数为三角形三个顶点坐标)
  u8g2.drawTriangle(14+offset,7-offset, 45+offset,30-offset, 57+offset,10-offset);
  u8g2.drawTriangle(57+offset*2,10, 45+offset*2,30, 86+offset*2,53);
  u8g2.drawTriangle(10+offset,40+offset, 45+offset,30+offset, 86+offset,53+offset);
}

/*
 * 显示ASCII码表中的字符
*/
void u8g2_ascii_1() {
  char s[2] = " ";
  uint8_t x, y;
  u8g2.drawStr( 0, 0, "ASCII page 1");
  for( y = 0; y < 2; y++ ) {
    for( x = 0; x < 16; x++ ) {
      s[0] = y*16 + x + 32;
      u8g2.drawStr(x*7, y*10+10, s);
    }
  }
}

void u8g2_ascii_2() {
  char s[2] = " ";
  uint8_t x, y;
  u8g2.drawStr( 0, 0, "ASCII page 2");
  for( y = 0; y < 2; y++ ) {
    for( x = 0; x < 16; x++ ) {
      s[0] = y*16 + x + 160;
      u8g2.drawStr(x*7, y*10+10, s);
    }
  }
}

/*
 * 绘制UTF-8编码中的字符串图标
*/
void u8g2_extra_page(uint8_t a)
{
  u8g2.drawStr( 0, 0, "Unicode");
  u8g2.setFont(u8g2_font_unifont_t_symbols);
  u8g2.setFontPosTop();
  u8g2.drawUTF8(0, 9, "☀ ☁");//在位置(0,24)开始绘制一个编码为UTF-8的字符串图标
  switch(a) {
    case 0:
    case 1:
    case 2:
    case 3:
      u8g2.drawUTF8(a*3, 20, "☂");
      break;
    case 4:
    case 5:
    case 6:
    case 7:
      u8g2.drawUTF8(a*3, 20, "☔");
      break;
  }
}

/*
 * 显示字体的反显
*/
void u8g2_xor(uint8_t a) {
  uint8_t i;
  u8g2.drawStr( 0, 0, "XOR");
  u8g2.setFontMode(1);
  u8g2.setDrawColor(2);
  for( i = 0; i < 5; i++)
  {
    u8g2.drawBox(10+i*16, 18, 21,10);
  }
  u8g2.drawStr( 5+a, 19, "XOR XOR XOR XOR");
}

/*
 *这是一个图形转换成位图的数据,用于使用drawXBMP()显示
*/
#define cross_width 24
#define cross_height 24
static const unsigned char cross_bits[] U8X8_PROGMEM  = {
  0x00, 0x18, 0x00, 0x00, 0x24, 0x00, 0x00, 0x24, 0x00, 0x00, 0x42, 0x00,
  0x00, 0x42, 0x00, 0x00, 0x42, 0x00, 0x00, 0x81, 0x00, 0x00, 0x81, 0x00,
  0xC0, 0x00, 0x03, 0x38, 0x3C, 0x1C, 0x06, 0x42, 0x60, 0x01, 0x42, 0x80,
  0x01, 0x42, 0x80, 0x06, 0x42, 0x60, 0x38, 0x3C, 0x1C, 0xC0, 0x00, 0x03,
  0x00, 0x81, 0x00, 0x00, 0x81, 0x00, 0x00, 0x42, 0x00, 0x00, 0x42, 0x00,
  0x00, 0x42, 0x00, 0x00, 0x24, 0x00, 0x00, 0x24, 0x00, 0x00, 0x18, 0x00, };

#define cross_fill_width 24
#define cross_fill_height 24
static const unsigned char cross_fill_bits[] U8X8_PROGMEM  = {
  0x00, 0x00, 0x00, 0x00, 0x00, 0x00, 0x18, 0x00, 0x18, 0x64, 0x00, 0x26,
  0x84, 0x00, 0x21, 0x08, 0x81, 0x10, 0x08, 0x42, 0x10, 0x10, 0x3C, 0x08,
  0x20, 0x00, 0x04, 0x40, 0x00, 0x02, 0x80, 0x00, 0x01, 0x80, 0x18, 0x01,
  0x80, 0x18, 0x01, 0x80, 0x00, 0x01, 0x40, 0x00, 0x02, 0x20, 0x00, 0x04,
  0x10, 0x3C, 0x08, 0x08, 0x42, 0x10, 0x08, 0x81, 0x10, 0x84, 0x00, 0x21,
  0x64, 0x00, 0x26, 0x18, 0x00, 0x18, 0x00, 0x00, 0x00, 0x00, 0x00, 0x00, };

#define cross_block_width 14
#define cross_block_height 14
static const unsigned char cross_block_bits[] U8X8_PROGMEM  = {
  0xFF, 0x3F, 0x01, 0x20, 0x01, 0x20, 0x01, 0x20, 0x01, 0x20, 0x01, 0x20,
  0xC1, 0x20, 0xC1, 0x20, 0x01, 0x20, 0x01, 0x20, 0x01, 0x20, 0x01, 0x20,
  0x01, 0x20, 0xFF, 0x3F, };

/*
 * 绘制位图
*/
void u8g2_bitmap_overlay(uint8_t a) {
  uint8_t frame_size = 28;
  u8g2.drawStr(0, 0, "Bitmap overlay");
  u8g2.drawStr(0, frame_size + 12, "Solid / transparent");
/*
 * 设置位图的模式,定义位图函数是否将写入背景色(模式0 / solid,is_transparent = 0)
 * 或不写入背景颜色(模式1 / transparent,is_transparent = 1)。默认模式为0(固定模式)
*/
  u8g2.setBitmapMode(false /* solid */);
  u8g2.drawFrame(0, 10, frame_size, frame_size);
/*
 * 位置(x,y)是位图的左上角。XBM包含单色的1位位图。
 * 当前的颜色索引用于绘制(请参阅setColorIndex)像素值1
*/
  u8g2.drawXBMP(2, 12, cross_width, cross_height, cross_bits);
  if(a & 4)
    u8g2.drawXBMP(7, 17, cross_block_width, cross_block_height, cross_block_bits);//绘制位图

  u8g2.setBitmapMode(true /* transparent*/);
  u8g2.drawFrame(frame_size + 5, 10, frame_size, frame_size);
  u8g2.drawXBMP(frame_size + 7, 12, cross_width, cross_height, cross_bits);
  if(a & 4)
    u8g2.drawXBMP(frame_size + 12, 17, cross_block_width, cross_block_height, cross_block_bits);
}

//定义绘制状态的初始变量
uint8_t draw_state = 0;

/*
 * 绘制函数,用于对其他函数的有序调用
*/
void draw(void) {
  u8g2_prepare();
  switch(draw_state >> 3) {
    case 0: u8g2_box_title(draw_state&7); break;
    case 1: u8g2_box_frame(draw_state&7); break;
    case 2: u8g2_circle_disc(draw_state&7); break;
    case 3: u8g2_RBox_RFrame(draw_state&7); break;
    case 4: u8g2_Hline(draw_state&7); break;
    case 5: u8g2_line(draw_state&7); break;
    case 6: u8g2_triangle(draw_state&7); break;
    case 7: u8g2_ascii_1(); break;
    case 8: u8g2_ascii_2(); break;
    case 9: u8g2_extra_page(draw_state&7); break;
    case 10: u8g2_xor(draw_state&7); break;
    case 11: u8g2_bitmap_overlay(draw_state&7); break;
  }
}

void setup(void) {
  u8g2.begin(); //初始化函数
}

void loop(void) {
  //图片循环
  u8g2.firstPage();
  do {
    draw();
  } while( u8g2.nextPage() );

  //状态变量增加
  draw_state++;
  if ( draw_state >= 14*8 )
    draw_state = 0;

  delay(150);
}
结果
兼容性测试
| MCU | 测试通过 | 测试失败 | 未测试 | 特别关注 |
|---|---|---|---|---|
| FireBeetle-ESP32 | √ | |||
| FireBeetle-ESP8266 | √ | |||
| Arduino Uno | √ | |||
| Leonardo | √ | |||
| Mega2560 | √ | |||
| Arduino M0 | √ |
疑难解答
更多问题及有趣的应用,可以 访问论坛 进行查阅或发帖!
