
简介
相信你一定用过GPS设备,我们很容易在手机,平板,汽车里找到它的身影。它的用处就是帮助你在全球范围内定位自己。 这款兼容Arduino平台的GPS模块将GPS芯片与天线集成在了一起,安装在一个小型的塑料盒内。通过TinyGPS库,就可以在Arduino上获取地理坐标(包括经纬度,海拔高度)、航速、航向、GMT时间信息。 另外,刷新速率也是一款GPS模块重要的性能参数。大部分手机内的GPS使用的是1Hz的刷新速率,这就意味着这种GPS每秒只能获取一组数据。而我们的GPS模块拥有1-10Hz可调节的定位更新速率,信号间隔的大大降低使得它可以应付更严苛的使用条件。(例如:快速移动的车辆)。更多配置选项请参考技术手册。
注:室内收不到卫星信号,请在户外测试,陶瓷面朝天放置,首次测试需要约1分钟搜星,灯闪烁即说明搜索到卫星信号定位成功。
产品参数
- 芯片方案: UBX-G7020-KT
- 刷新频率: 1Hz(默认) ~ 10Hz
- TTL串口通信频率: 9600bps(默认) [可通过软件配置:4800 ,19200 ,38400 ,57600 ,115200 ,230400 ,460800,921600]
- 额定电压: 5v @ 30mA(支持3.3~5v)
- 通信频道: 56CH
- 灵敏度: -161dBm
- 精确度: 2.5m (主动) / <2m[SBAS]
- 工作温度: -40°C to 85°C
- 热启动: 1s[平均]
- 暖启动: 28s[平均]
- 冷启动: 29s[平均]
- 模块尺寸: 28*28*8.6mm
- 外壳尺寸: 37x48x16mm
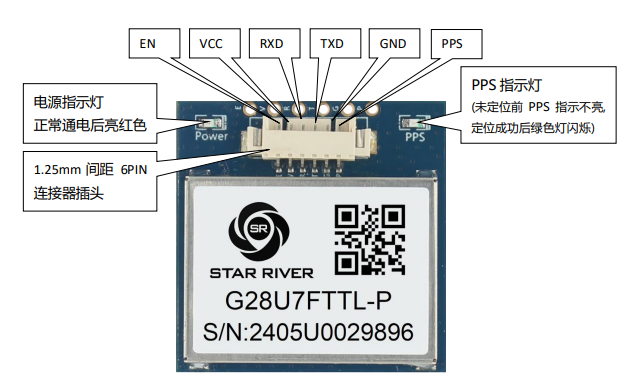
- 连接指示灯
应用
- 物品跟踪定位
- 飞行器控制
引脚说明 V1.0

| 名称 | 颜色 | 描述 |
|---|---|---|
| PPS | 白 | 时间标准脉冲输出 |
| VCC | 红 | 系统主电源,供电电压为3.3V-5.V |
| TX | 蓝 | UART/TTL接口 |
| RX | 绿 | UART/TTL接口 |
| GND | 黑 | 接地 |
| EN | 黄 | 电源使能,高电平/悬空模组工作,低电平模组关闭 |
引脚说明 V2.0
| 名称 | 颜色 | 描述 |
|---|---|---|
| PPS | 白 | 时间标准脉冲输出 |
| GND | 红 | 接地 |
| TX | 蓝 | UART/TTL接口 |
| RX | 绿 | UART/TTL接口 |
| VCC | 黑 | 系统主电源,供电电压为3.3V-5.V |
| EN | 黄 | 电源使能,高电平/悬空模组工作,低电平模组关闭 |
库说明
使用时,首先创建一个对象的实例,如下:
#include "TinyGPS.h"
TinyGPS gps;
通过调用 encode() 函数将一串NMEA标准数据数据一个接一个字符得发送到对象内(TinyGPS不能处理正在取回的来自GPS模块的数据串),如果encode()回复“true”,说明一个有效的句子已经保存在了tinygps对象的内部,例如:
void loop()
{
  while (Serial.available())
  {
    int c = Serial.read();
    if (gps.encode(c))
    {
      // process new gps info here
    }
  }
}
之后你可以查询对象得到各种各样想要的信息。为了测试得到的数据是否已过期,可以检查参数“fix_age”(可选),该参数代表从编码结束到现在的时间,以毫秒为单位。
long lat, lon;
unsigned long fix_age, time, date, speed, course;
unsigned long chars;
unsigned short sentences, failed_checksum;

// 获取经纬度值,单位为 十万分之一度
gps.get_position(&lat, &lon, &fix_age);

// 时间格式 hhmmsscc, 日期格式 ddmmyy
gps.get_datetime(&date, &time, &fix_age);

// 返回速度,单位为百分之一节
speed = gps.speed();

// 航向单位为百分之一度
course = gps.course();
使用教程
GPS 与 LCD 模块结合样例代码
连线图
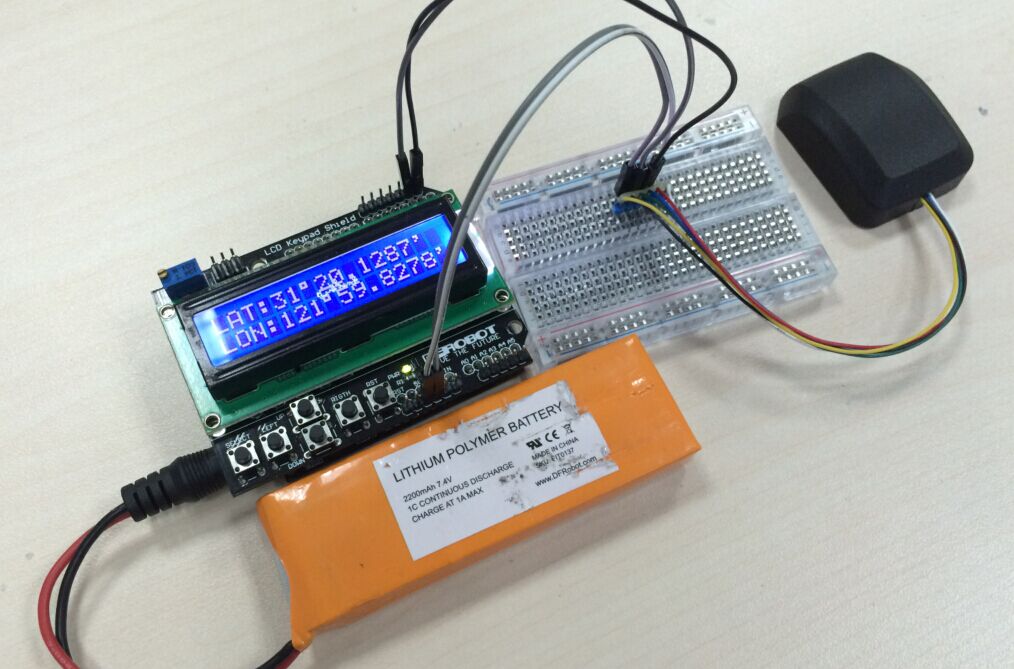
| GPS模块 | Arduino |
|---|---|
| VCC | VCC |
| GND | GND |
| RX | TX |
| TX | RX |
样例代码
库文件:TinyGPS V1.3
#include <TinyGPS.h>
#include <LiquidCrystal.h>

TinyGPS gps;
LiquidCrystal lcd(8, 9, 4, 5, 6, 7);              //LCD driver pins
int led = 13;

long lat, lon;
unsigned long fix_age, time, date, speed, course;
unsigned long chars;
unsigned short sentences, failed_checksum;
//int year;
//byte month, day, hour, minute, second, hundredths;

int DEG;
int MIN1;
int MIN2;

void LAT() {                      //Latitude state
  DEG = lat / 1000000;
  MIN1 = (lat / 10000) % 100;
  MIN2 = lat % 10000;

  lcd.setCursor(0, 0);            // set the LCD cursor   position
  lcd.print("LAT:");
  lcd.print(DEG);
  lcd.write(0xDF);
  lcd.print(MIN1);
  lcd.print(".");
  lcd.print(MIN2);
  lcd.print("'   ");
}
void LON() {                       //Longitude state
  DEG = lon / 1000000;
  MIN1 = (lon / 10000) % 100;
  MIN2 = lon % 10000;

  lcd.setCursor(0, 1);             // set the LCD cursor   position
  lcd.print("LON:");
  lcd.print(DEG);
  lcd.write(0xDF);
  lcd.print(MIN1);
  lcd.print(".");
  lcd.print(MIN2);
  lcd.print("'   ");
}


void setup()
{
  Serial.begin(9600);            //Set the GPS baud rate.

  pinMode(led, OUTPUT);

  lcd.begin(16, 2);               // start the library
  lcd.setCursor(0, 0);            // set the LCD cursor   position
  lcd.print("GPS test");          // print a simple message on the LCD
  delay(2000);
}

void loop()
{
  while (Serial.available())
  {
    digitalWrite(led, HIGH);
    int c = Serial.read();                   // Read the GPS data
    if (gps.encode(c))                        // Check the GPS data
    {
      // process new gps info here
    }

  }
  digitalWrite(led, LOW);
  gps.get_position(&lat, &lon, &fix_age);     // retrieves +/- lat/long in 100000ths of a degree
  gps.get_datetime(&date, &time, &fix_age);   // time in hhmmsscc, date in ddmmyy

  //gps.crack_datetime(&year, &month, &day,    //Date/time cracking
  //&hour, &minute, &second, &hundredths, &fix_age);

  LAT();
  LON();
}
结果
如上连线图所示,在室外空旷处,等待约30秒后,即可在屏幕上看到所在位置的GPS数据。
Mind+图形化编程
1、下载及安装软件。下载地址:https://mindplus.cc 详细教程:安装教程
2、切换到“上传模式”。 详细教程:Mind+基础wiki教程-上传模式编程流程
3、“扩展”中选择“主控板”中的“Arduino Uno”。通信模块中选择GPS模块加载扩展库。 详细教程:Mind+基础wiki教程-加载扩展库流程
4、进行编程,程序如下图:
5、菜单“连接设备”,“上传到设备”
6、程序上传完毕后,打开串口即可看到数据输出。详细教程:Mind+基础wiki教程-串口打印
注:室内收不到卫星信号,请在户外测试,陶瓷面朝天放置,首次测试需要约1分钟搜星,灯闪烁即说明搜索到卫星信号定位成功。

疑难解答
GPS定位准不准 决定定位精度的诸多因素
GPS怎么把经纬度转换成标准的度分秒单位
更多
相关文档 库文件TinyGPS
VK2828U7G5LF 技术手册.pdf
VKEL GPS 调试工具
购买链接  购买 DFRobot商城购买链接