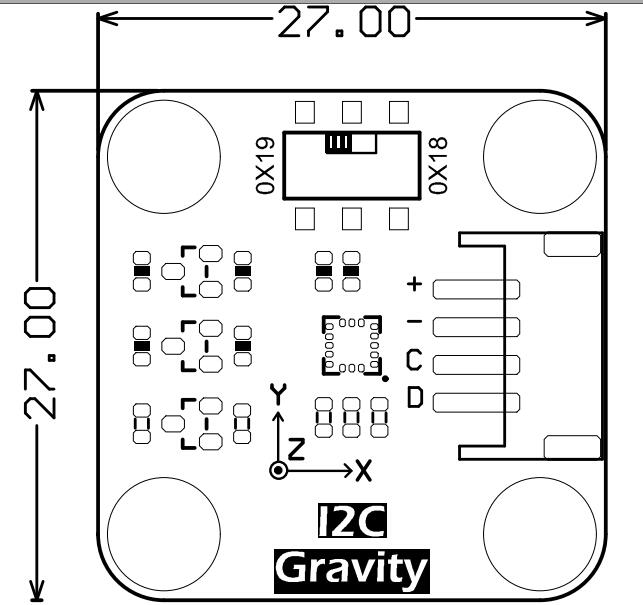
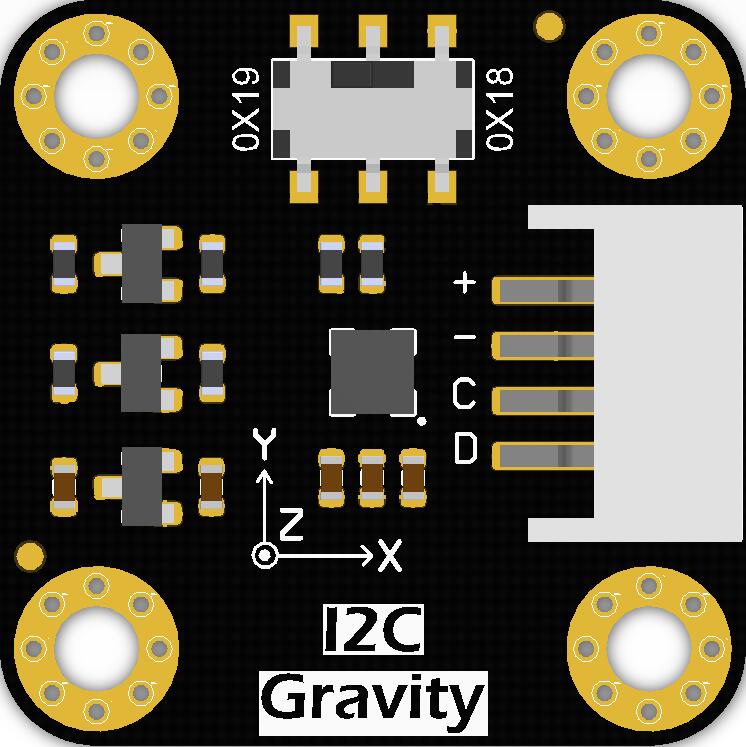
产品简介
LIS331HH三轴加速度计是一款量程较大的低功耗高精度线性加速度计,该传感器可选量程为±6g/±12g/±24g,可实现超低功耗(低至10uA),拥有16位数据输出,并能够以0.5 Hz至1 kHz的输出数据速率测量加速度。在导航类、智能农业、机器人技术、VR/AR等领域都极其适用。
特性
- 可选量程±6g/±12g/±24g
- 16位数据输出
- 简单易用的Gravity接口,无需焊接
- 拨扭开关可方便切换I2C地址
技术规格
- 工作电压:3.3V~5V
- 工作电流:10uA(低功耗模式) / 0.3mA(正常模式)
- 接口方式:Gravity-I2C接口
- I2C地址:0x19(默认地址)/0x18(可选)
- 可选标尺:±6g/±12g/±24g
- 频率:0.5Hz~1KHz
- 16位数据输出
- 睡眠唤醒功能
- 万克高抗撞击能力
- ECOPACK®RoHS和“绿色”标准
- 工作温度:-40℃~+85℃
- 模块尺寸:27 x 27(mm)
- 安装孔尺寸:内径3mm/外径6mm
注意:Gravity版本没有引出两个可编程中断引脚,若需要使用外部中断和睡眠唤醒的高级功能,请购买Breakout版本,购买链接为:(即将上线,尽请期待哦)
应用
- 自由落体检测
- 制动检测
引脚说明
| 序号 | 丝印 | 功能描述 |
|---|---|---|
| 1 | VCC/+ | 5V / 3V3 |
| 2 | GND/- | GND |
| 3 | SCL/C | I2C时钟线 |
| 4 | SDA/D | I2C数据线 |
注意:拨钮开关可选择I2C地址为0x18或0x19。Micro:bit(v1.5版本)的I2C地址与传感器I2C地址0x19冲突,所以请选择0x18。
Arduino使用教程
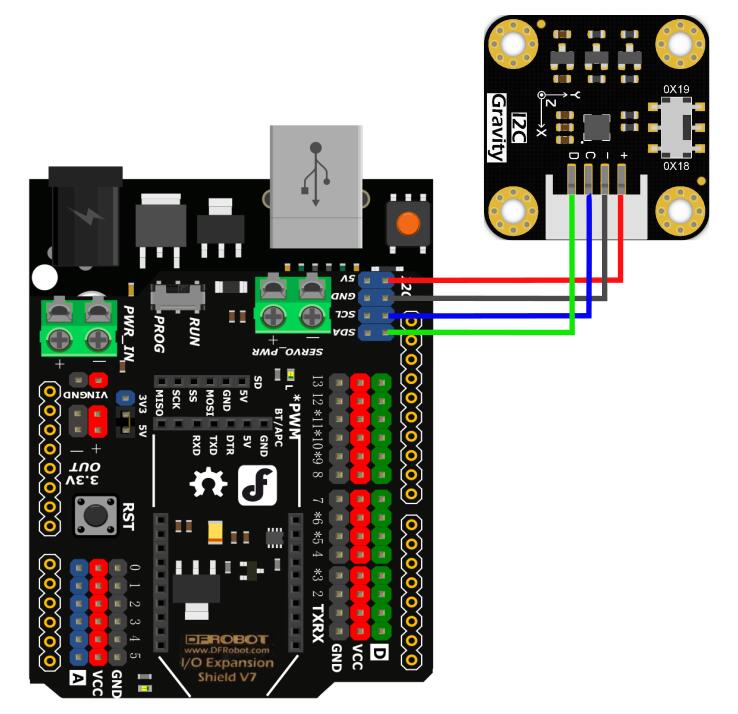
该产品使用的是Gravity标准I2C接口,使用起来比较简单,按接线图所示将传感器与uno(或其它主板)相连接即可。
连线图
准备
- 硬件
- 1 x Arduino UNO控制板
- 1 x LIS331HH三轴加速度计
- 若干 杜邦线
- 软件
- Arduino IDE, 点击下载Arduino IDE
- LIS系列库文件和示例程序
关于如何安装库文件,点击链接
-
样例代码
-
主要API接口函数列表
 /**
   * @brief 初始化函数
   * @return true(成功)/false(失败)
   */
  bool begin(void);

  /**
   * @brief 获取芯片ID
   * @return 8bit序列号
   */
  uint8_t getID();

  /**
   * @brief 使能中断
   * @param source 选择中断引脚
              eINT1 = 0,/<int1 >/
              eINT2,/<int2>/
   * @param event 中断事件,可选中断事件如下
                   eXLowerThanTh = 0, /<X方向加速度小于阈值>/
                   eXHigherThanTh , /<X方向加速度大于阈值>/
                   eYLowerThanTh, /<Y方向加速度小于阈值>/
                   eYHigherThanTh, /<Y方向加速度大于阈值>/
                   eZLowerThanTh, /<Z方向加速度小于阈值>/
                   eZHigherThanTh, /<Z方向加速度大于阈值>/
   */
  void enableInterruptEvent(eInterruptSource_t source, eInterruptEvent_t event);

  /**
   * @brief 设置测量范围
   * @param range 范围(g)
            e100_g = ±100g
            e200_g = ±200g
   * @return true(设置成功)/false(设置失败)
   */
  bool setRange(eRange_t range);

  /**
   * @brief 设置数据测量频率
   * @param rate 频率(HZ)
      ePowerDown_0HZ   //测量关闭
      eLowPower_halfHZ //低功耗模式,0.5 hz
      eLowPower_1HZ    //低功耗模式,1 hz
      eLowPower_2HZ    //低功耗模式,2 hz
      eLowPower_5HZ    //低功耗模式,5 hz
      eLowPower_10HZ   //低功耗模式,10 hz
      eNormal_50HZ     //正常测量模式,50 hz
      eNormal_100HZ    //正常测量模式,100 hz
      eNormal_400HZ    //正常测量模式,400 hz
      eNormal_1000HZ   //正常测量模式,1000 hz
   */
  void setAcquireRate(ePowerMode_t rate);

  /**
   * @brief 设置数据滤波模式
   * @param mode 模式,4种模式如下
                 eCutoffMode1 = 0,
                 eCutoffMode2,
                 eCutoffMode3,
                 eCutoffMode4,
                 eShutDown,  //无过滤
   *|---------------------------High-pass filter cut-off frequency configuration-----------------------------|
   *|--------------------------------------------------------------------------------------------------------|
   *|                |    ft [Hz]      |        ft [Hz]       |       ft [Hz]        |        ft [Hz]        |
   *|   mode         |Data rate = 50 Hz|   Data rate = 100 Hz |  Data rate = 400 Hz  |   Data rate = 1000 Hz |
   *|--------------------------------------------------------------------------------------------------------|
   *|  eCutoffMode1  |     1           |         2            |            8         |             20        |
   *|--------------------------------------------------------------------------------------------------------|
   *|  eCutoffMode2  |    0.5          |         1            |            4         |             10        |
   *|--------------------------------------------------------------------------------------------------------|
   *|  eCutoffMode3  |    0.25         |         0.5          |            2         |             5         |
   *|--------------------------------------------------------------------------------------------------------|
   *|  eCutoffMode4  |    0.125        |         0.25         |            1         |             2.5       |
   *|--------------------------------------------------------------------------------------------------------|
   */
  void setHFilterMode(eHighPassFilter_t mode);

  /**
   * @brief 设置中断源1的阈值
   * @param threshold 阈值(g),中断信号发生的测量边界,设置的阈值在量程之内(unit:g)
   */
  void setInt1Th(uint8_t threshold);

  /**
   * @brief 设置中断源1的阈值
   * @param threshold 阈值(g),中断信号发生的测量边界,设置的阈值在量程之内(unit:g)
   */
  void setInt2Th(uint8_t threshold);

  /**
   * @brief 使能睡眠唤醒功能
   * @param enable true(表示使能成功)/false(表示使能失败)
   * @return false 表示使能失败/true 表示使能成功
   */
  bool enableSleep(bool enable);

  /**
   * @brief 检查中断源1是否发生该中断事件
   * @param event 中断事件,可选中断事件如下
                   eXLowerThanTh = 0, /<X方向加速度小于阈值>/
                   eXHigherThanTh , /<X方向加速度大于阈值>/
                   eYLowerThanTh, /<Y方向加速度小于阈值>/
                   eYHigherThanTh, /<Y方向加速度大于阈值>/
                   eZLowerThanTh, /<Z方向加速度小于阈值>/
                   eZHigherThanTh, /<Z方向加速度大于阈值>/
   * @return true 发生了该事件,false 没发生该事件
   */
  bool getInt1Event(eInterruptEvent_t event);

  /**
   * @brief 检查中断源2是否发生该中断事件
   * @param event 中断事件,可选中断事件如下
                   eXLowerThanTh = 0, /<X方向加速度小于阈值>/
                   eXHigherThanTh , /<X方向加速度大于阈值>/
                   eYLowerThanTh, /<Y方向加速度小于阈值>/
                   eYHigherThanTh, /<Y方向加速度大于阈值>/
                   eZLowerThanTh, /<Z方向加速度小于阈值>/
                   eZHigherThanTh, /<Z方向加速度大于阈值>/
   * @return true 发生了该事件,false 没发生该事件
   */
  bool getInt2Event(eInterruptEvent_t event);

  /**
   * @brief 获取X方向的加速度
   * @return x方向的加速度 (单位:g)
   */
  int32_t readAccX();

  /**
   * @brief 获取Y方向的加速度
   * @return y方向的加速度(单位:g)
   */
  int32_t readAccY();

  /**
   * @brief 获取Z方向的加速度
   * @return z方向的加速度(单位:g)
   */
  int32_t readAccZ();

  /**
   * @brief 获取X,Y,Z三个方向的加速度
   * @param accx 储存x方向加速度的变量
   * @param accy 储存y方向加速度的变量
   * @param accz 储存z方向加速度的变量
   * @return true(成功获取数据)/false(数据未准备好)
   */
  bool getAcceFromXYZ(int32_t &accx,int32_t &accy,int32_t &accz);

  /**
   * @brief 获取传感器是否处于睡眠模式
   * @return true(处于睡眠模式)/false(处于正常模式)
   */
  bool getSleepState();

  /**
   * @brief 设置睡眠状态的标志
   * @param true(将现在的模式标记为睡眠模式)
            false(将现在的模式标记为正常模式)
   */
  void setSleepFlag(bool into);
样例代码1-读取x,y,z轴加速度(getAcceleration.ino)
- 选择getAcceleration.ino
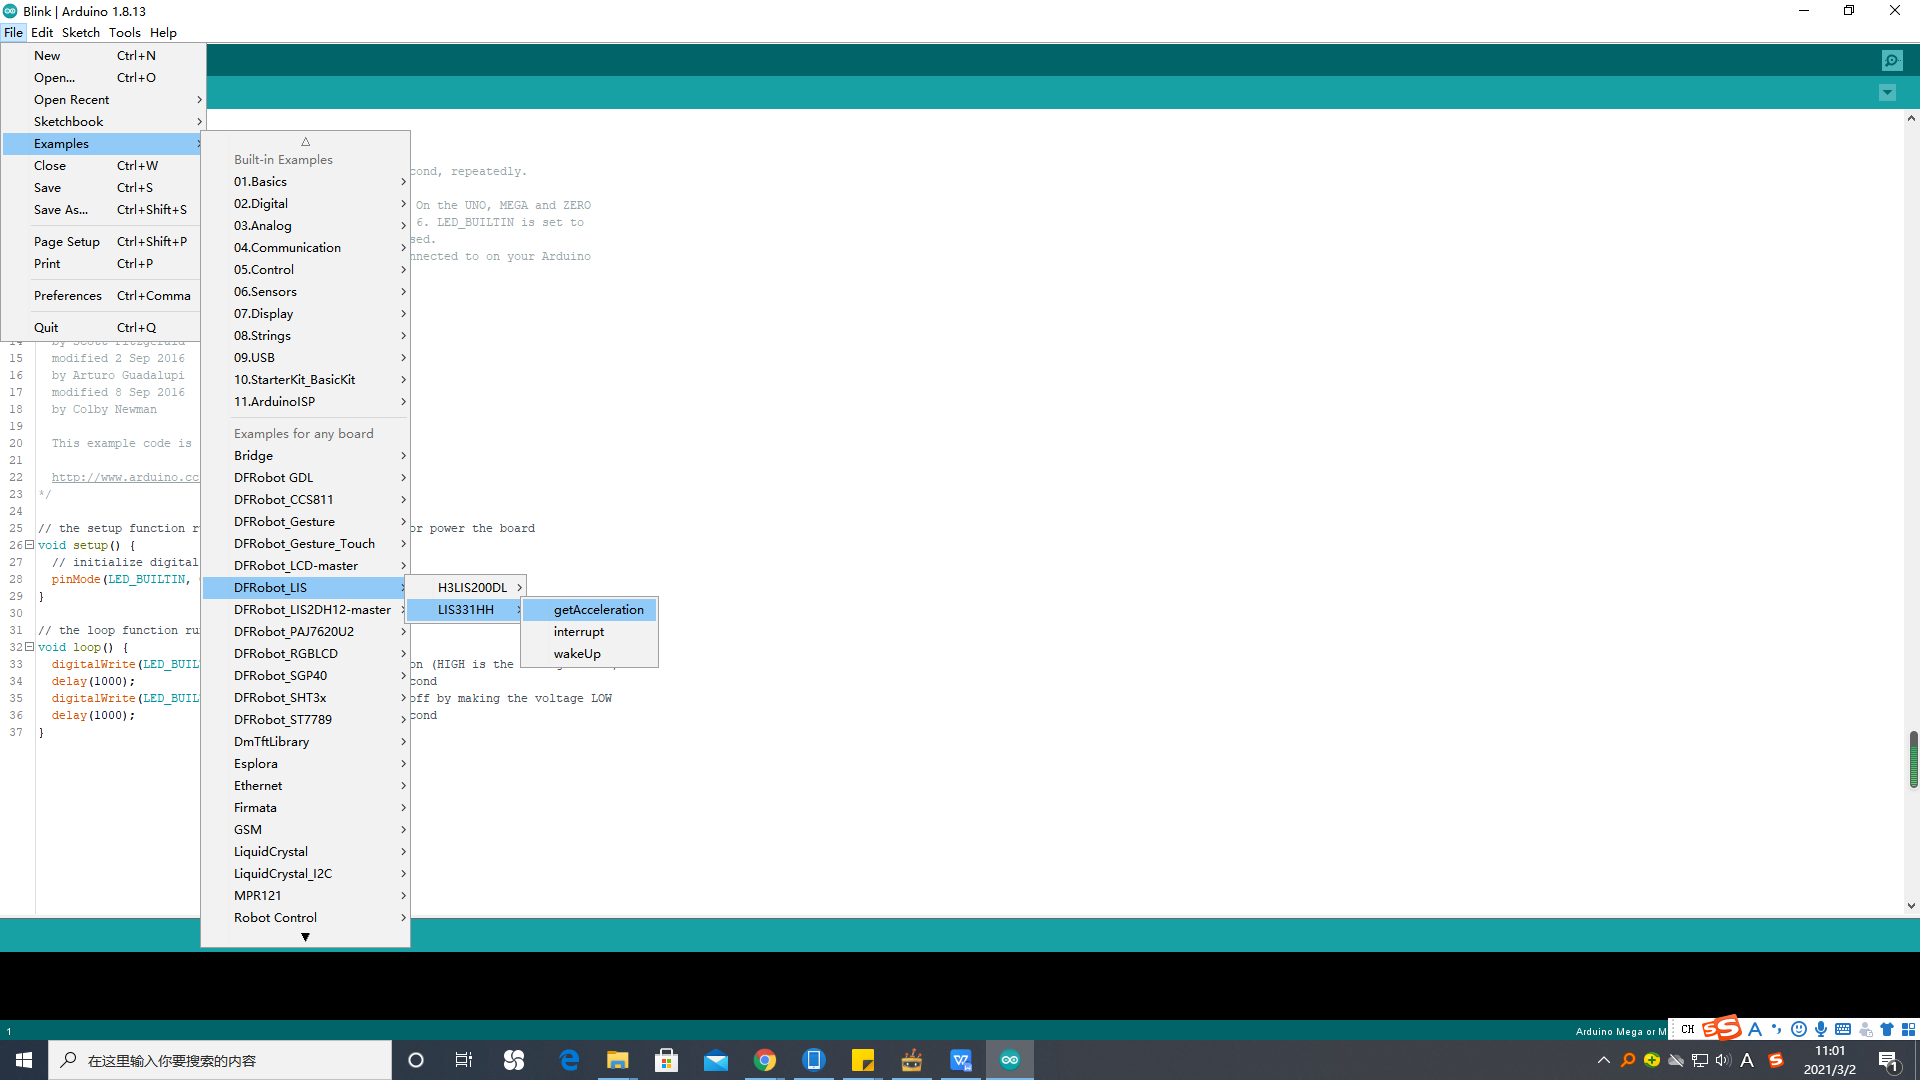
- 烧录程序
/**!
 * @file getAcceleration.ino
 * @brief 获取x,y,z三个方向的加速度值,范围(±6g/±12g/±24g)
 * @n 在使用SPI时片选引脚可以通过 LIS331HH_CS 的值修改
 * @copyright  Copyright (c) 2010 DFRobot Co.Ltd (http://www.dfrobot.com)
 * @licence     The MIT License (MIT)
 * @author [fengli](li.feng@dfrobot.com)
 * @version  V1.0
 * @date  2021-01-16
 * @get from https://www.dfrobot.com
 * @https://github.com/DFRobot/DFRobot_LIS
 */

#include <DFRobot_LIS.h>

//当你使用I2C通信时,使用下面这段程序,使用DFRobot_LIS331HH_I2C构造对象
/*!
 * @brief Constructor
 * @param pWire I2c controller
 * @param addr  I2C address(0x18/0x19)
 */
//DFRobot_LIS331HH_I2C acce(&Wire,0x19);
DFRobot_LIS331HH_I2C acce;

//当你使用SPI通信时,使用下面这段程序,使用DFRobot_LIS331HH_SPI构造对象
#if defined(ESP32) || defined(ESP8266)
#define LIS331HH_CS  D3
#elif defined(__AVR__) || defined(ARDUINO_SAM_ZERO)
#define LIS331HH_CS 3
#elif (defined NRF5)
#define LIS331HH_CS P3
#endif
/*!
 * @brief Constructor
 * @param cs : Chip selection pinChip selection pin
 * @param spi :SPI controller
 */
//DFRobot_LIS331HH_SPI acce(/*cs = */LIS331HH_CS);

void setup(void){

  Serial.begin(9600);
  //Chip initialization
  while(acce.begin()){
     delay(1000);
     Serial.println("初始化失败,请检查连线与I2C地址设置");
  }
  //Get chip id
  Serial.print("chip id : ");
  Serial.println(acce.getID(),HEX);

  /**
    set range:Range(g)
              eLis331h_6g = 6,/<±6g>/
              eLis331h_12g = 12,/<±12g>/
              eLis331h_24g = 24/<±24g>/
  */
  acce.setRange(/*range = */DFRobot_LIS::eLis331h_6g);

  /**
    Set data measurement rate:
      ePowerDown_0HZ = 0,
      eLowPower_halfHZ,
      eLowPower_1HZ,
      eLowPower_2HZ,
      eLowPower_5HZ,
      eLowPower_10HZ,
      eNormal_50HZ,
      eNormal_100HZ,
      eNormal_400HZ,
      eNormal_1000HZ,
  */
  acce.setAcquireRate(/*rate = */DFRobot_LIS::eNormal_50HZ);
  delay(1000);
}

void loop(void){

    //Get the acceleration in the three directions of xyz
    long ax,ay,az;
    ax = acce.readAccX();//Get the acceleration in the x direction
    ay = acce.readAccY();//Get the acceleration in the y direction
    az = acce.readAccZ();//Get the acceleration in the z direction
    //acce.getAcceFromXYZ(/*accx = */ax,/*accy = */ay,/*accz = */az);//第二种获取三方向加速度的方法
    Serial.print("Acceleration x: "); //print acceleration
    Serial.print(ax);
    Serial.print(" mg \ty: ");
    Serial.print(ay);
    Serial.print(" mg \tz: ");
    Serial.print(az);
    Serial.println(" mg");
    delay(300);
}
结果
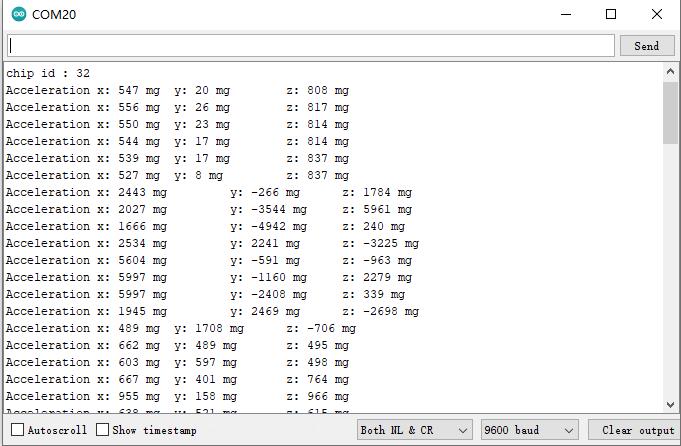
样例代码2-睡眠唤醒功能(wakeUp.ino)(仅Breakout版本可使用)
- 选择wakeUp.ino
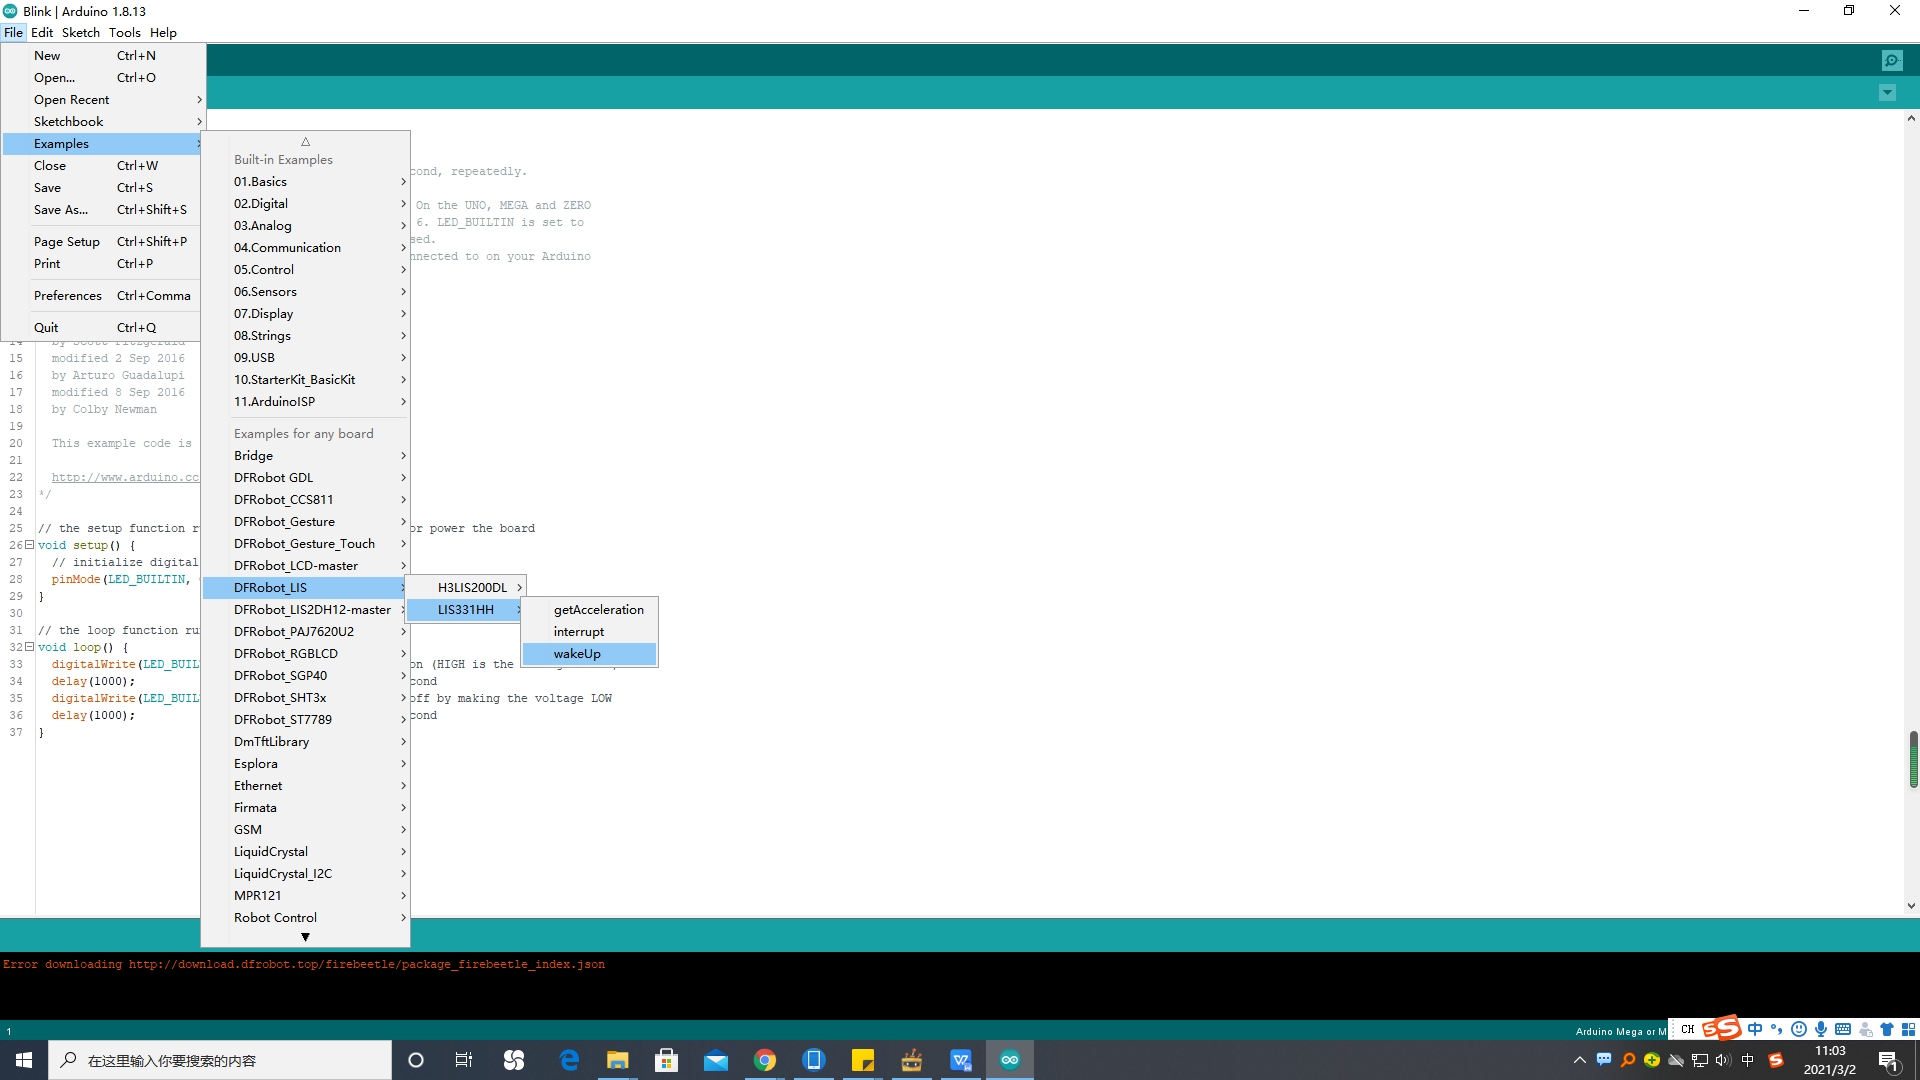
- 烧录程序
/**!
 * @file wakeUp.ino
 * @brief 使用睡眠唤醒功能
 * @n 现象:使用此功能需要先让模块处于低功耗模式,此时的测量速率会很慢
 * @n 当有设置好的中断事件产生,模块会进入正常模式,从而测量速率加快
 * @n 在使用SPI时,片选引脚时可以通过改变宏LIS331HH_CS的值修改
 * @copyright  Copyright (c) 2010 DFRobot Co.Ltd (http://www.dfrobot.com)
 * @licence     The MIT License (MIT)
 * @author [fengli](li.feng@dfrobot.com)
 * @version  V1.0
 * @date  2021-01-16
 * @get from https://www.dfrobot.com
 * @https://github.com/DFRobot/DFRobot_LIS
 */

#include <DFRobot_LIS.h>
//当你使用I2C通信时,使用下面这段程序,使用DFRobot_LIS331HH_I2C构造对象
/*!
 * @brief Constructor
 * @param pWire I2c controller
 * @param addr  I2C address(0x18/0x19)
 */
//DFRobot_LIS331HH_I2C acce(&Wire,0x19);
DFRobot_LIS331HH_I2C acce;

//当你使用SPI通信时,使用下面这段程序,使用DFRobot_LIS331HH_SPI构造对象
#if defined(ESP32) || defined(ESP8266)
#define LIS331HH_CS  D3
#elif defined(__AVR__) || defined(ARDUINO_SAM_ZERO)
#define LIS331HH_CS 3
#elif (defined NRF5)
#define LIS331HH_CS P3
#endif
/*!
 * @brief Constructor
 * @param cs : Chip selection pinChip selection pin
 * @param spi :SPI controller
 */
//DFRobot_LIS331HH_SPI acce(/*cs = */LIS331HH_CS);

//中断产生标志
volatile uint8_t intFlag = 0;
void interEvent(){
  intFlag = 1;
  acce.setSleepFlag(false);
}
void setup(void){

  Serial.begin(9600);
  //Chip initialization
  while(acce.begin()){
     delay(1000);
     Serial.println("初始化失败,请检查连线与I2C地址设置");
  }
    //Get chip id
  Serial.print("chip id : ");
  Serial.println(acce.getID(),HEX);

  /**
    set range:Range(g)
              eLis331h_6g = 6,/<±6g>/
              eLis331h_12g = 12,/<±12g>/
              eLis331h_24g = 24/<±24g>/
  */
  acce.setRange(/*range = */DFRobot_LIS::eLis331h_6g);

  /**
    Set data measurement rate:
      ePowerDown_0HZ = 0,
      eLowPower_halfHZ,
      eLowPower_1HZ,
      eLowPower_2HZ,
      eLowPower_5HZ,
      eLowPower_10HZ,
      eNormal_50HZ,
      eNormal_100HZ,
      eNormal_400HZ,
      eNormal_1000HZ,
  */
  // “sleep to wake-up”  need to put the chip in low power mode first
  acce.setAcquireRate(/*Rate = */DFRobot_LIS::eLowPower_halfHZ);

  /**
    Set the threshold of interrupt source 1 interrupt
    threshold:Threshold(g)
   */
  acce.setInt1Th(/*Threshold = */2);
  //Enable sleep wake function
  acce.enableSleep(true);

  /*!
    Enable interrupt
    Interrupt pin selection:
      eINT1 = 0,/<int1 >/
      eINT2,/<int2>/
    Interrupt event selection:
                   eXLowThanTh = 0,/<The acceleration in the x direction is less than the threshold>/
                   eXHigherThanTh ,/<The acceleration in the x direction is greater than the threshold>/
                   eYLowThanTh,/<The acceleration in the y direction is less than the threshold>/
                   eYHigherThanTh,/<The acceleration in the y direction is greater than the threshold>/
                   eZLowThanTh,/<The acceleration in the z direction is less than the threshold>/
                   eZHigherThanTh,/<The acceleration in the z direction is greater than the threshold>/
   */
  acce.enableInterruptEvent(/*int pin*/DFRobot_LIS::eINT1,
                             /*interrupt = */DFRobot_LIS::eXHigherThanTh);
  #if defined(ESP32) || defined(ESP8266)||defined(ARDUINO_SAM_ZERO)
  attachInterrupt(digitalPinToInterrupt(D6)/*Query the interrupt number of the D6 pin*/,interEvent,CHANGE);
  #else
  /*    The Correspondence Table of AVR Series Arduino Interrupt Pins And Terminal Numbers
   * ---------------------------------------------------------------------------------------
   * |                                        |  DigitalPin  | 2  | 3  |                   |
   * |    Uno, Nano, Mini, other 328-based    |--------------------------------------------|
   * |                                        | Interrupt No | 0  | 1  |                   |
   * |-------------------------------------------------------------------------------------|
   * |                                        |    Pin       | 2  | 3  | 21 | 20 | 19 | 18 |
   * |               Mega2560                 |--------------------------------------------|
   * |                                        | Interrupt No | 0  | 1  | 2  | 3  | 4  | 5  |
   * |-------------------------------------------------------------------------------------|
   * |                                        |    Pin       | 3  | 2  | 0  | 1  | 7  |    |
   * |    Leonardo, other 32u4-based          |--------------------------------------------|
   * |                                        | Interrupt No | 0  | 1  | 2  | 3  | 4  |    |
   * |--------------------------------------------------------------------------------------
   */
  /*                      The Correspondence Table of micro:bit Interrupt Pins And Terminal Numbers
   * ---------------------------------------------------------------------------------------------------------------------------------------------
   * |             micro:bit                       | DigitalPin |P0-P20 can be used as an external interrupt                                     |
   * |  (When using as an external interrupt,      |---------------------------------------------------------------------------------------------|
   * |no need to set it to input mode with pinMode)|Interrupt No|Interrupt number is a pin digital value, such as P0 interrupt number 0, P1 is 1 |
   * |-------------------------------------------------------------------------------------------------------------------------------------------|
   */
  attachInterrupt(/*Interrupt No*/0,interEvent,CHANGE);//Open the external interrupt 0, connect INT1/2 to the digital pin of the main control:
     //UNO(2), Mega2560(2), Leonardo(3), microbit(P0).
  #endif
}

void loop(void){
  //Get the acceleration in the three directions of xyz
  //If the chip is awakened, you can see a change in the frequency of data acquisition
  //Get the acceleration in the three directions of xyz
  Serial.print("Acceleration x: ");
  Serial.print(acce.readAccX());
  Serial.print(" mg \ty: ");
  Serial.print(acce.readAccY());
  Serial.print(" mg \tz: ");
  Serial.print(acce.readAccZ());
  Serial.println(" mg");
  if(intFlag == 1){
    /**
     获取传感器是否处于睡眠模式
     true(处于睡眠模式)/false(处于正常模式)
     */
    Serial.print("sleep state: ");
    Serial.println(acce.getSleepState());
    intFlag = 0;
  }
  delay(300);
}
样例代码3-外部中断功能(interrupt.ino)(仅Breakout版本可使用)
-
选择interrupt.ino
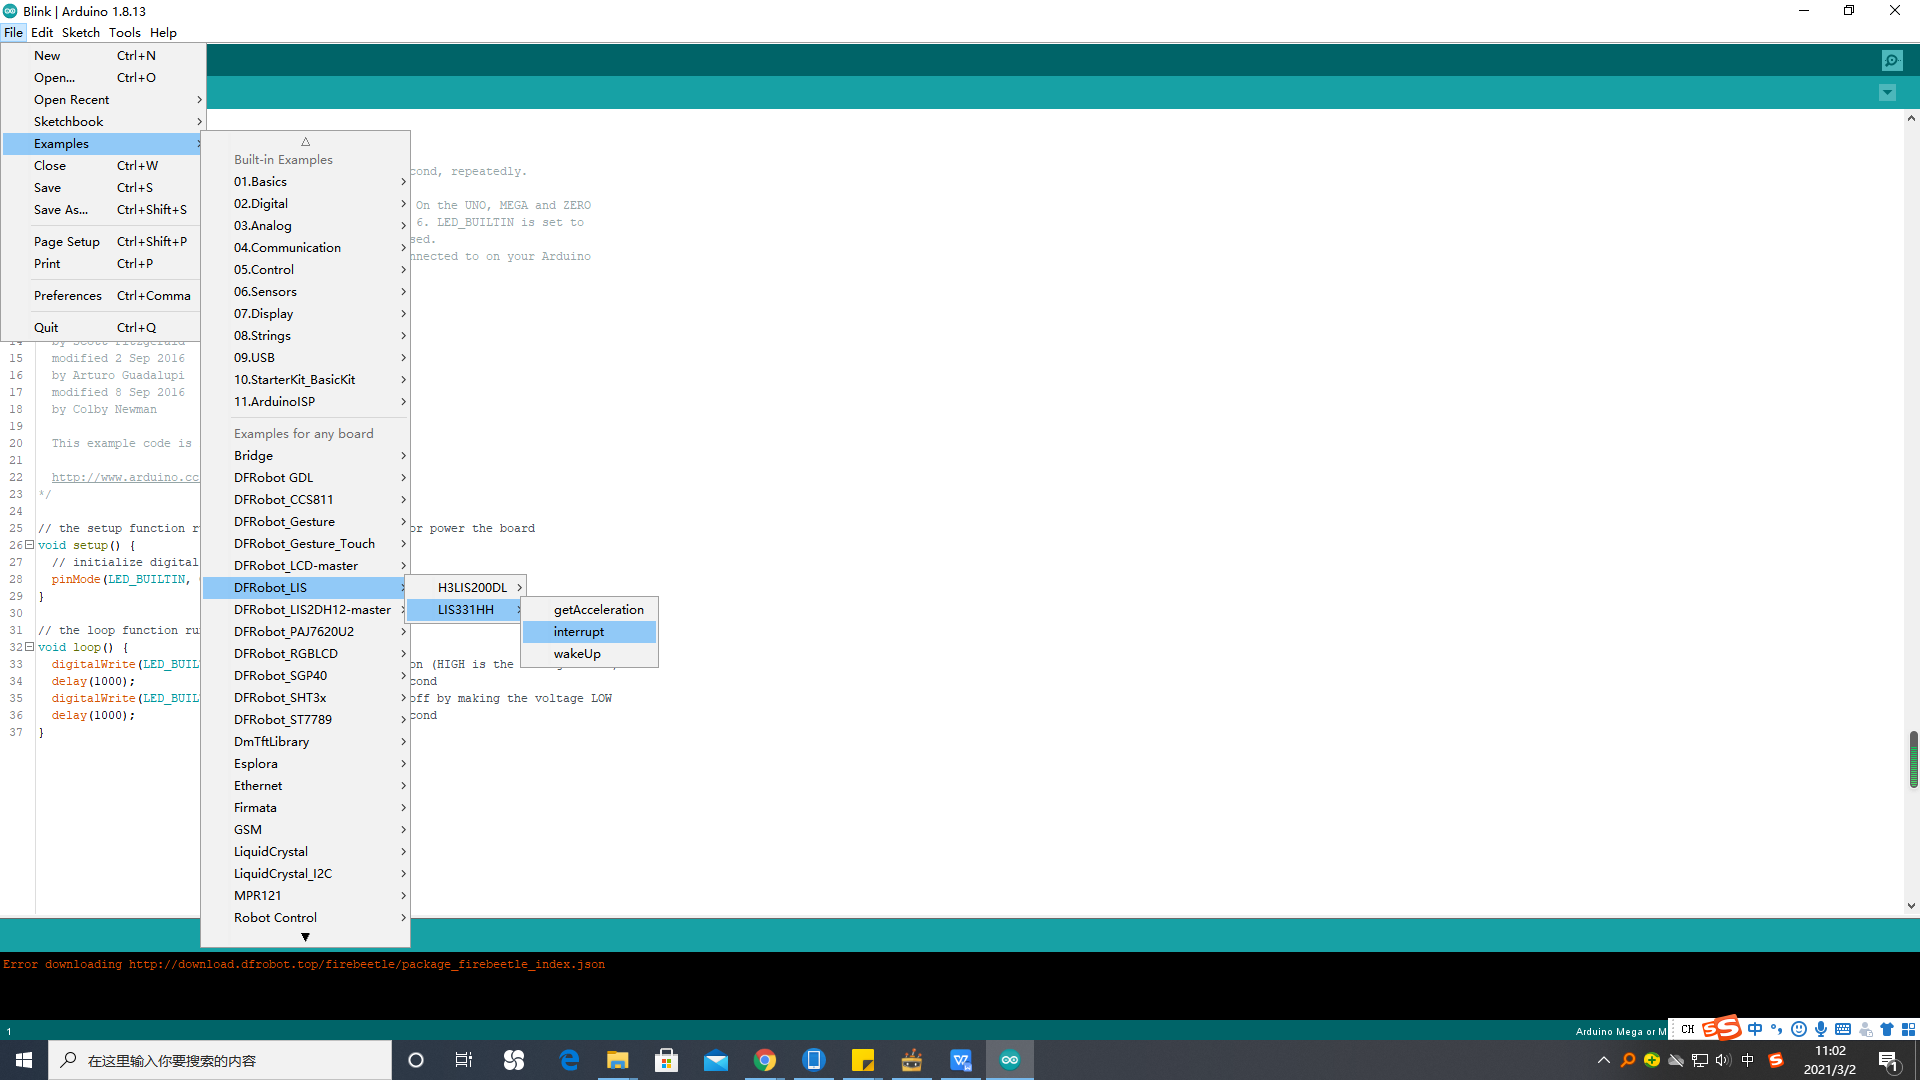
-
烧录程序
/**!
 * @file interrupt.ino
 * @brief Enable  interrupt events in the sensor, and get
 * @n the interrupt signal through the interrupt pin 1/2
 * @n 在使用SPI时,片选引脚可以通过改变宏LIS331HH_CS的值修改
 * @copyright  Copyright (c) 2010 DFRobot Co.Ltd (http://www.dfrobot.com)
 * @licence     The MIT License (MIT)
 * @author [fengli](li.feng@dfrobot.com)
 * @version  V1.0
 * @date  2021-01-16
 * @get from https://www.dfrobot.com
 * @https://github.com/DFRobot/DFRobot_LIS
 */

#include <DFRobot_LIS.h>
//当你使用I2C通信时,使用下面这段程序,使用DFRobot_LIS331HH_I2C构造对象
/*!
 * @brief Constructor
 * @param pWire I2c controller
 * @param addr  I2C address(0x18/0x19)
 */
//DFRobot_LIS331HH_I2C acce(&Wire,0x19);
DFRobot_LIS331HH_I2C acce;

//当你使用SPI通信时,使用下面这段程序,使用DFRobot_LIS331HH_SPI构造对象
#if defined(ESP32) || defined(ESP8266)
#define LIS331HH_CS  D3
#elif defined(__AVR__) || defined(ARDUINO_SAM_ZERO)
#define LIS331HH_CS 3
#elif (defined NRF5)
#define LIS331HH_CS P3
#endif
/*!
 * @brief Constructor
 * @param cs Chip selection pinChip selection pin
 * @param spi SPI controller
 */
//DFRobot_LIS331HH_SPI acce(/*cs = */LIS331HH_CS);

volatile uint8_t intFlag = 0;

void interEvent(){
   intFlag = 1;
}

void setup(void){

  Serial.begin(9600);
  //Chip initialization
  while(acce.begin()){
     delay(1000);
     Serial.println("初始化失败,请检查连线与I2C地址设置");
  }
  Serial.print("chip id : ");
  Serial.println(acce.getID(),HEX);

  /**
    set range:Range(g)
              eLis331h_6g = 6,/<±6g>/
              eLis331h_12g = 12,/<±12g>/
              eLis331h_24g = 24/<±24g>/
  */
  acce.setRange(/*range = */DFRobot_LIS::eLis331h_6g);

  /**
    Set data measurement rate:
      ePowerDown_0HZ = 0,
      eLowPower_halfHZ,
      eLowPower_1HZ,
      eLowPower_2HZ,
      eLowPower_5HZ,
      eLowPower_10HZ,
      eNormal_50HZ,
      eNormal_100HZ,
      eNormal_400HZ,
      eNormal_1000HZ,
  */
  acce.setAcquireRate(/*rate = */DFRobot_LIS::eLowPower_2HZ);
  #if defined(ESP32) || defined(ESP8266)||defined(ARDUINO_SAM_ZERO)
  attachInterrupt(digitalPinToInterrupt(D6)/*Query the interrupt number of the D6 pin*/,interEvent,CHANGE);
  #else
  /*    The Correspondence Table of AVR Series Arduino Interrupt Pins And Terminal Numbers
   * ---------------------------------------------------------------------------------------
   * |                                        |  DigitalPin  | 2  | 3  |                   |
   * |    Uno, Nano, Mini, other 328-based    |--------------------------------------------|
   * |                                        | Interrupt No | 0  | 1  |                   |
   * |-------------------------------------------------------------------------------------|
   * |                                        |    Pin       | 2  | 3  | 21 | 20 | 19 | 18 |
   * |               Mega2560                 |--------------------------------------------|
   * |                                        | Interrupt No | 0  | 1  | 2  | 3  | 4  | 5  |
   * |-------------------------------------------------------------------------------------|
   * |                                        |    Pin       | 3  | 2  | 0  | 1  | 7  |    |
   * |    Leonardo, other 32u4-based          |--------------------------------------------|
   * |                                        | Interrupt No | 0  | 1  | 2  | 3  | 4  |    |
   * |--------------------------------------------------------------------------------------
   */
  /*                      The Correspondence Table of micro:bit Interrupt Pins And Terminal Numbers
   * ---------------------------------------------------------------------------------------------------------------------------------------------
   * |             micro:bit                       | DigitalPin |P0-P20 can be used as an external interrupt                                     |
   * |  (When using as an external interrupt,      |---------------------------------------------------------------------------------------------|
   * |no need to set it to input mode with pinMode)|Interrupt No|Interrupt number is a pin digital value, such as P0 interrupt number 0, P1 is 1 |
   * |-------------------------------------------------------------------------------------------------------------------------------------------|
   */
  attachInterrupt(/*Interrupt No*/0,interEvent,CHANGE);//Open the external interrupt 0, connect INT1/2 to the digital pin of the main control:
     //UNO(2), Mega2560(2), Leonardo(3), microbit(P0).
  #endif

  /**
    Set the threshold of interrupt source 1 interrupt
    threshold:Threshold(g)
   */
  acce.setInt1Th(/*Threshold = */2);//单位为:g

  /*!
    Enable interrupt
    Interrupt pin selection:
      eINT1 = 0,/<int1 >/
      eINT2,/<int2>/
    Interrupt event selection:
                   eXLowThanTh = 0,/<The acceleration in the x direction is less than the threshold>/
                   eXHigherThanTh ,/<The acceleration in the x direction is greater than the threshold>/
                   eYLowThanTh,/<The acceleration in the y direction is less than the threshold>/
                   eYHigherThanTh,/<The acceleration in the y direction is greater than the threshold>/
                   eZLowThanTh,/<The acceleration in the z direction is less than the threshold>/
                   eZHigherThanTh,/<The acceleration in the z direction is greater than the threshold>/
   */
  acce.enableInterruptEvent(/*int pin*/DFRobot_LIS::eINT1,/*interrupt = */DFRobot_LIS::eYHigherThanTh);

  delay(1000);
}

void loop(void){
   //Get the acceleration in the three directions of xyz
   Serial.print("Acceleration x: ");
   Serial.print(acce.readAccX());
   Serial.print(" mg \ty: ");
   Serial.print(acce.readAccY());
   Serial.print(" mg \tz: ");
   Serial.print(acce.readAccZ());
   Serial.println(" mg");

   if(intFlag == 1){
      //Check whether the interrupt event is generated in interrupt 1
      if(acce.getInt1Event(DFRobot_LIS::eYHigherThanTh)){
        Serial.println("The acceleration in the y direction is greater than the threshold");
      }
     if(acce.getInt1Event(DFRobot_LIS::eZHigherThanTh)){
       Serial.println("The acceleration in the z direction is greater than the threshold");
      }
      if(acce.getInt1Event(DFRobot_LIS::eXHigherThanTh)){
        Serial.println("The acceleration in the x direction is greater than the threshold");
      }
      intFlag = 0;
   }
   delay(300);
}
树莓派使用教程
准备
-
硬件
- 树莓派4代B型(或类似)主控板 x 1
- LIS331HH三轴加速度传感器 x 1
- 若干杜邦线 x 1
-
软件
接线图
- 将模块与树莓派按照连线图相连。I2C地址默认为0x19

安装驱动
- 启动树莓派的I2C接口。如已开启,可跳过该步骤。
打开终端(Terminal),键入如下指令,并回车:
sudo raspi-config
然后用上下键选择“ 5 Interfacing Options ”, 按回车进入,选择 “ P5 I2C ”, 按回车确认“ YES ”即可。重启树莓派主控板。
- 安装Python依赖库与git,树莓派需要联网。如已安装,可跳过该步骤。
在终端中,依次键入如下指令,并回车:
sudo apt-get update
sudo apt-get install build-essential python-dev python-smbus git
- 下载LIS系列驱动库。在终端中,依次键入如下指令,并回车:
cd Desktop
git clone https://github.com/DFRobot/DFRobot_LIS
样例代码
- 样例代码1-读取x,y,z轴加速度(get_acceleration.py)
- 样例代码2-睡眠唤醒功能(wake_up.py)(仅Breakout版本可使用)
- 样例代码3-外部中断功能(interrupt.py)(仅Breakout版本可使用)
样例代码1-读取x,y,z轴加速度(get_acceleration.py)
- 在终端中,依次键入如下指令并回车,运行样例代码:
cd DFRobot_LIS/python/raspberrypi/examples/LIS331HH
cd get_acceleration/
python get_acceleration.py
- 传感器结果如图。
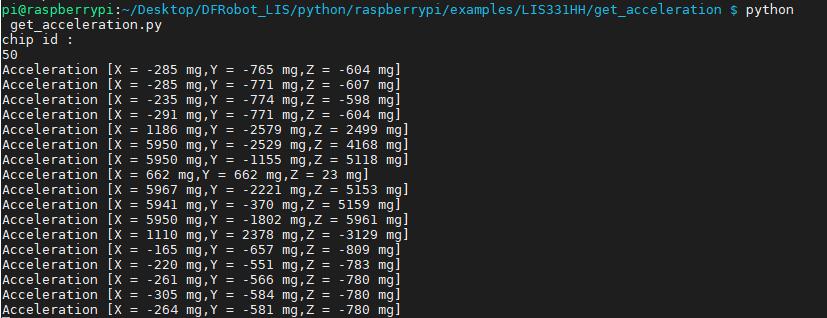
- 注意:若出现如图所示情况,请检查I2C地址是否正确。

样例代码2-睡眠唤醒功能(wake_up.py)(仅Breakout版本可使用)
- 在终端中,依次键入如下指令并回车,运行样例代码:
cd DFRobot_LIS/python/raspberrypi/examples/LIS331HH
cd wake_up
python wake_up.py
样例代码3-外部中断功能(interrupt.py)(仅Breakout版本可使用)
- 在终端中,依次键入如下指令并回车,运行样例代码:
cd DFRobot_LIS/python/raspberrypi/examples/LIS331HH
cd interrupt
python interrupt.py
常见问题
如果有客户对此产品有任何问题,欢迎通过qq或者论坛联系我们!
更多问题及有趣的应用,可以 访问论坛 进行查阅或发帖。
