简介
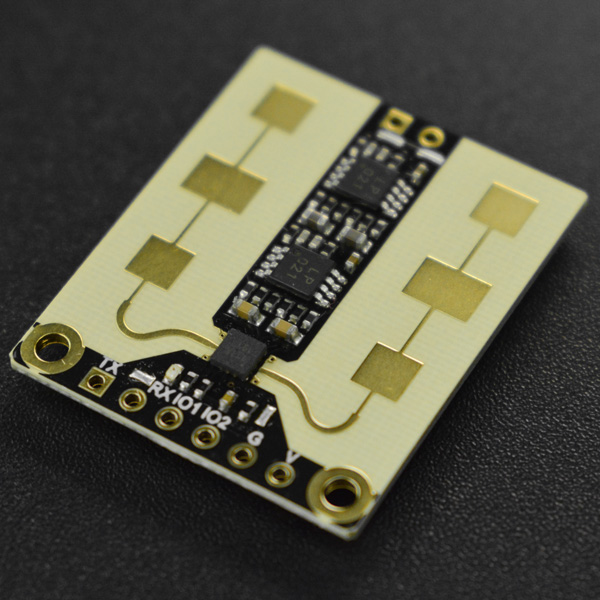
这款毫米波雷达是采用FMCW、CW多模调制和1发1收天线结构的24GHz毫米波传感器模块。传感器向感应区域发射FMCW和CW无线电波,感应区域内的所有运动、微动、极弱微动的目标反射的无线电波,经传感器系统中的毫米波 MMIC电路转换为电信号,送处理器,运行信号和数据处理算法。解算出目标信息。
该毫米波雷达具有人体存在、人体静止及人体运动感知功能。可以感知区域内无人或有人存在,对于人员睡觉等静止状态,也可准确感知到人员存在。感应结果可以选择通过串口输出或通过I/O口开关量输出,并且传感器模块具有感应可靠性强,灵敏度高,体积小,使用简单,易于嵌入集成等特点。
特点
- 人员存在感知:感知区域内无人存在或有人存在
- I/O口开关量输入输出控制
- 串口输入输出控制
- 抗干扰能力强不受雪雾霾、温度、湿度、 灰尘、光线 、噪音等环境影响
技术规格
- 工作电压:3.6~5V
- 工作电流:90mA
- 探测距离:9m
- 等效发射功率:13-15dBM
- 波束角度:100*40°
- 调制模式:FMCW、CW
- 工作频率:24GHz
- 工作温度:-40~85℃
- 波特率:115200
- 尺寸:24*28mm
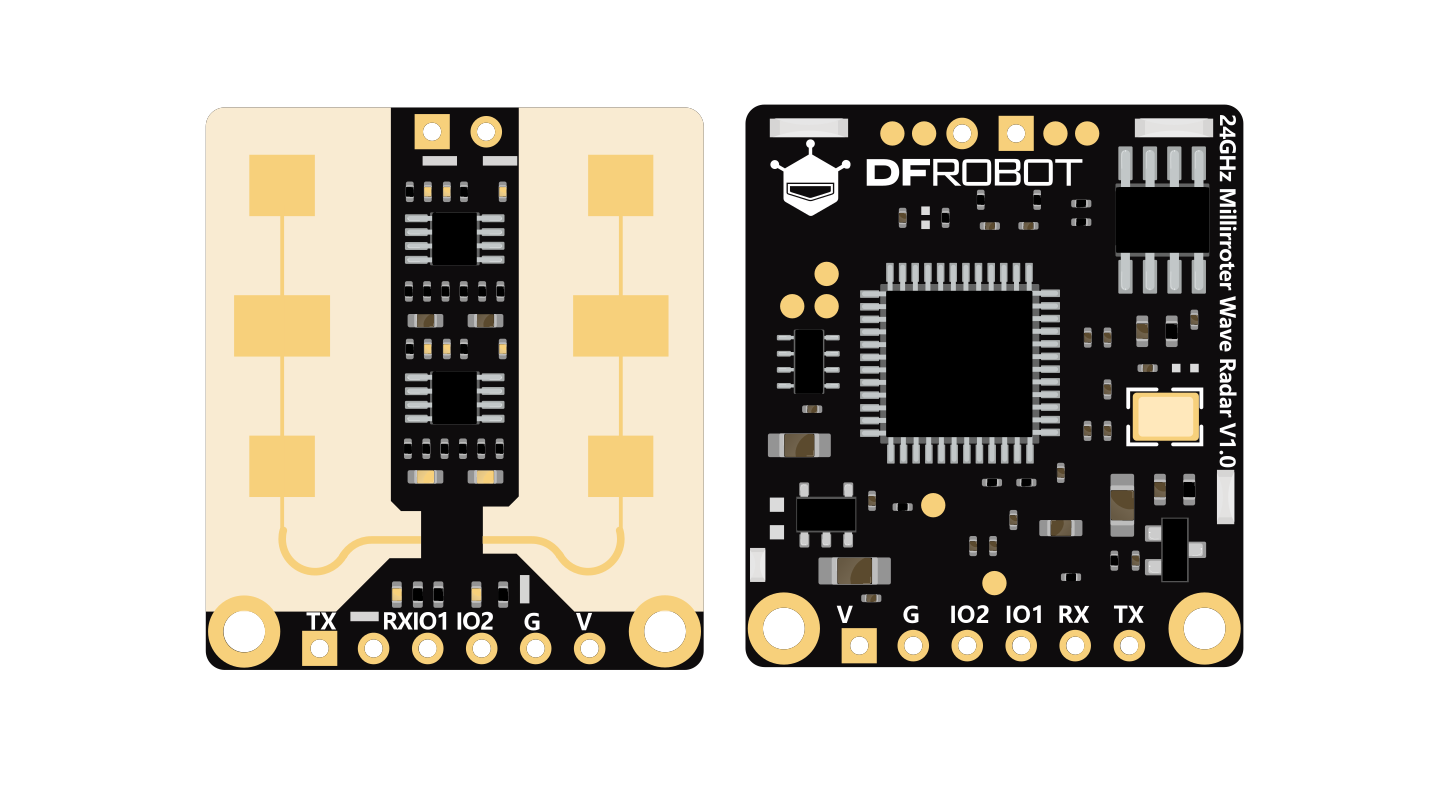
接口定义
该款毫米波的接口功能定义及功能说明详见表1所示
| 引脚序号 | 定义 | 说明 |
|---|---|---|
| 1 | UART Tx | 传感器串口发送 |
| 2 | UART Rx | 传感器串口接收 |
| 3 | GPIO1 | 通用输入输出 |
| 4 | GPIO2 | 通用输入输出(默认有人存在时输出高电平,无人存在时输出低电平) |
| 5 | GND | 地 |
| 6 | VCC | 电源 |
| 7 | NC | 保留,请悬空 |
| 8 | NC | 保留,请悬空 |
表1
它提供2路 I/O口,可用于电平触发输入输出应用;提供1路串口,用于配置输入及感应结果输出。
安装方式
毫米波人体传感器对安装方式较为敏感,不当安装会影响传感器的性能和功能。该模块常用的安装方式有顶部安装、底部安装、水平安装和向下倾斜安装。
顶部安装
图1为顶部安装示意图。
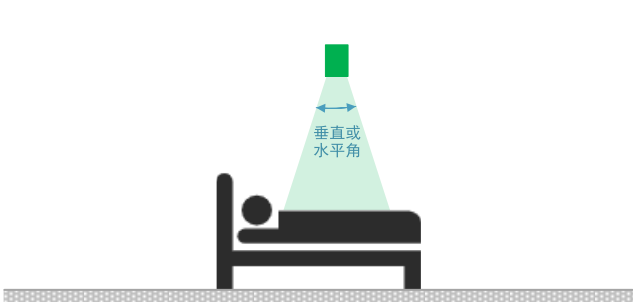
图1
底部安装
图2为底部安装示意图

图2
水平安装
图3为水平安装示意图
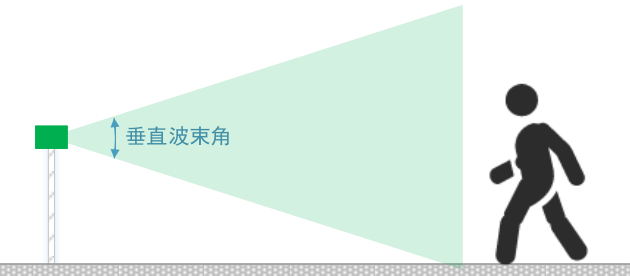
图3
使用方法
该模块采用串口通信协议,以ASCII 码字符串作为命令交互和数据交互。
- 串口通信配置: 115200 波特率, 1 位停止位, 8 位数据位,无奇偶校验位,无流控。
- 命令交互: ASCII 码字符串格式,以回车换行结束;命令和参数、参数和参数间用空格分割开。
- 配置传感器工作参数时,传感器必须处于停止状态;参数配置完成后,必须发送保存参数命令将改动的参数保存在不掉电丢失存储器中。
- 如果用户将该模块当作触发开关,即仅使用模块的I/O口,同时在配置参数满足性能和功能要求时,则可以不使用串口,也不需要关心通信协议。
配置输出信息
描述:
传感器默认配置为仅以 ASCII 码字符串格式输出感应结果,暂不支持修改。
人体感应结果输出: ASCII 码字符串格式
描述:
- 字符串信息以"$"开始, "*"结束, 多个参数用","隔开,占位参数(保留)用空格代替。
- “人体感应传感器”的感应结果默认以 1Hz 数据刷新率输出。
响应:$JYBSS,par1,par2,par3,par4*
| 参数项 | 描述 |
|---|---|
| par1 | 感应结果: 0: 无人 1: 有人( 静止或运动) |
| par2 | 占位参数: 保留,用空格代替 |
| par3 | 占位参数: 保留,用空格代替 |
| par4 | 占位参数: 保留,用空格代替 |
| 例子 | 命令 |
|---|---|
| 传感器感应到有人(运动或静止) | $JYBSS,1, , , * |
| 传感器感应到无人 | $JYBSS,0, , , * |
配置传感器感应区域
描述:
- 该模块默认将感应区域配置为 128 等份, 每一等份大约 15cm。 配置参数则在 0~127 中选择,
- 作为感应区域的距离值索引。
- 感应区域允许配置 4 段, 4 段配置值必须从小到大依次配置,且不能互相包含。
命令:detRangeCfg par1 parA_s parA_e parB_s parB_e parC_s parC_e parD_s parD_e
| 参数项 | 描述 |
|---|---|
| par1 | 保留,常数-1 |
| parA_s parA_e |
第 1 段感应区域配置值: parA_s:感应区域距离起始值索引( ≥0) parA_e:感应区域距离结束值索引 |
| parB_s parB_e |
第 2 段感应区域配置值(索引必须从第 1 段感应区域配置索引后开始) : parB_s:感应区域距离起始值索引 parB_e:感应区域距离结束值索引 |
| parC_s parC_e |
第 3 段感应区域配置值(索引必须从第 2 段感应区域配置索引后开始) : parC_s:感应区域距离起始值索引 parC_e:感应区域距离结束值索引 |
| parD_s parD_e |
第 4 段感应区域配置值(索引必须从第 3 段感应区域配置索引后开始) : parD_s:感应区域距离起始值索引 parD_e:感应区域距离结束值索引( ≤127) |
注: 将感应区域距离起始或结束值索引乘以 15cm,则代表起始或结束距离值
| 响应 | 描述 |
|---|---|
| Done | 命令执行成功 |
| Error | 命令执行失败 |
| 例子 | 命令 |
|---|---|
| (默认配置) 感应距离“ 0m 到3m”的区域 (0m=0 * 0.15cm, 3m=20 * 0.15cm) |
detRangeCfg -1 0 20 |
| 感应距离“ 1.5m 到 3m”的区域 (1.5m=10 * 0.15cm, 3m=20 * 0.15cm) |
detRangeCfg -1 10 20 |
| 感应距离“1.5m 到 3m”“7.5m到 12m”的区域 (1.5m=10 * 0.15cm, 3m=20*0.15cm) (7.5m=50 * 0.15cm, 12m=80 * 0.15cm) |
detRangeCfg -1 10 20 50 80 |
| 感应距离“1.5m 到 3m”“7.5m到 12m”“13.5m 到 15m”的区域 (1.5m=10 * 0.15cm, 3m=20 * 0.15cm) (7.5m=50 * 0.15cm, 12m=80 * 0.15cm) (13.5m=90 * 0.15cm, 15m=100 * 0.15cm) |
detRangeCfg -1 10 20 50 80 90 100 |
| 感应距离“1.5m 到 3m”“7.5m到 12m” “13.5m 到 15m”“15.75m 到 16.5m”的区域 (1.5m=10 * 0.15cm, 3m=20 * 0.15cm) (7.5m=50 * 0.15cm, 12m=80 * 0.15cm) (13.5m=90 * 0.15cm, 15m=100 * 0.15cm) (15.75m=105 * 0.15cm,16.5m=110 * 0.15cm) |
detRangeCfg -1 10 20 50 80 90 100 105 110 |
配置传感器输出延迟时间
描述:
配置传感器检测到目标, 延迟输出感应结果的时间; 目标消失后, 延迟输出感应结果的时间。 默认检
测到目标后, 延迟输出时间为 2.5 秒; 目标消失后,延迟输出时间为 10 秒。
命令:outputLatency par1 par2 par3
| 参数项 | 描述 |
|---|---|
| par1 | 保留,常数-1 |
| par2 | 检测到目标,延迟输出感应结果时间: 值范围: 0~65535,单位: 25ms |
| par3 | 目标消失后,延迟输出感应结果时间: 值范围: 0~65535,单位: 25ms |
| 响应 | 描述 |
|---|---|
| Done | 命令执行成功 |
| Error | 命令执行失败 |
| 例子 | 命令 |
|---|---|
| (默认配置) 检查到目标,延迟时间 2.5 秒。目标消失后,延迟时间10 秒。 | outputLatency -1 100 400 |
| 检查到目标,延迟时间5 秒。目标消失后,延迟时间 20 秒。 | outputLatency -1 200 800 |
配置传感器启动模式
描述:
配置传感器上电立即启动运行或是上电等待启动命令再启动运行;默认为上电立即启动运行。
命令:sensorCfgStart par1
| 参数项 | 描述 |
|---|---|
| par1 | 使能传感器上电立即启动运行: 0: 禁止传感器上电立即启动运行, 需要 sensorStart 命令才能启动运行(默认值) 1: 使能传感器上电立即启动运行, 无需 sensorStart 命令即可开始运行 |
| 响应 | 描述 |
|---|---|
| Done | 命令执行成功 |
| Error | 命令执行失败 |
| 例子 | 命令 |
|---|---|
| 禁止传感器上电立即启动运行 | sensorCfgStart 0 |
| (默认配置) 使能传感器上电立即启动运行 | sensorCfgStart 1 |
传感器启动控制
描述:
- 当传感器处于未启动状态且没有设置的参数需要保存时, 启动传感器开始运行。
- 通过 sensorCfgStart 命令, 传感器配置为上电立即启动运行时, 则不需要等待 sensorStart 命令启动运行。
命令:sensorStart
| 参数项 | 描述 |
|---|---|
| 空 | 无参数 |
| 响应 | 描述 |
|---|---|
| Done | 命令执行成功 |
| Error | 命令执行失败 |
传感器复位控制
描述:
软件复位传感器。
命令:resetSystem
| 参数项 | 描述 |
|---|---|
| 空 | 无参数 |
| 响应 | 描述 |
|---|---|
| Error | 命令执行失败 |
| 无响应字符串 | 命令执行成功后会直接复位传感器,因此无响应字符串 |
传感器停止控制
描述:
- 传感器在运行状态时, 使传感器停止运行。
命令:sensorStop
| 参数项 | 描述 |
|---|---|
| 空 | 无参数 |
| 响应 | 描述 |
|---|---|
| Done | 命令执行成功 |
| Error | 命令执行失败,传感器未在运行状态 |
保存配置参数
描述:
- 通过串口重新配置传感器参数,且未保存时, 该命令将新的配置参数保存到传感器 Flash 中。
命令:saveCfg par1 par2 par3 par4
| 参数项 | 描述 |
|---|---|
| par1 | 固定值: 0x45670123 |
| par2 | 固定值: 0xCDEF89AB |
| par3 | 固定值: 0x956128C6 |
| par4 | 固定值: 0xDF54AC89 |
| 响应 | 描述 |
|---|---|
| Done | 命令执行成功 |
| Error | 命令执行失败(无参数需要保存时,命令将执行失败) |
保存配置参数到不掉电丢失存储器中命令:saveCfg 0x45670123 0xCDEF89AB 0x956128C6 0xDF54AC89
恢复出厂设置
描述:
- 将传感器当前配置参数值, 恢复到出厂的默认值。
命令:factoryReset par1 par2 par3 par4
| 参数项 | 描述 |
|---|---|
| par1 | 固定值: 0x45670123 |
| par2 | 固定值: 0xCDEF89AB |
| par3 | 固定值: 0x956128C6 |
| par4 | 固定值: 0xDF54AC89 |
| 响应 | 描述 |
|---|---|
| Done | 命令执行成功 |
| Error | 命令执行失败 |
配置参数恢复到出厂默认值命令:factoryReset 0x45670123 0xCDEF89AB 0x956128C6 0xDF54AC89
在arduino上使用
准备
- 硬件
毫米波
Arduino Uno
- 软件
Arduino IDE,点击下载Arduino IDE
DFRobot_mmWave_Radar库,点击下载DFRobot_mmWave_Radar库
如何安装库文件,点击链接
主要函数接口
/**
      @brief Constructor
      @param Stream  Software serial port interface
    */
    DFRobot_mmWave_Radar(Stream *s);

    /**
      @brief  Configure sensor detection area
      @param parA_s The sensing area distance starting value of the first segment, unit: m
      @param parA_e The sensing area distance ending value of the first segment, unit: m(Must be greater than the starting value of the current sensing area)
    */
    void DetRangeCfg(float parA_s, float parA_e);


    /**
      @brief  Configure sensor detection area
      @param parA_s The sensing area distance starting value of the first segment, unit: m
      @param parA_e The sensing area distance ending value of the first segment, unit: m(Must greater than the starting value of the current sensing area)
      @param parB_s The sensing area distance starting value of the second segment, unit: m(Must be greater than the ending value of the previous segment sensing area)
      @param parB_e The sensing area ending value of the second segment, unit: m(Must be greater than the starting value of the current sensing area)
    */
    void DetRangeCfg(float parA_s, float parA_e, float parB_s, float parB_e);


    /**
      @brief  Configure sensor detection area
      @param parA_s The sensing area distance starting value of the first segment, unit: m
      @param parA_e The sensing area distance ending value of the first segment, unit: m (Must be greater than the starting value of the current sensing area)
      @param parB_s The sensing area distance starting value of the second segment, unit: m(Must be greater than the ending value of the previous segment sensing area)
      @param parB_e The sensing area distance ending value of the second segment, unit: m(Must be greater than the starting value of the current sensing area)
      @param parC_s The sensing area distance starting value of the third segment, unit: m(Must be greater than the ending value of the previous segment sensing area)
      @param parC_e The sensing area distance ending value of the third segment, unit: m(Must be greaer than the starting value of the current sensing area)
    */
    void DetRangeCfg(float parA_s, float parA_e, float parB_s, float parB_e, float parC_s, float parC_e);


    /**
      @brief  Configure sensor detection area
      @param parA_s The sensing area distance starting value of the first segment, unit: m
      @param parA_e The sensing area distance ending value of the first segment, unit: m(Must be greater than the starting value of the current sensing area)
      @param parB_s The sensing area distance starting value of the second segment, unit: m(Must be greatet than the ending value of the previous segment sensing area)
      @param parB_e The sensing area distance ending value of the second segment, unit: m(Must be greater than the starting value of the current sensing area)
      @param parC_s The sensing area distance starting value of the third segment, unit: m(Must be greater than the ending value of the previous segment sensing area)
      @param parC_e The sensing area distance ending value of the third segment, unit: m(Must be greater than the starting value of the current sensing area)
      @param parD_s The sensing area distance starting value of the fourth segment, unit: m(Must be greater than the ending value of the previous segment sensing area)
      @param parD_e The sensing area ditance ending value of the fourth segment, unit: m(Must be greater than the starting value of the current sensin area)
    */
    void DetRangeCfg(float parA_s, float parA_e, float parB_s, float parB_e, float parC_s, float parC_e, float parD_s, float parD_e);


    /**
      @brief  Read whether there is people or object moving in the sensing area
      @return  Returning true means that there is people or animal moving in the detection range; false means the opposite
    */
    bool readPresenceDetection(void);


    /**
      @brief  Configure sensor output delay time
      @param par1 When a target detected, delay the output time of sensing result, range:0~1638.375, unit: s
      @param par2 When the target disappears, delay the output time of sensing result, range: 0~1638.375, unit: s
    */
    void OutputLatency(float par1, float par2);


    /**
      @brief  Restore the sensor current configuration to the factory settings.
    */
    void factoryReset(void);
接线图
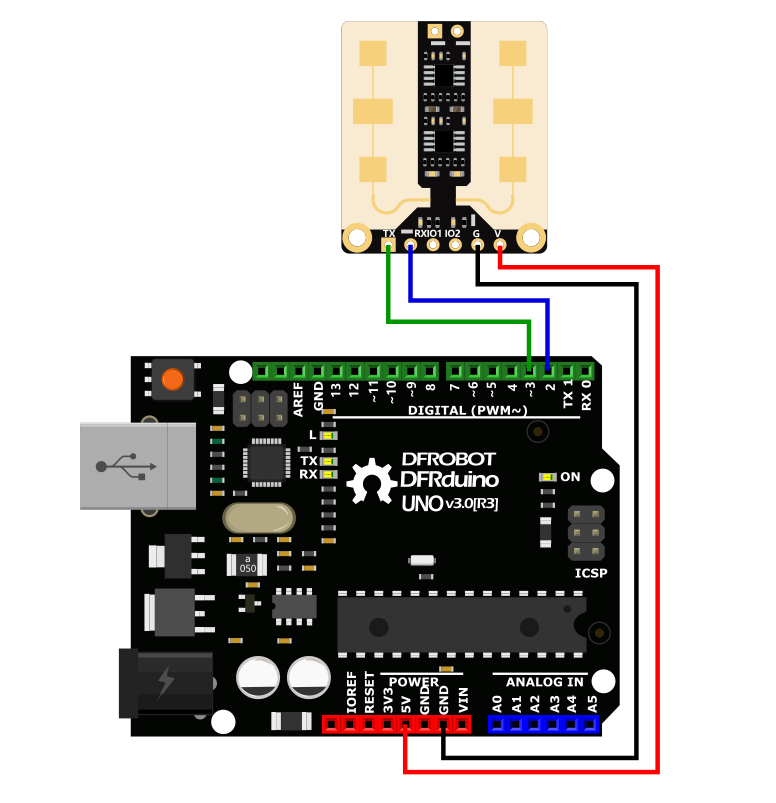
| 毫米波 | Arduino Uno |
|---|---|
| VCC | 5V |
| GND | GND |
| RX | D2 |
| TX | D3 |
样例代码
复制以下代码到您的Arduino IDE中并上传。
/*!
@file DFRobot_mmWave_Radar.ino
@可以读取到传感器探测范围内有无人或物在动,可以配置传感器感应区域,可以配置传感器输出延迟时间,可以将传感器恢复出厂设置。
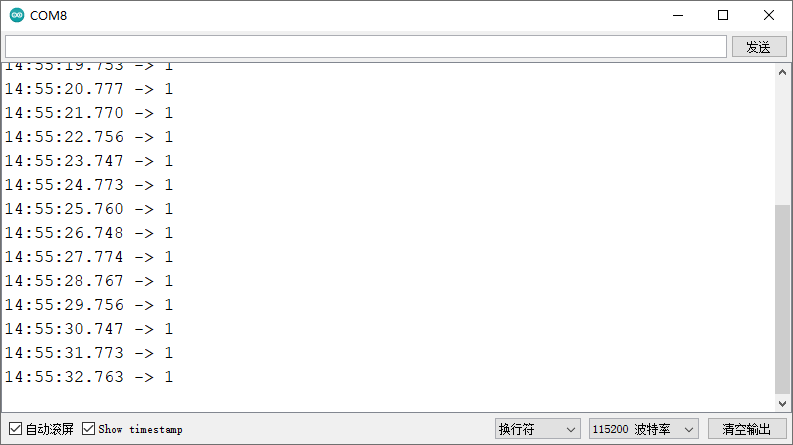
@n Experimental phenomenon: 传感器设备启动成功后,将在串口显示器上打印0或1,0表示探测范围内没有人或物在动,1表示探测范围内有人或物在动
@copyright Copyright (c) 2010 DFRobot Co.Ltd (http://www.dfrobot.com)
@licence The MIT License (MIT)
@version V1.0
@date 2020-3-25
@https://github.com/DFRobot
*/
#include <SoftwareSerial.h>
#include "DFRobot_mmWave_Radar.h"
SoftwareSerial mySerial(3, 2);
DFRobot_mmWave_Radar sensor(&mySerial);
int ledPin = 13;
void setup()
{
Serial.begin(115200);
mySerial.begin(115200);
pinMode(ledPin, OUTPUT);
sensor.factoryReset(); //恢复出厂设置
sensor.DetRangeCfg(0, 9); //设置感应距离,最远为9m
sensor.OutputLatency(0, 0); //设置输出延时
}
void loop()
{
int val = sensor.readPresenceDetection();
digitalWrite(ledPin, val);
Serial.println(val);
}
结果
在FireBeetle Board-ESP32上使用
准备
- 硬件
- 软件
Arduino IDE,点击下载Arduino IDE
DFRobot_mmWave_Radar库,点击下载DFRobot_mmWave_Radar库
如何安装库文件,点击链接
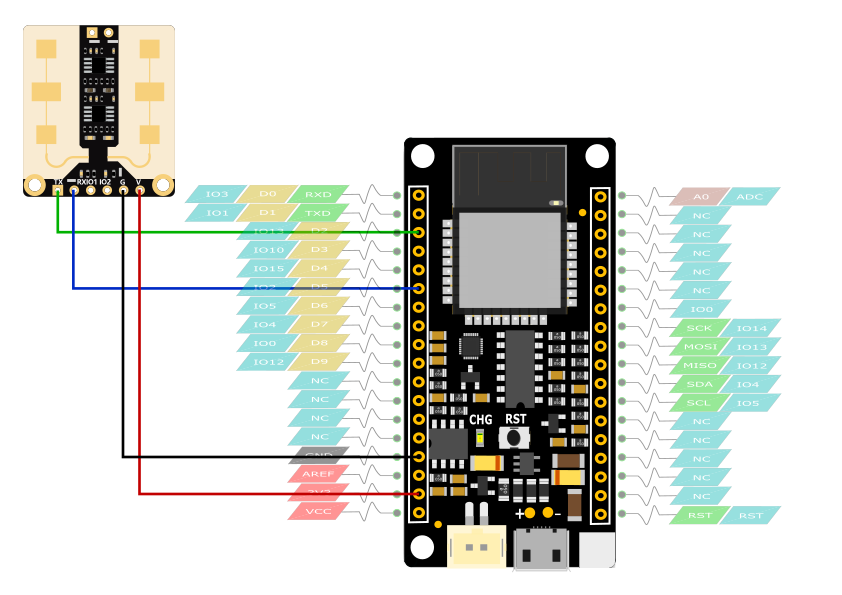
接线图

| 毫米波 | FireBeetle Board-ESP32 |
|---|---|
| VCC | 3V3 |
| GND | GND |
| RX | D3 |
| TX | D2 |
样例代码
/*!
   @file DFRobot_mmWave_Radar.ino
   @ Read whether there is people or object moving in the detection range of the sensor.
   @ The sensor detection range and output delay time can be configured. Also you can restore the sensor to factory default settings.
   @n Experimental phenomenon: When the sensor starts successfully, 0 or 1 will be printed on the serial monitor.
   @ 0 means that there is no human or object moving in sensing area, 1 means the oppposite.
   @copyright   Copyright (c) 2010 DFRobot Co.Ltd (http://www.dfrobot.com)
   @licence     The MIT License (MIT)
   @version  V1.0
   @date  2023-3-13
   @https://github.com/DFRobot
*/

#include <DFRobot_mmWave_Radar.h>

HardwareSerial mySerial(1);
DFRobot_mmWave_Radar sensor(&mySerial);


void setup() {
  Serial.begin(115200);
  mySerial.begin(115200, SERIAL_8N1, D2, D3);  //RX,TX
  pinMode(LED_BUILTIN, OUTPUT);

  sensor.factoryReset();     //Restore to the factory settings
  sensor.DetRangeCfg(0, 9);  //The detection range is as far as 9m
  sensor.OutputLatency(0, 0);
}

void loop() {
  int val = sensor.readPresenceDetection();
  digitalWrite(LED_BUILTIN, val);
  Serial.println(val);
}
结果
有人打印“1”,无人打印“0”。
在FireBeetle Board-ESP8266上使用
准备
- 硬件
- 软件
Arduino IDE,点击下载Arduino IDE
DFRobot_mmWave_Radar库,点击下载DFRobot_mmWave_Radar库
如何安装库文件,点击链接
接线图
| 毫米波 | FireBeetle Board-ESP8266 |
|---|---|
| VCC | 3V3 |
| GND | GND |
| RX | D5 |
| TX | D2 |
样例代码
/*!
   @file DFRobot_mmWave_Radar.ino
   @可以读取到传感器探测范围内有无人或物在动,可以配置传感器感应区域,可以配置传感器输出延迟时间,可以将传感器恢复出厂设置。
   @n Experimental phenomenon: 传感器设备启动成功后,将在串口显示器上打印0或1,0表示探测范围内没有人或物在动,1表示探测范围内有人或物在动
   @copyright   Copyright (c) 2010 DFRobot Co.Ltd (http://www.dfrobot.com)
   @licence     The MIT License (MIT)
   @version  V1.0
   @date  2023-3-13
   @https://github.com/DFRobot
*/

#include <SoftwareSerial.h>
#include <DFRobot_mmWave_Radar.h>

int LED_BLINK = 2;

SoftwareSerial mySerial(D2, D5);
DFRobot_mmWave_Radar sensor(&mySerial);

void setup() {
  Serial.begin(115200);
  mySerial.begin(115200);
  pinMode(LED_BLINK, OUTPUT);

  sensor.factoryReset();       //恢复出厂设置
  sensor.DetRangeCfg(0, 9);    //设置感应距离,最远为9m
  sensor.OutputLatency(0, 0);  //设置输出延时
}

void loop() {
  int val = sensor.readPresenceDetection();
  digitalWrite(LED_BLINK, val);
  Serial.println(val);
  delay(1000);
}
结果
有人打印“1”,无人打印“0”。
在Beetle ESP32-C3上使用
准备
- 硬件
- 软件
Arduino IDE,点击下载Arduino IDE
DFRobot_mmWave_Radar库,点击下载DFRobot_mmWave_Radar库
如何安装库文件,点击链接
接线图
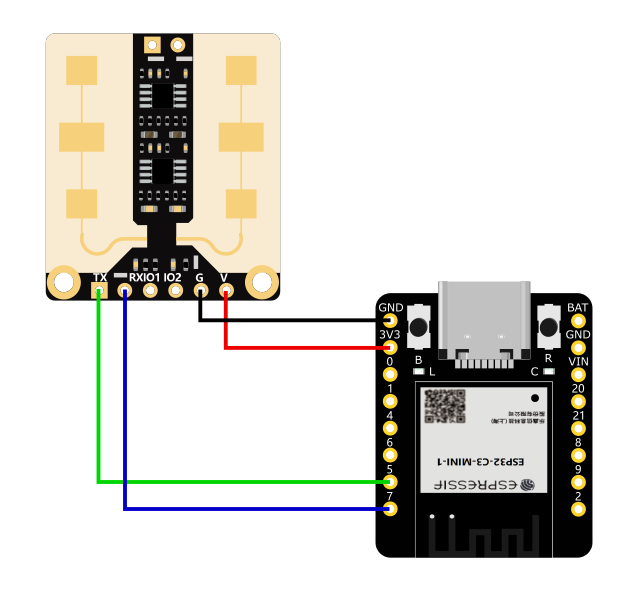
| 毫米波 | Beetle ESP32-C3 |
|---|---|
| VCC | 3V3 |
| GND | GND |
| RX | D7 |
| TX | D5 |
样例代码
/*!
   @file DFRobot_mmWave_Radar.ino
   @ Read whether there is people or object moving in the detection range of the sensor.
   @ The sensor detection range and output delay time can be configured. Also you can restore the sensor to factory default settings.
   @n Experimental phenomenon: When the sensor starts successfully, 0 or 1 will be printed on the serial monitor.
   @ 0 means that there is no human or object moving in sensing area, 1 means the oppposite.
   @copyright   Copyright (c) 2010 DFRobot Co.Ltd (http://www.dfrobot.com)
   @licence     The MIT License (MIT)
   @version  V1.0
   @date  2023-3-13
   @https://github.com/DFRobot
*/

#include <DFRobot_mmWave_Radar.h>

HardwareSerial mySerial(1);
DFRobot_mmWave_Radar sensor(&mySerial);

int LED_BLINK = 10;

void setup() {
  Serial.begin(115200);
  mySerial.begin(115200, SERIAL_8N1, 5, 7);  //RX,TX
  pinMode(LED_BLINK, OUTPUT);

  sensor.factoryReset();     //Restore to the factory settings
  sensor.DetRangeCfg(0, 9);  //The detection range is as far as 9m
  sensor.OutputLatency(0, 0);
}

void loop() {
  int val = sensor.readPresenceDetection();
  digitalWrite(LED_BLINK, val);
  Serial.println(val);
}
结果
有人打印“1”,无人打印“0”。
常见问题
还没有客户对此产品有任何问题,欢迎通过 qq 或者论坛联系我们!
更多问题及有趣的应用,可以访问论坛进行查阅或发帖