简介
这款环境光传感器设计新颖,外壳采用透明的半球封装形式,可以更好的聚光而采集光照。该传感器拥有0-200klx的检测范围,采用I2C通信,兼容Arduino、esp32等多种控制器。针对人眼对环境光的响应,结合红外和紫外屏蔽,优化了片上光电二极管的光谱响应,自适应增益电路自动选择正确的流明范围优化测试(计数值/流明)。可用于智能灯、汽车智能灯、智能孵化器、农业、仪器仪表等。
光亮度数据参考:
- 晚上:0.001-0.02 lx;
- 月夜:0.02-0.3 lx;
- 多云室内:5-50 lx;
- 多云室外:50-500 lx;
- 晴天室内:100-1000 lx;
- 夏天中午光照下:大约10*6 lx;
- 阅读书籍时的照明度:50-60 lx;
- 家庭录像标准照明度:1400 lx;
注意 :
这是一种感应器,能获得光的强度。
它使用I2C传输采集到的数据,其IIC地址不能改变。
您可以将所需的配置写入配置寄存器(地址:0x04),设置不同的获取精度。
您可以从数据寄存器读取光强数据(地址:0x00~0x03)。
这个传感器采用软件I2C封库,不能与其它采用硬件I2C的设备或传感器一起使用。
技术规格
- 供电电压:2.7-6V
- 工作电流:0.7mA
- 检测范围:0-200klx
- 精度:0.054lx
- 通信方式:I2C
- 工作温度范围:-40°C~+85°C
- 尺寸:内径 22mm、外径 26mm、外壳直径 28.5mm,高18mm半球封装
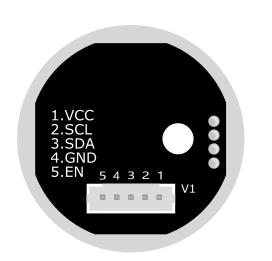
引脚示意图

| 标号 | 名称 | 功能描述 |
|---|---|---|
| 1 | VCC | 电源正极 |
| 2 | SCL | I2C时钟输入引脚 |
| 3 | SDA | I2C数据输入引脚 |
| 4 | GND | 电源负极 |
| 5 | EN | EN 传感器片选使能端, H 高有效,L 关闭传感器 |
使用教程
准备
- 硬件
Arduino UNO x1
环境光传感器(0-200klx) x1
- 软件
Arduino IDE,点击下载 Arduino IDE
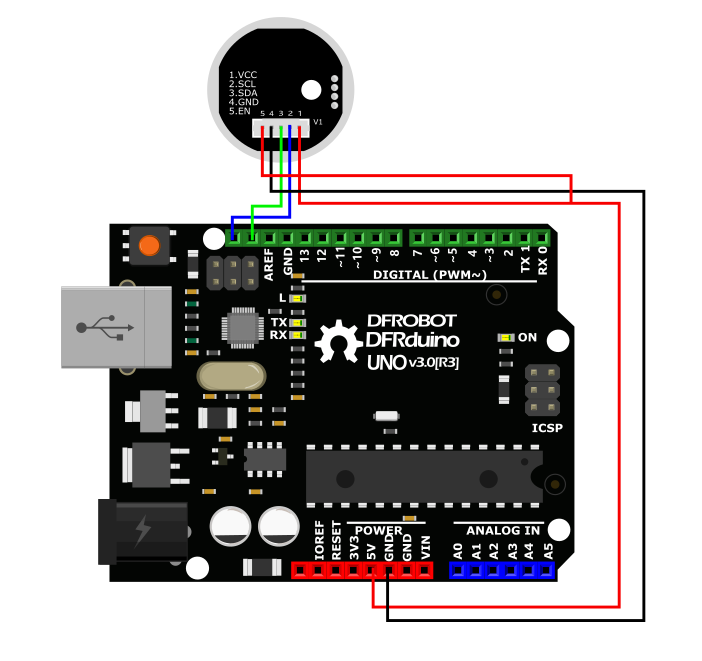
接线图

示例代码
下载Ambient Light Sensor(0-200klx)库文件,如何安装库文件
/*!
 * @file getLightIntensity.ino
 * @brief Set sensor mode and read light values
 * @n Experimental phenomenon: the light value is read once a second after the sensor device starts successfully
 * @copyright   Copyright (c) 2010 DFRobot Co.Ltd (http://www.dfrobot.com)
 * @licence     The MIT License (MIT)
 * @author [Fary](fary_young@outlook.com)
 * @version  V1.0
 * @date  2020-12-03
 * @https://github.com/DFRobot/DFRobot_B_LUX_V30B
 */
#include <DFRobot_B_LUX_V30B.h>
DFRobot_B_LUX_V30B    myLux(13);//The sensor chip is set to 13 pins, SCL and SDA adopt default configuration
  /*
   * MANUAL
   *   eAutomatic:The default automatic configuration, after using this mode does not have to configure the following mode, IC automatic configuration.
   *   eManual :Manual configuration. This pattern is configured and used in combination with subsequent patterns
   * CDR
   *   eCDR_0:Don't divide the CDR
   *   eCDR_1: Eight divided the CDR
   * TIM
   *   eTime800ms:The collection time is 800ms
   *   eTime400ms:The collection time is 400ms
   *   eTime200ms:The collection time is 200ms
   *   eTime100mse:The collection time is 100ms
   *   Time50ms:The collection time is 50ms
   *   eTime25ms:The collection time is 25ms
   *   eTime12_5ms:The collection time is 12.5ms
   *   eTime6_25ms:The collection time is 6.25ms
   * Manual mode combination
   *   (The collected value cannot exceed the maximum range of each mode. If the read data exceeds the range, the data is not correct)
   *   eManual+eCDR_0+eTime800ms    mode=64    The maximum value collected is: 2938 (Lux)
   *   eManual+eCDR_0+eTime400ms    mode=65    The maximum value collected is: 5875(lux)
   *   eManual+eCDR_0+eTime200ms    mode=66    The maximum value collected is: 11750(lux)
   *   eManual+eCDR_0+eTime100ms    mode=67    The maximum value collected is: 23501(lux)
   *   eManual+eCDR_0+eTime50ms     mode=68    The maximum value collected is: 47002(lux)
   *   eManual+eCDR_0+eTime25ms     mode=69    The maximum value collected is: 94003(lux)
   *   eManual+eCDR_0+eTime12.50ms  mode=70    The maximum value collected is: 200000(lux)
   *   eManual+eCDR_0+eTime6.25ms   mode=71    The maximum value collected is: 200000(lux)
   *
   *   eManual+eCDR_1+eTime800ms    mode=72    The maximum value collected is: 23501(lux)
   *   eManual+eCDR_1+eTime400ms    mode=73    The maximum value collected is: 47002(lux)
   *   eManual+eCDR_1+eTime200ms    mode=74    The maximum value collected is: 94003(lux)
   *   eManual+eCDR_1+eTime100ms    mode=75    The maximum value collected is: 200000(lux)
   *   eManual+eCDR_1+eTime50ms     mode=76    The maximum value collected is: 200000(lux)
   *   eManual+eCDR_1+eTime25ms     mode=77    The maximum value collected is: 200000(lux)
   *   eManual+eCDR_1+eTime12.50ms  mode=78    The maximum value collected is: 200000(lux)
   *   eManual+eCDR_1+eTime6.25ms   mode=79    The maximum value collected is: 200000(lux)
   */
void setup() {
  Serial.begin(9600);
  myLux.begin();
  /*
   * The setMode and readMode functions can be omitted. When not configured, the default configuration is the one used last time.
   * When using the setMode function, its return value should be judged. If the return value is 1, the setting is successful.
   * while(!myLux.setMode(myLux.eManual,myLux.eCDR_0,myLux.eTime800ms));
   * Serial.print("mode: ");
   * Serial.println(myLux.readMode());
  */
}

void loop() {
  Serial.print("value: ");
  Serial.print(myLux.lightStrengthLux());
  Serial.println(" (lux).");
  delay(1000);
}
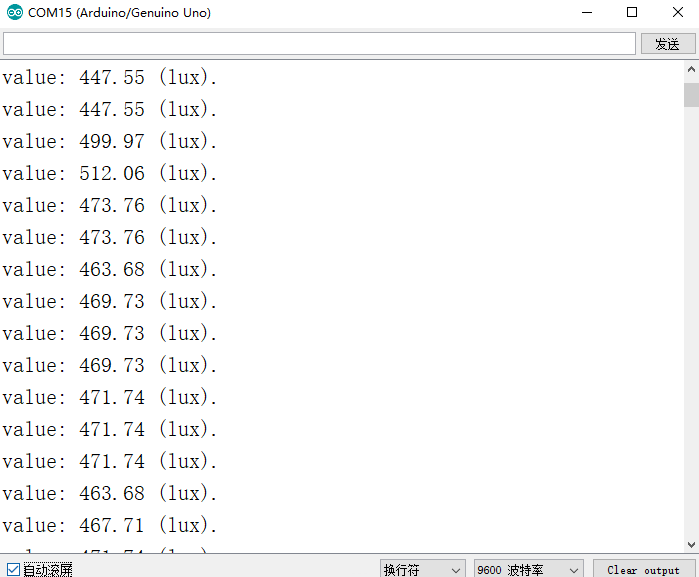
串口查看传感器采集到的光照值

常见问题
还没有客户对此产品有任何问题,欢迎通过 qq 或者论坛联系我们!
更多问题及有趣的应用,可以访问论坛进行查阅或发帖