简介
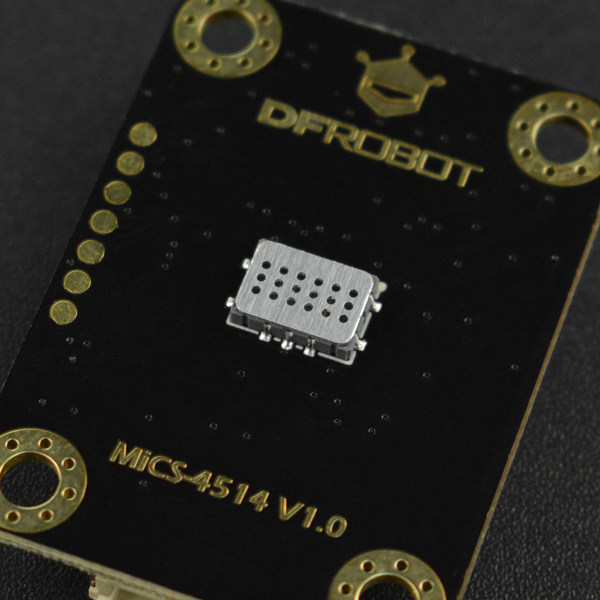
这是一款由DFRobot推出的3.3/5V兼容的MEMS气体浓度传感器,支持CO,C2H5OH(Alcohol),H2,NO2,NH3等多种气体浓度的检测,代码中集成了各种气体的浓度换算公式,方便传感器的测试和使用。支持3.3~5.5V宽电压输入,支持I2C输出方式,兼容Arduino、ESP32、树莓派等主流的主控设备,具有良好的兼容性。
产品功能描述
-
支持多种有害气体检测
-
集成各种气体浓度计算公式
-
低功耗
-
I2C数字输出
-
兼容3.3~5.5V主控器
产品参数
- 检测物理量:CO,C2H5OH(Alcohol),H2,NO2,NH3,CH4的气体浓度
- 工作电压: 3.3~5.5V DC
- 功耗:0.45W(5V)
- 输出信号: I2C(0~3V)
- 测量范围:
- 1 – 1000ppm(一氧化碳 CO )
- 0.05 – 10ppm(二氧化氮 NO2)
- 10 – 500ppm(乙醇 C2H5OH )
- 1 – 1000ppm(氢气 H2)
- 1 – 500ppm(氨气 NH3 )
- >1000ppm(甲烷 CH4 )
- 工作温度: -30~85℃
- 工作湿度: 5~95%RH (无凝结)
- 存储温度: -40~85℃
- 寿 命: >2 年(空气中)
- 电路板尺寸:27mm*37mm
- 安装孔尺寸:内径3.1mm/外径6mm
- 重量:
引脚说明
SEN0377 Gravity: MEMS Gas Sensor - MiCS-4514接口定义
| 标号 | 名称 | 功能描述 |
|---|---|---|
| 1 | SDA | I2C数据线SDA |
| 2 | SCL | I2C时钟线SCL |
| 3 | GND | 电源负极 |
| 4 | VCC | 电源正极 |
Arduino使用教程
将程序下载到UNO,打开串口监视器查看气体浓度、原始数据及其他参数。
软硬件准备
- 硬件
- 软件
- Arduino IDE 点击下载Arduino IDE
- 下载并安装DFRobot_MICS库。如何安装库?
样例1:读取传感器计算后的气体浓度(PPM)数据
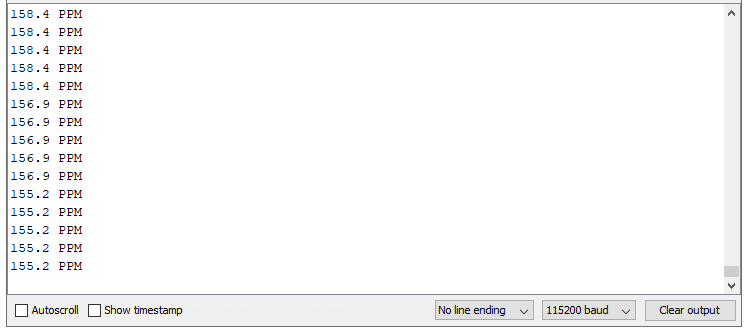
将样例程序下载到Arduino UNO,打开串口监视器查看气体浓度(PPM)数据。
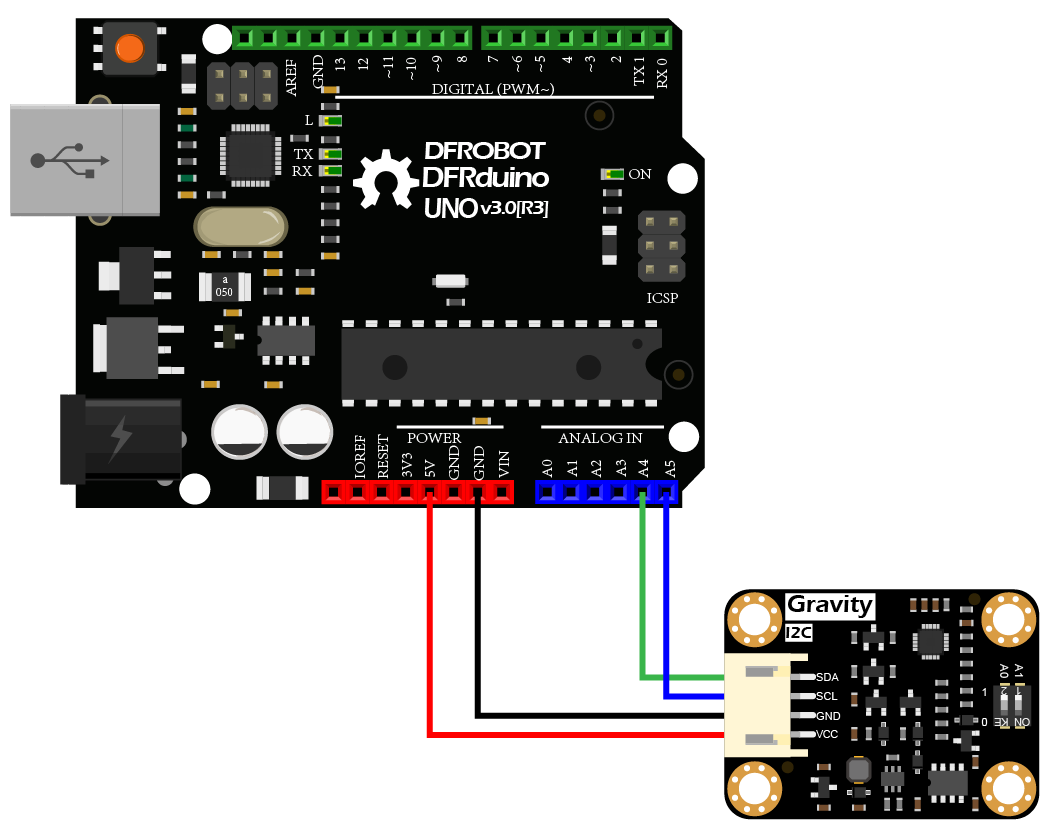
接线图
样例代码
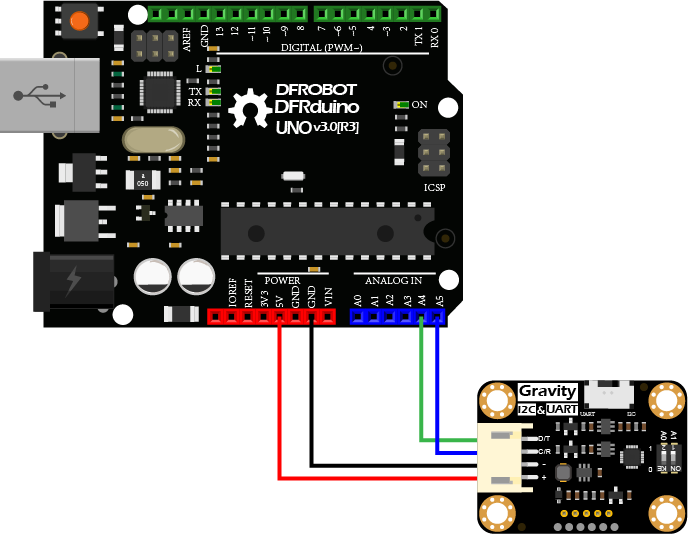
- 将模块与Arduino按照上方的连线图相连,当然你也可以配合Gravity I/O扩展板使用,可以更方便、更快速的完成项目原型搭建。
- 将传感器上的选择开关,拨到I2C一侧。
- I2C地址默认为0x75,对应代码中的ADDRESS_0。如果需要修改I2C地址,可先通过模块上的拨码开关配置硬件I2C地址,并修改样例代码中I2C地址的定义ADDRESS_X。拨码开关与I2C地址参数对应关系如下:
- ADDRESS_0:0x75, A0=0, A1=0(默认地址)
- ADDRESS_1:0x76, A0=1, A1=0
- ADDRESS_2:0x77, A0=0, A1=1
- ADDRESS_3:0x78, A0=1, A1=1
- 下载并安装DFRobot_MICS库。如何安装库?
- 打开Arduino IDE
- 将下面的样例代码上传到Arduino UNO。
- 或者打开库文件样例中的getGasPPM.ino代码,烧录至Arduino UNO。
- 打开Arduino IDE的串口监控视器,把波特率调至115200,观察串口打印结果。
 /*!
  * @file  getGasPPM.ino
  * @brief Reading Gas concentration, A concentration of one part per million (PPM).
  * @n When using IIC device, select I2C address, set the dialing switch A0, A1 (Address_0 is [0 0]), (Address_1 is [1 0]), (Address_2 is [0 1]), (Address_3 is [1 1]).
  * @n When using the Breakout version, connect the adcPin and PowerPin
  * @copyright   Copyright (c) 2010 DFRobot Co.Ltd (http://www.dfrobot.com)
  * @licence     The MIT License (MIT)
  * @author      ZhixinLiu(zhixin.liu@dfrobot.com)
  * @version     V1.1
  * @date        2021-04-19
  * @get         from https://www.dfrobot.com
  * @url         https://github.com/dfrobot/DFRobot_MICS
  */
#include "DFRobot_MICS.h"

#define CALIBRATION_TIME   3                      // Default calibration time is three minutes

// When using I2C communication, use the following program to construct an object by DFRobot_MICS_I2C
/**!
    iic slave Address, The default is ADDRESS_0
       ADDRESS_0               0x75             // i2c device address
       ADDRESS_1               0x76
       ADDRESS_2               0x77
       ADDRESS_3               0x78
*/
#define Mics_I2C_ADDRESS ADDRESS_0
DFRobot_MICS_I2C mics(&Wire, Mics_I2C_ADDRESS);

// When using the Breakout version, use the following program to construct an object from DFRobot_MICS_ADC
/**!
  adcPin is A0~A5
  powerPin is General IO
*/
#define ADC_PIN   A0
#define POWER_PIN 10
//DFRobot_MICS_ADC mics(/*adcPin*/ADC_PIN, /*powerPin*/POWER_PIN);

void setup()
{
  Serial.begin(115200);
  while(!Serial);
  while(!mics.begin()){
    Serial.println("NO Deivces !");
    delay(1000);
  } Serial.println("Device connected successfully !");

  /**!
    Gets the power mode of the sensor
    The sensor is in sleep mode when power is on,so it needs to wake up the sensor.
    The data obtained in sleep mode is wrong
   */
  uint8_t mode = mics.getPowerState();
  if(mode == SLEEP_MODE){
    mics.wakeUpMode();
    Serial.println("wake up sensor success!");
  }else{
    Serial.println("The sensor is wake up mode");
  }

  /**!
     Do not touch the sensor probe when preheating the sensor.
     Place the sensor in clean air.
     The default calibration time is 3 minutes.
  */
  while(!mics.warmUpTime(CALIBRATION_TIME)){
    Serial.println("Please wait until the warm-up time is over!");
    delay(1000);
  }
}

void loop()
{
  /**!
    Gas type:
    MICS-4514 You can get all gas concentration
    MICS-5524 You can get the concentration of CH4, C2H5OH, H2, NH3, CO
    MICS-2714 You can get the concentration of NO2
      Methane          (CH4)    (1000 - 25000)PPM
      Ethanol          (C2H5OH) (10   - 500)PPM
      Hydrogen         (H2)     (1    - 1000)PPM
      Ammonia          (NH3)    (1    - 500)PPM
      Carbon Monoxide  (CO)     (1    - 1000)PPM
      Nitrogen Dioxide (NO2)    (0.1  - 10)PPM
  */
  float gasdata = mics.getGasData(C2H5OH);
  Serial.print(gasdata,1);
  Serial.println(" PPM");
  delay(1000);
  //mics.sleepMode();
}
结果
打开串口监视器,预热约3分钟后,得到酒精气体浓度数据。
注意:
- 如需要修改其他气体,需将自行修改样例代码中的被检测气体设置
- 传感器需要3分钟的预热时间
样例2:检测气体泄漏
MEMS芯片MiCS-4514对多种气体有反应,但部分气体浓度反馈值的线性度较差,故其浓度值不具有参考价值,但可以用作该气体泄漏的判定依据。
如果你需要进行相关气体的泄漏检测,可以将样例程序下载到Arduino UNO,打开串口监视器查看所设置气体是否泄漏。
接线图
样例代码
- 将模块与Arduino按照上方的连线图相连,当然你也可以配合Gravity I/O扩展板使用,可以更方便、更快速的完成项目原型搭建。
- 将传感器上的选择开关,拨到I2C一侧。
- I2C地址默认为0x75,对应代码中的ADDRESS_0。如果需要修改I2C地址,可先通过模块上的拨码开关配置硬件I2C地址,并修改样例代码中I2C地址的定义ADDRESS_X。拨码开关与I2C地址参数对应关系如下:
- ADDRESS_0:0x75, A0=0, A1=0(默认地址)
- ADDRESS_1:0x76, A0=1, A1=0
- ADDRESS_2:0x77, A0=0, A1=1
- ADDRESS_3:0x78, A0=1, A1=1
- 下载并安装DFRobot_MICS库。如何安装库?
- 打开Arduino IDE
- 将下面的样例代码上传到Arduino UNO。
- 或者打开库文件样例中的getGasExist.ino代码,烧录至Arduino UNO。
- 打开Arduino IDE的串口监控视器,把波特率调至115200,观察串口打印结果。
 /*!
  * @file  getGasExist.ino
  * @brief Reading Gas concentration, A concentration of one part per million (PPM).
  * @n When using IIC device, select I2C address, set the dialing switch A0, A1 (Address_0 is [0 0]), (Address_1 is [1 0]), (Address_2 is [0 1]), (Address_3 is [1 1]).
  * @n When using the Breakout version, connect the adcPin and PowerPin
  * @copyright   Copyright (c) 2010 DFRobot Co.Ltd (http://www.dfrobot.com)
  * @licence     The MIT License (MIT)
  * @author      ZhixinLiu(zhixin.liu@dfrobot.com)
  * @version     V1.1
  * @date        2021-04-19
  * @get         from https://www.dfrobot.com
  * @url         https://github.com/dfrobot/DFRobot_MICS
  */

#include "DFRobot_MICS.h"

#define CALIBRATION_TIME   3                      // Default calibration time is three minutes

// When using I2C communication, use the following program to construct an object by DFRobot_MICS_I2C
/**!
    iic slave Address, The default is ADDRESS_0
       ADDRESS_0               0x75             // i2c device address
       ADDRESS_1               0x76
       ADDRESS_2               0x77
       ADDRESS_3               0x78
*/
#define Mics_I2C_ADDRESS ADDRESS_0
DFRobot_MICS_I2C mics(&Wire, Mics_I2C_ADDRESS);

// When using the Breakout version, use the following program to construct an object from DFRobot_MICS_ADC
/**!
  adcPin is A0~A5
  powerPin is General IO
*/
#define ADC_PIN   A0
#define POWER_PIN 10
//DFRobot_MICS_ADC mics(/*adcPin*/ADC_PIN, /*powerPin*/POWER_PIN);

void setup()
{
  Serial.begin(115200);
  while(!Serial);
  while(!mics.begin()){
    Serial.println("NO Deivces !");
    delay(1000);
  } Serial.println("Device connected successfully !");

  /**!
    Gets the power mode of the sensor
    The sensor is in sleep mode when power is on,so it needs to wake up the sensor.
    The data obtained in sleep mode is wrong
   */
  uint8_t mode = mics.getPowerState();
  if(mode == SLEEP_MODE){
    mics.wakeUpMode();
    Serial.println("wake up sensor success!");
  }else{
    Serial.println("The sensor is wake up mode");
  }

  /**!
     Do not touch the sensor probe when preheating the sensor.
     Place the sensor in clean air.
     The default calibration time is 3 minutes.
  */
  while(!mics.warmUpTime(CALIBRATION_TIME)){
    Serial.println("Please wait until the warm-up time is over!");
    delay(1000);
  }
}

void loop()
{
  /**!
    Type of detection gas
    MICS-4514 You can get all gas state
    MICS-5524 You can get the state of CO, CH4, C2H5OH, C3H8, C4H10, H2, H2S, NH3
    MICS-2714 You can get the state of NO2, H2 ,NO
      CO       = 0x01  (Carbon Monoxide)
      CH4      = 0x02  (Methane)
      C2H5OH   = 0x03  (Ethanol)
      C3H8     = 0x04  (Propane)
      C4H10    = 0x05  (Iso Butane)
      H2       = 0x06  (Hydrogen)
      H2S      = 0x07  (Hydrothion)
      NH3      = 0x08  (Ammonia)
      NO       = 0x09  (Nitric Oxide)
      NO2      = 0x0A  (Nitrogen Dioxide)
  */
  int8_t gasFlag = mics.getGasExist(CO);
  if(gasFlag == EXIST){
    Serial.println("The gas exists!");
  }else{
    Serial.println("The gas does not exist!");
  }
  delay(1000);
  //mics.sleepMode();
}
结果
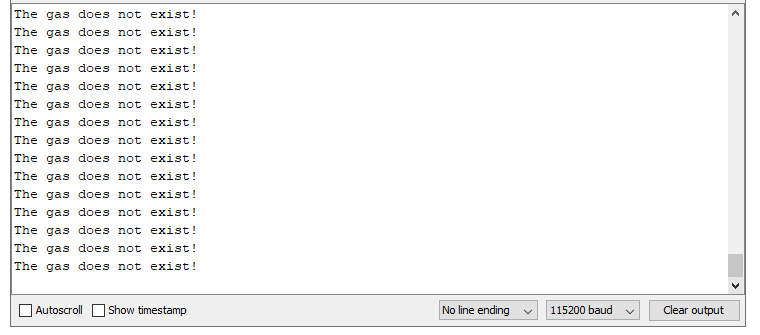
打开串口监视器,预热约3分钟后,可以实时检测一氧化碳(CO)是否泄漏。
注意:
- 如需要修改其他气体,需将自行修改样例代码中的被检测气体设置
- 传感器需要3分钟的预热时间
样例3:获取传感器原始模拟量数值
如果您需要获取传感器原始数据,通过数据手册自行计算气体浓度或者需要自行添加温度补偿等功能,您可以将样例程序下载到Arduino UNO,打开串口监视器查看MEMS芯片MiCS-4514的原始电压输出。
接线图
样例代码
- 将模块与Arduino按照上方的连线图相连,当然你也可以配合Gravity I/O扩展板使用,可以更方便、更快速的完成项目原型搭建。
- 将传感器上的选择开关,拨到I2C一侧。
- I2C地址默认为0x75,对应代码中的ADDRESS_0。如果需要修改I2C地址,可先通过模块上的拨码开关配置硬件I2C地址,并修改样例代码中I2C地址的定义ADDRESS_X。拨码开关与I2C地址参数对应关系如下:
- ADDRESS_0:0x75, A0=0, A1=0(默认地址)
- ADDRESS_1:0x76, A0=1, A1=0
- ADDRESS_2:0x77, A0=0, A1=1
- ADDRESS_3:0x78, A0=1, A1=1
- 下载并安装DFRobot_MICS库。如何安装库?
- 打开Arduino IDE
- 将下面的样例代码上传到Arduino UNO。
- 或者打开库文件样例中的getGasExist.ino代码,烧录至Arduino UNO。
- 打开Arduino IDE的串口监控视器,把波特率调至115200,观察串口打印结果。
 /*!
  * @file  getADCData.ino
  * @brief Reading MICS sensor ADC original value
  * @n When using IIC device, select I2C address, set the dialing switch A0, A1 (Address_0 is [0 0]), (Address_1 is [1 0]), (Address_2 is [0 1]), (Address_3 is [1 1]).
  * @n When using the Breakout version, connect the adcPin and PowerPin
  * @copyright   Copyright (c) 2010 DFRobot Co.Ltd (http://www.dfrobot.com)
  * @licence     The MIT License (MIT)
  * @author      ZhixinLiu(zhixin.liu@dfrobot.com)
  * @version     V1.1
  * @date        2021-04-19
  * @get         from https://www.dfrobot.com
  * @url         https://github.com/dfrobot/DFRobot_MICS
  */

#include "DFRobot_MICS.h"

// When using I2C communication, use the following program to construct an object by DFRobot_MICS_I2C
/**!
    iic slave Address, The default is ADDRESS_3
       ADDRESS_0               0x75             // i2c device address
       ADDRESS_1               0x76
       ADDRESS_2               0x77
       ADDRESS_3               0x78
*/
#define Mics_I2C_ADDRESS ADDRESS_3
DFRobot_MICS_I2C mics(&Wire, Mics_I2C_ADDRESS);

// When using the Breakout version, use the following program to construct an object from DFRobot_MICS_ADC
/**!
  adcPin is A0~A5
  powerPin is General IO
*/
#define ADC_PIN   A0
#define POWER_PIN 10
//DFRobot_MICS_ADC mics(/*adcPin*/ADC_PIN, /*powerPin*/POWER_PIN);

void setup()
{
  Serial.begin(115200);
  while(!Serial);
  while(!mics.begin()){
    Serial.println("NO Deivces !");
    delay(1000);
  } Serial.println("Device connected successfully !");

  /**!
    Gets the power mode of the sensor
    The sensor is in sleep mode when power is on,so it needs to wake up the sensor.
    The data obtained in sleep mode is wrong
   */
  uint8_t mode = mics.getPowerState();
  if(mode == SLEEP_MODE){
    mics.wakeUpMode();
    Serial.println("wake up sensor success!");
  }else{
    Serial.println("The sensor is wake up mode");
  }
}

void loop()
{
  int16_t ox_data  = 0;
  int16_t red_data = 0;
  /**!
    MICS-5524 Only OX_MODE ADC data can be obtained
    MICS-2714 Only RED_MODE ADC data can be obtained
    MICS-4514 Gravity can obtain AllMode ADC data
  */
  ox_data  = mics.getADCData(OX_MODE);
  //red_data = mics.getADCData(RED_MODE);
  Serial.print("ox  data = ");
  Serial.println(ox_data);
  //Serial.print("red data = ");
  //Serial.println(red_data);
  delay(1000);
}
结果
打开串口监视器,预热约3分钟后,可以获取MEMS芯片MiCS-4514原始数据。
注意:
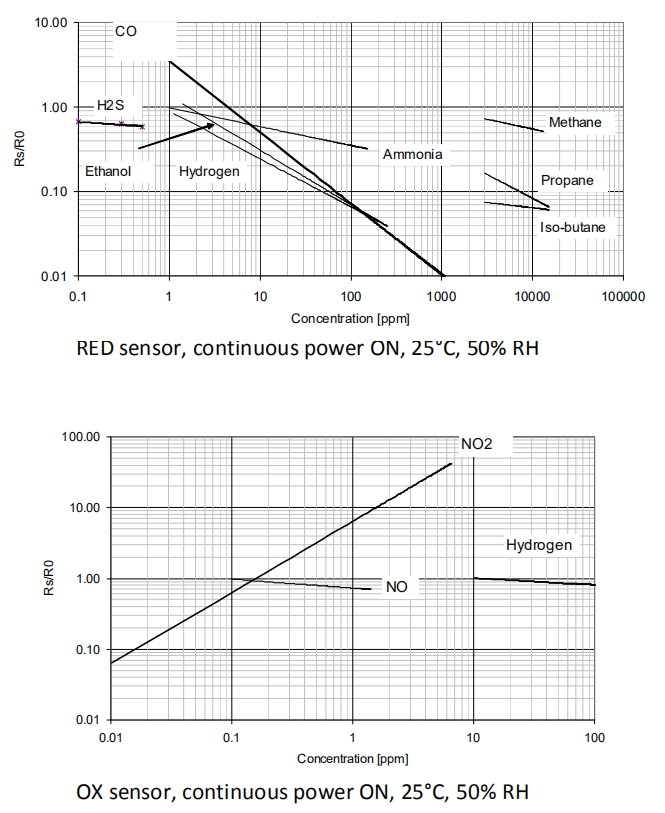
- MiCS-4514中集成了两个检测单元,分为ox和red,用以计算不同气体的浓度数据,具体曲线可参考wiki中关于传感器数据曲线的相关内容。
- 传感器需要3分钟的预热时间
注意事项
使用注意
- 请勿将传感器暴露于高浓度的有机溶剂,硅酮蒸气或香烟烟雾中,以免使敏感层中毒。
- 模组每次上电使用需预热3分钟左右,使模组充分稳定后正常测试。
- 传感器应放置在经过过滤的外壳中,以避免其免受水和灰尘的侵害。
传感器数据曲线
MiCS-4514中集成了两个检测单元,分为ox和red,用以计算不同气体的浓度数据。
常见问题
还没有客户对此产品有任何问题,欢迎通过QQ在线客服或者论坛联系我们!
更多问题及有趣的应用,可以 访问论坛 进行查阅或发帖。
