简介
CCS811空气质量传感器能够测量eCO2(equivalent CO2)和TVOC(Total Volatile Organic Compounds)浓度。可用于空气测量应用,例如:空气质量检测、空气净化器、新风系统等。
CCS811使用AMS独有的微热板技术,相比传统的气体传感器,功耗更低、预热时间更短、体积更小。内部集成ADC和MCU,可以对数据进行采集、计算,并且通过I2C返回数据。
CCS811支持多种模式:每1秒、10秒、1分钟、250毫秒测量一次以及休眠模式,这些模式在传感器测量期间进行了低功耗优化,因此CCS811适用于便携式应用。CCS811支持浓度报警,
当浓度超过用户设置的阈值时,INT引脚就会触发。
⚠注意:该芯片对I2C进行了时钟延展,有些控制器不支持时钟延展,例如树莓派。
二氧化碳浓度参考
| 二氧化碳浓度(ppm) | 人体反映 |
|---|---|
| <500 | 正常 |
| 500-1000 | 感到空气污浊 |
| 1000-2500 | 感到困倦 |
| 2500-5000 | 对健康不利 |
| 大于5000 | 有中毒危险 |
TVOC浓度参考
| TVOC浓度(ppb) | 人体反应 |
|---|---|
| <50 | 正常 |
| 50-750 | 可能会急躁不安和不舒服 |
| 750-6000 | 可能会急躁不安、不舒服和头疼 |
| >6000 | 头痛和其他神经问题 |
应用场景
- 车内空气质量检测
- 室内空气质量检测
- 空气净化器
- 家庭控制器
- 新风系统
技术规格
- 供电电压:3.3V~5.5 V
- 预热时间:<15s
- I2C地址:0x5A(默认)/0X5B
- 工作温度范围:-40℃~85℃
- 工作湿度范围:10%RH~95%RH
- eCO2测量范围:400ppm~8000ppm
- TVOC测量范围:0ppb~1100ppb
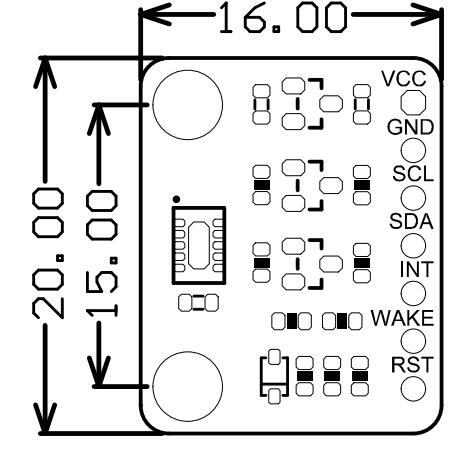
- 产品尺寸:16*20mm
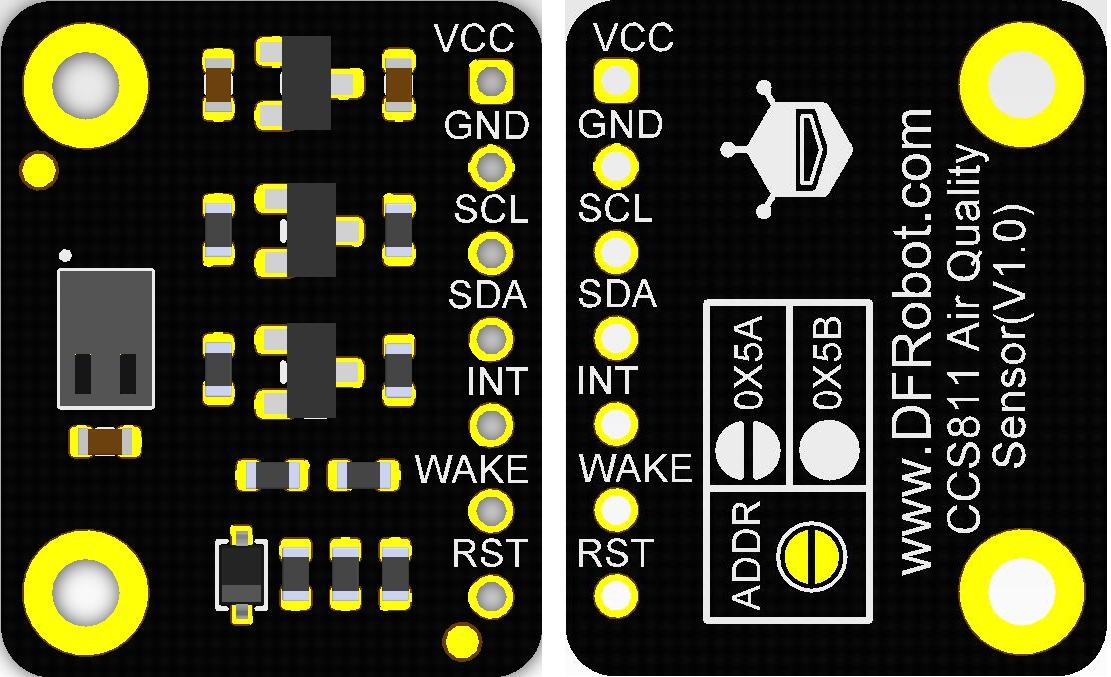
引脚说明
| 序号 | 丝印 | 功能描述 |
|---|---|---|
| 1 | VCC | 电源正极 |
| 2 | GND | 电源负极 |
| 3 | SCL | I2C时钟线 |
| 4 | SDA | I2C数据线 |
| 5 | INT | 中断引脚:低电平中断 |
| 6 | WAKE | 模式选择引脚:低电平唤醒/高电平睡眠 |
| 7 | RST | 复位引脚:低电平复位 |
使用教程
该产品预热时间短,在上电后很短时间就能有准确的读数,在设置环境基线后能够更快的有准确读数(下面会讲基线获取和设置方法)
⚠**注意:**数据手册建议在第一次使用传感器时,先运行48小时
准备
- 硬件
- 1 x Arduino UNO控制板
- 1 x CCS811 空气质量传感器
- 若干 杜邦线
- 软件
- Arduino IDE, 点击下载Arduino IDE
- CCS811库文件和示例程序
关于如何安装库文件,点击链接
- 主要API接口函数列表
  /**
   * @功能 判断是否可以读取数据
   * @返回 可以读取时为true,否则为false
   */
  bool checkDataReady();
    /**
   * @功能 设置环境参数
   * @参数 温度输入温度值,单位:摄氏度,范围(-40-85℃)
   * @参数 湿度输入湿度值,单位:%RH,范围(0-100%RH)
   */
  void setInTemHum(float temperature, float humidity);

  /**
   * @功能 设置测量周期和中断
   * @参数 cycle: eClosed      :空闲(在此模式下禁用测量)
   *              eCycle_1s    :每秒进行一次测量
   *              eCycle_10s   :每10秒进行一次测量
   *              eCycle_60s   :每60秒进行一次测量
   *              eCycle_250ms :每250ms进行一次测量
   * @参数 thresh: 0:禁止报警中断
   *               1:启用报警中断
   * @参数 interrupt: 0:禁止采集中断
   *                  1:启用采集中断
   */
  void setMeasurementMode(eCycle_t mode, uint8_t thresh = 0, uint8_t interrupt = 0, );

  /**
   * @功能 获取当前的二氧化碳浓度
   * @返回 当前二氧化碳浓度,单位:ppm
   */
  uint16_t  getCO2PPM();
  /**
   * @功能 获取当前的TVOC浓度
   * @返回 返回当前的TVOC浓度,单位:ppb
   */
  uint16_t getTVOCPPB();

  /**
   *@功能 获取当前的基线值
   *@返回 当前基线值的十六进制数
   */
  uint16_t readBaseLine();

  /**
   *@功能 将基线编值写入寄存器
   *@参数 从getBaseLine.ino获取一个十六进制数
   */
  void writeBaseLine(uint16_t baseLine);
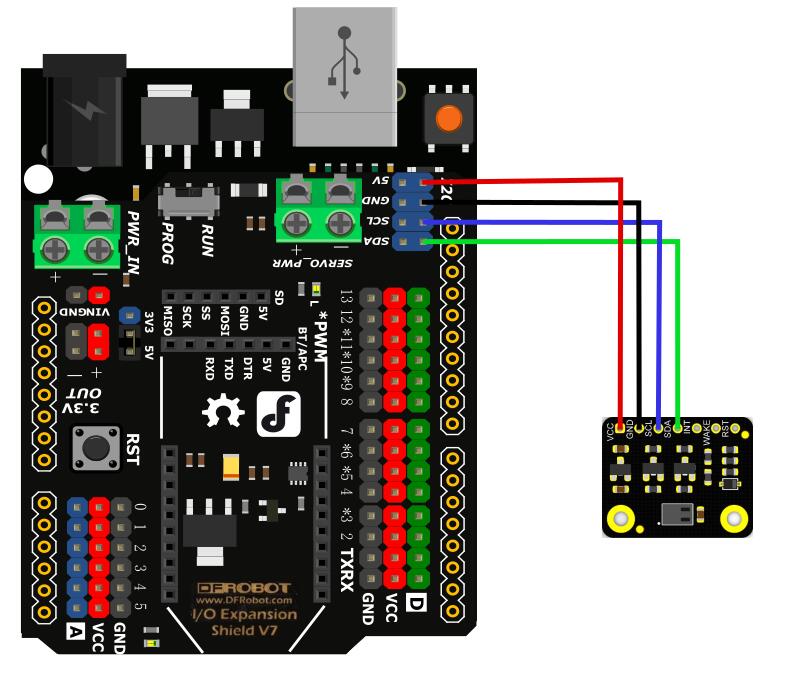
接线图
样例代码1 - 获取基线
为什么要获取基线?
因为之后你可以写入获取的基线,这样可以让传感器预热后立即显示空气质量,否则在污染空气中启动时需要非常久的时间才有正确读数
数据手册对基线校准的建议:在运行传感器的第一周,建议每24小时保存一个新的基线,运行1周后,可以每1-28天保存一次
⚠**特别注意:**请放在空气清新的环境中(20分钟以上)获取基线,不同传感器、不同测量周期基线不同
/*!
 * @file getBaseLine.ino
 * @brief Put the module in clear air and work a few minutes, wait for baseline doing not change
 * @n Experiment phenomenon: get
 *
 * @copyright	Copyright (c) 2010 DFRobot Co.Ltd (http://www.dfrobot.com)
 * @licence     The MIT License (MIT)
 * @author [LuoYufeng](yufeng.luo@dfrobot.com)
 * @version  V0.1
 * @date  2019-07-19
 * @get from https://www.dfrobot.com
 * @url https://github.com/DFRobot/DFRobot_CCS811
 */
#include "DFRobot_CCS811.h"


/*
 * IIC address default 0x5A, the address becomes 0x5B if the ADDR_SEL is soldered.
 */
//DFRobot_CCS811 CCS811(&Wire, /*IIC_ADDRESS=*/0x5A);
DFRobot_CCS811 CCS811;

void setup(void)
{
    Serial.begin(115200);
    /*Wait for the chip to be initialized completely, and then exit*/
    while(CCS811.begin() != 0){
        Serial.println("failed to init chip, please check if the chip connection is fine");
        delay(1000);
    }
}
void loop() {
    if(CCS811.checkDataReady() == true){
        /*!
         * @brief Set baseline
         * @return baseline in clear air
         */
        Serial.println(CCS811.readBaseLine(), HEX);

    } else {
        Serial.println("Data is not ready!");
    }
    //delay cannot be less than measurement cycle
    delay(1000);
}
结果
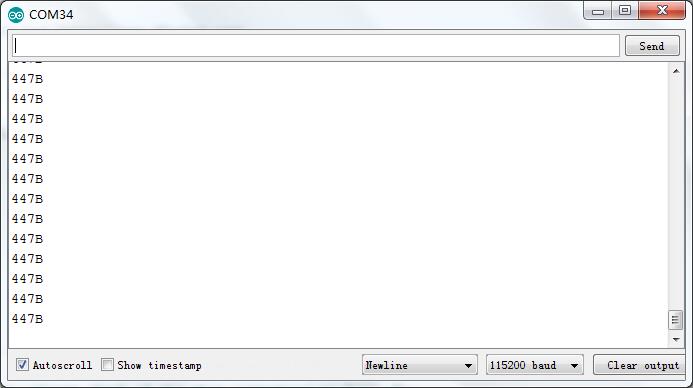
经过一段时间后基线稳定
样例代码2 - 获取数据
请将获取到的基线值填入到sensor.writeBaseLine();这个函数中。如果您不设置基线请在示例程序中将这个函数屏蔽,传感器将自动校准基线,但是这个过程非常缓慢。
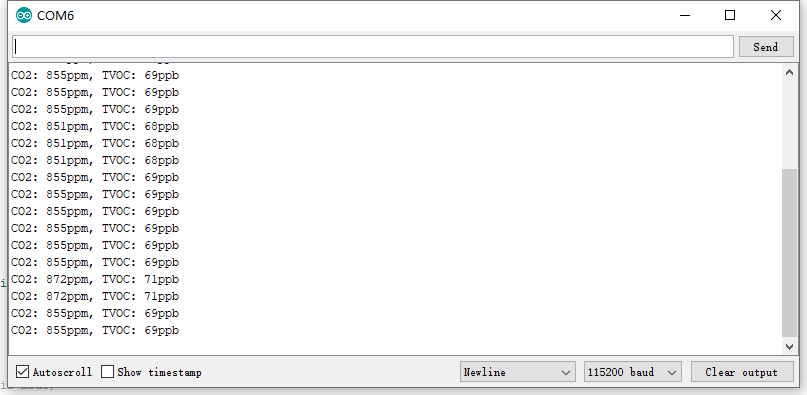
上传到UNO后打开串口监视器我们可以的看到CO2和TVOC浓度。
/*!
 * @file readData.ino
 * @brief Read the concentration of carbon dioxide and TVOC
 * @n Experiment phenomenon: read data every 0.5s, and print it out on serial port.
 *
 * @copyright	Copyright (c) 2010 DFRobot Co.Ltd (http://www.dfrobot.com)
 * @licence     The MIT License (MIT)
 * @author [LuoYufeng](yufeng.luo@dfrobot.com)
 * @version  V0.1
 * @date  2019-07-19
 * @get from https://www.dfrobot.com
 * @url https://github.com/DFRobot/DFRobot_CCS811
 */
#include "DFRobot_CCS811.h"

/*
 * IIC address default 0x5A, the address becomes 0x5B if the ADDR_SEL is soldered.
 */
//DFRobot_CCS811 CCS811(&Wire, /*IIC_ADDRESS=*/0x5A);
DFRobot_CCS811 CCS811;

void setup(void)
{
    Serial.begin(115200);
    /*Wait for the chip to be initialized completely, and then exit*/
    while(CCS811.begin() != 0){
        Serial.println("failed to init chip, please check if the chip connection is fine");
        delay(1000);
    }
}
void loop() {
    if(CCS811.checkDataReady() == true){
        Serial.print("CO2: ");
        Serial.print(CCS811.getCO2PPM());
        Serial.print("ppm, TVOC: ");
        Serial.print(CCS811.getTVOCPPB());
        Serial.println("ppb");

    } else {
        Serial.println("Data is not ready!");
    }
    /*!
     * @brief Set baseline
     * @param get from getBaseline.ino
     */
    CCS811.writeBaseLine(0x447B);
    //delay cannot be less than measurement cycle
    delay(1000);
}
结果
样例代码3 - 浓度报警
请将获取到的基线值填入到sensor.writeBaseLine();这个函数中。如果您不设置基线请在示例程序中将这个函数屏蔽,传感器将自动校准基线,但是这个过程非常缓慢。
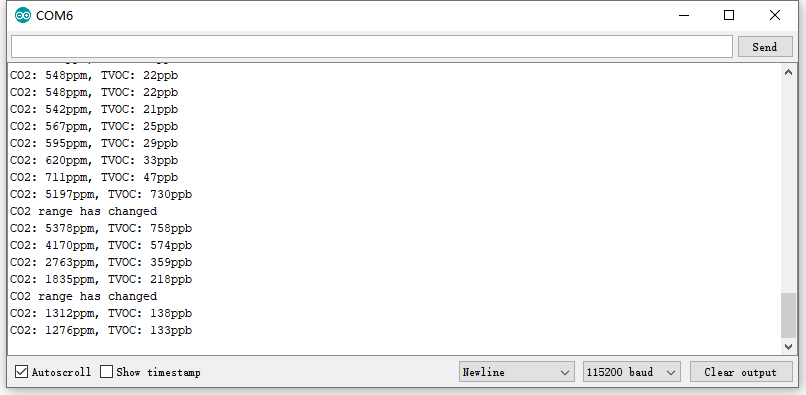
当CO2浓度从当前范围(低、中、高)移动到另一个范围(超过50ppm),则产生中断,并在打印当前CO2值。
本样例需要将传感器的INT引脚连接到主控板相应的中断引脚(样例选用的UNO中断引脚D2)。
| AVR系列中断引脚与中断号 | |||||||
|---|---|---|---|---|---|---|---|
| Uno,Nano,Mini 其他328主板 | 中断引脚 | D2 | D3 | ||||
| Uno,Nano,Mini 其他328主板 | 中断号 | 0 | 1 | ||||
| Mega2560 | 中断引脚 | D2 | D3 | D21 | D20 | D19 | D18 |
| Mega2560 | 中断号 | 0 | 1 | 2 | 3 | 4 | 5 |
| Leonardo,其他32u4主板 | 中断引脚 | D3 | D2 | D0 | D1 | D7 | |
| Leonardo,其他32u4主板 | 中断号 | 0 | 1 | 2 | 3 | 4 |
/*!
 * @file setInterrupt.ino
 * @brief Set interrupt parameter, when CO2 concentration range changes, get an interrupt
 * @n Experiment phenomenon: read data every 1s, and print it out on serial port.
 *
 * @copyright	Copyright (c) 2010 DFRobot Co.Ltd (http://www.dfrobot.com)
 * @licence     The MIT License (MIT)
 * @author [LuoYufeng](yufeng.luo@dfrobot.com)
 * @version  V1.0
 * @date  2019-07-13
 * @get from https://www.dfrobot.com
 * @url https://github.com/DFRobot/DFRobot_Sensor
 */
#include "DFRobot_CCS811.h"

volatile  int8_t GPIO1TRIG = 0;

/*
 * IIC address default 0x5A, the address becomes 0x5B if the ADDR_SEL is soldered.
 */
//DFRobot_CCS811 CCS811(&Wire, /*IIC_ADDRESS=*/0x5A);
DFRobot_CCS811 CCS811;

void setup(void)
{
    Serial.begin(115200);
    /*wait for the chip to be initialized completely, and then exit*/
    while(CCS811.begin() != 0){
        Serial.println("failed to init chip, please check if the chip connection is fine");
        delay(1000);
    }
    attachInterrupt(0, interrupt, RISING);
    /**
     * @brief Measurement parameter configuration
     * @param mode:in typedef enum{
     *              eClosed,      //Idle (Measurements are disabled in this mode)
     *              eCycle_1s,    //Constant power mode, IAQ measurement every second
     *              eCycle_10s,   //Pulse heating mode IAQ measurement every 10 seconds
     *              eCycle_60s,   //Low power pulse heating mode IAQ measurement every 60 seconds
     *              eCycle_250ms  //Constant power mode, sensor measurement every 250ms 1xx: Reserved modes (For future use)
     *          }eCycle_t;
     * @param thresh:0 for Interrupt mode operates normally; 1 for interrupt mode only asserts the nINT signal (driven low) if the new
     * @param interrupt:0 for Interrupt generation is disabled; 1 for the nINT signal is asserted (driven low) when a new sample is ready in
     */
    CCS811.setMeasurementMode(CCS811.eCycle_250ms, 1, 1);
    /**
     * @brief Set interrupt thresholds
     * @param lowToMed: interrupt triggered value in range low to middle
     * @param medToHigh: interrupt triggered value in range middle to high
     */
    CCS811.setThresholds(1500,2500);
}
void loop() {
    if(GPIO1TRIG == 1){
        Serial.println("CO2 range has changed");
        Serial.print("CO2: ");
        Serial.print(CCS811.getCO2PPM());
        Serial.print("ppm, TVOC: ");
        Serial.print(CCS811.getTVOCPPB());
        Serial.println("ppb");
        delay(1000);
    }
    GPIO1TRIG = 0;
    Serial.print("CO2: ");
    Serial.print(CCS811.getCO2PPM());
    Serial.print("ppm, TVOC: ");
    Serial.print(CCS811.getTVOCPPB());
    Serial.println("ppb");
    CCS811.writeBaseLine(0x447B);
    delay(1000);
}


void interrupt(){
  GPIO1TRIG = 1;
}
结果
当对传感器呼气,CO2浓度范围发生了变化,产生了一次中断;当气体浓度降下来时,也产生了一次中断
常见问题
还没有客户对此产品有任何问题,欢迎通过qq或者论坛联系我们!
更多问题及有趣的应用,可以 访问论坛 进行查阅或发帖。
