简介
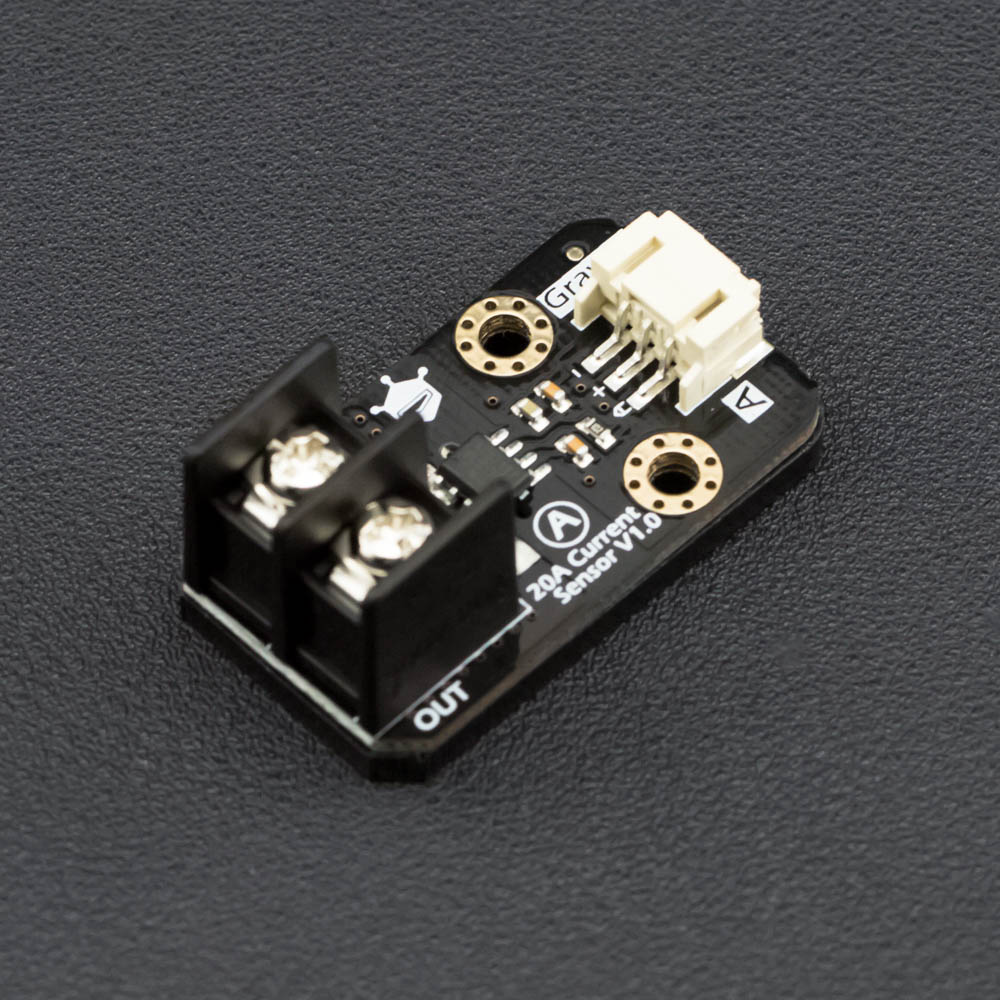
这款20A电流传感器模块采用ACS712霍尔电流感应芯片,具有量程大、简单易用、体积小巧、精度较高、无需焊接等特点,可用于直流电流和交流电流的测量。在设计上做了高压隔离,确保使用的安全性。模块输出的电压线性对应测量电流,且接口为Gravity 3P接口,即插即用。
 |
|---|
| 该模块不建议在20A及以上的大电流情况下长时间工作。 |
| 测量高压电时,请注意安全。 |
产品参数
- 供电电压:+5.0V
- 测量范围:0 ~ ±20A DC, 0 ~ 17A(RMS) AC
- 测量容忍电压:220V AC,311V DC
- 相对误差:±3%
- 尺寸:39mm * 22mm *17mm
- 接口:Gravity PH2.0-3P
- 重量:18g
引脚说明

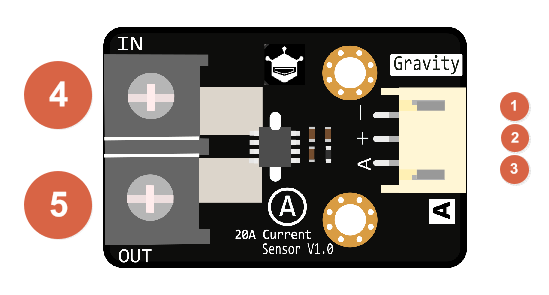
20A电流传感器引脚对应表
| 标号 | 名称 | 功能描述 |
|---|---|---|
| 1 | GND | GND |
| 2 | VCC | 5V电压输入 |
| 3 | 信号线 | 信号输出 |
| 4 | 测量电流输入+ | 测量电流输入端 |
| 5 | 测量电流输出- | 测量电流输出端 |
使用教程
本教程演示如何使用这款20A电流传感器。
准备
- 硬件
- Arduino UNO x1
- 20A电流传感器模块 x1
- Gravity PH2.0-3P接线 x1
- 杜邦线、导线 若干
- 软件
- Arduino IDE 版本1.6.8 点击下载Arduino IDE
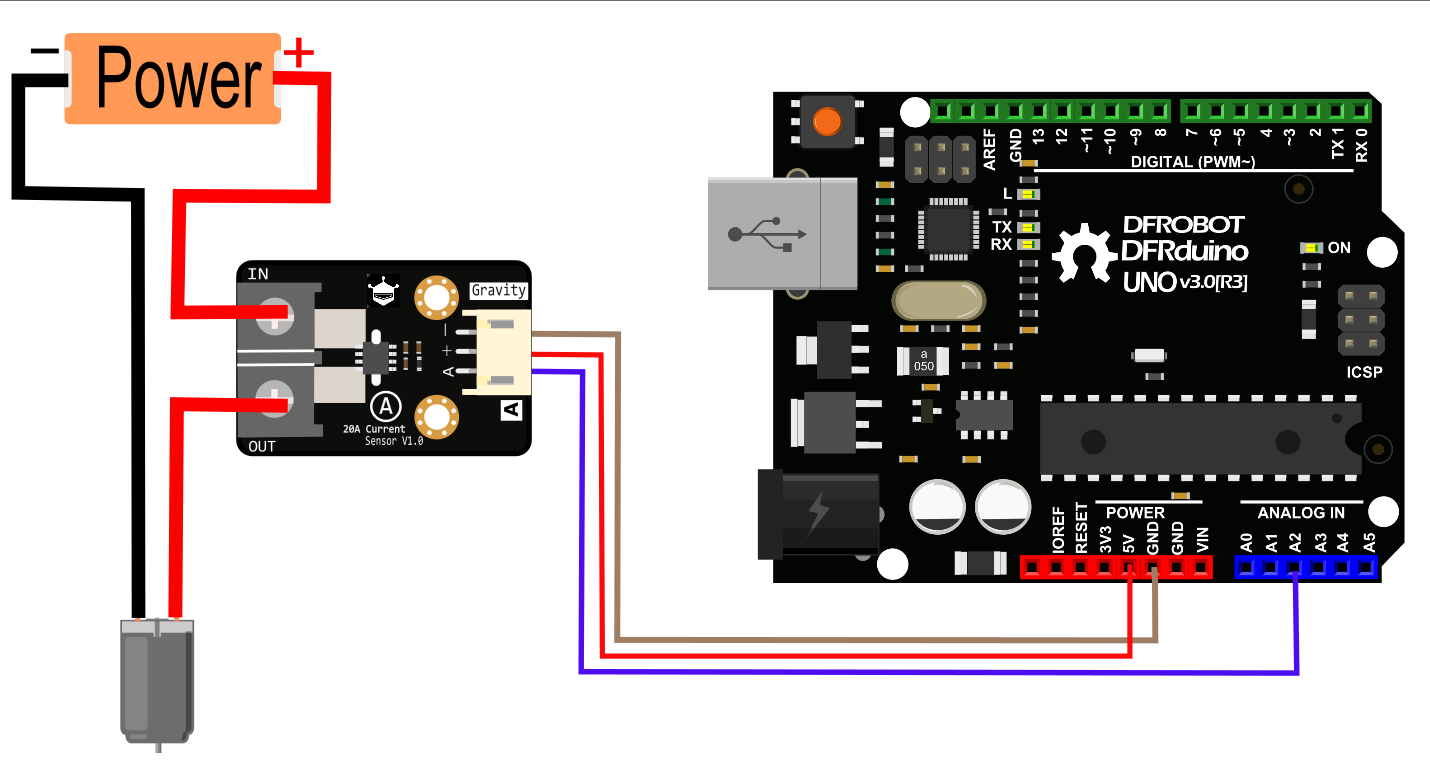
接线图
[ ]
]
样例代码
/***********************************************************
  This sample code shows how to use 20A current sensor module.

  Created 2016-4-26
  By Bernie Chen <bernie.chen@dfrobot.com>

  GNU Lesser General Public License.
  See <https://www.gnu.org/licenses/> for details.
  All above must be included in any redistribution
 ****************************************************/

/***********Notice and Trouble shooting***************
  1.Connection and Diagram can be found here, https://wiki.dfrobot.com.cn/index.php?title=(SKU:SEN0214)_20A%E7%94%B5%E6%B5%81%E4%BC%A0%E6%84%9F%E5%99%A8#.E6.A0.B7.E4.BE.8B.E4.BB.A3.E7.A0.81
  2.This code is tested on Arduino Uno.
 ****************************************************/

const int currentSensorPin = A0; //define sensor pin
const int mVperAmp = 100; // use 185 for 5A Module, and 66 for 30A Module
float Vref  = 0; //read your Vcc voltage,typical voltage should be 5000mV(5.0V)

void setup()
{
  Serial.begin(115200);
  Vref = readVref(); //read the reference votage(default:VCC)
}

void loop()
{
  /*If you are reading DC current, use this function to read DC current. Then uncomment the AC function.*/
  float CurrentValue =  readDCCurrent(currentSensorPin);
  /*If you are reading AC current, use this function to read AC current,it returns the RMS. Then uncomment the DC function.*/
  //float CurrentValue =  readACCurrent(currentSensorPin);
  Serial.println(CurrentValue);
  delay(500);
}

/*read DC Current Value*/
float readDCCurrent(int Pin)
{
  int analogValueArray[31];
  for (int index = 0; index < 31; index++)
  {
    analogValueArray[index] = analogRead(Pin);
  }
  int i, j, tempValue;
  for (j = 0; j < 31 - 1; j ++)
  {
    for (i = 0; i < 31 - 1 - j; i ++)
    {
      if (analogValueArray[i] > analogValueArray[i + 1])
      {
        tempValue = analogValueArray[i];
        analogValueArray[i] = analogValueArray[i + 1];
        analogValueArray[i + 1] = tempValue;
      }
    }
  }
  float medianValue = analogValueArray[(31 - 1) / 2];
  float DCCurrentValue = (medianValue / 1024.0 * Vref - Vref / 2.0) / mVperAmp;  //Sensitivity:100mV/A, 0A @ Vcc/2
  return DCCurrentValue;
}

/*read AC Current Value and return the RMS*/
float readACCurrent(int Pin)
{
  int analogValue;             //analog value read from the sensor output pin
  int maxValue = 0;            // store max value
  int minValue = 1024;         // store min value
  unsigned long start_time = millis();
  while ((millis() - start_time) < 200) //sample for 0.2s
  {
    analogValue = analogRead(Pin);
    if (analogValue > maxValue)
    {
      maxValue = analogValue;
    }
    if (analogValue < minValue)
    {
      minValue = analogValue;
    }
  }
  float Vpp = (maxValue - minValue) * Vref / 1024.0;
  float Vrms = Vpp / 2.0 * 0.707 / mVperAmp; //Vpp -> Vrms
  return Vrms;
}

/*read reference voltage*/
long readVref()
{
  long result;
#if defined(__AVR_ATmega168__) || defined(__AVR_ATmega328__) || defined (__AVR_ATmega328P__)
  ADMUX = _BV(REFS0) | _BV(MUX3) | _BV(MUX2) | _BV(MUX1);
#elif defined(__AVR_ATmega32U4__) || defined(__AVR_ATmega1280__) || defined(__AVR_ATmega2560__) || defined(__AVR_AT90USB1286__)
  ADMUX = _BV(REFS0) | _BV(MUX4) | _BV(MUX3) | _BV(MUX2) | _BV(MUX1);
  ADCSRB &= ~_BV(MUX5);   // Without this the function always returns -1 on the ATmega2560 https://openenergymonitor.org/emon/node/2253#comment-11432
#elif defined (__AVR_ATtiny24__) || defined(__AVR_ATtiny44__) || defined(__AVR_ATtiny84__)
  ADMUX = _BV(MUX5) | _BV(MUX0);
#elif defined (__AVR_ATtiny25__) || defined(__AVR_ATtiny45__) || defined(__AVR_ATtiny85__)
  ADMUX = _BV(MUX3) | _BV(MUX2);
#endif
#if defined(__AVR__)
  delay(2);                                        // Wait for Vref to settle
  ADCSRA |= _BV(ADSC);                             // Convert
  while (bit_is_set(ADCSRA, ADSC));
  result = ADCL;
  result |= ADCH << 8;
  result = 1126400L / result;  //1100mV*1024 ADC steps https://openenergymonitor.org/emon/node/1186
  return result;
#elif defined(__arm__)
  return (3300);                                  //Arduino Due
#else
  return (3300);                                  //Guess that other un-supported architectures will be running a 3.3V!
#endif
}
函数功能说明:
float readDCCurrent(int Pin) 该函数用来测量直流电流
float readACCurrent(int Pin) 该函数用来测量交流电流,测得的是交流电流的有效值。
根据被测电流,选择相应的函数调用即可,不能两个函数同时调用。
常见问题
还没有客户对此产品有任何问题,欢迎通过qq或者论坛联系我们!
更多问题及有趣的应用,可以 访问论坛 进行查阅或发帖!

