简介
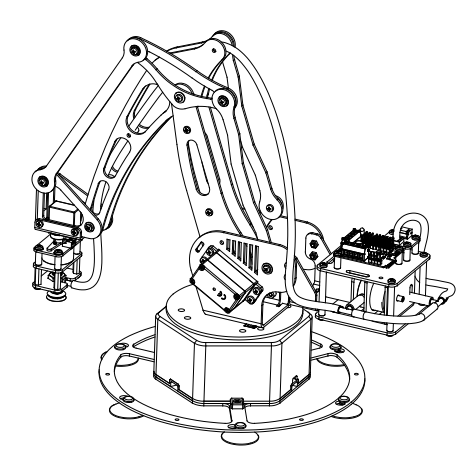
Explorer OA1开源机械臂是专门为创客爱好者设计的一款金属四轴机械臂。本机械臂的主体结构全部采用铝合金加工而成,关节部分均采用高精密级的轴承连接,驱动舵机均采用高质量金属齿轮舵机。整体精致、美观、耐用。
- 我们的机械臂能做什么?
- 1、标准套件中集成了气压吸嘴的所有配件。吸附重量最大可达500克。
- 2、标准套件中集成了机械夹持器,可以轻松做有趣的夹持应用。
- 3、我们的机械臂主板romeo mini BLE集成了蓝牙4.0 。
- 4、可以使用PC、iphone、手柄等多种终端来无线控制机械臂。我们免费提供客户端程序。
- 5、我们免费提供气压吸嘴配件、夹持器配件、核心算法程序、PC端程序、手机客户端,通讯协议,
- 6、你可以使用arduino代码无限拓展机械臂的功能。比如你可以用机械臂来画画、写字、下棋、帮你夹取物品、甚至在纸上画出数学函数图。
产品规格
本套件包含以下零配件:
- 1、完整的机械结构零件、连接线、开关-------1套
- 2、控制板-------------------------------1个
- 3、气压传感器----------------------------1个
- 4、大力矩金属齿轮舵机--------------------3个
- 5、微型MG90金属齿轮舵机------------------1个
- 6、完整的底座云台配件--------------------1套
- 7、气泵、电磁阀、气嘴、气管、三通---------1套
- 8、机械夹持器完整套件--------------------1套
提供多套完整的实例程序, 详情请见装箱清单。
技术参数:
- 1、整机尺寸(收拢状态) :直径200mm×高270mm
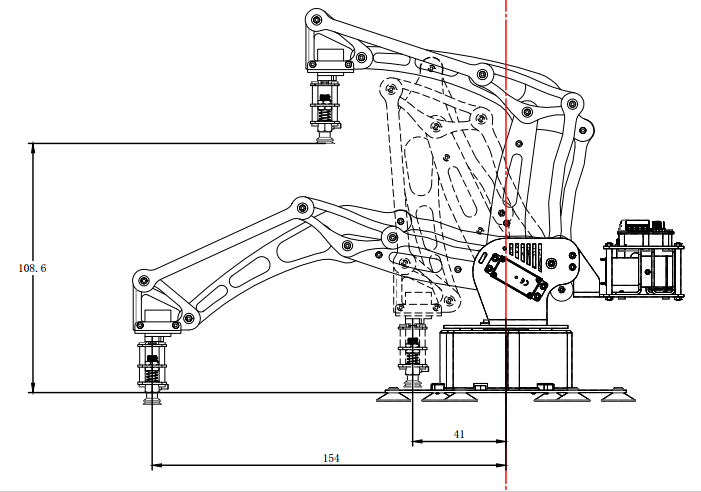
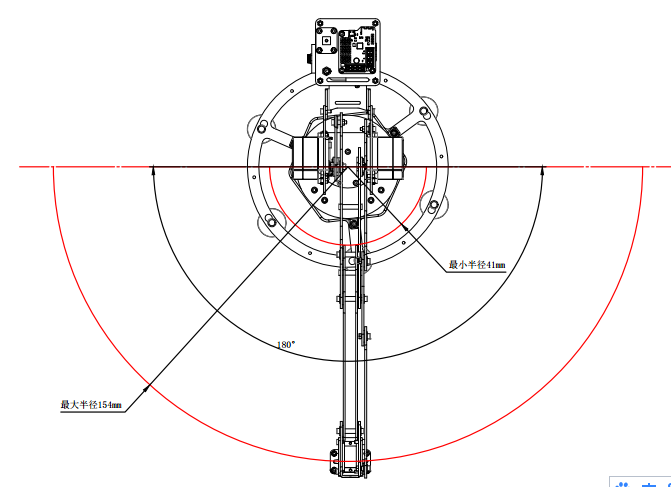
- 2、机械臂工作范围 :半径R:41mm~154mm,高度H:0~108mm
- 3、整机重量 :1.5kg
- 4、底座云台最大旋转角度 :180度


装箱清单
| 序号 | 名称 | 编号 | 单位 | 数量 |
| 1 | 尾架底板 | A1 | 件 | 1 |
| 2 | 尾架顶板 | A2 | 件 | 1 |
| 3 | 电机支架1 | A3 | 件 | 1 |
| 4 | 电机支架2 | A4 | 件 | 1 |
| 5 | 右侧舵机支撑 | A5 | 件 | 1 |
| 6 | 左侧舵机支撑 | A6 | 件 | 1 |
| 7 | 前臂 | A7 | 件 | 2 |
| 8 | 左后臂 | A8(L) | 件 | 1 |
| 9 | 右后臂 | A8(R) | 件 | 1 |
| 10 | 左后支臂 | A9(L) | 件 | 1 |
| 11 | 右后支臂 | A9(R) | 件 | 1 |
| 12 | 前支臂 | A10 | 件 | 1 |
| 13 | 三角架 | A11 | 件 | 1 |
| 14 | 后小臂 | A12 | 件 | 1 |
| 15 | 多功能支架 | A13 | 件 | 1 |
| 16 | 舵机安装架 | A14 | 件 | 1 |
| 17 | 吸嘴支板下 | A15 | 件 | 1 |
| 18 | 吸嘴支板上 | A16 | 件 | 1 |
| 19 | 连接件 | A17 | 件 | 1 |
| 20 | 大底盘 | A18 | 件 | 1 |
| 21 | 电磁阀 | B1 | 件 | 1 |
| 22 | 气泵 | B2 | 件 | 1 |
| 23 | 控制板 | B3 | 件 | 1 |
| 24 | 气压传感器 | B4 | 件 | 1 |
| 25 | 开关 | B5 | 个 | 1 |
| 26 | 插座 | B6 | 个 | 1 |
| 27 | 舵机DF15RMG | B7 | 个 | 3 |
| 28 | MG90舵机 | B8 | 个 | 1 |
| 29 | 光电接触板 | B9 | 个 | 1 |
| 30 | 舵机延长线 | B10 | 根 | 3 |
| 31 | 电源适配器 | B11 | 个 | 1 |
| 32 | USB数据线 | B12 | 条 | 1 |
| 33 | 云台壳体 | C1 | 件 | 1 |
| 34 | 轴承 | C2 | 件 | 1 |
| 35 | 云台转台 | C3 | 件 | 1 |
| 36 | 云台底盖 | C4 | 件 | 1 |
| 37 | 蘑菇头吸盘 | C5 | 个 | 6 |
| 38 | 真空吸盘 | C6 | 件 | 1 |
| 39 | 吸嘴 | C7 | 件 | 1 |
| 40 | 遮光环 | C8 | 件 | 1 |
| 41 | 三通 | C9 | 件 | 1 |
| 42 | 硅胶软气管 | C10 | 米 | 1.5 |
| 43 | PU小气管 | C11 | 米 | 0.2 |
| 44 | M2×6螺丝 | N1 | 颗 | 3 |
| 45 | M2螺帽 | N2 | 颗 | 2 |
| 46 | M3×4螺丝 | N3 | 颗 | 9 |
| 47 | M3×6螺丝 | N4 | 颗 | 51 |
| 48 | M3×8螺丝 | N5 | 颗 | 25 |
| 49 | M3×14螺丝 | N6 | 颗 | 2 |
| 50 | M3弹垫 | N7 | 颗 | 8 |
| 51 | M3螺帽 | N8 | 颗 | 14 |
| 52 | M4×6螺丝 | N9 | 颗 | 1 |
| 53 | M4×10自攻螺丝 | N10 | 颗 | 4 |
| 54 | M2.3×6自攻螺丝 | N11 | 颗 | 6 |
| 55 | M3×10自攻螺丝 | N12 | 颗 | 6 |
| 56 | M3×4mm立柱 | N13 | 颗 | 4 |
| 57 | M3×11立柱 | N14 | 颗 | 11 |
| 58 | M3X12mm立柱 | N15 | 颗 | 4 |
| 59 | M3×15mm单通立柱 | N16 | 颗 | 4 |
| 60 | M3×17mm立柱 | N17 | 颗 | 2 |
| 61 | M3×40mm立柱 | N18 | 颗 | 4 |
| 62 | M2×4螺丝 | N19 | 颗 | 1 |
| 63 | 备用螺丝包 | N20 | 套 | 1 |
| 64 | 金属舵机盘 | N21 | 个 | 2 |
| 65 | 舵机垫片 | N22 | 个 | 2 |
| 66 | 塑料舵机盘 | N23 | 个 | 1 |
| 67 | MG90舵机连杆 | N24 | 个 | 1 |
| 68 | MG90舵机圆盘 | N25 | 个 | 1 |
| 69 | ROB0131机械夹持器 | N26 | 套 | 1 |
| 70 | 小号两用螺丝刀 | N27 | 个 | 1 |
| 71 | 说明书 | 份 | 1 | |
产品装箱清单
资料下载
使用说明:
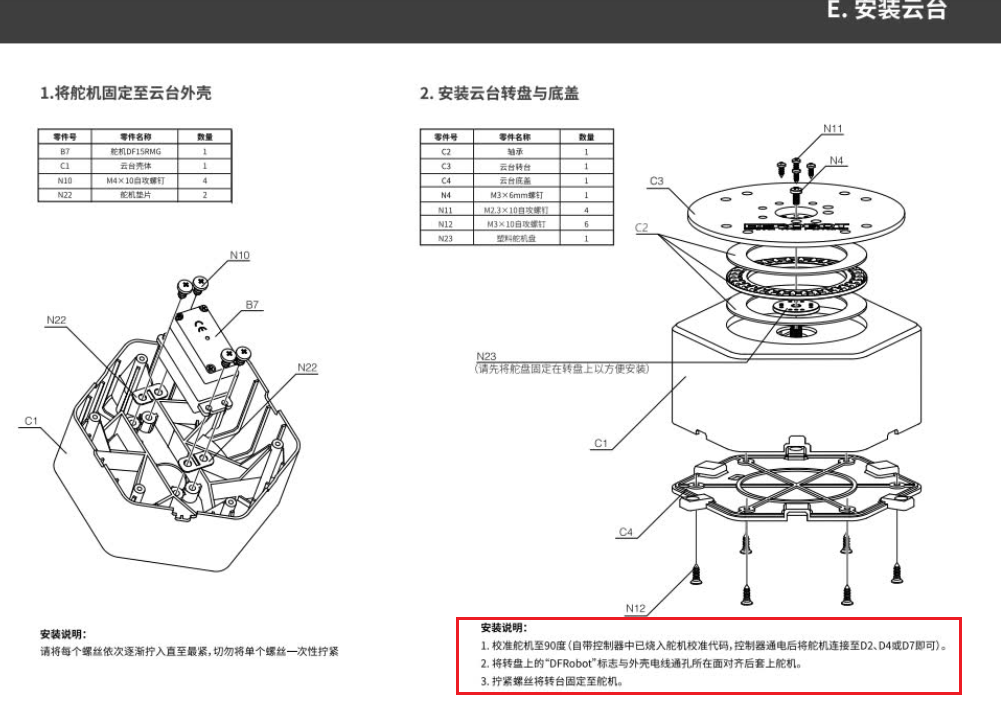
- 重要:组装时注意所有舵机均需要校准到90度位置才能进行安装固定,否则可能导致舵机控制异常
- 重要:需使用机械臂套装中的电源适配器,主控板供电时需要并联接线,详见文末常见问题。
- 机械臂既可以由我们开发的电脑端上位机软件“arm_tool”来进行控制,同时也支持arduino编程控制。
arm_tool控制方式操作方法:
- 1、下载“控制板固件”,解压后将“explorerOA1V1.0”文件夹导入arduino库文件,然后烧录explorerOA1.ino程序
- 2、下载“PC端软件”,解压后双击运行“arm_tool.exe”,打开串口即可进行控制
arduino编程控制:
根据“库函数说明文档”实用arduino ide进行编程控制
全部资料打包下载:
示例程序
直线位移
/*!
 * @file exampleLineMove.ino
 * @brief DFRobot's explorer OA1 Mechanical arm
 * @n ino file for DFRobot's explorer OA1 Mechanical arm
 *
 * @copyright   [DFRobot](https://www.dfrobot.com), 2016
 * @copyright   GNU Lesser General Public License
 * @n [Connection and Diagram](https://wiki.dfrobot.com.cn/index.php?title=(SKU:ROB0115)_Explorer_OA1%E6%9C%BA%E6%A2%B0%E8%87%82)
 * @author [Zc](shrimp.liu@dfrobot.com)
 * @version  V1.0
 * @date  2016-03-22
 */

#include "DFRobotOA1Calculation.h"
#include "DFRobotOA1Setting.h"
#include "DFRobotOA1Control.h"
#include <Servo.h>

DFRobotOA1Control  control;                 // initialize the OA1 Control library
DFRobotOA1Setting mySetting;                // initialize the OA1 Setting library
int buttonState = 0;

void setup() {
  // put your setup code here, to run once:
  Serial.begin(115200);                    //start serial port at 115200 bps
  mySetting.ServoSetting();                 //to set the Servo port
  mySetting.setMyarm(140,152,50);           //to set the OA1 arms lengths
  mySetting.initialization(155,0,40,1);     //initialize the OA1 coordinates
}

void loop() {
  // put your main code here, to run repeatedly:
   LineMove(100,100,100,5);                   // Linear movement to the coordinates
   delay(1000);
   LineMove(100,-100,100,5);                  // Linear movement to the coordinates
   delay(1000);
}
极坐标位移
/*!
 * @file examplePolarControl.ino
 * @brief DFRobot's explorer OA1 Mechanical arm
 * @n ino file for DFRobot's explorer OA1 Mechanical arm
 *
 * @copyright   [DFRobot](https://www.dfrobot.com), 2016
 * @copyright   GNU Lesser General Public License
 * @n [Connection and Diagram](https://wiki.dfrobot.com.cn/index.php?title=(SKU:ROB0115)_Explorer_OA1%E6%9C%BA%E6%A2%B0%E8%87%82)
 * @author [Zc](shrimp.liu@dfrobot.com)
 * @version  V1.0
 * @date  2016-03-22
 */

#include "DFRobotOA1Calculation.h"
#include "DFRobotOA1Setting.h"
#include "DFRobotOA1Control.h"
#include <Servo.h>

DFRobotOA1Control  control;                 // initialize the OA1 Control library
DFRobotOA1Setting mySetting;                // initialize the OA1 Setting library

void setup() {
  // put your setup code here, to run once:
  Serial.begin(115200);                    //start serial port at 115200 bps
  mySetting.ServoSetting();                 //to set the Servo port
  mySetting.setMyarm(140,152,50);           //to set the OA1 arms lengths
  mySetting.initialization(155,0,40,1);     //initialize the OA1 coordinates
}

void loop() {
  // put your main code here, to run repeatedly:
   for(int i=0;i<80;i++)
   {
     control.LeftTurn();                //turn left
     delay(10);
   }
   for(int i=160;i>0;i--)
   {
     control.RightTurn();              //turn right
     delay(10);
   }
   for(int i=0;i<80;i++)
   {
     control.LeftTurn();               //turn left
     delay(10);
   }
  for(int i=0;i<50;i++)
   {
     control.Spread();                 //spread
     delay(10);
   }
   for(int i=100;i>0;i--)
   {
     control.Shrink();                 //shrink
     delay(10);
   }
   for(int i=0;i<50;i++)
   {
     control.Spread();                 //spread
     delay(10);
   }
}
笛卡尔坐标位移
/*!
 * @file exampleDescareControl.ino
 * @brief DFRobot's explorer OA1 Mechanical arm
 * @n ino file for DFRobot's explorer OA1 Mechanical arm
 *
 * @copyright   [DFRobot](https://www.dfrobot.com), 2016
 * @copyright   GNU Lesser General Public License
 * @n [Connection and Diagram](https://wiki.dfrobot.com.cn/index.php?title=(SKU:ROB0115)_Explorer_OA1%E6%9C%BA%E6%A2%B0%E8%87%82)
 * @author [Zc](shrimp.liu@dfrobot.com)
 * @version  V1.0
 * @date  2016-03-22
 */

#include "DFRobotOA1Calculation.h"
#include "DFRobotOA1Setting.h"
#include "DFRobotOA1Control.h"
#include <Servo.h>

DFRobotOA1Control  control;                 // initialize the OA1 Control library
DFRobotOA1Setting mySetting;                // initialize the OA1 Setting library

void setup() {
  // put your setup code here, to run once:
  Serial.begin(115200);                    //start serial port at 115200 bps
  mySetting.ServoSetting();                 //to set the Servo port
  mySetting.setMyarm(140,152,50);           //to set the OA1 arms lengths
  mySetting.initialization(155,0,40,1);     //initialize the OA1 coordinates
}

void loop() {
  // put your main code here, to run repeatedly:
   for(int i=0;i<50;i++)
   {
     control.xup();                             //Along the x coordinate forward
     delay(10);
   }
   for(int i=100;i>0;i--)
   {
     control.xdown();                          //Along the x coordinate backward
     delay(10);
   }
   for(int i=0;i<50;i++)
   {
     control.xup();                            //Along the x coordinate forward
     delay(10);
   }
  for(int i=0;i<50;i++)
   {
     control.yup();                           //Along the y coordinate forward
     delay(10);
   }
   for(int i=100;i>0;i--)
   {
     control.ydown();                         //Along the y coordinate backward
     delay(10);
   }
   for(int i=0;i<50;i++)
   {
     control.yup();                          //Along the y coordinate forward
     delay(10);
   }
   for(int i=0;i<50;i++)
   {
     control.up();                           //Along the z coordinate forward
     delay(10);
   }
   for(int i=100;i>0;i--)
   {
     control.down();                         //Along the z coordinate backward
     delay(10);
   }
   for(int i=0;i<50;i++)
   {
     control.up();                           //Along the z coordinate forward
     delay(10);
   }
}
机械臂手腕控制
/*!
 * @file exampleElbowControl.ino
 * @brief DFRobot's explorer OA1 Mechanical arm
 * @n ino file for DFRobot's explorer OA1 Mechanical arm
 *
 * @copyright   [DFRobot](https://www.dfrobot.com), 2016
 * @copyright   GNU Lesser General Public License
 * @n [Connection and Diagram](https://wiki.dfrobot.com.cn/index.php?title=(SKU:ROB0115)_Explorer_OA1%E6%9C%BA%E6%A2%B0%E8%87%82)
 * @author [Zc](shrimp.liu@dfrobot.com)
 * @version  V1.0
 * @date  2016-03-22
 */

#include "DFRobotOA1Calculation.h"
#include "DFRobotOA1Setting.h"
#include "DFRobotOA1Control.h"
#include <Servo.h>

DFRobotOA1Judgment judgment;                // initialize the OA1 Judgment library
DFRobotOA1Control  control;                 // initialize the OA1 Control library
DFRobotOA1Setting mySetting;                // initialize the OA1 Setting library

void setup() {
  // put your setup code here, to run once:
  Serial.begin(115200);                    //start serial port at 115200 bps
  mySetting.ServoSetting();                 //to set the Servo port
  mySetting.setMyarm(140,152,50);           //to set the OA1 arms lengths
  mySetting.initialization(155,0,40,1);     //initialize the OA1 coordinates
}

void loop() {
  // put your main code here, to run repeatedly:
   for(int i=0;i<85;i++)
   {
     control.rroll();                   //Turn Right wrist
     delay(10);
   }
   for(int i=170;i>0;i--)
   {
     control.lroll();                   //Turn left wrist
     delay(10);
   }
   for(int i=0;i<85;i++)
   {
     control.rroll();                  //Turn Right wrist
     delay(10);
   }

}
机械爪控制
/*!
 * @file exampleClawControl.ino
 * @brief DFRobot's explorer OA1 Mechanical arm
 * @n ino file for DFRobot's explorer OA1 Mechanical arm
 *
 * @copyright   [DFRobot](https://www.dfrobot.com), 2016
 * @copyright   GNU Lesser General Public License
 * @n [Connection and Diagram](https://wiki.dfrobot.com.cn/index.php?title=(SKU:ROB0115)_Explorer_OA1%E6%9C%BA%E6%A2%B0%E8%87%82)
 * @author [Zc](shrimp.liu@dfrobot.com)
 * @version  V1.0
 * @date  2016-03-22
 */

#include "DFRobotOA1Calculation.h"
#include "DFRobotOA1Setting.h"
#include "DFRobotOA1Control.h"
#include <Servo.h>

DFRobotOA1Control  control;                 // initialize the OA1 Control library
DFRobotOA1Setting mySetting;                // initialize the OA1 Setting library

void setup() {
  // put your setup code here, to run once:
  Serial.begin(115200);                    //start serial port at 115200 bps
  mySetting.ServoSetting();                 //to set the Servo port
  mySetting.setMyarm(140,152,50);           //to set the OA1 arms lengths
  mySetting.initialization(155,0,40,1);     //initialize the OA1 coordinates
}

void loop() {
  // put your main code here, to run repeatedly:
   for(int i=0;i<28;i++)
   {
     control.cls();                      //Paw closed
     delay(10);
   }
   for(int i=65;i>0;i--)
   {
     control.ope();                     //Paw open
     delay(10);
   }
   for(int i=0;i<37;i++)
   {
     control.cls();                     //Paw closed
     delay(10);
   }
}
气泵控制
/*!
 * @file examplePumpControl.ino
 * @brief DFRobot's explorer OA1 Mechanical arm
 * @n ino file for DFRobot's explorer OA1 Mechanical arm
 *
 * @copyright   [DFRobot](https://www.dfrobot.com), 2016
 * @copyright   GNU Lesser General Public License
 * @n [Connection and Diagram](https://wiki.dfrobot.com.cn/index.php?title=(SKU:ROB0115)_Explorer_OA1%E6%9C%BA%E6%A2%B0%E8%87%82)
 * @author [Zc](shrimp.liu@dfrobot.com)
 * @version  V1.0
 * @date  2016-03-22
 */

#include "DFRobotOA1Calculation.h"
#include "DFRobotOA1Setting.h"
#include "DFRobotOA1Control.h"
#include <Servo.h>

DFRobotOA1Control  control;                 // initialize the OA1 Control library
DFRobotOA1Setting mySetting;                // initialize the OA1 Setting library

void setup() {
  // put your setup code here, to run once:
  Serial.begin(115200);                    //start serial port at 115200 bps
  mySetting.ServoSetting();                 //to set the Servo port
  mySetting.setMyarm(140,152,50);           //to set the OA1 arms lengths
  mySetting.initialization(155,0,40,1);     //initialize the OA1 coordinates
}

void loop() {
  // put your main code here, to run repeatedly:
  control.pumpOn();                   //pump on
  delay(5000);
 control.pumpOff();                   //pump off
 control.valveOn();                   //valve on
 delay(1000);
 control.valveOff();                  //valve off
}
气压传感器气泵控制
/*!
 * @file exampleBaroceptorControl.ino
 * @brief DFRobot's explorer OA1 Mechanical arm
 * @n ino file for DFRobot's explorer OA1 Mechanical arm
 *
 * @copyright   [DFRobot](https://www.dfrobot.com), 2016
 * @copyright   GNU Lesser General Public License
 * @n [Connection and Diagram](https://wiki.dfrobot.com.cn/index.php?title=(SKU:ROB0115)_Explorer_OA1%E6%9C%BA%E6%A2%B0%E8%87%82)
 * @author [Zc](shrimp.liu@dfrobot.com)
 * @version  V1.0
 * @date  2016-03-22
 */

#include "DFRobotOA1Calculation.h"
#include "DFRobotOA1Setting.h"
#include "DFRobotOA1Control.h"
#include <Servo.h>

const int analogInPin = pressure_SENSOR;
DFRobotOA1Control  control;                 // initialize the OA1 Control library
DFRobotOA1Setting mySetting;                // initialize the OA1 Setting library

void setup() {
  // put your setup code here, to run once:
  Serial.begin(115200);                    //start serial port at 115200 bps
  mySetting.ServoSetting();                 //to set the Servo port
  mySetting.setMyarm(140,152,50);           //to set the OA1 arms lengths
  mySetting.initialization(155,0,40,1);     //initialize the OA1 coordinates
}

void loop() {
  // put your main code here, to run repeatedly:
  sensorValue = analogRead(analogInPin);
  if(sensorValue>180)
  {
    control.pumpOff();                          //air pumpoff
  }
  else if(sensorValue<180)
  {
    control.pumpOn();                          //air pumpon
  }
}
常见问题
Q:机械臂安装完之后不正常动作是怎么回事?
A:机械臂舵机安装时一定要校准到90°位置安装,否则无法正常执行动作,严重情况下会堵转舵机造成损坏。

Q:机械臂安装完成之后开机静止状态抖动严重是怎么回事?
A:供电不足,需要使用配套的5V电源,并且扩展板上四个供电口需要并联供电。

更多问题及有趣的应用,可以 访问论坛 进行查阅或发帖! |}
更多
 [Link DFRobot商城购买链接] |}