1.简介
这是一款支持多卫星系统,通过4G模块联网获取定位校准数据的RTK高精度定位的套件。GNSS模块同时支持接收GNSS,GPS,GLONASS,Galileo,BDS和QZSS卫星信号,同时跟踪GPS L1 C/A,GLONASS L1,Galileo E1,BDS B1I,QZSS L1 C/A,GPS L5,GalileoE5a,BDS B2a and QZSS L5频带,相较于传统的RTK定位套件,使用更灵活,能实现RTK定位范围更广,一般可覆盖15~20km的范围。
套件使用Ntrip协议的方式获取RTCM校准数据,使用前需要准备一个CORS账号和4G卡,请提前了解当地的CORS服务覆盖的情况,当前国内CORS服务基本覆盖了大部分的城市地区。
套件通过Gravity接口输出数据信息,可切换I2C和UART模式,兼容Arduino、ESP32、树莓派等主控。作为高精度定位入门级套件,没有复杂的数据链搭建过程,非常适合高精度定位循迹小车,物品追踪,轨迹获取等应用场景。
注:由于室内卫星信号弱,且遮挡严重地方会影响天线搜星质量,故只能用于室外相对开阔地带使用,首次上电由于4G模块初始化和GNSS天线搜星需要一个过程,因此上电需等待几分钟才能获取到RTK定位信息。
2. 外观接口介绍
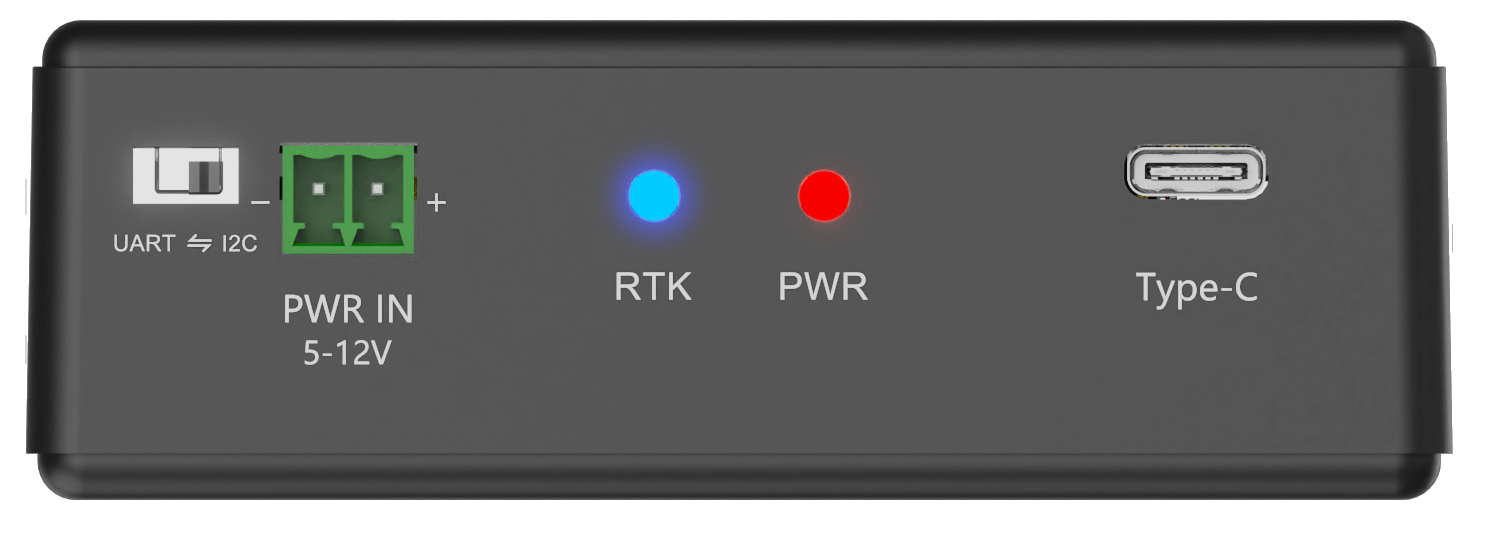
正面接口
| 名称 | 介绍 |
|---|---|
| UART⇄I2C | UART/I2C输出切换开关 |
| PWR IN 5~12V | 外部供电接线端口(DC 5~12V) |
| RTK | RTK状态指示灯,定位状态值为5,1s闪烁一次;定位状态值为4,常量,其他状态,灭 |
| PWR | 电源指示灯-Type-C或PWR IN供电后亮起 |
| Type-C | Type-C供电接口 |
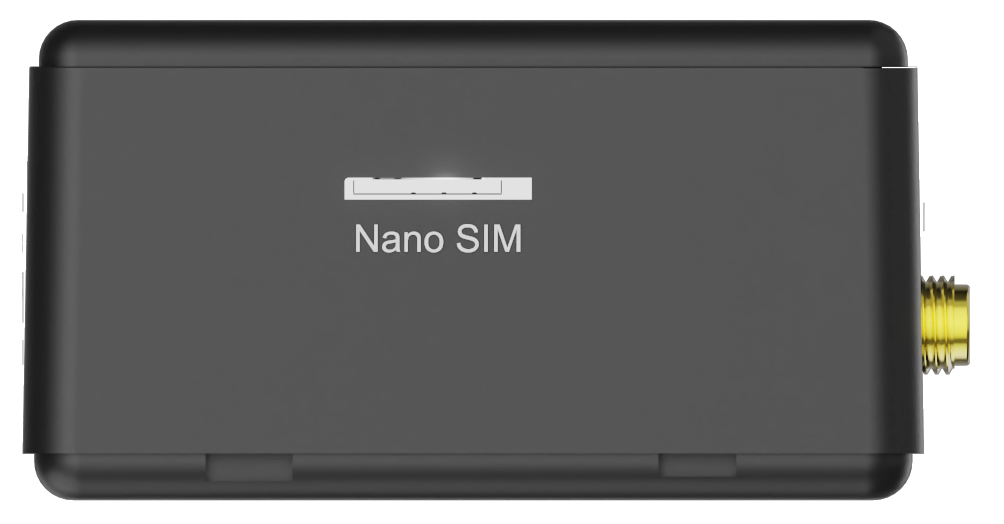
Nano SIM
| 名称 | 描述 |
|---|---|
| Nano SIM | Nano SIM卡孔位 |
SIM卡安装
安装时,将SIM卡金属芯片面朝下对准卡槽,使用内附螺丝刀轻轻下压,听到清脆得“卡嗒”声即锁定成功
取出时,同样使用内附螺丝刀,轻轻下压,弹出后,使用螺丝刀侧面挑出(非必要情况下不建议反复取出)

此面安装时朝下安装
Gravity接口

| 名称 | 描述 |
|---|---|
| Gravity I2C&UART | 数据输出Gravity接口 |
天线接口

| 名称 | 描述 |
|---|---|
| 4G | 4G天线SMA接口 |
| GNSS | GNSS天线SMA接口 |
3. 定位原理
3.1 RTK定位原理
3.1.1 Ntrip协议
定义
NTRIP(Networked Transport of RTCM via Internet Protocol)是一种基于互联网的协议,专为实时传输差分GNSS(全球导航卫星系统)数据而设计。它主要用于将RTCM(Radio Technical Commission for Maritime Services)格式的差分校正数据(如GPS、GLONASS等)从基准站传输到移动端(如测绘设备、无人机、自动驾驶系统等),以提高定位精度(从米级提升至厘米级)。
组成
- NTRIP客户端(Client):接收差分数据的终端设备(如GNSS接收机)。
- NTRIP服务器(Server):存储并分发基准站的差分数据。
- NTRIP Caster:核心中介服务器,负责协调客户端与服务器的连接,类似“路由器”角色。
- Mount Point:数据流的唯一标识符,客户端通过它订阅特定数据源(如某个基准站的数据)。
工作原理
- 基于HTTP/HTTPS协议,使用长连接(Keep-Alive)实现实时数据传输。
- 客户端向Caster发送HTTP请求,指定目标Mount Point,Caster将对应的RTCM数据流持续推送给客户端。
- 支持身份验证(如用户名/密码),确保数据访问安全。
特点
- 低延迟:适用于实时性要求高的场景(如自动驾驶)。
- 跨网络兼容性:利用HTTP协议穿透防火墙,适应复杂网络环境。
- 灵活性:支持单播(点对点)和多播(一对多)传输模式。
- 标准化数据格式:使用RTCM SC-104标准(常用版本为RTCM 3.x),确保设备兼容性。
3.1.2 国内常见的CORS服务商和定位精度
| 服务商/系统 | 运营背景/特点 | 实时定位精度(典型值) | 基准站规模参考 |
|---|---|---|---|
| 全国CORS(千寻位置) | 阿里巴巴与中国兵器工业集团合资 | 水平2cm | 依托国家北斗地基增强系统,接入超3000座基站 |
| 华测导航(FixCM) | 专注测绘地理信息领域 | 水平1.2cm,高程2.5cm | 3200+自建站点 |
| 中国移动(OnePoint) | 利用通信铁塔改造基站 | 动态精度约±3cm | 4400座通信铁塔改造 |
| 腾讯GNSS增强服务 | 融合腾讯地图POI数据库 | 定位误差≤5cm(如AR工程放样) | 2800+基准站网 |
| 六分科技(NRTK) | 兼容低轨道卫星增强服务 | 毫米级服务(如高铁轨道精调) | / |
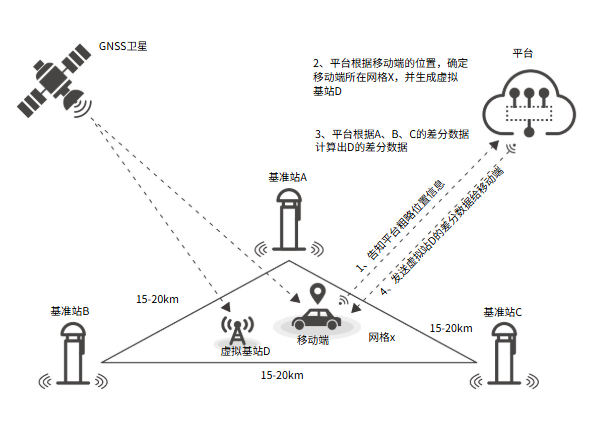
3.2 定位原理简介和流程图
在一个较大区域内,均匀分散多个基站(3个及以上),构成一个基准站网,它们将数据发送给中央服务器。中央服务器根据数据模拟出一个“虚拟基准站”,用户通过固定的CORS账号,采用4G网络和Ntrip协议,将“虚拟基准站”的数据实时播发给移动站,移动站通过实时差分解算,消除公共误差,从而实现厘米级精度的RTK定位。
3.3 网络RTK的优缺点
网络RTK具有显著优势,主要体现在利用广泛分布的移动通信基站作为基准站,实现了无缝覆盖,并通过内置4G模块完成流动站与中央服务器的高效通信。用户无需自建基准站,降低了成本,仅需支付通讯费用。同时,由于基准站数量多,即使有个别损坏也不影响整体的精度和可靠性。
但是,在网络RTK的模型中,网络的稳定性对定位精度影响极大。必须保证网络通信稳定,从而确保差分数据稳定下发,才能实现超高定位精度。
3.4 常见应用场景
- 测绘与地理信息采集:提高野外测量的精度。
- 精准农业:农机自动驾驶与变量施肥。
- 无人机导航:实现厘米级定位的航拍或巡检。
- 智能交通系统:车辆高精度定位与车道级导航。
3.5 定位数据解析
产品支持的标准NMEA 0183数据,包含RMC、GGA、GSV、GSA、VTG、GLL、ZDA、GRS、GST
$后跟随的字符代表国家或地区或GNSS系统,比如GPGGA代表美国GPS ,BDGGA代表中国北斗 ,GLGGA代表俄罗斯GLONASS ,GAGGA代表欧盟Galileo,GNGGA代表多星联合定位。
此处以GGA数据为例分析,更多数据分析 参考NMEA 0183数据解析 2.2. Standard Messages部分
以下是一组GGA数据解析
$GNGGA,063924.000,3037.643956,N,10348.010829,E,5,34,0.46,507.909,M,-32.181,M,1.0,3335*76
| 字段序号 | 字段名称 | 说明 | 示例值 |
|---|---|---|---|
| 0 | 标识符 | 每个NMEA数据的起始符) | $ |
| 1 | 区域或系统 | 固定为 $GP(GPS)或 $GL(GLONASS)或$GN(GNSS)等 |
$GNGGA |
| 2 | 语句标识符 | 全球定位系统修正数据 | GGA |
| 1 | UTC 时间 | 定位UTC时间 (hhmmss.sss格式) | 063924.000 |
| 2 | 纬度 | 纬度值 (ddmm.mmmmmm格式) | 3037.643956 |
| 3 | 纬度半球 | N=北纬, S=南纬 | N |
| 4 | 经度 | 经度值 (dddmm.mmmmmm格式) | 10348.010829 |
| 5 | 经度半球 | E=东经, W=西经 | E |
| 6 | 定位状态 | 0=无效1=GPS定位2=差分定位4=RTK固定解5=RTK浮点解6=估算值 |
5 |
| 7 | 使用卫星数 | 参与解算的卫星数量 | 34 |
| 8 | HDOP | 水平精度因子 (值越小精度越高) • <1:极好 • 0-2:很好 • 2-5:好 • 5-10:中等 • >10:较差 |
0.46 |
| 9 | 海拔高度 | 天线海拔高度 (米,相对于平均海平面MSL) | 507.909 |
| 10 | 高度单位 | 固定为 M (米) |
M |
| 11 | 大地水准面高度 | 大地水准面与WGS84椭球面的高度差 (米) • 正值:大地水准面高于椭球面 • 负值:大地水准面低于椭球面 |
-32.181 |
| 12 | 高度差单位 | 固定为 M (米) |
M |
| 13 | 差分数据龄期 | 仅RTK固定解或浮点解有效 | 1 |
| 14 | 差分参考站ID | 仅RTK固定解或浮点解有效 | 3335 |
| 15 | 校验和 | *后的十六进制校验值 |
*76 |
3.6 常见坐标系对比
| 坐标系 | CGCS2000坐标系 | WGS84坐标系 | ITRF2008坐标系对比 |
|---|---|---|---|
| 区域性 | 中国 | 全球 | 全球 |
| 精度 | 高(在中国区域 | 中 | 最高 |
| 参考框架 | 基于ITRF,中国区域优化 | 基于ITRF,不断更新 | 基于全球多种空间大地测量技术 |
| 应用 | 中国境内、GIS、导航等 | GPS、全球导航、地图服务等 | 科学研究、高精度定位、坐标系基准 |
| 维护机构 | 中国国家测绘地理信息局(现自然资源部) | 美国国防部国家地理空间情报局(NGA) | 国际地球自转服务(IERS) |
| 与ITRF的关系 | 与ITRF紧密联系,但经过区域调整 | 与ITRF紧密联系,不断更新以保持一致性 | 本身就是ITRF的一个版本,是基准 |
4.产品特点
- 4G通信,Ntrip协议传输数据
- 覆盖范围广(一般为15~20km,取决于不同CORS服务商的覆盖范围)
- 精度均匀可靠
- 厘米级定位精度(不同厂商定位精度略有偏差)
5.产品性能参数
- 供电接口:Gravity接口,3.3~5V
- Type-c:4G模块供电(需单独供电)
- 输出信号:I2C/UART
- 天线接口:SMA
- 接收频段
- GPS/QZSS:L1 C/A,L5
- GLONASS:L1
- Galileo:E1,E5a
- BDS:B1l,B2a
- 默认星系:GPS+GLONASS+Galileo+BDS+QZSS
- 并发接收星系数量:4+QGNSS
- SBAS:WAAS、EGNOS、MSAS、GAGAN
- 功能:RTK
- 水平定位精度
- 自主定位:1m
- RTK:5cm+1ppm
- 速度精度:0.03m/s
- 1pps精度:20ns
- RTK收敛时间:RTK<10s
- 灵敏度
- 捕获:-145dBm
- 跟踪:-165dBm
- 重捕获:-157dBm
- 动态性能
- 最高海拔:10000m
- 最大速率:500m/s
- 最大加速度:4g
- 导航更新频率:RTK:1Hz
- 原始数据更新频率:GNSS:1Hz
- 协议:NMEA 0183/RTCM 3.x
- 重量:约380g
- 支持国家和区域:中国、印度、东南亚
6 使用教程
6.1 Arduino IDE使用教程
6.1.1硬件准备
-
GNSS-RTK高精度定位套件 - 4G联网RTK模块、厘米级定位 x1
6.1.2 软件准备
-
Arduino IDE 点击下载Arduino IDE
-
下载并安装4G RTK库
-
CORS账号(根据需要选择合适的平台-常见的有千寻、华测、中国移动、腾讯GNSS、六分科技)
6.1.3 API接口
/**
 * @fn getUTC
 * @brief Get UTC, standard time
 * @return sTim_t type, represents the returned hour, minute and second
 * @retval sTim_t.hour hour
 * @retval sTim_t.minute minute
 * @retval sTim_t.second second
 */
  sTim_t getUTC(void);

/**
 * @fn getDate
 * @brief Get date information, year, month, day
 * @return sTim_t type, represents the returned year, month, day
 * @retval sTim_t.year year
 * @retval sTim_t.month month
 * @retval sTim_t.day day
 */
  sTim_t getDate(void);

/**
 * @fn getLat
 * @brief Get latitude
 * @return sLonLat_t type, represents the returned latitude
 * @retval sLonLat_t.latDD   Latitude degree(0-90)
 * @retval sLonLat_t.latMM   The first and second digits behind the decimal point
 * @retval sLonLat_t.latMMMMM Latitude  The third and seventh digits behind the decimal point
 * @retval sLonLat_t.latitude Latitude value with 7 decimal digits
 * @retval sLonLat_t.latDirection Direction of latitude
 */
  sLonLat_t getLat(void);

/**
 * @fn getLon
 * @brief Get longitude
 * @return sLonLat_t Type, represents the returned longitude
 * @retval sLonLat_t.lonDDD  Longitude degree(0-90)
 * @retval sLonLat_t.lonMM   Longitude  The first and second digits behind the decimal point
 * @retval sLonLat_t.lonMMMMM Longitude The third and seventh digits behind the decimal point
 * @retval sLonLat_t.lonitude Longitude value with 7 decimal digits
 * @retval sLonLat_t.lonDirection Direction of longitude
 */
  sLonLat_t getLon(void);

/**
 * @fn getNumSatUsed
 * @brief Get the number of the used satellite used
 * @return uint8_t type, represents the number of the used satellite
 */
  uint8_t getNumSatUsed(void);

/**
 * @fn getAlt
 * @brief Altitude information
 * @return double type, represents altitude
 */
  double getAlt(void);

/**
 * @fn getSep
 * @brief At the height of geoid
 * @return double
 */
  double getSep(void);

/**
 * @fn getHdop
 * @brief Indicates the horizontal accuracy of positioning
 * @return double
 */
  double getHdop(void);

/**
 * @fn getQuality
 * @brief message Quality
 * @return uint8_t
 */
  uint8_t getQuality(void);

/**
 * @fn getSiteID
 * @brief The site id of differential gps data, commonly used for differential gps positioning
 * @return uint16_t
 */
  uint16_t getSiteID(void);

/**
 * @fn getDifTime
 * @brief The number of seconds in which a differential signal was last received
 * @return double
 */
  double getDifTime(void);

/**
 * @fn getDataFlush
 * @brief Gets whether data is refreshed
 * @return bool
 * @retval True if data is refreshed
 * @retval false if data is not refreshed
 */
  bool getDataFlush(void);

/**
 * @fn setModule
 * @brief Set the Module
 * @param mode 4G or lora
 */
  void setModule(eModuleMode_t mode);

/**
 * @fn getModule
 * @brief Get the Module run mode
 * @return eModuleMode_t
 */
  eModuleMode_t getModule(void);

  /**
   * @fn transmitAT
   * @brief Interface for transparent transmission of gnss commands
   * @return char * return commands
   */
  char * transmitAT(const char* cmd);

/**
 * @fn getGnssMessage
 * @brief Get different types of gps data
 * @param mode eGnssData_t type
 * @return char*
 */
  char * getGnssMessage(eGnssData_t mode);

/**
 * @fn getAllGnss
 * @brief Get GNSS data, call back and receive
 * @return null
 */
  void getAllGnss(void);

/**
 * @fn setModuleBaud
 * @brief Set the Module Baud rate
 * @param baud eModuleBaud_t
 */
  void setModuleBaud(eModuleBaud_t baud);

/**
 * @fn set4gBaud
 * @brief Set the receive 4g Baud rate
 * @param baud eModuleBaud_t
 */
  void set4gBaud(eModuleBaud_t baud);

/**
 * @fn setLoraBaud
 * @brief Set the recevie Lora Baud rate
 * @param baud eModuleBaud_t
 */
  void setLoraBaud(eModuleBaud_t baud);

/**
 * @fn getModuleBaud
 * @brief Get the Module Baud rate
 * @return uint32_t Baud rate of serial communication
 */
  uint32_t getModuleBaud(void);

/**
 * @fn getLoraBaud
 * @brief Get the Lora Baud rate
 * @return uint32_t Baud rate of serial communication
 */
  uint32_t getLoraBaud(void);

/**
 * @fn get4gBaud
 * @brief Get the 4G Baud rate
 * @return uint32_t Baud rate of serial communication
 */
  uint32_t get4gBaud(void);

/**
 * @fn setUserName
 * @brief Set the 4G User Name
 * @param name user name eg:"chw123456789"
 * @param len name length
 */
  void setUserName(const char *name, uint8_t len);

/**
 * @fn setUserPassword
 * @brief Set the 4G User Password
 * @param password eg:"12345678"
 * @param len password length
 */
  void setUserPassword(const char *password, uint8_t len);

/**
 * @fn setServerAddr
 * @brief Set the Server Addr
 * @param addr ip address eg: "192.168.1.1"
 * @param len addr length
 */
  void setServerAddr(const char *addr, uint8_t len);

/**
 * @fn setServerAddr
 * @brief set Mount Point
 * @param point eg:"RTCM33"
 * @param len point length
 */
  void setMountPoint(const char *point, uint8_t len);

/**
 * @fn setPort
 * @brief Set the Port
 * @param port eg: 8002
 */
  void setPort(uint16_t port);

/**
 * @fn connect
 * @brief connect
 * @return String connect state
 */
  String connect(void);

/**
 * @fn getConnectState
 * @brief get connect state
 * @return true or false
 */
  bool getConnectState(void);

/**
 * @fn reConnect
 * @brief re connect
 */
  void reConnect(void);

/**
 * @fn setCallback
 * @brief Set callback function type
 * @param  call function name
 * @return null
 */
  void setCallback(void (*call)(char *, uint8_t));
6.1.4 使用I2C读取数据NMEA数据
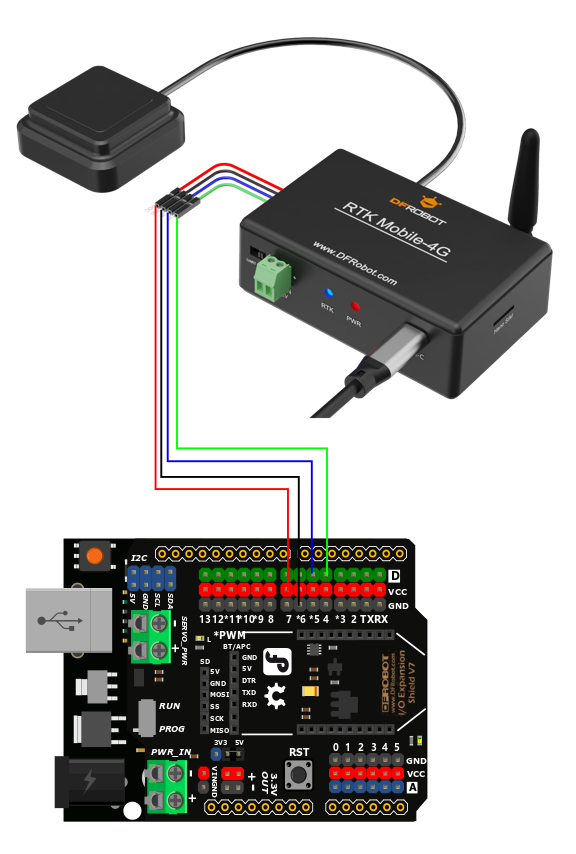
接线图
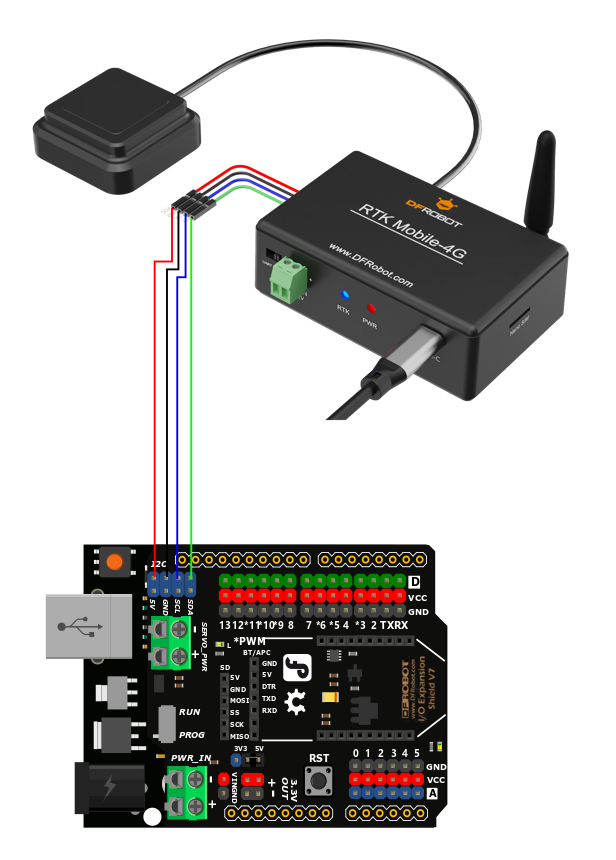
- 将产品取出,按照上图方式移动站与Arduino按照上方的连线图相连
- 将移动站上的选择开关,拨到I2C一侧。
- 下载并安装RTK库如何安装库?
- 购买CORS账号,修改CORS账号、密码、服务器地址、挂载点、端口号,需自行修改
#define  USER_NAME      "xxx"
#define  USER_PASSWORD  "xxxx"
#define  SERVER_ADDR    "xxx.x.xxx.xxx"
#define  MOUNT_POINT    "RTCMxx"
uint16_t port = 8002;
- 上传代码
将设备至于户外空旷地带,打开Arduino IDE的串口监控视器,把波特率调至115200,观察串口打印结果
 /*!
  * @file  getAllGnss4G.ino
  * @brief read all rtk data at 4G mode
  * @copyright Copyright (c) 2010 DFRobot Co.Ltd (http://www.dfrobot.com)
  * @license The MIT License (MIT)
  * @author ZhixinLiu(zhixin.liu@dfrobot.com)
  * @version V0.5.0
  * @date 2024-10-28
  * @url https://github.com/DFRobot/DFRobot_RTK_4G
  */

#include "DFRobot_RTK_4G.h"

void callback(char *data, uint8_t len)
{
  for(uint8_t i = 0; i < len; i++){
    Serial.print((char)data[i]);
  }
}

#define I2C_COMMUNICATION  //use I2C for communication, but use the serial port for communication if the line of codes were masked

#ifdef  I2C_COMMUNICATION
  DFRobot_RTK_4G_I2C rtk(&Wire ,DEVICE_ADDR);
#else
/* -----------------------------------------------------------------------------------------------------
 * |  Sensor  | Connect line | Leonardo/Mega2560/M0 |    UNO    | ESP8266 | ESP32 |  microbit  |   m0  |
 * |   VCC    |=============>|        VCC           |    VCC    |   VCC   |  VCC  |     X      |  vcc  |
 * |   GND    |=============>|        GND           |    GND    |   GND   |  GND  |     X      |  gnd  |
 * |   RX     |=============>|     Serial1 TX1      |     5     |   5/D6  |  D2   |     X      |  tx1  |
 * |   TX     |=============>|     Serial1 RX1      |     4     |   4/D7  |  D3   |     X      |  rx1  |
 * ----------------------------------------------------------------------------------------------------*/
/* Baud rate cannot be changed  */
  #if defined(ARDUINO_AVR_UNO) || defined(ESP8266)
    SoftwareSerial mySerial(4, 5);
    DFRobot_RTK_4G_UART rtk(&mySerial, 57600);
  #elif defined(ESP32)
    DFRobot_RTK_4G_UART rtk(&Serial1, 115200 ,/*rx*/D2 ,/*tx*/D3);
  #else
    DFRobot_RTK_4G_UART rtk(&Serial1, 115200);
  #endif
#endif


#define  USER_NAME      "maplays7874"
#define  USER_PASSWORD  "79546"
#define  SERVER_ADDR    "103.45.160.41"
#define  MOUNT_POINT    "RTCM33GRCEJpro"
uint16_t port = 8002;
String   result = "";

void setup()
{
  Serial.begin(115200);
  while(!rtk.begin()){
    Serial.println("NO Deivces !");
    delay(1000);
  }
  Serial.println("Device connected !");

  rtk.setModule(eMoudle4g);
  while(rtk.getModule() != eMoudle4g){
    Serial.println("Module type is not 4G!  please wait!");
    delay(1000);
  }
  rtk.setUserName(USER_NAME, strlen(USER_NAME));
  rtk.setUserPassword(USER_PASSWORD, strlen(USER_PASSWORD));
  rtk.setServerAddr(SERVER_ADDR, strlen(SERVER_ADDR));
  rtk.setMountPoint(MOUNT_POINT, strlen(MOUNT_POINT));
  rtk.setPort(port);
  Serial.println("please wait 4g module init!");
  Serial.println("connecting network please wait !");
  result = rtk.connect();
  if((String)"CONNECT SUCCESSFUL" == result){
    Serial.println("connect success");
  }else{
    Serial.println(result);
  }

  rtk.setCallback(callback);
}

void loop()
{
  // Please note that there is no judgment of timeout reconnection for the 4G module here
  rtk.getAllGnss();
  if(!rtk.getConnectState()){
    Serial.println("restart connect .....");
    rtk.reConnect();
  }
}
更多数据分析 参考NMEA 0183数据解析 2.2. Standard Messages部分
6.1.5 使用UART读取解析后的数据
6.1.5.1 修改波特率
注:如使用UNO,需要使用库文件里面的configparam例程,需先调到I2C模式配置移动站模块波特率修改为57600,使用如MEGA2560、ESP32等UART接口无需修改波特率
接线图
-
将模块与Arduino按照上方的连线图相连
-
将传感器上的选择开关,拨到I2C一侧。
-
下载并安装库文件
-
打开Arduino IDE,将下面的代码上传到Arduino UNO。
-
打开Arduino IDE的串口监控视器,把波特率调至57600,观察串口打印结果。
-
注:配置模式只支持I2C模式,运行该示例需拨到I2C
参数配置样例代码
/*!
* @file configParam.ino
* @brief config moudle param
* @copyright Copyright (c) 2010 DFRobot Co.Ltd (http://www.dfrobot.com)
* @license The MIT License (MIT)
* @author ZhixinLiu(zhixin.liu@dfrobot.com)
* @version V0.5.0
* @date 2024-04-24
* @url https://github.com/DFRobot/DFRobot_RTK_LoRa
*/
#include "DFRobot_RTK_LoRa.h"
// must use iic config parameter
DFRobot_RTK_LoRa_I2C rtk(&Wire ,DEVICE_ADDR);
void setup()
{
Serial.begin(115200);
while(!rtk.begin()){
Serial.println("NO Deivces !");
delay(1000);
}
Serial.println("Device connected !");
/**
* | Support Baud | UNO/ESP8266 | Leonardo/Mega2560 | ESP32 | M0 |
* | eBaud9600 | √ | √ | √ | √ |
* | eBaud14400 | √ | √ | √ | √ |
* | eBaud19200 | √ | √ | √ | √ |
* | eBaud38400 | √ | √ | √ | √ |
* | eBaud56000 | √ | √ | √ | √ |
* | eBaud57600 | √ | √ | √ | √ |
* | eBaud115200 | | √ | √ | √ |
* | eBaud256000 | | | √ | √ |
* | eBaud512000 | | | √ | √ |
* | eBaud921600 | | | √ | √ |
*/
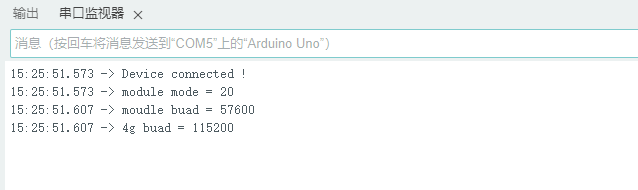
rtk.setModuleBaud(eBaud115200);
Serial.print("module mode = ");
Serial.println(rtk.getModule());
Serial.print("moudle buad = ");
Serial.println(rtk.getModuleBaud());
}
void loop()
{
// Reserved interface, direct communication with gnss firmware, use with the original factory data manual
Serial.println(rtk.transmitAT("$PQTMVERNO*58\r\n"));
delay(2000);
}
打开串口监视器,按下复位按钮查看当前通信波特率
6.1.5.2 UART模式获取经纬度和定位状态
接线图
- 将产品取出,按照上图方式移动站与Arduino按照上方的连线图相连
- 将移动站上的选择开关,拨到UART一侧。
- 下载并安装RTK库如何安装库?
- 购买CORS账号,修改CORS账号、密码、服务器地址、挂载点、端口号,需自行修改
#define  USER_NAME      "xxx"
#define  USER_PASSWORD  "xxxx"
#define  SERVER_ADDR    "xxx.x.xxx.xxx"
#define  MOUNT_POINT    "RTCMxx"
uint16_t port = 8002;
- 上传代码
将设备至于户外空旷地带,打开Arduino IDE的串口监控视器,把波特率调至115200,观察串口打印结果
 /*!
  * @file  getGnss4G.ino
  * @brief Get gnss simple data at 4G mode
  * @copyright Copyright (c) 2010 DFRobot Co.Ltd (http://www.dfrobot.com)
  * @license The MIT License (MIT)
  * @author ZhixinLiu(zhixin.liu@dfrobot.com)
  * @version V0.5.0
  * @date 2024-10-28
  * @url https://github.com/DFRobot/DFRobot_RTK_4G
  */

#include "DFRobot_RTK_4G.h"

#define I2C_COMMUNICATION  //use I2C for communication, but use the serial port for communication if the line of codes were masked

#ifdef  I2C_COMMUNICATION
  DFRobot_RTK_4G_I2C rtk(&Wire ,DEVICE_ADDR);
#else
/* -----------------------------------------------------------------------------------------------------
 * |  Sensor  | Connect line | Leonardo/Mega2560/M0 |    UNO    | ESP8266 | ESP32 |  microbit  |   m0  |
 * |   VCC    |=============>|        VCC           |    VCC    |   VCC   |  VCC  |     X      |  vcc  |
 * |   GND    |=============>|        GND           |    GND    |   GND   |  GND  |     X      |  gnd  |
 * |   RX     |=============>|     Serial1 TX1      |     5     |   5/D6  |  D2   |     X      |  tx1  |
 * |   TX     |=============>|     Serial1 RX1      |     4     |   4/D7  |  D3   |     X      |  rx1  |
 * ----------------------------------------------------------------------------------------------------*/
/* Baud rate cannot be changed */
  #if defined(ARDUINO_AVR_UNO) || defined(ESP8266)
    SoftwareSerial mySerial(4, 5);
    DFRobot_RTK_4G_UART rtk(&mySerial, 57600);
  #elif defined(ESP32)
    DFRobot_RTK_4G_UART rtk(&Serial1, 115200 ,/*rx*/D2 ,/*tx*/D3);
  #else
    DFRobot_RTK_4G_UART rtk(&Serial1, 115200);
  #endif
#endif

#define  USER_NAME      "chwj068746"
#define  USER_PASSWORD  "16409678"
#define  SERVER_ADDR    "119.3.136.126"
#define  MOUNT_POINT    "RTCM33"
uint16_t port = 8002;
String   result = "";
void setup()
{
  Serial.begin(115200);
  while(!rtk.begin()){
    Serial.println("NO Deivces !");
    delay(1000);
  }
  Serial.println("Device connected !");
  rtk.setModule(eMoudle4g);
  while(rtk.getModule() != eMoudle4g){
    Serial.println("Module type is not 4G!  please wait!");
    delay(1000);
  }

  rtk.setUserName(USER_NAME, strlen(USER_NAME));
  rtk.setUserPassword(USER_PASSWORD, strlen(USER_PASSWORD));
  rtk.setServerAddr(SERVER_ADDR, strlen(SERVER_ADDR));
  rtk.setMountPoint(MOUNT_POINT, strlen(MOUNT_POINT));
  rtk.setPort(port);
  Serial.println("please wait 4g module init!");
  Serial.println("connecting network please wait !");
  result = rtk.connect();
  if((String)CONNECT_SUCCESS == result){
    Serial.println("connect success");
  }else{
    Serial.println(result);
  }

}

void loop()
{
  bool state = rtk.getDataFlush();
  if(state == true){
    sTim_t utc = rtk.getUTC();
    sTim_t date = rtk.getDate();
    sLonLat_t lat = rtk.getLat();
    sLonLat_t lon = rtk.getLon();
    double high = rtk.getAlt();
    uint8_t starUserd = rtk.getNumSatUsed();
    double hdop = rtk.getHdop();
    double sep = rtk.getSep();
    uint8_t mode = rtk.getQuality();
    uint16_t siteID = rtk.getSiteID();
    double diftime = rtk.getDifTime();

    Serial.println("");
    Serial.print(date.year);
    Serial.print("/");
    Serial.print(date.month);
    Serial.print("/");
    Serial.print(date.date);
    Serial.print("/");
    Serial.print(utc.hour);
    Serial.print(":");
    Serial.print(utc.minute);
    Serial.print(":");
    Serial.print(utc.second);
    Serial.println();
    Serial.println((char)lat.latDirection);
    Serial.println((char)lon.lonDirection);

    // Serial.print("lat DDMM.MMMMM = ");
    // Serial.println(lat.latitude, 5);
    // Serial.print(" lon DDDMM.MMMMM = ");
    // Serial.println(lon.lonitude, 5);
    Serial.print("lat degree = ");
    Serial.println(lat.latitudeDegree,6);
    Serial.print("lon degree = ");
    Serial.println(lon.lonitudeDegree,6);

    Serial.print("star userd = ");
    Serial.println(starUserd);
    Serial.print("alt high = ");
    Serial.println(high);
    Serial.print("sep  = ");
    Serial.println(sep);

    Serial.print("hdop = ");
    Serial.println(hdop);
    Serial.print("message mode  = ");
    Serial.println(mode);
    Serial.print("siteID = ");
    Serial.println(siteID);
    Serial.print("diftime = ");
    Serial.println(diftime);
    Serial.println(rtk.getGnssMessage(eGGA));
    Serial.println(rtk.getGnssMessage(eRMC));
    Serial.println(rtk.getGnssMessage(eGLL));
    Serial.println(rtk.getGnssMessage(eVTG));
  }
  if(!rtk.getConnectState()){
    Serial.println("restart connect .....");
    rtk.reConnect();
  }
  delay(800);
}
结果和解析
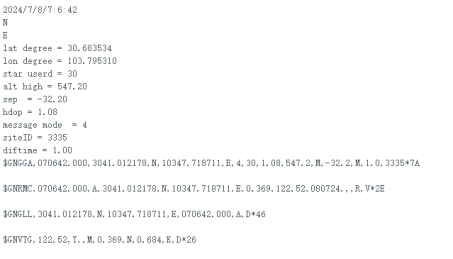
| 数据 | 含义 | 备注 |
|---|---|---|
| N | 北纬 | 纬度半球 |
| E | 东经 | 经度半球 |
| lat degree | 纬度 | |
| lon degree | 经度 | |
| star | 移动站搜索到的卫星数量 | 包含GNSS,GPS,GLONASS,Galileo,BDS |
| alt high | 海拔高度 | GNSS天线相当于海平面 |
| sep | 大地水准面与WGS84椭球面的高度差 (米) | 正值:大地水准面高于椭球面;负值:大地水准面低于椭球面 |
| hdop | 水平精度因子 | 值越小精度越高 |
| message mode | 定位状态 | 1=GPS定位;2=差分定位;4=RTK固定解;5=RTK浮点解 |
| siteID | 差分参考站ID | 仅RTK固定解或浮点解有效 |
| diftime | 数据差分龄期 | 仅RTK固定解或浮点解有效 |
| $GNGGA | NMEA数据 | 请参考 NMEA 0183数据解析部分 |
| $GNRMC | NMEA数据 | 请参考 NMEA 0183数据解析部分 |
| $GNGLL | NMEA数据 | 请参考 NMEA 0183数据解析部分 |
| $GNVTG | NMEA数据 | 请参考 NMEA 0183数据解析部分 |
6.2 树莓派4B使用教程
6.2.1 硬件准备
- 树莓派4B主控板
- DFR0566 树莓派4B/3B+ IO扩展板
- GNSS-RTK高精度定位套件 - 4G联网RTK模块、厘米级定位
6.2.2 软件准备
- Raspberry Pi Imager
- DFRobot_RTK_LoRa库文件
- CORS账号(根据需要选择合适的平台-常见的有千寻、华测、中国移动、腾讯GNSS、六分科技)
6.2.3 I2C使用教程
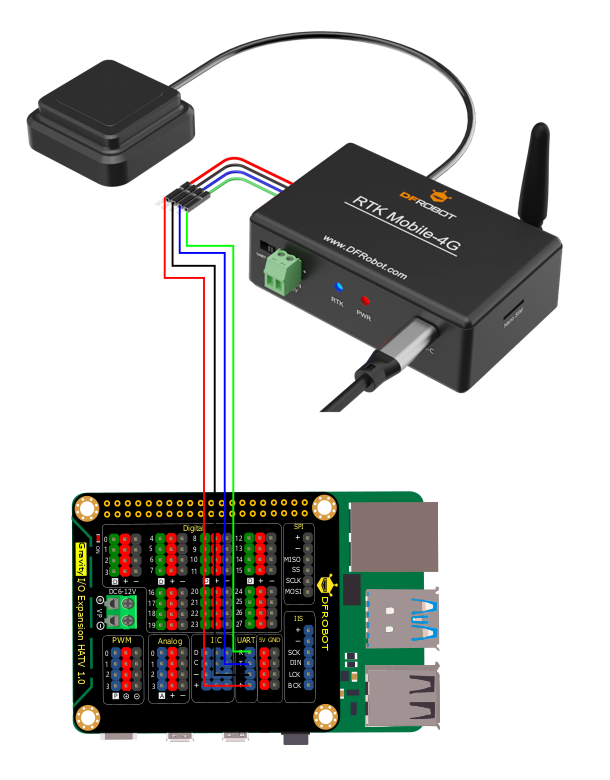
接线图
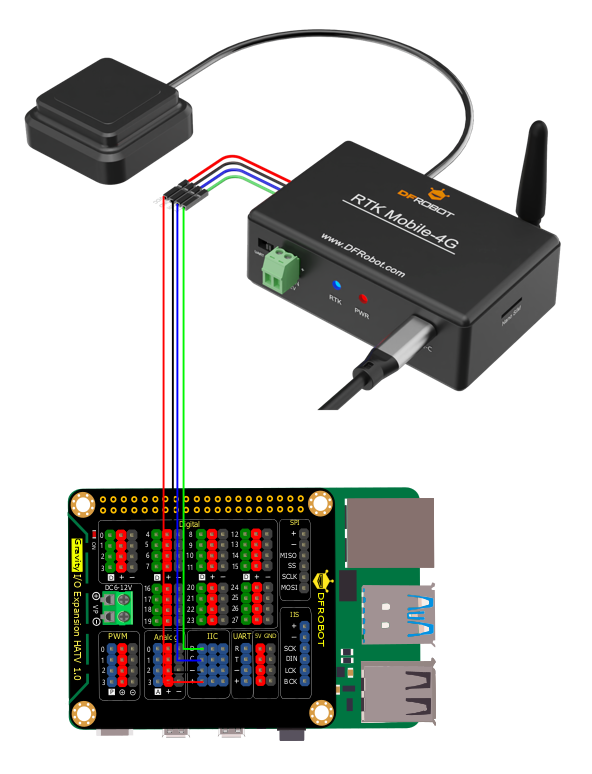
使用前,请先确认I2C速率为400k,配置如下
sudo vi /boot/firmware/config.txt        //修改配置文件
sudo reboot                              //修改保存后重启树莓派生效

若已存在dtparam=i2c_arm=on,直接添加i2c_arm_baudrate=400000
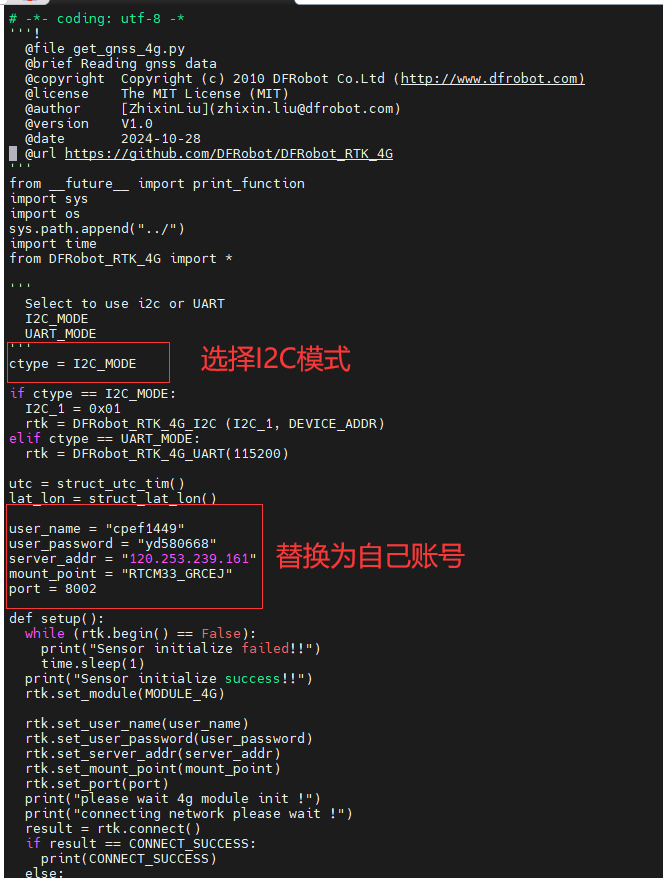
**下载库文件并运行,默认为I2C模式
将硬件拨码开关拨到I2C模式,注意:波动拨码开关时设备时上电状态,请拨码后断电重启设备以生效。
	##新建文件获取库文件
	cd ~
	cd Desktop
	mkdir df                                                         ##创建文件夹
	cd df															##切换到文件夹
	git clone https://github.com/cdjq/DFRobot_RTK_4G.git            ##获取库文件
	cd DFRobot_RTK_4G/python/raspberrypi/examples				  ##切换到例程文件
	sudo python3 get_gnss.py
6.2.4 UART教程
接线图
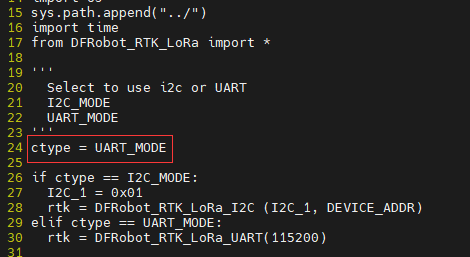
- 修改为UART模式
	##新建文件获取库文件
	cd ~
	cd Desktop
	mkdir df                                                         ##创建文件夹
	cd df															##切换到文件夹
	git clone https://github.com/cdjq/DFRobot_RTK_4G.git            ##获取库文件
	cd DFRobot_RTK_4G/python/raspberrypi/examples				  ##切换到例程文件
	sudo vi get_gnss.py       ##选择要运行的程序修改为UART模式
将硬件拨码开关拨到UART模式,注意:波动拨码开关时设备时上电状态,请拨码后断电重启设备以生效。
sudo python3 get_gnss.py
7. 使用注意事项
1. 使用时,单独通过Gravity接口供电,可能会出现4G模块供电不足的情况导致4G模块部分通讯失败,建议使用Type-C接口或接线柱额外供电。- 由于室内卫星信号弱,且遮挡严重地方会影响天线搜星质量,故只能用于室外相对开阔地带使用。
3.首次上电由于4G模块初始化和GNSS天线搜星需要一个过程,因此上电需等待几分钟才能获取到RTK定位信息。
4.切换I2C/UART输出模式时,需要断电重新上电才生效