简介
本款实时时钟模块(RTC)采用SD3031芯片方案,芯片内部集成了晶振和温度补偿器,因此拥有很高的计时精度和稳定性。在25℃计时精度为±3.8ppm (±0.32832秒/天)。
SD3031可以用纽扣电池供电,断开主电源时仍可保持精确计时。RTC可提供秒、分、时、星期、日、月和年的信息,可以自动调整月末的日期、闰年修正。SD3031内置70Byte SRAM可用于低功耗储存数据。
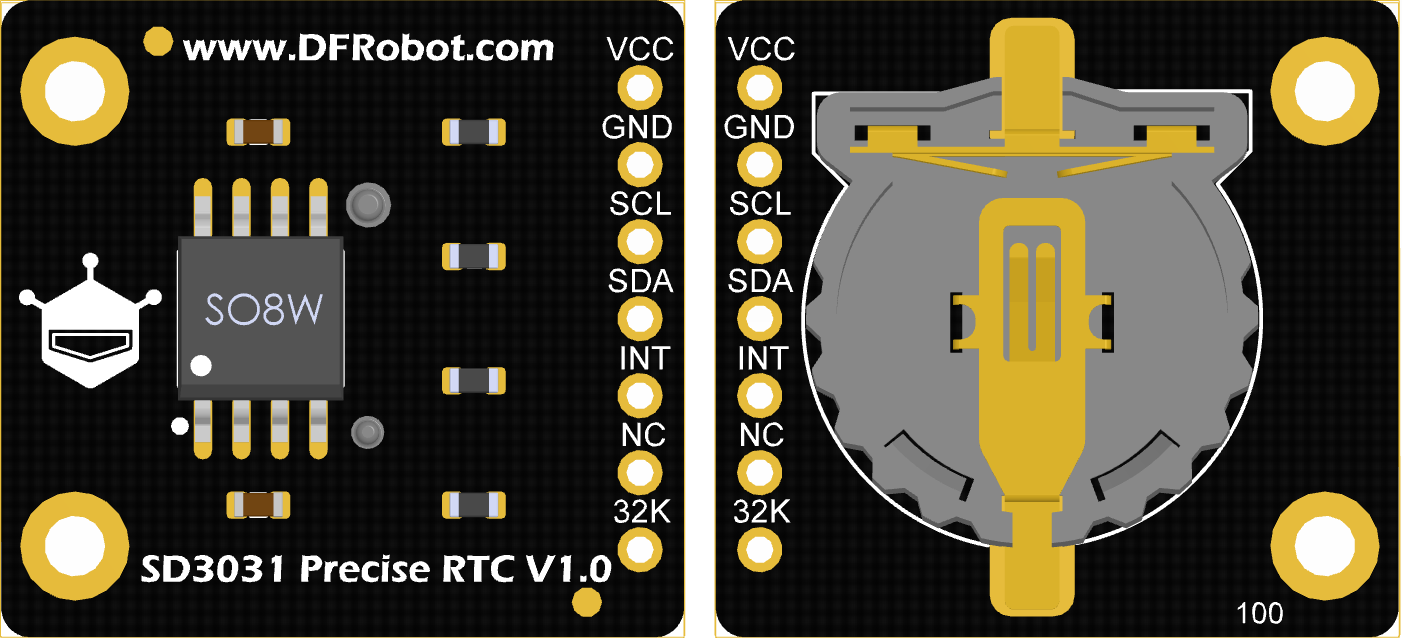
注意:由于最新的航空货运规定,电池,磁体,液体等特殊物品的运输审核会变得非常严格,故RTC模块不配电池,请在当地购买。模块使用的纽扣电池型号为CR1220。
特性
- 低功耗,纽扣电池供电工作电流仅为1.8uA
- 高精度,±3.8ppm@25℃
- 内部集成温度补偿器,温度漂移小
- 可读取纽扣电池电压
- 内置70Byte SRAM
应用场景
- 事件提醒器
- 倒计时设备
- MCU外部唤醒源
- 时钟、闹钟输出
- 物联网数据采集存储
技术规格
- 供电电压:3.3V-5.5V
- I2C地址:0x32
- SRAM:70 Byte (0x2C~0x71)
- 计时范围:2000 ~ 2099年
- 工作温度:-10℃ ~ +70℃
- 计时精度:±3.8ppm @ 25℃
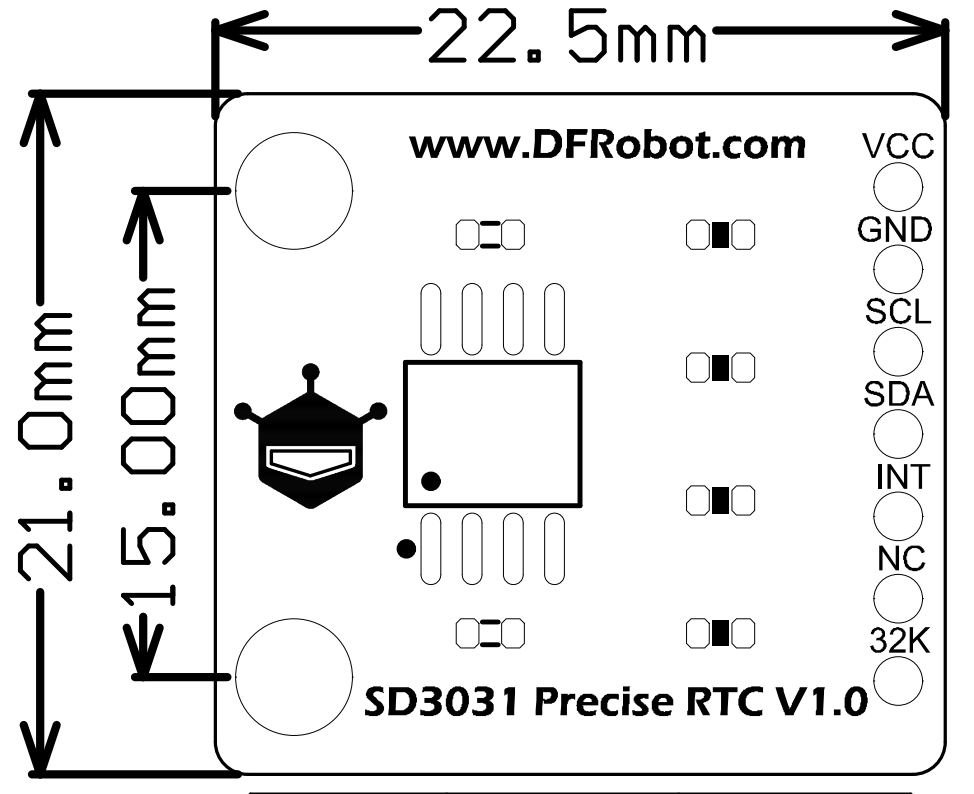
- 产品尺寸:22.5*21mm
引脚说明
引脚说明
| 序号 | 丝印 | 功能描述 |
| 1 | VCC | 电源正极 |
| 2 | GND | 电源负极 |
| 3 | SCL | I2C时钟线 |
| 4 | SDA | I2C数据线 |
| 5 | INT | 低电平有效中断或1Hz方波输出 |
| 6 | NC | NC |
| 7 | 32K | 32.768KHz脉冲输出 |
Arduino使用教程
准备
- 硬件
- 1 x Arduino UNO控制板
- 1 x Fermion: SD3031实时时钟模块
- 若干 杜邦线
- 软件
- Arduino IDE, 点击下载Arduino IDE
- SD3031库文件和示例程序
关于如何安装库文件,点击链接
接线图
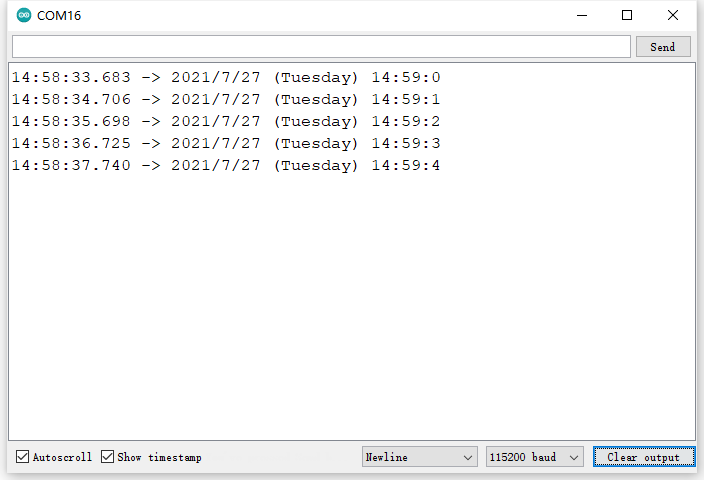
样例代码1 - 设置与读取时间
在VCC供电时温度每60S更新一次,在电池供电时温度每600S更新一次
/*!
 * @file getTime.ino
 * @brief 运行这个例程,先设置内部时钟,在循环获取时钟和温度电压数据
 * @copyright    Copyright (c) 2010 DFRobot Co.Ltd (http://www.dfrobot.com)
 * @license      The MIT License (MIT)
 * @author       [TangJie](jie.tang@dfrobot.com)
 * @version      V1.0.0
 * @date         2022-07-27
 * @url         https://github.com/DFRobot/DFRobot_SD3031
 */
#include "DFRobot_SD3031.h"

DFRobot_SD3031 rtc;
void setup()
{
    Serial.begin(115200);
    /*Wait for the chip to be initialized completely, and then exit*/
    while(rtc.begin() != 0){
        Serial.println("Failed to init chip, please check if the chip connection is fine. ");
        delay(1000);
    }
    rtc.setHourSystem(rtc.e24hours);//设置显示格式
    rtc.setTime(2021,7,27,14,59,0);//初始化时间
    // //获取内部温度
    // Serial.print(rtc.getTemperatureC());
    // Serial.println(" C");
    // //获取电池电压
    // Serial.print(rtc.getVoltage());
    // Serial.println(" V");
}

void loop()
{

    sTimeData_t sTime;
    sTime = rtc.getRTCTime();
    Serial.print(sTime.year, DEC);//year
    Serial.print('/');
    Serial.print(sTime.month, DEC);//month
    Serial.print('/');
    Serial.print(sTime.day, DEC);//day
    Serial.print(" (");
    Serial.print(sTime.week);//week
    Serial.print(") ");
    Serial.print(sTime.hour, DEC);//hour
    Serial.print(':');
    Serial.print(sTime.minute, DEC);//minute
    Serial.print(':');
    Serial.print(sTime.second, DEC);//second
    Serial.println(' ');
    /*12小时时制启用*/
    // Serial.print(rtc.getAMorPM());
    // Serial.println();
    delay(1000);
}
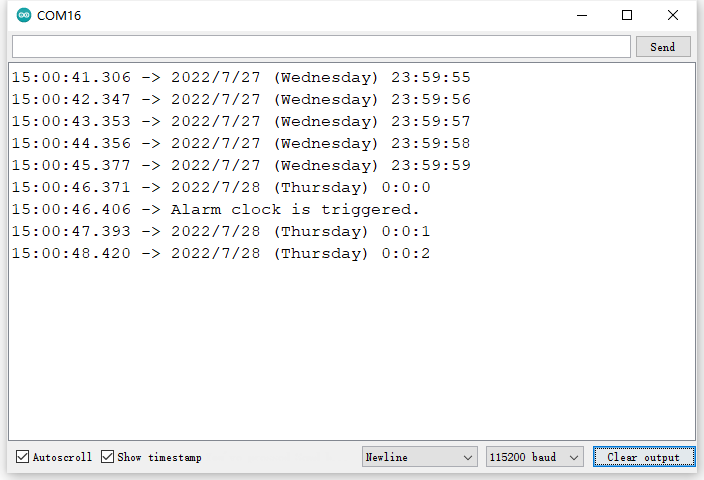
结果
样例代码2 - 中断
/*!
 * @file interrupt.ino
 * @brief 运行这个例程,先设置内部时钟和中断触发,当时间到达定时时间触发中断
 * @copyright    Copyright (c) 2010 DFRobot Co.Ltd (http://www.dfrobot.com)
 * @license      The MIT License (MIT)
 * @author       [TangJie](jie.tang@dfrobot.com)
 * @version      V1.0.0
 * @date         2022-07-27
 * @url         https://github.com/DFRobot/DFRobot_SD3031
 */

#include "DFRobot_SD3031.h"
volatile  int8_t alarmFlag = 0;
DFRobot_SD3031 rtc;

#define PIN 2
void setup()
{
    Serial.begin(115200);
    /*Wait for the chip to be initialized completely, and then exit*/
    while(rtc.begin() != 0){
        Serial.println("Failed to init chip, please check if the chip connection is fine. ");
        delay(1000);
    }
    rtc.setHourSystem(rtc.e24hours);//设置显示格式
    rtc.setTime(2022,7,27,23,59,55);//设置默认时间
    //倒计时、日程报警和每天定时报警不能同时使用
    //rtc.countDown(3);//倒计时
    //rtc.setAlarm(2022,7,28);//设置日程报警
    rtc.setAlarm(rtc.eEveryDay,24,0,0);//设置每天定时报警

    #if defined(ESP32)||defined(ARDUINO_SAM_ZERO)
      attachInterrupt(digitalPinToInterrupt(D7)/*Query the interrupt number of the D6 pin*/,interrupt,FALLING);
    #elif defined(ESP8266)
      attachInterrupt(digitalPinToInterrupt(D5)/*Query the interrupt number of the D6 pin*/,interrupt,FALLING);
    #else
    /*    The Correspondence Table of AVR Series Arduino Interrupt Pins And Terminal Numbers
    * ---------------------------------------------------------------------------------------
    * |                                        |  DigitalPin  | 2  | 3  |                   |
    * |    Uno, Nano, Mini, other 328-based    |--------------------------------------------|
    * |                                        | Interrupt No | 0  | 1  |                   |
    * |-------------------------------------------------------------------------------------|
    * |                                        |    Pin       | 2  | 3  | 21 | 20 | 19 | 18 |
    * |               Mega2560                 |--------------------------------------------|
    * |                                        | Interrupt No | 0  | 1  | 2  | 3  | 4  | 5  |
    * |-------------------------------------------------------------------------------------|
    * |                                        |    Pin       | 3  | 2  | 0  | 1  | 7  |    |
    * |    Leonardo, other 32u4-based          |--------------------------------------------|
    * |                                        | Interrupt No | 0  | 1  | 2  | 3  | 4  |    |
    * |--------------------------------------------------------------------------------------
    */
    /*                      The Correspondence Table of micro:bit Interrupt Pins And Terminal Numbers
    * ---------------------------------------------------------------------------------------------------------------------------------------------
    * |             micro:bit                       | DigitalPin |P0-P20 can be used as an external interrupt                                     |
    * |  (When using as an external interrupt,      |---------------------------------------------------------------------------------------------|
    * |no need to set it to input mode with pinMode)|Interrupt No|Interrupt number is a pin digital value, such as P0 interrupt number 0, P1 is 1 |
    * |-------------------------------------------------------------------------------------------------------------------------------------------|
    */
    attachInterrupt(digitalPinToInterrupt(2), interrupt, FALLING);
    #endif
}

void loop()
{
    sTimeData_t sTime;
    sTime = rtc.getRTCTime();
    Serial.print(sTime.year, DEC);//year
    Serial.print('/');
    Serial.print(sTime.month, DEC);//month
    Serial.print('/');
    Serial.print(sTime.day, DEC);//day
    Serial.print(" (");
    Serial.print(sTime.week);//week
    Serial.print(") ");
    Serial.print(sTime.hour, DEC);//hour
    Serial.print(':');
    Serial.print(sTime.minute, DEC);//minute
    Serial.print(':');
    Serial.print(sTime.second, DEC);//second
    Serial.println(' ');
    /*12小时时制启用*/
    // Serial.print(rtc.getAMorPM());
    // Serial.println();
     if(alarmFlag == 1){
        rtc.clearAlarm();
        alarmFlag = 0;
        Serial.println("Alarm clock is triggered.");
        delay(1000);

    }else{
      delay(1000);
    }
}

void interrupt(void)
{
    alarmFlag = 1;
}
结果
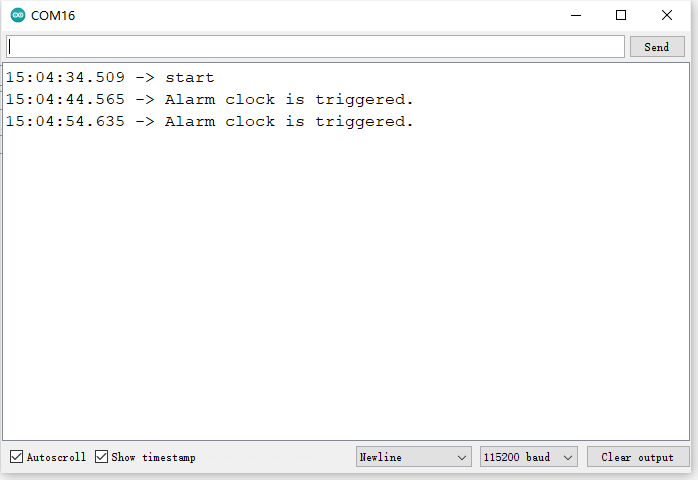
样例代码3 - 倒计时
/*!
 * @file countDown.ino
 * @brief 运行这个例程,实现倒计时功能
 * @copyright    Copyright (c) 2010 DFRobot Co.Ltd (http://www.dfrobot.com)
 * @license      The MIT License (MIT)
 * @author       [TangJie](jie.tang@dfrobot.com)
 * @version      V1.0.0
 * @date         2022-07-27
 * @url         https://github.com/DFRobot/DFRobot_SD3031
 */
#include "DFRobot_SD3031.h"

DFRobot_SD3031 rtc;
volatile  int8_t alarmFlag = 0;
void setup()
{
    Serial.begin(115200);
    /*Wait for the chip to be initialized completely, and then exit*/
    while(rtc.begin() != 0){
        Serial.println("Failed to init chip, please check if the chip connection is fine. ");
        delay(1000);
    }
    #if defined(ESP32)||defined(ARDUINO_SAM_ZERO)
      attachInterrupt(digitalPinToInterrupt(D7)/*Query the interrupt number of the D6 pin*/,interrupt,FALLING);
    #elif defined(ESP8266)
      attachInterrupt(digitalPinToInterrupt(D5)/*Query the interrupt number of the D6 pin*/,interrupt,FALLING);
    #else
    /*    The Correspondence Table of AVR Series Arduino Interrupt Pins And Terminal Numbers
    * ---------------------------------------------------------------------------------------
    * |                                        |  DigitalPin  | 2  | 3  |                   |
    * |    Uno, Nano, Mini, other 328-based    |--------------------------------------------|
    * |                                        | Interrupt No | 0  | 1  |                   |
    * |-------------------------------------------------------------------------------------|
    * |                                        |    Pin       | 2  | 3  | 21 | 20 | 19 | 18 |
    * |               Mega2560                 |--------------------------------------------|
    * |                                        | Interrupt No | 0  | 1  | 2  | 3  | 4  | 5  |
    * |-------------------------------------------------------------------------------------|
    * |                                        |    Pin       | 3  | 2  | 0  | 1  | 7  |    |
    * |    Leonardo, other 32u4-based          |--------------------------------------------|
    * |                                        | Interrupt No | 0  | 1  | 2  | 3  | 4  |    |
    * |--------------------------------------------------------------------------------------
    */
    /*                      The Correspondence Table of micro:bit Interrupt Pins And Terminal Numbers
    * ---------------------------------------------------------------------------------------------------------------------------------------------
    * |             micro:bit                       | DigitalPin |P0-P20 can be used as an external interrupt                                     |
    * |  (When using as an external interrupt,      |---------------------------------------------------------------------------------------------|
    * |no need to set it to input mode with pinMode)|Interrupt No|Interrupt number is a pin digital value, such as P0 interrupt number 0, P1 is 1 |
    * |-------------------------------------------------------------------------------------------------------------------------------------------|
    */
    attachInterrupt(digitalPinToInterrupt(2), interrupt, CHANGE);
    #endif
    rtc.countDown(10);
    Serial.println("start");
}

void loop()
{
    if(alarmFlag == 1){
        rtc.countDown(10);
        alarmFlag = 0;
        Serial.println("Alarm clock is triggered.");
    }
}
void interrupt(void)
{
    alarmFlag = 1;
}
结果
样例代码4 - 读写SRAM
/*!
 * @file getTimeAndTemperature.ino
 * @brief 运行这个例程,对RTC模块中RAM数据进行读写
 * @copyright    Copyright (c) 2010 DFRobot Co.Ltd (http://www.dfrobot.com)
 * @license      The MIT License (MIT)
 * @author       [TangJie](jie.tang@dfrobot.com)
 * @version      V1.0.0
 * @date         2022-07-27
 * @url         https://github.com/DFRobot/DFRobot_SD3031
 */
#include "DFRobot_SD3031.h"

DFRobot_SD3031 rtc;
void setup()
{
    uint8_t data= 0;
    Serial.begin(115200);
    /*Wait for the chip to be initialized completely, and then exit*/
    while(rtc.begin() != 0){
        Serial.println("Failed to init chip, please check if the chip connection is fine. ");
        delay(1000);
    }
    rtc.writeSRAM(0x2D,2);//地址范围 0x2c~0x71
    delay(1000);
    data = rtc.readSRAM(0x2D);
    Serial.print("data:");
    Serial.println(data);
    delay(100);
    rtc.clearSRAM(0x2D);
    delay(100);
    data = rtc.readSRAM(0x2D);
    Serial.print("data:");
    Serial.println(data);
}

void loop()
{
    delay(1000);
}
结果
样例代码5 - 32K方波输出
/*!
 * @file control32k.ino
 * @brief 运行这个例程,控制32K引脚输出方波
 * @copyright    Copyright (c) 2010 DFRobot Co.Ltd (http://www.dfrobot.com)
 * @license      The MIT License (MIT)
 * @author       [TangJie](jie.tang@dfrobot.com)
 * @version      V1.0.0
 * @date         2022-07-27
 * @url         https://github.com/DFRobot/DFRobot_SD3031
 */
#include "DFRobot_SD3031.h"

DFRobot_SD3031 rtc;
void setup()
{
    uint8_t data= 0;
    Serial.begin(115200);
    /*Wait for the chip to be initialized completely, and then exit*/
    while(rtc.begin() != 0){
        Serial.println("Failed to init chip, please check if the chip connection is fine. ");
        delay(1000);
    }

    rtc.enable32k();
    delay(1000);
    rtc.disable32k();
}

void loop()
{
    delay(1000);
}
主要API接口函数列表
  /**
   * @struct sTimeData_t
   * @brief 存储时间数据得结构体
   */
  typedef struct{
    uint16_t year;
    uint8_t  month;
    uint8_t  day;
    String   week;
    uint8_t  hour;
    uint8_t minute;
    uint8_t second;
  }sTimeData_t;

  /**
   * @fn getRTCTime
   * @brief 获取时钟模块中的年
   * @return 返回获取的年份
   */
  sTimeData_t getRTCTime(void);

  /**
   * @fn getAMorPM
   * @brief output AM or PM of time
   * @return AM or PM, 24 hours mode return empty string
   */
  String getAMorPM();

  /**
   * @brief 设置时钟是24小时制还是12小时制
   * @param mode 时钟计算方式
   */
  void setHourSystem(eHours_t mode){ _mode = mode; };

  /**
   * @fn setTime
   * @brief Set time into rtc and take effect immediately
   * @param year 2000~2099
   * @param month 1~12
   * @param day 1~31
   * @param week 0~6
   * @param hour 0~23
   * @param minute 0~59
   * @param second 0~59
   * @return None
   */
  void setTime(uint16_t year, uint8_t month, uint8_t day, uint8_t hour, uint8_t minute, uint8_t second);

  /**
   * @fn setAlarm
   * @brief 设置触发报警的数据
   * @param year 2000~2099
   * @param month 1~12
   * @param day 1~31
   * @return None
   */
  void setAlarm(uint16_t year, uint8_t month, uint8_t day);

  /**
   * @enum eWeek_t
   * @brief 星期枚举定义
   */
  typedef enum{
    eSunday    = 0x01,
    eMonday    = 0x02,
    eTuesday   = 0x04,
    eWednesday = 0x08,
    eThursday  = 0x10,
    eFriday    = 0x20,
    eSaturday  = 0x40,
    eEveryDay  = 0x7f,
    eWorkday   = 0x3e,
  }eWeek_t;

  /**
   * @fn setAlarm
   * @brief Set the Alarmnumber object
   * @param week
   * @n ---------------------------------------------------------------------------------------------------------
   * @n |    bit7    |    bit6    |    bit5    |    bit4    |    bit3    |    bit2    |    bit1    |    bit0    |
   * @n ---------------------------------------------------------------------------------------------------------
   * @n |            |  Saturday  |  Friday    |  Thursday  | Wednesday  |  Tuesday   |  Monday    |  Sunday    |
   * @n ---------------------------------------------------------------------------------------------------------
   * @param hour 0~23
   * @param minute 0~59
   * @param second 0~59
   */
  void setAlarm(uint8_t week,uint8_t hour, uint8_t minute, uint8_t second);
常见问题
还没有客户对此产品有任何问题,欢迎通过qq或者论坛联系我们!
更多问题及有趣的应用,可以 访问论坛 进行查阅或发帖。
