简介
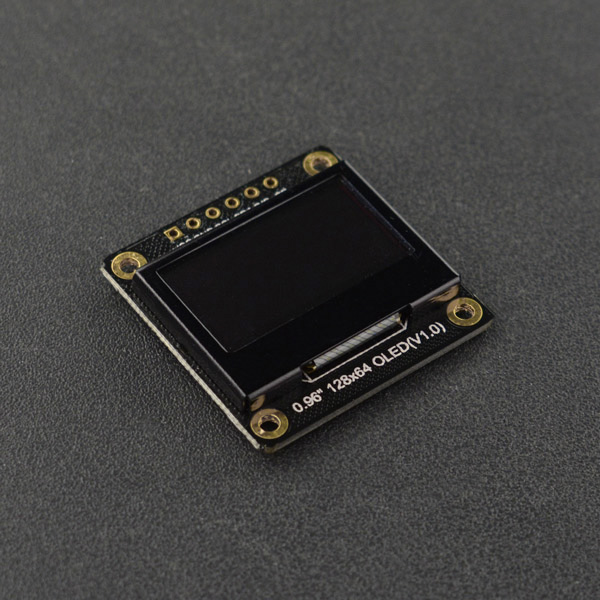
0.96"OLED是一款无需任何背景,自发光式的显示模块,驱动芯片为SSD1306,其分辨率为12864,具有IIC/SPI两种通信方式。
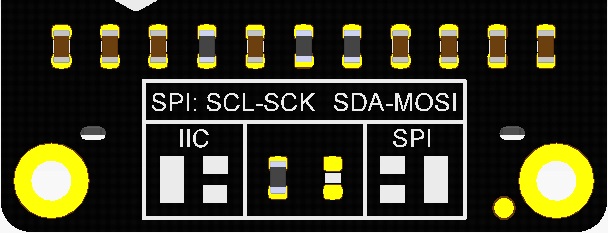
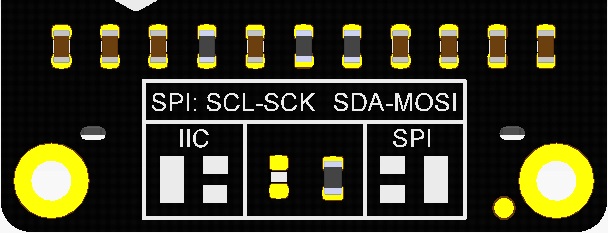
不用担心通信方式的选择,我们默认的通信方式是IIC(地址为0x3C),当您需要使用SPI接口通信时,只需要改变一个0欧姆电阻位置即可。
支持上电复位,所以未引出Res引脚。这样一款Breakout显示模块,当您焊接好排针后,可以与面包板完美结合。
另外显示屏采用了铝合金外框封装,在保护屏幕不受损伤的同时,也能防止您在使用过程中,不被屏幕的玻璃边缘划伤。
产品参数
- 工作电压:3.3V~5V
- 显示颜色:白色像素点
- 像素个数:128列 × 32行
- 接口方式:I2C
- 驱动芯片:SSD1306
- 亮度:180 (Typ) cd/m2
- 全屏点亮功耗:(IIC)约24mA3.3V/5V;(SPI)约27mA3.3V/5V
- 全屏熄灭功耗:(IIC)约2mA3.3V/5V;(SPI)约2.87mA3.3V/5V
- 工作温度:-30℃~+70℃
- 显示面积:22.38×5.58 mm
- 安装孔直径:2 mm
- 尺寸:30x30 mm
- 重量:4.2 g
本产品配送了2.54排针,默认P数均≥10P,如P数超过你的使用需求,请自行使用钳子掰断。
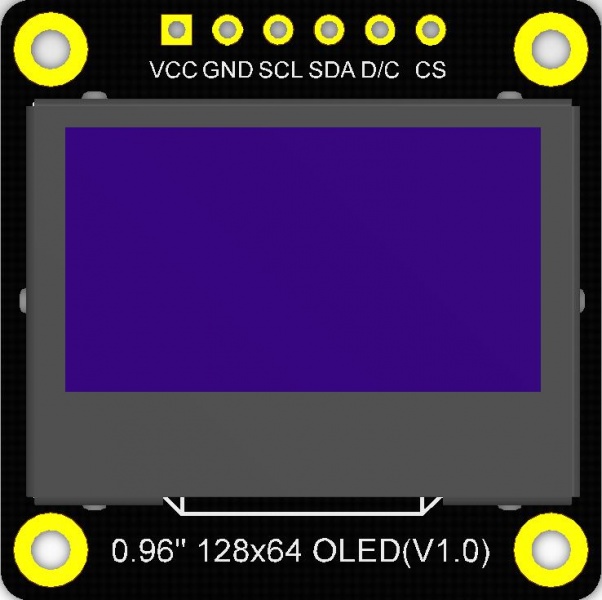
引脚说明
| 标号 | 名称 | 功能描述 |
|---|---|---|
| 1 | VCC | 电源正极 |
| 2 | GND | 电源负极 |
| 3 | SCL | IIC/SPI时钟线 |
| 4 | SDA | IIC/SPI数据线 |
| 5 | D/C | SPI数据/吗命令 |
| 6 | CS | SPI片选线 |
使用教程
注意:
1.IIC地址为0x3C
2.建议使用Arduino1.8.9及以上版本
3.在焊接时,尽量让焊盘上的排针或者排线与安装孔保持距离。
准备
- 硬件
- 1 x Arduino UNO控制板
- 1 x 0.96" 128x64 I2C/SPI OLED
- 若干杜邦线
- 软件
- Arduino IDE, 点击下载Arduino IDE
- 0.96" 128x64 I2C/SPI OLED u8g2库文件和示例程序
- 0.96" 128x64 I2C/SPI OLED DFRobot_GDL库文件和示例程序(暂未发布)
关于如何安装库文件,点击链接
u8g2 API接口函数,点击链接了解详情
u8g2 字体参数列表,点击链接了解详情
DFRobot_GDL API接口函数,点击链接了解详情
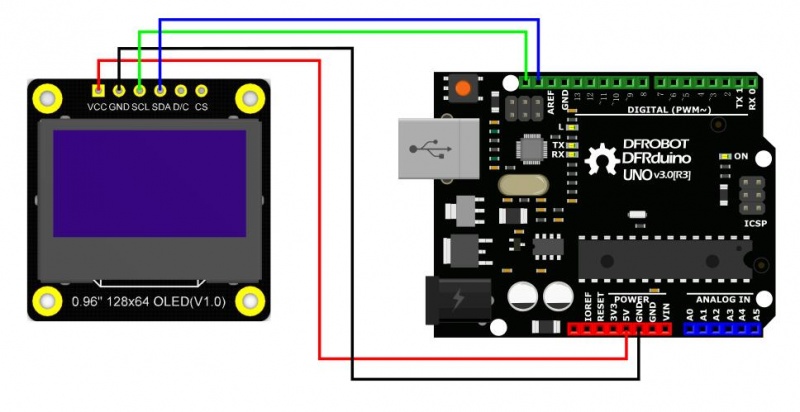
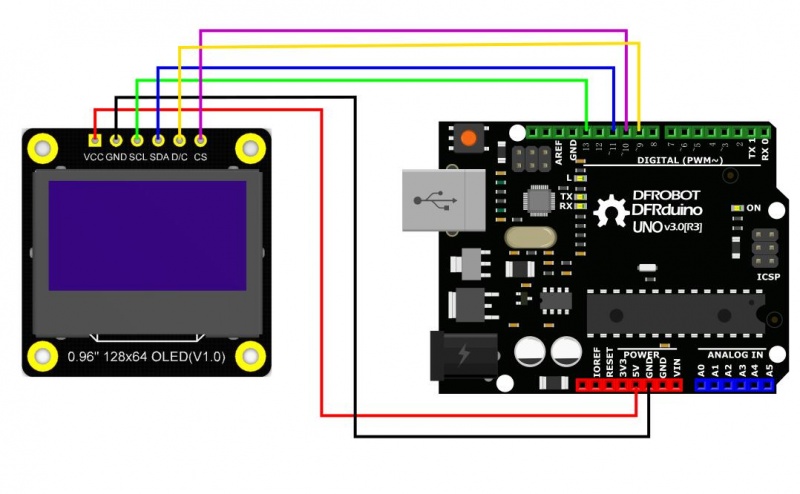
接线图
Arduino 连接图
尺寸图
- 模块尺寸:30.00x30.00mm
- 安装孔间距:25mm,25mm
- 安装孔尺寸:2.0mm

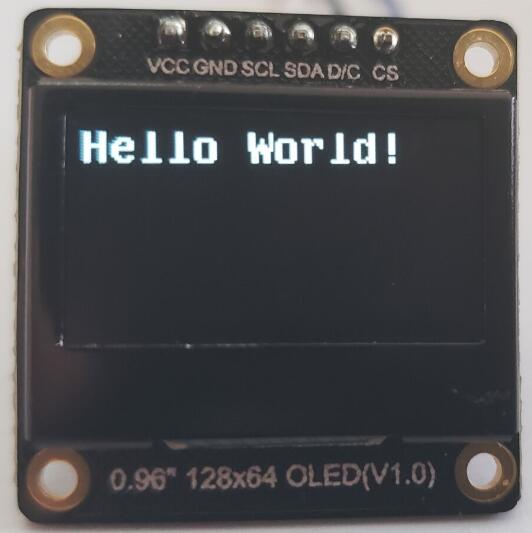
样例代码1-Hello World!
注意:
1.样例代码在example -> DFRobot_Demo ->0.96 inch OLED12864-SSD1306文件夹内。
2.程序默认为IIC通信,只打开了IIC相关的文件和构造函数
/*!
 * @file HelloWorld.ino
 * @brief 简单又经典的Hello World!显示
 * @n U8G2支持多种大小的字体,此demo只是选取1种字体大小进行显示"Hello World!"
 * @n U8G2字体GitHub连接:https://github.com/olikraus/u8g2/wiki/fntlistall
 *
 * @copyright  Copyright (c) 2010 DFRobot Co.Ltd (http://www.dfrobot.com)
 * @licence     The MIT License (MIT)
 * @author [Ivey](Ivey.lu@dfrobot.com)
 * @version  V1.0
 * @date  2019-11-29
 * @get from https://www.dfrobot.com
 * @url https://github.com/DFRobot/U8g2_Arduino
*/
#include <Arduino.h>
#include <U8g2lib.h>

//#include <SPI.h>
#include <Wire.h>

/*
 * 显示屏硬件IIC接口构造函数
 *@param rotation:U8G2_R0 不旋转,横向,绘制方向从左到右
		   U8G2_R1 顺时针旋转90度,绘制方向从上到下
		   U8G2_R2 顺时针旋转180度,绘制方向从右到左
		   U8G2_R3 顺时针旋转270度,绘制方向从下到上
		   U8G2_MIRROR 正常显示镜像内容(v2.6.x版本以上使用)   注意:U8G2_MIRROR需要与setFlipMode()配搭使用.
 *@param reset:U8x8_PIN_NONE 表示引脚为空,不会使用复位引脚
 * 显示屏硬件SPI接口构造函数
 *@param  cs 按引脚接上即可(引脚可自己选择)
 *@param  dc 按引脚接上即可(引脚可自己选择)
 *
*/
U8G2_SSD1306_128X64_NONAME_F_HW_I2C u8g2(/* rotation=*/U8G2_R0, /* reset=*/ U8X8_PIN_NONE);    //  M0/ESP32/ESP8266/mega2560/Uno/Leonardo
//U8G2_SSD1306_128X64_NONAME_1_4W_HW_SPI u8g2(/* rotation=*/U8G2_R0, /* cs=*/ 10, /* dc=*/ 9);
// End of constructor list


void setup(void) {
  u8g2.begin();
}

void loop(void) {
  u8g2.clearBuffer();					// clear the internal memory
  u8g2.setFont(u8g2_font_t0_17b_tr  );	// choose a suitable font
  u8g2.drawStr(0,10,"Hello World!");	// write something to the internal memory
  u8g2.sendBuffer();					// transfer internal memory to the display
  delay(1000);
}
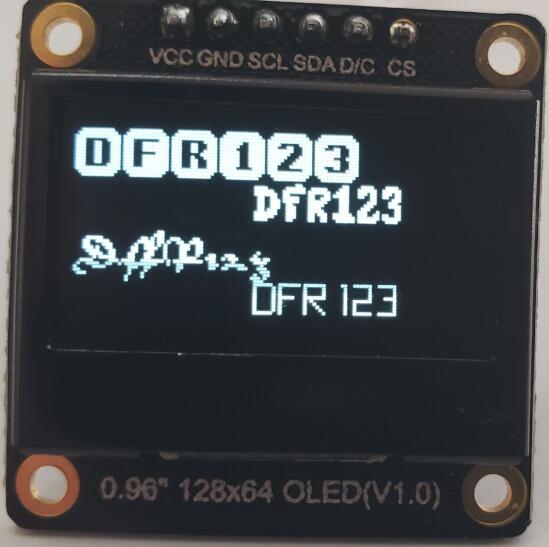
结果
样例代码2 - 字体显示
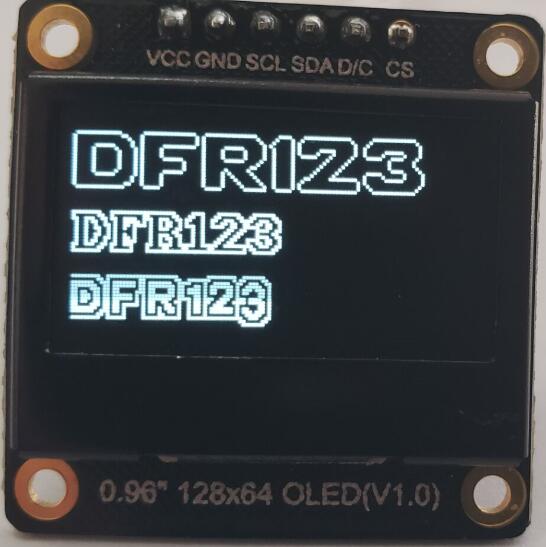
您还只用单调的英文、数字字体吗?您是否想要好看的花式字体,让您的应用哪怕是只显示"Hello World!"都可以很吸引人?
那么就尝试一下这一个示例吧。
/*!
 * @file Font.ino
 * @brief U8G2中支持的几种字体显示
 * @n U8G2支持多种字体,此demo只是选取几种字体进行显示
 * @n U8G2字体GitHub连接:https://github.com/olikraus/u8g2/wiki/fntlistall
 *
 * @copyright  Copyright (c) 2010 DFRobot Co.Ltd (http://www.dfrobot.com)
 * @licence     The MIT License (MIT)
 * @author [Ivey](Ivey.lu@dfrobot.com)
 * @version  V1.0
 * @date  2019-11-29
 * @get from https://www.dfrobot.com
 * @url https://github.com/DFRobot/U8g2_Arduino
*/

#include <Arduino.h>
#include <U8g2lib.h>

//#include <SPI.h>
#include <Wire.h>

/*
 * 显示屏硬件IIC接口构造函数
 *@param rotation:U8G2_R0 不旋转,横向,绘制方向从左到右
		   U8G2_R1 顺时针旋转90度,绘制方向从上到下
		   U8G2_R2 顺时针旋转180度,绘制方向从右到左
		   U8G2_R3 顺时针旋转270度,绘制方向从下到上
		   U8G2_MIRROR 正常显示镜像内容(v2.6.x版本以上使用)   注意:U8G2_MIRROR需要与setFlipMode()配搭使用.
 *@param reset:U8x8_PIN_NONE 表示引脚为空,不会使用复位引脚
 * 显示屏硬件SPI接口构造函数
 *@param  cs 按引脚接上即可(引脚可自己选择)
 *@param  dc 按引脚接上即可(引脚可自己选择)
 *
*/
U8G2_SSD1306_128X64_NONAME_F_HW_I2C u8g2(/* rotation=*/U8G2_R0, /* reset=*/ U8X8_PIN_NONE);    //  M0/ESP32/ESP8266/mega2560/Uno/Leonardo
//U8G2_SSD1306_128X64_NONAME_1_4W_HW_SPI u8g2(/* rotation=*/U8G2_R0, /* cs=*/ 10, /* dc=*/ 9);

void setup(void)
{
  u8g2.begin();       //初始化函数
  u8g2.setFontPosTop();  /*使用drawStr显示字符串时,默认标准为显示字符的左下角坐标。
                          本函数的功能可理解为将坐标位置改为显示字符串的左上角为坐标标准。*/
}


void draw(int a )
{
   switch(a)
   {
     case 0:
     u8g2.setFont(u8g2_font_bubble_tr);    //设置字体集,字体为“u8g2_font_bubble_tr”
     u8g2.drawStr(/* x=*/0,/* y=*/0, "DFR123");       //在x=0,y=0的坐标开始绘制字符串“DFR123”
     u8g2.setFont(u8g2_font_lucasarts_scumm_subtitle_o_tf);
     u8g2.drawStr(0, 25, "DFR123");
     u8g2.setFont(u8g2_font_HelvetiPixelOutline_tr);
     u8g2.drawStr(0, 45, "DFR123");
     break;
     case 1:
     u8g2.setFont(u8g2_font_tenstamps_mr);
     u8g2.drawStr(0,0, "DFR123");
     u8g2.setFont(u8g2_font_jinxedwizards_tr);
     u8g2.drawStr(56, 16, "DFR123");
     u8g2.setFont(u8g2_font_secretaryhand_tr);
     u8g2.drawStr(0, 32, "DFR123");
     u8g2.setFont(u8g2_font_freedoomr10_mu);
     u8g2.drawStr(56, 48, "DFR123");
     break;
   }
}

 void loop()
{
  for( int i = 0; i <2 ; i++)
  {
   /*
	* firstPage方法会把当前页码位置变成0
	* 修改内容处于firstPage和nextPage之间,每次都是重新渲染所有内容
	* 该方法消耗的ram空间,比sendBuffer消耗的ram空间要少
   */
    u8g2.firstPage();
    do
	  {
		  draw(i);
	  } while( u8g2.nextPage() );
	  delay(2000);
  }
}
结果
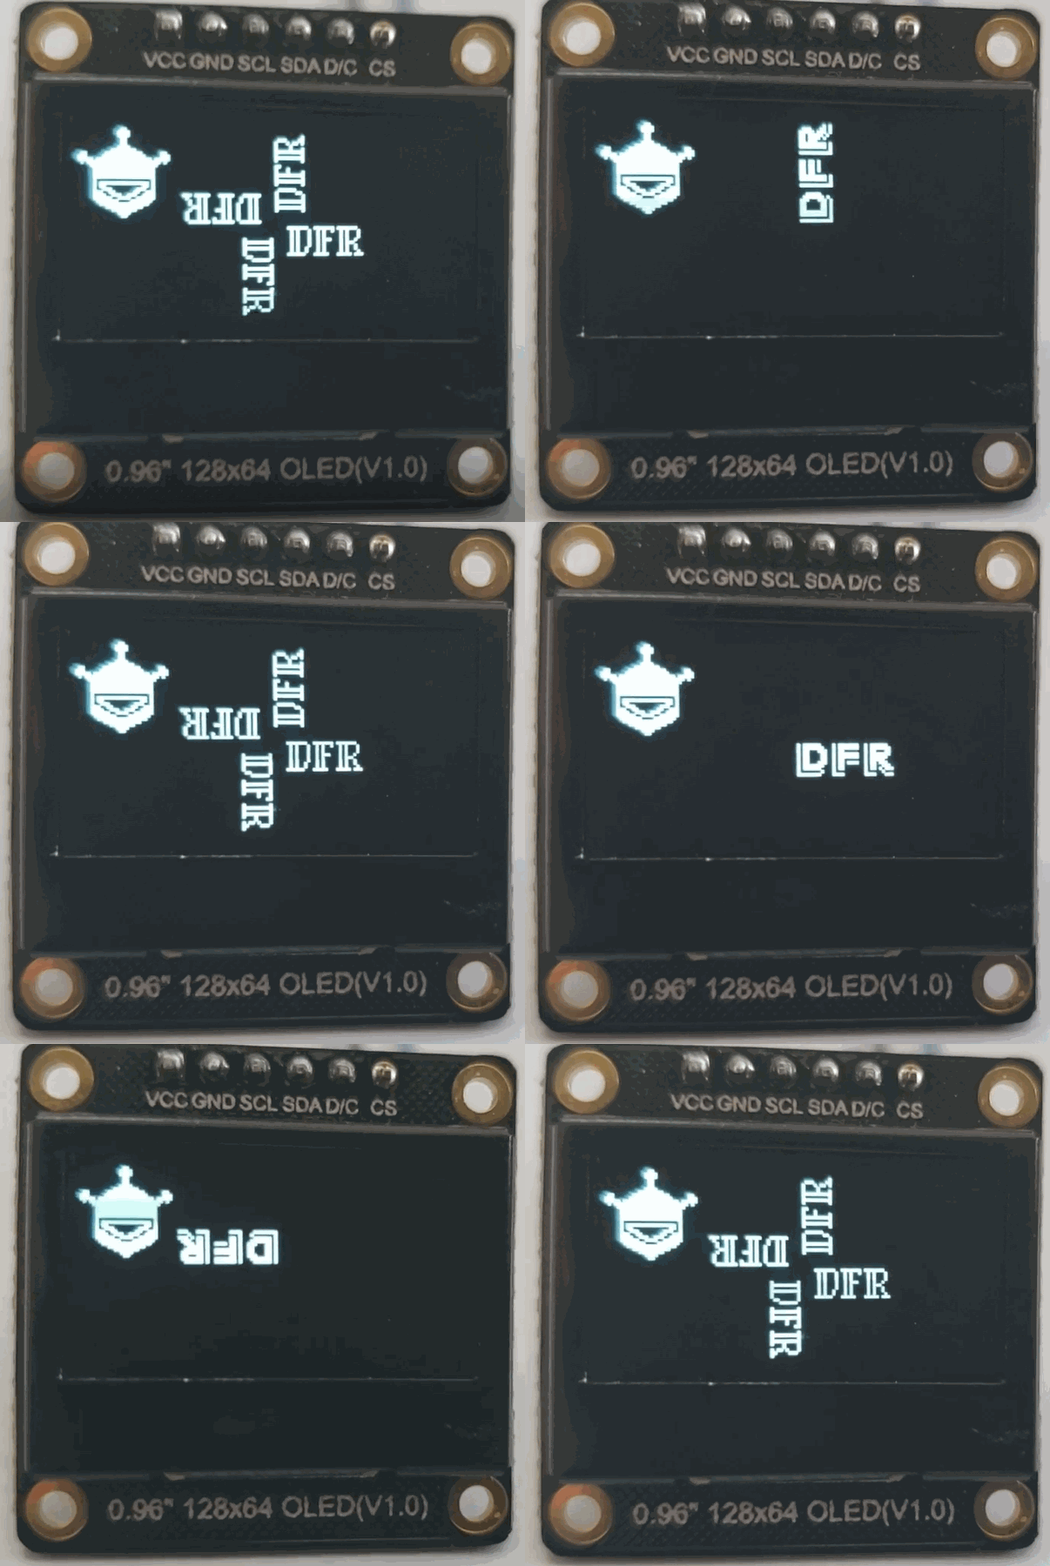
样例代码3-不同方向的字体显示
不同方向的显示,可以配合一些重力传感器做一下有趣的应用
/*!
 * @file FontDirection.ino
 * @brief U8G2中支持的几种字体方向的显示
 * @n U8G2支持多种字体,此demo只展示了四种方向(没有展示镜像)。
 * @n U8G2字体GitHub连接:https://github.com/olikraus/u8g2/wiki/fntlistall
 *
 * @copyright  Copyright (c) 2010 DFRobot Co.Ltd (http://www.dfrobot.com)
 * @licence     The MIT License (MIT)
 * @author [Ivey](Ivey.lu@dfrobot.com)
 * @version  V1.0
 * @date  2019-11-29
 * @get from https://www.dfrobot.com
 * @url https://github.com/DFRobot/U8g2_Arduino
*/

#include <Arduino.h>
#include <U8g2lib.h>

//#include <SPI.h>
#include <Wire.h>

/*
 * 显示屏硬件IIC接口构造函数
 *@param rotation:U8G2_R0 不旋转,横向,绘制方向从左到右
		   U8G2_R1 顺时针旋转90度,绘制方向从上到下
		   U8G2_R2 顺时针旋转180度,绘制方向从右到左
		   U8G2_R3 顺时针旋转270度,绘制方向从下到上
		   U8G2_MIRROR 正常显示镜像内容(v2.6.x版本以上使用)   注意:U8G2_MIRROR需要与setFlipMode()配搭使用.
 *@param reset:U8x8_PIN_NONE 表示引脚为空,不会使用复位引脚
 * 显示屏硬件SPI接口构造函数
 *@param  cs 按引脚接上即可(引脚可自己选择)
 *@param  dc 按引脚接上即可(引脚可自己选择)
 *
*/
U8G2_SSD1306_128X64_NONAME_F_HW_I2C u8g2(/* rotation=*/U8G2_R0, /* reset=*/ U8X8_PIN_NONE);  //  M0/ESP32/ESP8266/mega2560/Uno/Leonardo
//U8G2_SSD1306_128X64_NONAME_1_4W_HW_SPI u8g2(/* rotation=*/U8G2_R0, /* cs=*/ 10, /* dc=*/ 9);


//width:30,height:30
const uint8_t col[] U8X8_PROGMEM= {0x00,0xc0,0x00,0x00,0x00,0xe0,0x01,0x00,0x00,0xe0,0x01,0x00,0x00,
                                         0xc0,0x00,0x00,0x00,0xc0,0x00,0x00,0x00,0xc0,0x00,0x00,0x00,0xe0,
                                         0x01,0x00,0x00,0xf8,0x07,0x00,0x06,0xfe,0x1f,0x18,0x07,0xff,0x3f,
                                         0x38,0xdf,0xff,0xff,0x3e,0xfa,0xff,0xff,0x17,0xf0,0xff,0xff,0x03,
                                         0xe0,0xff,0xff,0x01,0xe0,0xff,0xff,0x01,0xe0,0xff,0xff,0x01,0xe0,
                                         0xff,0xff,0x01,0x20,0x00,0x00,0x01,0xa0,0xff,0x7f,0x01,0xa0,0x01,
                                         0x60,0x01,0x20,0x07,0x38,0x01,0xe0,0x0c,0xcc,0x01,0xe0,0x39,0xe7,
                                         0x01,0xe0,0xe7,0xf9,0x01,0xc0,0x1f,0xfe,0x00,0x80,0xff,0x7f,0x00,
                                         0x00,0xfe,0x1f,0x00,0x00,0xf8,0x07,0x00,0x00,0xe0,0x01,0x00,0x00,
                                         0xc0,0x00,0x00};

void setup() {
  u8g2.begin();
  u8g2.setFontPosTop();/*使用drawStr显示字符串时,默认标准为显示字符的左下角坐标。
                          本函数的功能可理解为将坐标位置改为显示字符串的左上角为坐标标准。*/
}

void Rotation() {
  u8g2.setFont(u8g2_font_bracketedbabies_tr        );
  u8g2.firstPage();
  do {
    u8g2.drawXBMP( /* x=*/0 , /* y=*/0 , /* width=*/30 , /* height=*/30 , col );//绘制图像
	/*@brief 设置所有字符串或字形的绘制方向setFontDirection(uint8_t dir)
     *@param dir=0,旋转0度
		     dir=1,旋转90度
			 dir=2,旋转180度
			 dir=3,旋转270度
    */
    u8g2.setFontDirection(0);
    u8g2.drawStr( /* x=*/64,/* y=*/32, " DFR");		//绘制字符串
    u8g2.setFontDirection(1);
    u8g2.drawStr(64,32, " DFR");
    u8g2.setFontDirection(2);
    u8g2.drawStr(64,32, " DFR");
    u8g2.setFontDirection(3);
    u8g2.drawStr(64,32, " DFR");
  }while(u8g2.nextPage());
  delay(1500);
}

void loop(void)
{
    u8g2.setFont( u8g2_font_sticker_mel_tr      );
    for(int i = 0 ; i < 4 ; i++ )
    {
       switch(i)
       {
          case 0:
            u8g2.setFontDirection(0);
            break;
          case 1:
            u8g2.setFontDirection(1);
            break;
          case 2:
            u8g2.setFontDirection(2);
            break;
          case 3:
            u8g2.setFontDirection(3);
            break;
       }
	  /*
	   * firstPage方法会把当前页码位置变成0
	   * 修改内容处于firstPage和nextPage之间,每次都是重新渲染所有内容
	   * 该方法消耗的ram空间,比sendBuffer消耗的ram空间要少
	  */
      u8g2.firstPage();
      do
      {
        u8g2.drawStr(64, 32, "DFR");
        u8g2.drawXBMP( 0 , 0 , 30 , 30 , col );
      }while(u8g2.nextPage());
      delay(500);
    }
    Rotation();
}
结果
SPI接线图
注意:
使用SPI时,需要将模块背后的0欧姆电阻更换到相应位置
SPI连接方式:
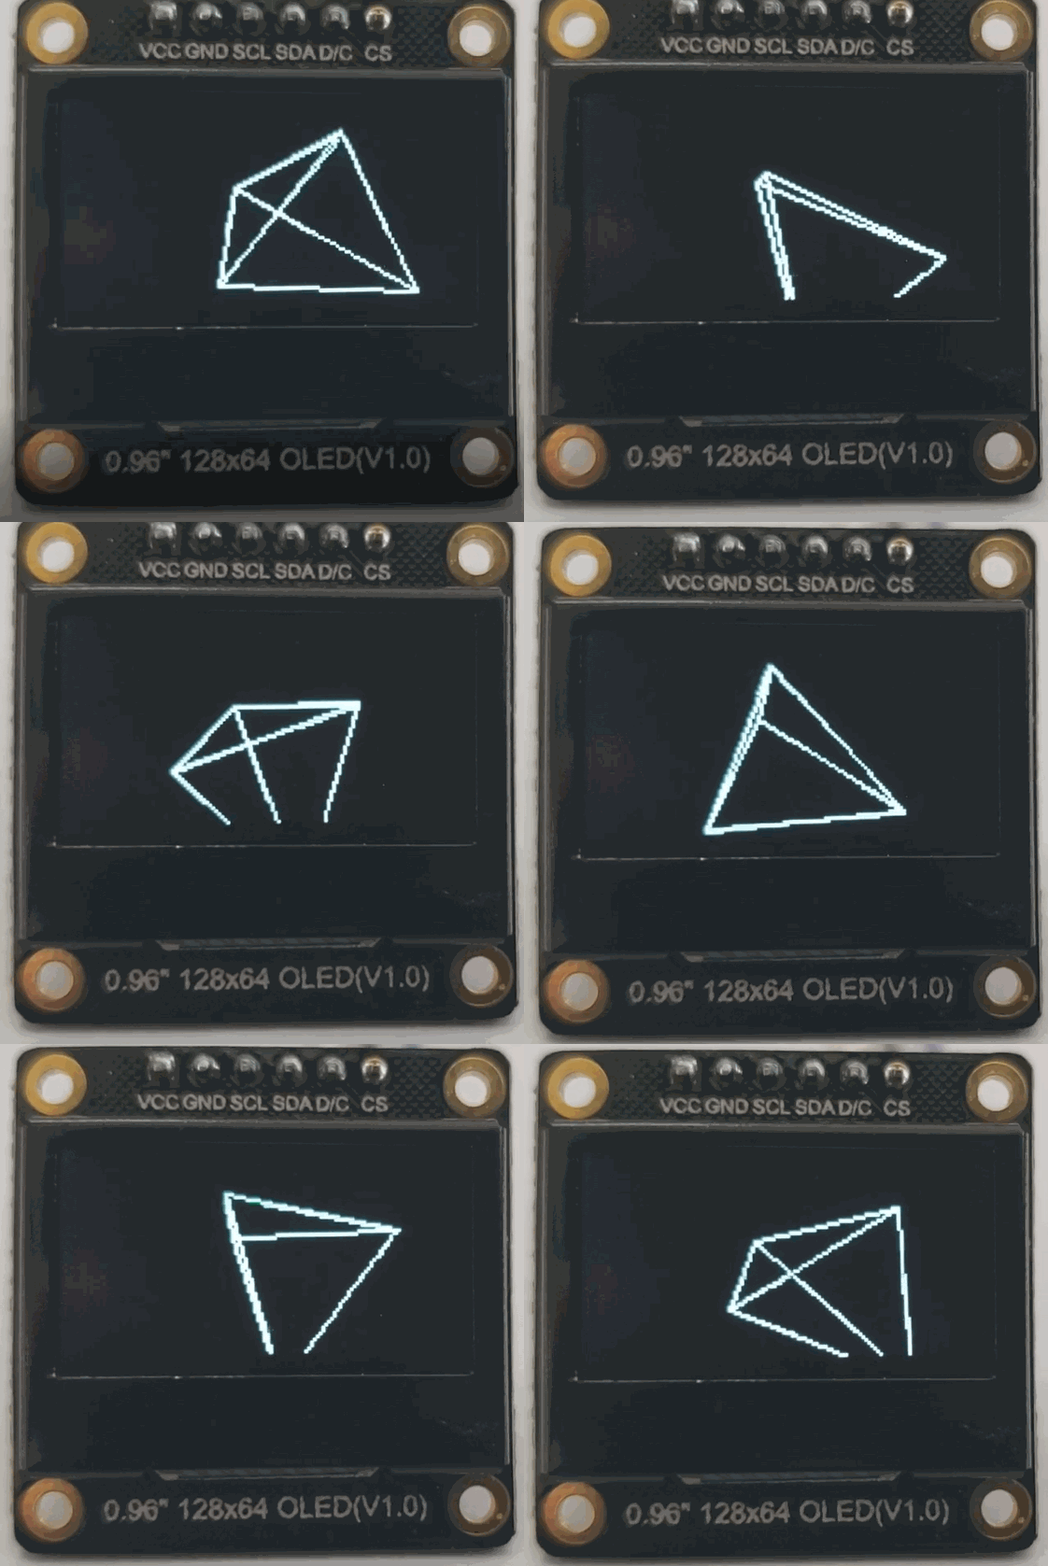
样例代码4 - 动图显示
这是一个旋转中的四面体,为了达到流畅的现实效果,建议您打开SPI的实体化函数
/*!
 * @file Cube.ino
 * @brief 旋转的三维立体图形
 * @n 这是一个简单的旋转四面体
 *
 * @copyright  Copyright (c) 2010 DFRobot Co.Ltd (http://www.dfrobot.com)
 * @licence     The MIT License (MIT)
 * @author [Ivey](Ivey.lu@dfrobot.com)
 * @version  V1.0
 * @date  2019-11-29
 * @get from https://www.dfrobot.com
 * @url https://github.com/DFRobot/U8g2_Arduino
*/

#include <Arduino.h>
#include <U8g2lib.h>

#include <SPI.h>
//#include <Wire.h>


/*
 * 显示屏硬件IIC接口构造函数
 *@param rotation:U8G2_R0 不旋转,横向,绘制方向从左到右
		   U8G2_R1 顺时针旋转90度,绘制方向从上到下
		   U8G2_R2 顺时针旋转180度,绘制方向从右到左
		   U8G2_R3 顺时针旋转270度,绘制方向从下到上
		   U8G2_MIRROR 正常显示镜像内容(v2.6.x版本以上使用)   注意:U8G2_MIRROR需要与setFlipMode()配搭使用.
 *@param reset:U8x8_PIN_NONE 表示引脚为空,不会使用复位引脚
 * 显示屏硬件SPI接口构造函数
 *@param  cs 按引脚接上即可(引脚可自己选择)
 *@param  dc 按引脚接上即可(引脚可自己选择)
 *
*/
//U8G2_SSD1306_128X64_NONAME_1_HW_I2C u8g2(/* rotation=*/U8G2_R0, /* reset=*/ U8X8_PIN_NONE);  //  M0/ESP32/ESP8266/mega2560/Uno/Leonardo
U8G2_SSD1306_128X64_NONAME_1_4W_HW_SPI u8g2(/* rotation=*/U8G2_R0, /* cs=*/ 10, /* dc=*/ 9);


//二维数组,里面存储了四面体所有顶点的坐标
double tetrahedron[4][3] = {{0,30,-30},{-30,-30,-30},{30,-30,-30},{0,0,30}};
void setup(void) {
  u8g2.begin();
}

void loop(void) {
  u8g2.firstPage();
  do {
  //将四面体里面相对应的点连接到一起
  u8g2.drawLine(OxyzToOu(tetrahedron[0][0], tetrahedron[0][2]), OxyzToOv(tetrahedron[0][1], tetrahedron[0][2]), OxyzToOu(tetrahedron[1][0], tetrahedron[1][2]), OxyzToOv(tetrahedron[1][1], tetrahedron[1][2]));
  u8g2.drawLine(OxyzToOu(tetrahedron[1][0], tetrahedron[1][2]), OxyzToOv(tetrahedron[1][1], tetrahedron[1][2]), OxyzToOu(tetrahedron[2][0], tetrahedron[2][2]), OxyzToOv(tetrahedron[2][1], tetrahedron[2][2]));
  u8g2.drawLine(OxyzToOu(tetrahedron[0][0], tetrahedron[0][2]), OxyzToOv(tetrahedron[0][1], tetrahedron[0][2]), OxyzToOu(tetrahedron[2][0], tetrahedron[2][2]), OxyzToOv(tetrahedron[2][1], tetrahedron[2][2]));
  u8g2.drawLine(OxyzToOu(tetrahedron[0][0], tetrahedron[0][2]), OxyzToOv(tetrahedron[0][1], tetrahedron[0][2]), OxyzToOu(tetrahedron[3][0], tetrahedron[3][2]), OxyzToOv(tetrahedron[3][1], tetrahedron[3][2]));
  u8g2.drawLine(OxyzToOu(tetrahedron[1][0], tetrahedron[1][2]), OxyzToOv(tetrahedron[1][1], tetrahedron[1][2]), OxyzToOu(tetrahedron[3][0], tetrahedron[3][2]), OxyzToOv(tetrahedron[3][1], tetrahedron[3][2]));
  u8g2.drawLine(OxyzToOu(tetrahedron[2][0], tetrahedron[2][2]), OxyzToOv(tetrahedron[2][1], tetrahedron[2][2]), OxyzToOu(tetrahedron[3][0], tetrahedron[3][2]), OxyzToOv(tetrahedron[3][1], tetrahedron[3][2]));
  // 旋转0.1度
  rotate(0.1);

  } while ( u8g2.nextPage() );
  //delay(50);
}
/*!
 * @brief 将三维坐标系Oxyz里的xz转化为二维坐标系Ouv里面的 u坐标
 * @param 三维坐标系Oxyz里的x坐标
 * @param 三维坐标系Oxyz里的z坐标
 * @return 二维坐标系Ouv里面的 u坐标
 */
int OxyzToOu(double x,double z){

   return (int)((x + 64) - z*0.35);
}


/*!
 * @brief 将三维坐标系Oxyz里的yz转化为二维坐标系Ouv里面的 v坐标
 * @param 三维坐标系Oxyz里的y坐标
 * @param 三维坐标系Oxyz里的z坐标
 * @return 二维坐标系Ouv里面的v坐标
 */
int OxyzToOv(double y,double z){
    return (int)((y + 35) - z*0.35);
}


/*!
 * @brief  将整个三维图形的所有点的坐标绕 Z轴旋转
 * @param  angle 表示要旋转的角度
 *
 *  z旋转(z不变)
    x3 = x2 * cosb - y1 * sinb
    y3 = y1 * cosb + x2 * sinb
    z3 = z2
 */
void rotate(double angle)
{
  double rad, cosa, sina, Xn, Yn;

  rad = angle * PI / 180;
  cosa = cos(rad);
  sina = sin(rad);
  for (int i = 0; i < 4; i++)
  {
    Xn = (tetrahedron[i][0] * cosa) - (tetrahedron[i][1] * sina);
    Yn = (tetrahedron[i][0] * sina) + (tetrahedron[i][1] * cosa);

    //将已经转化好的的坐标存入坐标数组
    //由于是绕Z轴旋转,所以点 z 轴的坐标不变
    tetrahedron[i][0] = Xn;
    tetrahedron[i][1] = Yn;
  }
}
结果
兼容性测试
| MCU | 测试通过 | 测试失败 | 未测试 | 特别关注 |
|---|---|---|---|---|
| FireBeetle-ESP32 | √ | |||
| FireBeetle-ESP8266 | √ | |||
| Arduino Uno | √ | |||
| Leonardo | √ | |||
| Mega2560 | √ | |||
| Arduino M0 | √ |
疑难解答
更多问题及有趣的应用,可以 访问论坛 进行查阅或发帖!
