[ ](https://www.dfrobot.com.cn/index.php "Sparrow 微控制器(SKU:DFR0589
简介
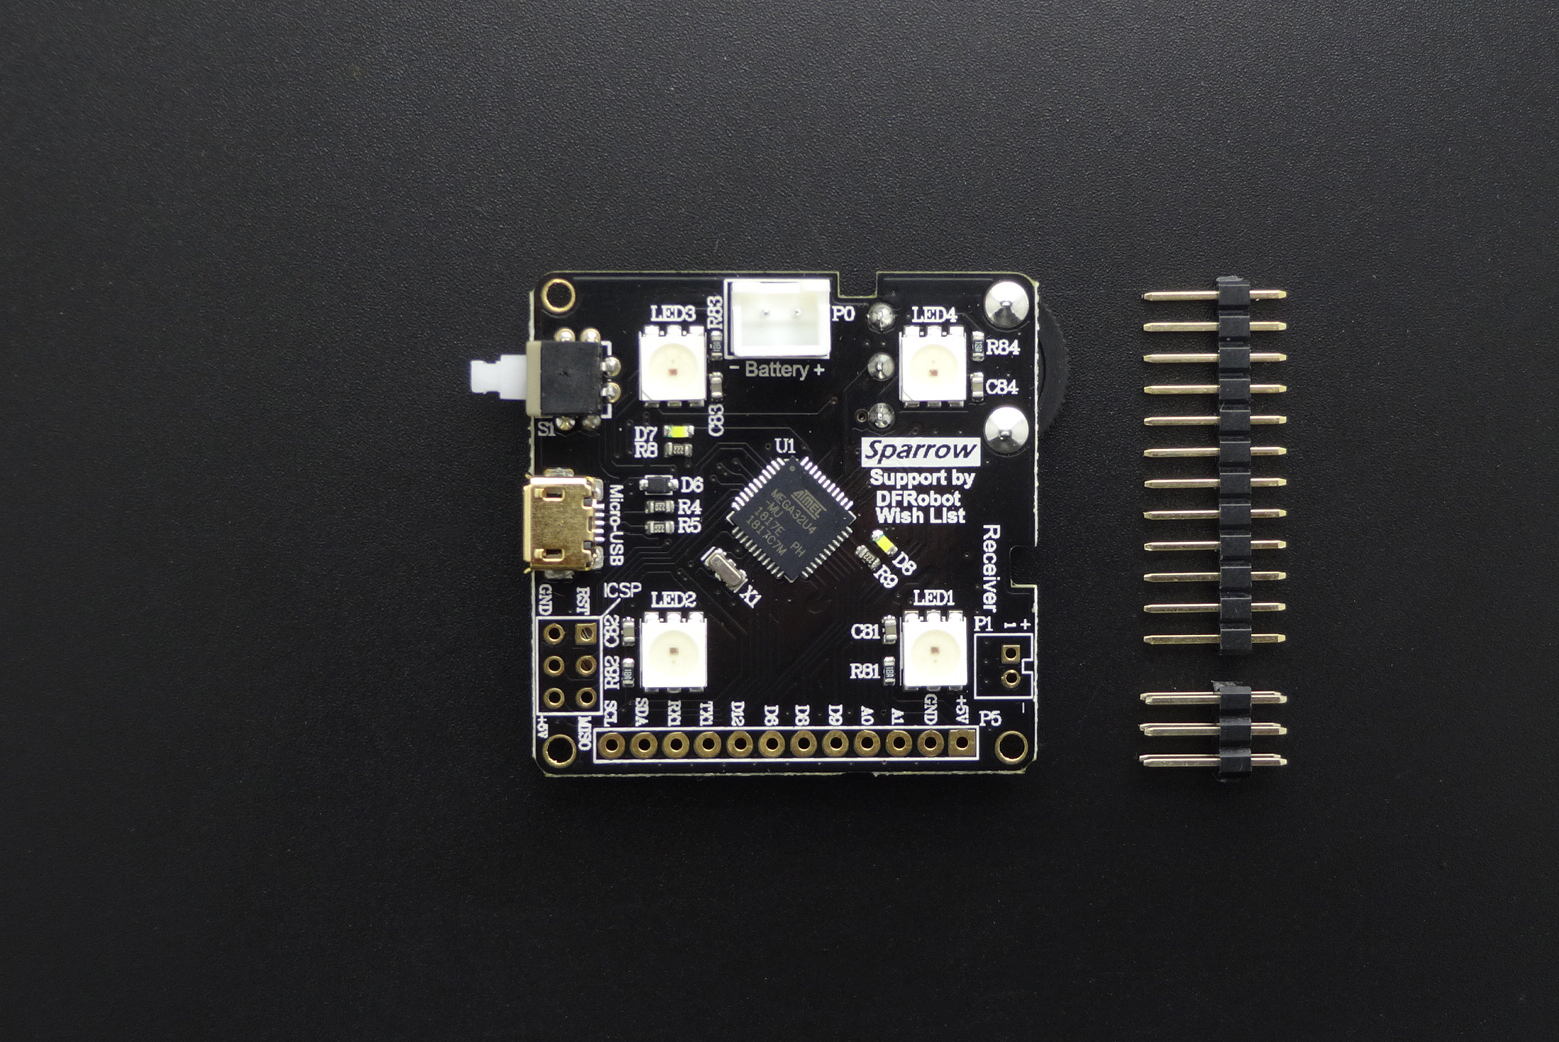
Sparrow是一款到手即玩且功能强大的控制器,是Arduino Leonardo的高度集成版本,具备和Leonardo类似的强大应用能力,支持兼容Arduino能用的所有编程软件,它搭载一颗ATmega32U4主控芯片,可直接用micro USB烧录程序,同时集成4个WS2812灯珠、电位器角度传器、5V升压模块、锂电池充放电保护模块、2路逻辑自锁电源开关。此外它还具有11个数口,4个PWM,3个模拟输入,一组I2C端口,一组UART串口,1组电源端口,4种供电方式(USB、电池、无线供电、太阳能电池),满足你对项目的更多可玩性。板子采用沉金工艺不仅让整块板子美观精致,也使IO输入输出口应用在可穿戴项目时接触良好,连接可靠。Sparrow高度的集成化,让你不再需要太多繁琐复杂耗时的焊接,提高项目的进度和效率,同时板子40mmx40mm体积非常小巧不占用太多项目空间,真正做到了“麻雀虽小,五脏俱全”。
注意事项:
- 本产品使用直流电源,额定工作电压为5V,超过6V将会损坏产品。在4.5V-5V 使用有良好的可靠性;在3V-4.5V可以工作,但可靠性不能保证。
- 对于大负载应用(比如控制电机、舵机、WS2812点阵),需要将该负载的VCC和GND直接和Sparrow控制器的+5V、GND电源接口连接,同时在Sparrow的电源端口上并联10uF以上电容,以防止大负载启动瞬间导致Sparrow重启或程序跑飞。
- 在Arduino环境中,Sparrow和Leonardo一样,其串口有多个,Serial用于USB的虚拟串口,Serial1用于RX/TX接口。
- Sparrow的板载5V升压模块输出电流为500ma,当负载超过该电流时可能造成板载升压部分损坏以及自锁开关过流烧毁,当需要控制大电流负载时,建议直接采用外挂稳压5V电源与Sparrow控制器的+5V、GND电源接口供电。
特性
- 40mm X 40mm小巧尺寸
- 通过Micro USB接口可直接下载、调试程序,无需编程器
- 镀金IO口,应用在可穿戴项目接触良好,连接可�
- 四种供电方式(USB、锂电池、无线供电、太阳能电池)
- 集成5V升压、WS2812炫彩灯珠、电位器角度传感器、锂电池充放电保护
- 两路逻辑自锁开关,到手即玩
- 多种柔光BLINK指示灯
技术规格
- 微控制器: ATmega32u4
- 时钟频率: 16 MHz
- 工作电压: 5V DC
- 数字口数量: 11个
- PWM接口数量: 4个
- 模拟输入口数量: 5个
- UART端口: 1组
- I2C端口: 1组
- Micro USB接口: 1个
- 电源端口: 3组
- Flash空间: 32 KB (4K已用于bootloader)
- SRAM空间: 2.5 KB
- EEPROM空间: 1 KB
- 物理尺寸: 40mm*40mm*10.8mm
引脚说明


| 丝印 | 数字端口 | PWM端口 | 模拟端口 | 串口 | I2C端口 | 备注 |
| Rx1 | 0 | Serial1 | ||||
| Tx1 | 1 | Serial1 | ||||
| SDA | 2 | SDA | ||||
| SCL | 3 | 3 | SCL | |||
| D6 | 6 | 6 | A7 | |||
| D8 | 8 | A8 | ||||
| D9 | 9 | 9 | A9 | |||
| A0 | A0 | A0 | ||||
| A1 | A1 | A1 | ||||
| A2 | 电位器 | |||||
| 10 | 10 | WS2812 |
引脚说明
| 丝印 | 说明 |
| Battery (P0) | 3.7V锂电池2.54接口 |
| Receiver (P1) | 5v的太阳能电池或5v无线充电接受2.0接口(建议直接焊接) |
| +5v | 电源正极 |
| GND | 电源负极 |
| + | 电源正极 |
| - | 电源负极 |
单板上电源端口丝印说明
使用教程
供电方式
- 使用5v太阳能电池、5v无线供电接受线圈供电或对锂电池充电(适合小电流、可穿戴、LED项目)
- 使用3.7v锂电池供电(适合小电流、可穿戴、LED项目)
- 使用外挂稳压5V电源连接Sparrow控制器5v电源接口(适合大电流项目,例如LED点阵、舵机、电机等)
- 使用USB线缆供电或对锂电池充电(此时Sparrow不受自锁开关控制)
电池充电
 Sparrow控制器背面的电池充放电保护,并配锂电池充电状态指示灯,正在给锂电池充电红色LED指示灯“亮”,锂电池充满充电停止绿灯“亮”。
程序加载
Sparrow兼容Arduino Leonardo,具体方法请参见:安装Arduino IDE,该链接同样适用Sparrow,不同之处在于单板类型需要选择"Arduino Leonardo"(在Arduino IDE中选择"工具 〉 单板 〉 Arduino Leonardo")。
样例代码1:电位器数值读取
|
void setup()
{
  Serial.begin(9600);     //Set serial baud rate to 9600 bps
}
void loop()
{
  int val;
  val=analogRead(A2);      //Read slider value from analog 0
  Serial.println(val,DEC);//Print the value to serial port
  delay(100);
}
|} 打开串口监视器查看电位器数值。
样例代码2:WS2812 RGB LED灯
点击下载库文件:Adafruit_NeoPixel库文件。如何安装库?
|
#include <Adafruit_NeoPixel.h>
#ifdef __AVR__
  #include <avr/power.h>
#endif

#define PIN 10        //灯带驱动管脚

// Parameter 1 = number of pixels in strip
// Parameter 2 = Arduino pin number (most are valid)
// Parameter 3 = pixel type flags, add together as needed:
//   NEO_KHZ800  800 KHz bitstream (most NeoPixel products w/WS2812 LEDs)
//   NEO_KHZ400  400 KHz (classic 'v1' (not v2) FLORA pixels, WS2811 drivers)
//   NEO_GRB     Pixels are wired for GRB bitstream (most NeoPixel products)
//   NEO_RGB     Pixels are wired for RGB bitstream (v1 FLORA pixels, not v2)
//   NEO_RGBW    Pixels are wired for RGBW bitstream (NeoPixel RGBW products)
Adafruit_NeoPixel strip = Adafruit_NeoPixel(64, PIN, NEO_GRB + NEO_KHZ800);

// IMPORTANT: To reduce NeoPixel burnout risk, add 1000 uF capacitor across
// pixel power leads, add 300 - 500 Ohm resistor on first pixel's data input
// and minimize distance between Arduino and first pixel.  Avoid connecting
// on a live circuit...if you must, connect GND first.

void setup() {
  // This is for Trinket 5V 16MHz, you can remove these three lines if you are not using a Trinket
  #if defined (__AVR_ATtiny85__)
    if (F_CPU == 16000000) clock_prescale_set(clock_div_1);
  #endif
  // End of trinket special code


  strip.begin();
  strip.show(); // Initialize all pixels to 'off'
}

void loop() {
  // Some example procedures showing how to display to the pixels:
  //colorWipe(strip.Color(255, 0, 0), 50); // Red
 // colorWipe(strip.Color(0, 255, 0), 50); // Green
  //colorWipe(strip.Color(0, 0, 255), 50); // Blue
//colorWipe(strip.Color(0, 0, 0, 255), 50); // White RGBW
  // Send a theater pixel chase in...
 // theaterChase(strip.Color(127, 127, 127), 50); // White
  //theaterChase(strip.Color(127, 0, 0), 50); // Red
  //theaterChase(strip.Color(0, 0, 127), 50); // Blue

  rainbow(20);
  //rainbowCycle(20);
  //theaterChaseRainbow(50);
}

// Fill the dots one after the other with a color
void colorWipe(uint32_t c, uint8_t wait) {
  for(uint16_t i=0; i<strip.numPixels(); i++) {
    strip.setPixelColor(i, c);
    strip.show();
    delay(wait);
  }
}

void rainbow(uint8_t wait) {
  uint16_t i, j;

  for(j=0; j<256; j++) {
    for(i=0; i<strip.numPixels(); i++) {
      strip.setPixelColor(i, Wheel((i+j) & 255));
    }
    strip.show();
    delay(wait);
  }
}

// Slightly different, this makes the rainbow equally distributed throughout
void rainbowCycle(uint8_t wait) {
  uint16_t i, j;

  for(j=0; j<256*5; j++) { // 5 cycles of all colors on wheel
    for(i=0; i< strip.numPixels(); i++) {
      strip.setPixelColor(i, Wheel(((i * 256 / strip.numPixels()) + j) & 255));
    }
    strip.show();
    delay(wait);
  }
}

//Theatre-style crawling lights.
void theaterChase(uint32_t c, uint8_t wait) {
  for (int j=0; j<10; j++) {  //do 10 cycles of chasing
    for (int q=0; q < 3; q++) {
      for (uint16_t i=0; i < strip.numPixels(); i=i+3) {
        strip.setPixelColor(i+q, c);    //turn every third pixel on
      }
      strip.show();

      delay(wait);

      for (uint16_t i=0; i < strip.numPixels(); i=i+3) {
        strip.setPixelColor(i+q, 0);        //turn every third pixel off
      }
    }
  }
}

//Theatre-style crawling lights with rainbow effect
void theaterChaseRainbow(uint8_t wait) {
  for (int j=0; j < 256; j++) {     // cycle all 256 colors in the wheel
    for (int q=0; q < 3; q++) {
      for (uint16_t i=0; i < strip.numPixels(); i=i+3) {
        strip.setPixelColor(i+q, Wheel( (i+j) % 255));    //turn every third pixel on
      }
      strip.show();

      delay(wait);

      for (uint16_t i=0; i < strip.numPixels(); i=i+3) {
        strip.setPixelColor(i+q, 0);        //turn every third pixel off
      }
    }
  }
}

// Input a value 0 to 255 to get a color value.
// The colours are a transition r - g - b - back to r.
uint32_t Wheel(byte WheelPos) {
  WheelPos = 255 - WheelPos;
  if(WheelPos < 85) {
    return strip.Color(255 - WheelPos * 3, 0, WheelPos * 3);
  }
  if(WheelPos < 170) {
    WheelPos -= 85;
    return strip.Color(0, WheelPos * 3, 255 - WheelPos * 3);
  }
  WheelPos -= 170;
  return strip.Color(WheelPos * 3, 255 - WheelPos * 3, 0);
}
|}
注意:在Sparrow端口范围内,Arduino Leonardo已有代码都可以使用。
常见问题及注意事项
- 问题:使用一直正常,加载新程序后,在电脑上找不到Sparrow的虚拟串口?
- 解答:在排除线缆连接问题后,则这种现象一般是新加载程序影响了USB通讯导致。Sparrow/Leonardo的USB转串口是由相应的软件实现的(Arduino IDE中实现),它和用户程序都在其上的ATMEGA32U4中,如果用户程序影响了USB的相关操作将导致看不到USB虚拟串口。此时需要重新加载可用的用户程序(比如Blink)。 由于Sparrow/Leonardo已经和电脑失去联系,不能自动复位,需要人工复位方式进行加载。Sparrow的复位需要通过跳线短接ICSP接口中的RST和GND来实现。 注意Sparrow/Leonardo上电启动时将直接运行用户程序,因此通过插拔USB不能使其进入Bootloader。

- 手动复位下载程序过程:
- 在Arduino IDE中打开blink程序,单板类型选择为“Leonardo”,点击“upload”上载程序;
- 当IDE中显示“uploading”时,用跳线进行软复位(将ICSP接口中的RESET和地短路一下后断开);
- 等待程序加载完毕。
| 更多问题及有趣的应用,可以 访问论坛 进行查阅或发帖。 |
