
概述
DFRobot FireBeetle萤火虫系列是专为物联网设计的低功耗开发组件,此款FireBeetle Board-ESP8266板载ESP8266 WiFi物联网无线模组,它集成了TCP/IP网络协议栈,32位低功耗MCU,10-bit精度ADC,并带有HSPI、UART、PWM、I2C和I2S等丰富的硬件接口。同时,FireBeetle Board-ESP8266可以在低功耗连接模式下工作,如DTIM10模式下,维持WiFi连接,仅需要1.2mW功耗,且该产品配置了16MB的外置SPI闪存,可用于用户程序和固件的存储。
在软件编程方面,FireBeetle Board-ESP8266支持Linux下的RTOS SDK开发,支持开源的arduino IDE编程,支持microPython解释执行。
FireBeetle Board-ESP8266主板在硬件上做了特殊的处理,不用手动切换boot模式,实现一键下载,大大降低了使用难度,提高了主板的稳定性。
特性
- FireBeetle系列兼容
- 内置32-bit Tensilica L106 MCU
- 支持Arduino、RTOS、microPython编程
- 支持IEEE802.11 b/g/n标准WiFi (2.4 GHz~2.5 GHz),不支持5 GHz WiFi
- 支持TCP/IP 协议栈
- 支持锂电池充电(最大充电电流500mA)
- 支持低功耗模式
- 支持Arduino一键下载
- 内置 10 bit 高精度 ADC
性能描述
- 工作电压:3.3V
- 供电电压:3.3~5V (3.7V锂电池 & 5V USB供电)
- 控制器芯片:Tensilica L106 (32-bit MCU)
- CPU时钟频率:80MHz(最高可达160MHz)
- SRAM:50KB
- 外置Flash:16MB
- 支持低功耗:46uA
- 工作电流平均值:80mA
- 支持最大放电电流:600mA(LDO-3.3V电源输出)
- 支持最大充电电流:500mA
- 数字IO口:10个
- 模拟IO输入:1个
- SPI接口:1个
- I2C接口:1个
- IR接口:1个
- I2S接口:1个
- 接口方式:2.54mm间距(排针/排母),默认不焊接
- 集成 Wi-Fi MAC/ BB/RF/PA/LNA
- 无线标准:802.11 b/g/n
- 支持 AT 远程升级及云端 OTA 升级
- 支持 STA/AP/STA+AP 工作模式
- 工作温度:-40℃~+85℃
- 模块尺寸:58 × 29(mm)
- 安装孔位置:53 x 24(mm)
- 安装孔尺寸:内径3.1mm
- 重量:24g
引脚布局
FireBeetle Board-ESP8266主板在硬件上除了兼容乐鑫官网的引脚布局,还做了特殊的 Arduino IDE的PIN兼容,使用Arduino IDE编译时可以直接使用 Dx(x=1, 2, 3...)来控制相应的 GPIO 口。 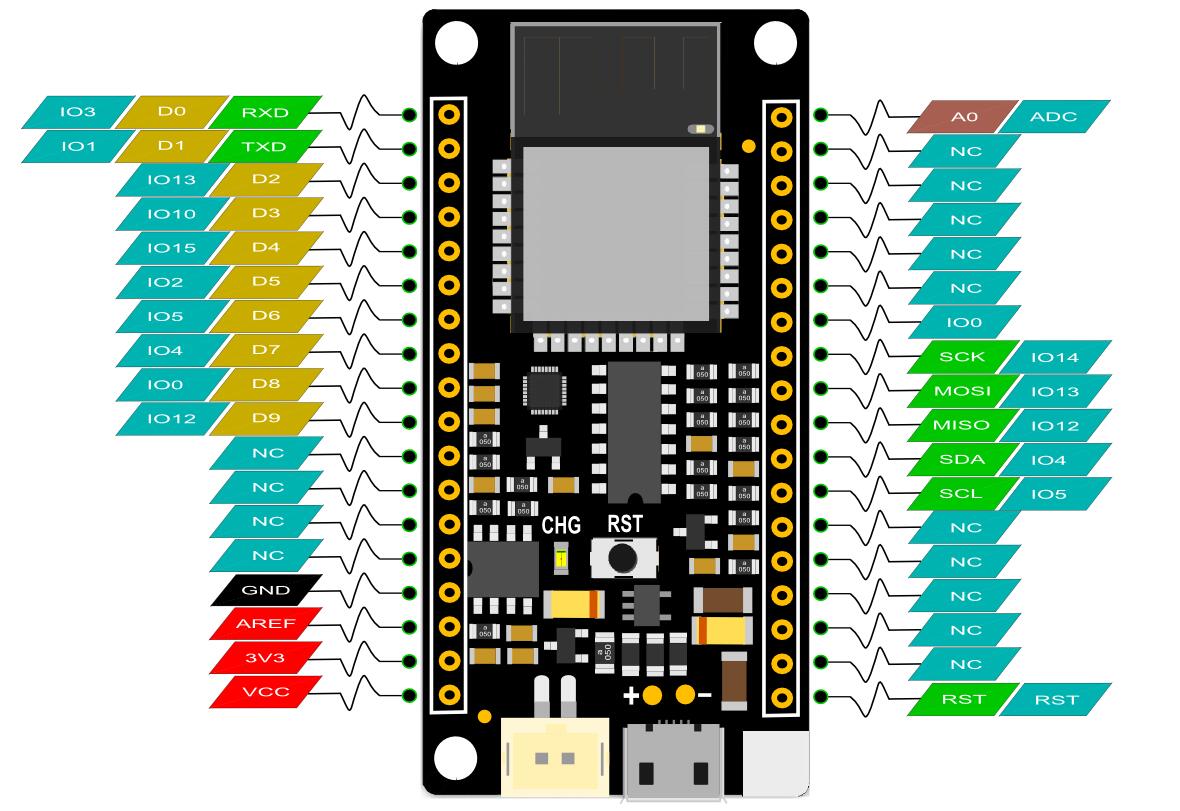
- CHG:电源充电指示灯。如果没有插接锂电池,而是接其他电源(如USB),CHG灯闪烁;充电时,CHG灯常亮;充电完成后,CHG灯常灭。
- RST:复位按钮
 |
|
| 注:NC不连接,VCC为电源电压输出(5V-USB 供电时, 3.7V-锂电池供电时) |
使用教程
FireBeetle驱动安�
FireBeetle-ESP8266采用CH340串口芯片,在绝大部分的设备中,都可以免驱使用。若您发现插上设备,驱动没有自动安装,也可以自行手动安装:点击下载CH340驱动程序 
Arduino IDE配置
- 配置URL网址到Arduino IDE
打开Arduino IDE,点击File->Preferences,如下图所示: 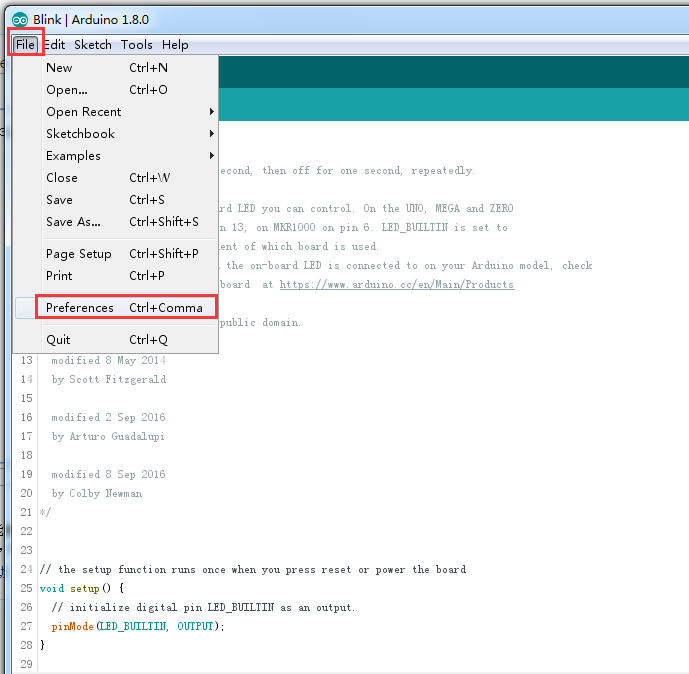 在新打开的界面中,点击如下图红色圆圈中的按钮,
 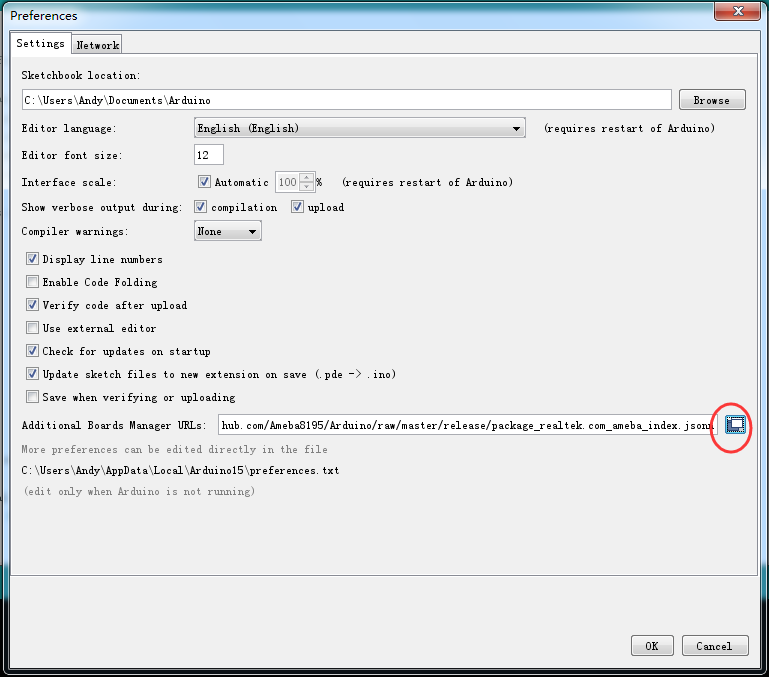 将如下链接地址复制到新弹出的对话框中:
国内使用:https://downloadcd.dfrobot.com.cn/FireBeetle/package_firebeetle8266_index.json
海外使用:https://raw.githubusercontent.com/DFRobot/FireBeetle-ESP8266/master/package_firebeetle8266_index.json
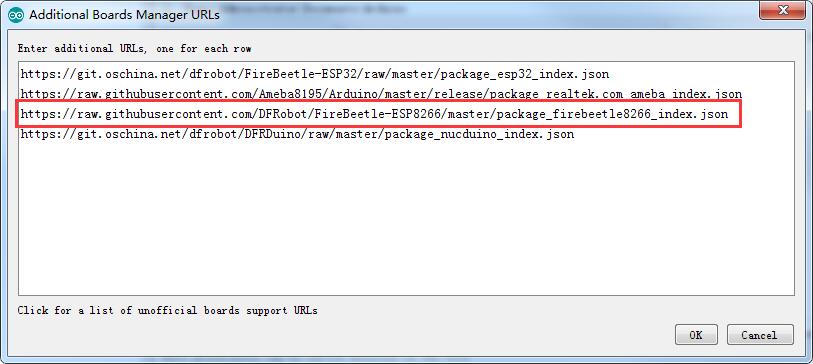 点击OK
点击OK
- 更新板卡
打开Tools->Board:->Boards Manager...,如下图所示: 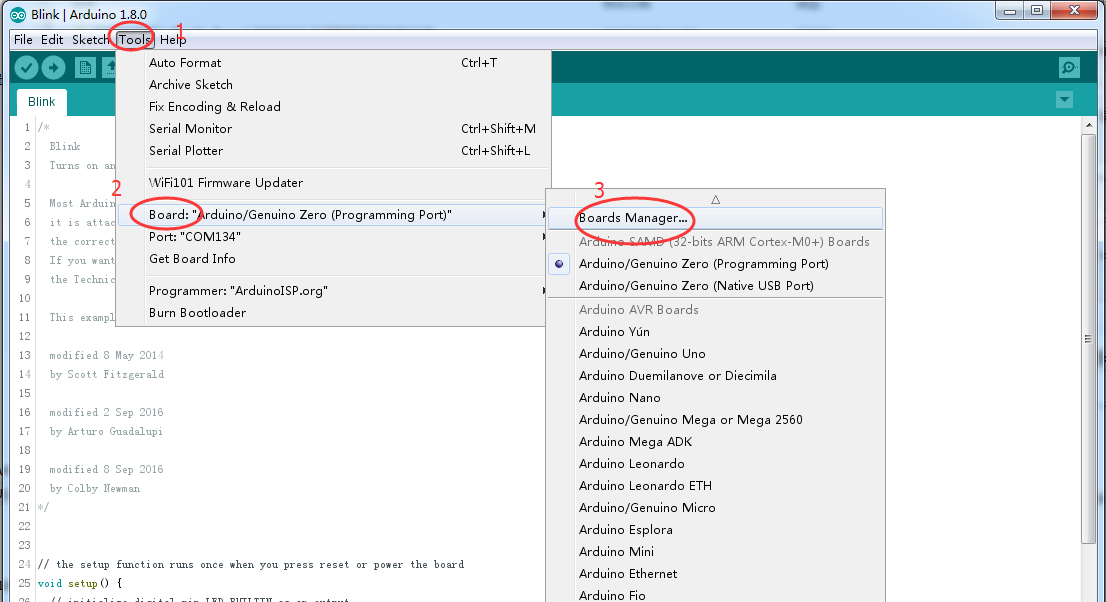 Boards Manager会自动更新板卡,如下图所示:
 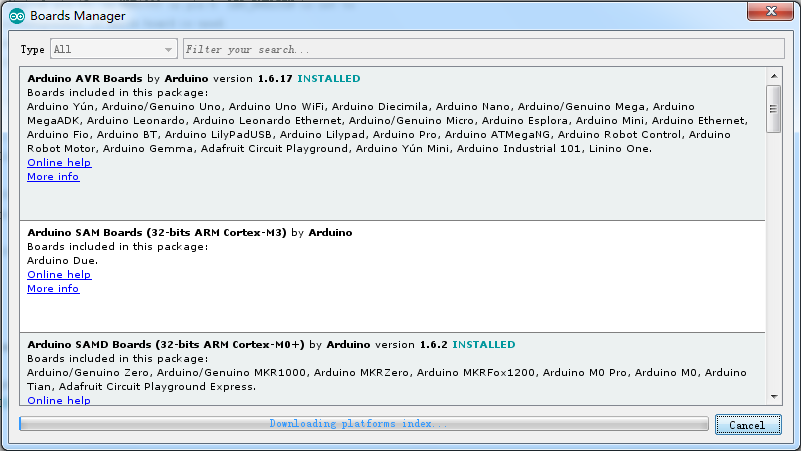 更新完成后,会在列表中看到FireBeetle-ESP8266主板,点击安装:
  安装完成后,列表会显示已经安装FireBeetle-ESP8266主板,如下图所示:
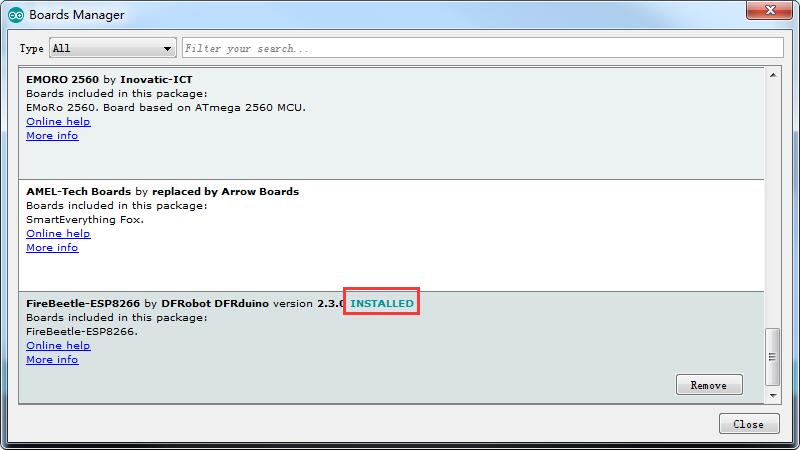
点亮一个LED——Blink
- 板卡选择
如果FireBeetle Board-ESP8266主板安装成功,在Arduino IDE的Tools->Boards里面可以找到FireBeetle-ESP8266主板。 
- 示例代码
FireBeetle Board-ESP8266默认Blink灯连接到D5 (IO2),示例代码可以在File->Examples->Basics->Blink中找到,代码如下:
注意:ESP8266在不同开发环境下,映射的管脚不同,比如:Blink管脚调用写法为:2,指的是ESP8266本身的IO2,对应在Arduino中是 D5,多了一个**"D"**,含义就完全不一样了。
// digital pin 2 has a LED_BLINK attached to it. Give it a name:
int LED_BLINK = 2;
// the setup function runs once when you press reset or power the board
void setup() {
  // initialize digital pin LED_BUILTIN as an output.
  pinMode(LED_BLINK, OUTPUT);
}

// the loop function runs over and over again forever
void loop() {
  digitalWrite(LED_BLINK, HIGH);   // turn the LED on (HIGH is the voltage level)
  delay(1000);                       // wait for a second
  digitalWrite(LED_BLINK, LOW);    // turn the LED off by making the voltage LOW
  delay(1000);                       // wait for a second
}
WiFi
FireBeetle Board-ESP8266主板安装成功后,Arduino IDE本身自带了很多示例程序,示例代码可以在File->Examples中找到,这里主要展示下WiFi设备扫描,示例代码如下:
/*
 *  This sketch demonstrates how to scan WiFi networks.
 *  The API is almost the same as with the WiFi Shield library,
 *  the most obvious difference being the different file you need to include:
 */
#include "ESP8266WiFi.h"

void setup() {
  Serial.begin(115200);

  // Set WiFi to station mode and disconnect from an AP if it was previously connected
  WiFi.mode(WIFI_STA);
  WiFi.disconnect();
  delay(100);

  Serial.println("Setup done");
}

void loop() {
  Serial.println("scan start");

  // WiFi.scanNetworks will return the number of networks found
  int n = WiFi.scanNetworks();
  Serial.println("scan done");
  if (n == 0)
    Serial.println("no networks found");
  else
  {
    Serial.print(n);
    Serial.println(" networks found");
    for (int i = 0; i < n; ++i)
    {
      // Print SSID and RSSI for each network found
      Serial.print(i + 1);
      Serial.print(": ");
      Serial.print(WiFi.SSID(i));
      Serial.print(" (");
      Serial.print(WiFi.RSSI(i));
      Serial.print(")");
      Serial.println((WiFi.encryptionType(i) == ENC_TYPE_NONE)?" ":"*");
      delay(10);
    }
  }
  Serial.println("");

  // Wait a bit before scanning again
  delay(5000);
}
打开IDE串口监视窗口,可以看到主板扫描到了周围的WiFi网络。 
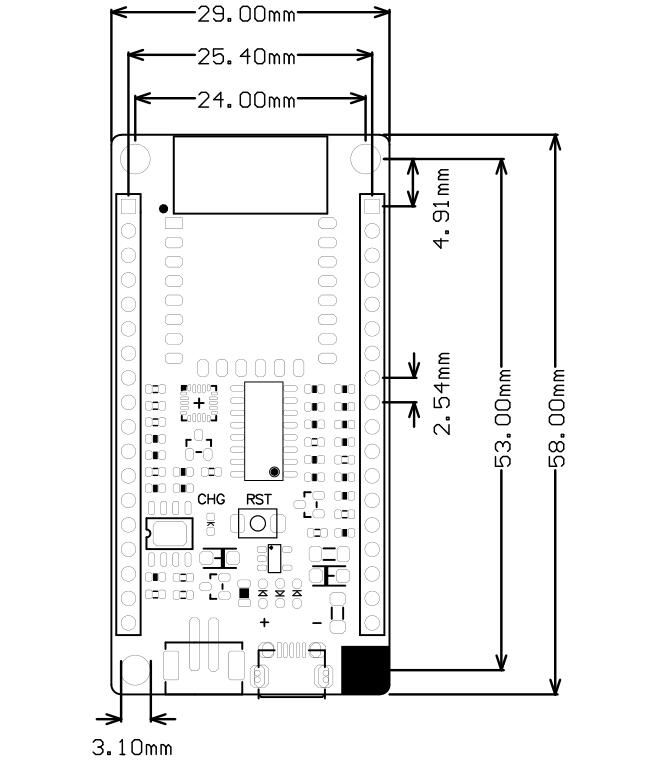
尺寸图
- pin脚间距:2.54mm
- 安装孔间距:24mm/53mm
- 安装孔尺寸:3.1mm
- 主板尺寸:29.00mm×58.00mm
- 板厚:1.6mm
常见问题
| 问: 如何给FireBeetle供电 |
- 答: 针对FireBeetle萤火虫系列主板供电问题,点击链接查看。
| 问: 如何使用MicroPython为FireBeetle编程? |
- 答: micropython编程及FireBeetle系列技术讨论请加 619558168 QQ群
| 更多问题及有趣的应用,可以 访问论坛 进行查阅或发帖。 |
