简介
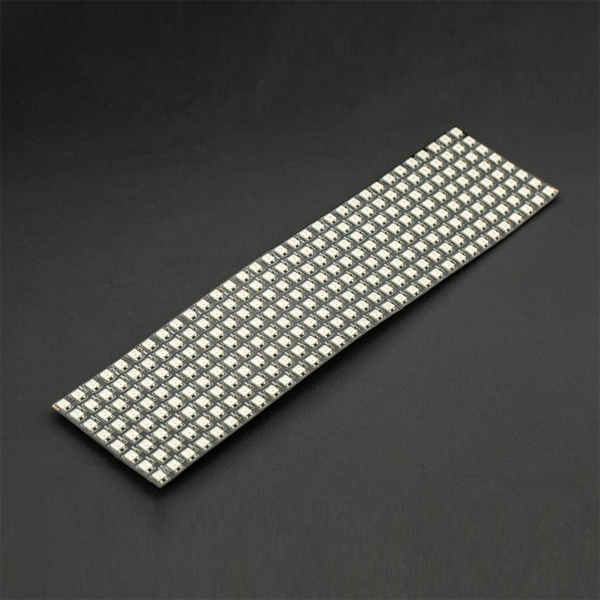
这是一款8x32 RGB全彩LED柔性点阵屏,支持单总线控制,仅需一根管脚即可控制所有LED,并且模块支持级联控制,可以多个模块同时控制,不占用管脚资源。模块采用LED专用主控芯片SK6812/WS2812,每个LED拥有独立地址位,可以单独控制,并且每一个RGB像素点可实现256级亮度显示,完成16777216种颜色显示,扫描频率不低于400Hz。
我们专为这个模块定制了统一的Gravity接口,无需焊接,就可以直插Gravity扩展板。再配上开源的Arduino库,仅需一根管脚,就可以轻松实现LED颜色控制。320mm的长度很适合流水显示,这个尺寸的灯板弯折度更大。
每个模块支持级联控制,可以把第二个模块的DIN接到第一个模块的DOUT的位置,以此类推,把所有的模块串接起来,组成一个更大的屏幕!
注意:
每个LED最大需要18mA电流,当全亮(白色)电流为2A,建议配合DFRobot Gravity IO 扩展板,可通过Servo Power Port为多个LED单独供电,可根据级联的数量选择5V@1A,5V@2A,5V@5A,甚至5V@10A的外接供电。
所有“5V”和“GND”都是各自内部相连的,当您给一个“5V”和“GND”供电后,请勿在其他接口重复供电,以免损坏设备。
技术规格
- 工作电压:5V
- 板 材:软铜板(可弯曲)
- 灯珠规格:SK6812/WS2812
- 灰度等级:256级
- 发光角度:180度
- 光 源:SMD 5050 RGB
- 发光颜色:白、红、黄、蓝、绿等各种灯光模式
- 产品尺寸:80*320 mm
- 通信接口:单线控制
- 工作温度:-40~+85摄氏度
- 防水等级:不防水
引脚说明
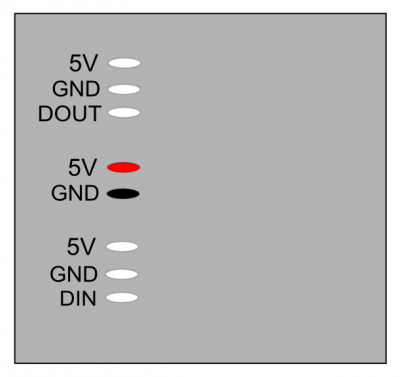
灯板背面缩率图:
| 标号 | 名称 | 功能描述 |
|---|---|---|
| 1 | 5V | 电源正极 红色引脚方便外接电源正极 |
| 2 | GND | 电源负极 黑色引脚方便外接电源负极 |
| 3 | DIN | 控制信号输入端 |
| 4 | DOUT | 控制信号输出端,用于级联到下一个灯板的DIN脚 |
表名
使用教程
本教程是实现灯效的幻彩控制
准备
- 硬件
- 1 x UNO控制板
- 1 x 8x32 Soft Screen RGB LED Matrix
- 若干 杜邦线
- 软件
- Arduino IDE (版本要求:最新), 点击下载Arduino IDE
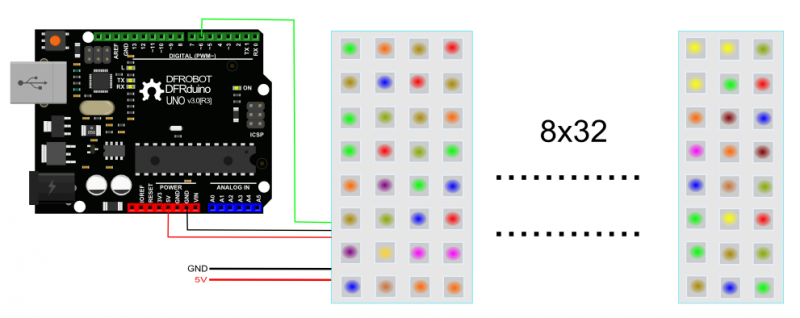
接线图
样例代码
    #include <Adafruit_NeoPixel.h>
    #ifdef __AVR__
      #include <avr/power.h>
    #endif

    #define PIN 6

    // Parameter 1 = number of pixels in strip
    // Parameter 2 = Arduino pin number (most are valid)
    // Parameter 3 = pixel type flags, add together as needed:
    //   NEO_KHZ800  800 KHz bitstream (most NeoPixel products w/WS2812 LEDs)
    //   NEO_KHZ400  400 KHz (classic 'v1' (not v2) FLORA pixels, WS2811 drivers)
    //   NEO_GRB     Pixels are wired for GRB bitstream (most NeoPixel products)
    //   NEO_RGB     Pixels are wired for RGB bitstream (v1 FLORA pixels, not v2)
    //   NEO_RGBW    Pixels are wired for RGBW bitstream (NeoPixel RGBW products)
    Adafruit_NeoPixel strip = Adafruit_NeoPixel(500, PIN, NEO_GRB + NEO_KHZ800);

    // IMPORTANT: To reduce NeoPixel burnout risk, add 1000 uF capacitor across
    // pixel power leads, add 300 - 500 Ohm resistor on first pixel's data input
    // and minimize distance between Arduino and first pixel.  Avoid connecting
    // on a live circuit...if you must, connect GND first.

    void setup() {
      // This is for Trinket 5V 16MHz, you can remove these three lines if you are not using a Trinket
      #if defined (__AVR_ATtiny85__)
        if (F_CPU == 16000000) clock_prescale_set(clock_div_1);
      #endif
      // End of trinket special code


      strip.begin();
      strip.show(); // Initialize all pixels to 'off'
    }

    void loop() {
      // Some example procedures showing how to display to the pixels:
      //colorWipe(strip.Color(255, 0, 0), 50); // Red
     // colorWipe(strip.Color(0, 255, 0), 50); // Green
      //colorWipe(strip.Color(0, 0, 255), 50); // Blue
    //colorWipe(strip.Color(0, 0, 0, 255), 50); // White RGBW
      // Send a theater pixel chase in...
     // theaterChase(strip.Color(127, 127, 127), 50); // White
      //theaterChase(strip.Color(127, 0, 0), 50); // Red
      //theaterChase(strip.Color(0, 0, 127), 50); // Blue

      rainbow(20);
      //rainbowCycle(20);
      //theaterChaseRainbow(50);
    }

    // Fill the dots one after the other with a color
    void colorWipe(uint32_t c, uint8_t wait) {
      for(uint16_t i=0; i<strip.numPixels(); i++) {
        strip.setPixelColor(i, c);
        strip.show();
        delay(wait);
      }
    }

    void rainbow(uint8_t wait) {
      uint16_t i, j;

      for(j=0; j<256; j++) {
        for(i=0; i<strip.numPixels(); i++) {
          strip.setPixelColor(i, Wheel((i+j) & 255));
        }
        strip.show();
        delay(wait);
      }
    }

    // Slightly different, this makes the rainbow equally distributed throughout
    void rainbowCycle(uint8_t wait) {
      uint16_t i, j;

      for(j=0; j<256*5; j++) { // 5 cycles of all colors on wheel
        for(i=0; i< strip.numPixels(); i++) {
          strip.setPixelColor(i, Wheel(((i * 256 / strip.numPixels()) + j) & 255));
        }
        strip.show();
        delay(wait);
      }
    }

    //Theatre-style crawling lights.
    void theaterChase(uint32_t c, uint8_t wait) {
      for (int j=0; j<10; j++) {  //do 10 cycles of chasing
        for (int q=0; q < 3; q++) {
          for (uint16_t i=0; i < strip.numPixels(); i=i+3) {
            strip.setPixelColor(i+q, c);    //turn every third pixel on
          }
          strip.show();

          delay(wait);

          for (uint16_t i=0; i < strip.numPixels(); i=i+3) {
            strip.setPixelColor(i+q, 0);        //turn every third pixel off
          }
        }
      }
    }

    //Theatre-style crawling lights with rainbow effect
    void theaterChaseRainbow(uint8_t wait) {
      for (int j=0; j < 256; j++) {     // cycle all 256 colors in the wheel
        for (int q=0; q < 3; q++) {
          for (uint16_t i=0; i < strip.numPixels(); i=i+3) {
            strip.setPixelColor(i+q, Wheel( (i+j) % 255));    //turn every third pixel on
          }
          strip.show();

          delay(wait);

          for (uint16_t i=0; i < strip.numPixels(); i=i+3) {
            strip.setPixelColor(i+q, 0);        //turn every third pixel off
          }
        }
      }
    }

    // Input a value 0 to 255 to get a color value.
    // The colours are a transition r - g - b - back to r.
    uint32_t Wheel(byte WheelPos) {
      WheelPos = 255 - WheelPos;
      if(WheelPos < 85) {
        return strip.Color(255 - WheelPos * 3, 0, WheelPos * 3);
      }
      if(WheelPos < 170) {
        WheelPos -= 85;
        return strip.Color(0, WheelPos * 3, 255 - WheelPos * 3);
      }
      WheelPos -= 170;
      return strip.Color(WheelPos * 3, 255 - WheelPos * 3, 0);
    }
结果
灯板显示彩色
常见问题
还没有客户对此产品有任何问题,欢迎通过qq或者论坛联系我们!
更多问题及有趣的应用,可以 访问论坛 进行查阅或发帖。


