简介
DFRduino Ethernet W5100S扩展板能使你的Arduino控制器通过RJ45电缆连接到互联网。将扩展板插上Arduino控制器,使用Arduino IDE中的Ethernet库示例,便可以轻松的搭建一个通信稳定的物联网项目。
DFRduino Ethernet W5100S扩展板搭载了WizNet W5100S 网络接口芯片,内部集成全硬件的TCP/IP协议栈,同时W5100S还拥有4个独立的硬件SOCKETs。
Arduino通过SPI接口(使用ICSP头)与W5100S和SD卡进行通讯。该扩展板不仅UNO能够使用,同时还兼容Arduino Mega系列。
Arduino能够通过SPI口和W5100S和SD卡进行通信(用ICSP头)。这个是在Duemilanove/Uno上的数字11,12,13口和Mega的50,51,52号口。这些端口不能用作一般的输入输出。在Mega上,硬件SS口,53,不能用于W5100S和SD卡,但是它必须要被用于输出口,否则SPI接口没法工作。
这块Ethernet板提供标准的RJ45以太网插座。扩展板上的Reset按键可以同时重启W5100S芯片以及Arduino控制器。
注意事项:因为W5100S和SD卡公用SPI口,而只有一个能在同一时间激活。如果你想要一起使用两个设备,需采用分时复用的办法,两个设备,通过CS片选引脚来激活(低电平激活,高电平禁止)。当你不用其中任一外设,你需要特别说明不选择使用它们。想不用SD卡,把4号口设为输出并且写为高电平。同理,想不用W5100S,把10号设为高电平输出。
当前硬件版本V3.0:芯片由W5100升级为W5100S,功耗更低、发热量更小、性能更强
特性
- 全硬件TCP/IP协议栈
- 支持4路独立硬件Socket同时通信
- 内部16K字节收发缓存供TCP/IP包处理
- 支持自动协商
技术规格
- 工作电压:5V
- 16KB收发缓存
- 4路硬件Socket
- 全硬件TCP/IP协议栈 + MAC +PHY
- 工作温度范围:-40℃~85℃
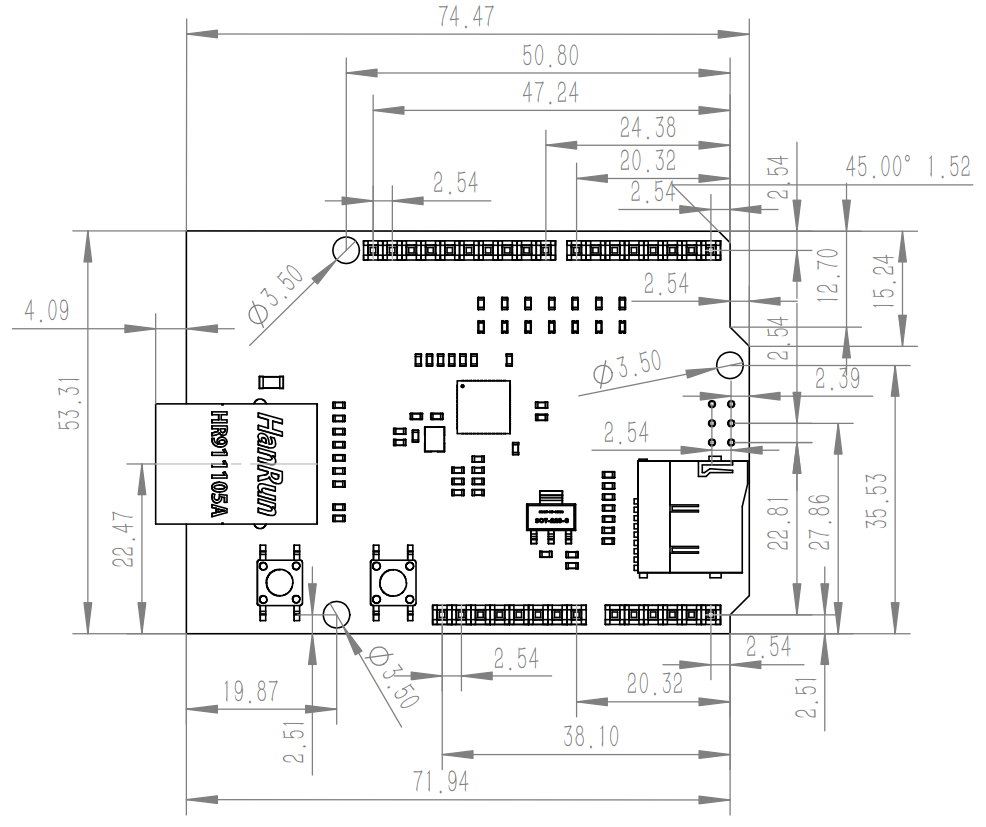
- 产品尺寸:70*55*30mm
指示灯说明
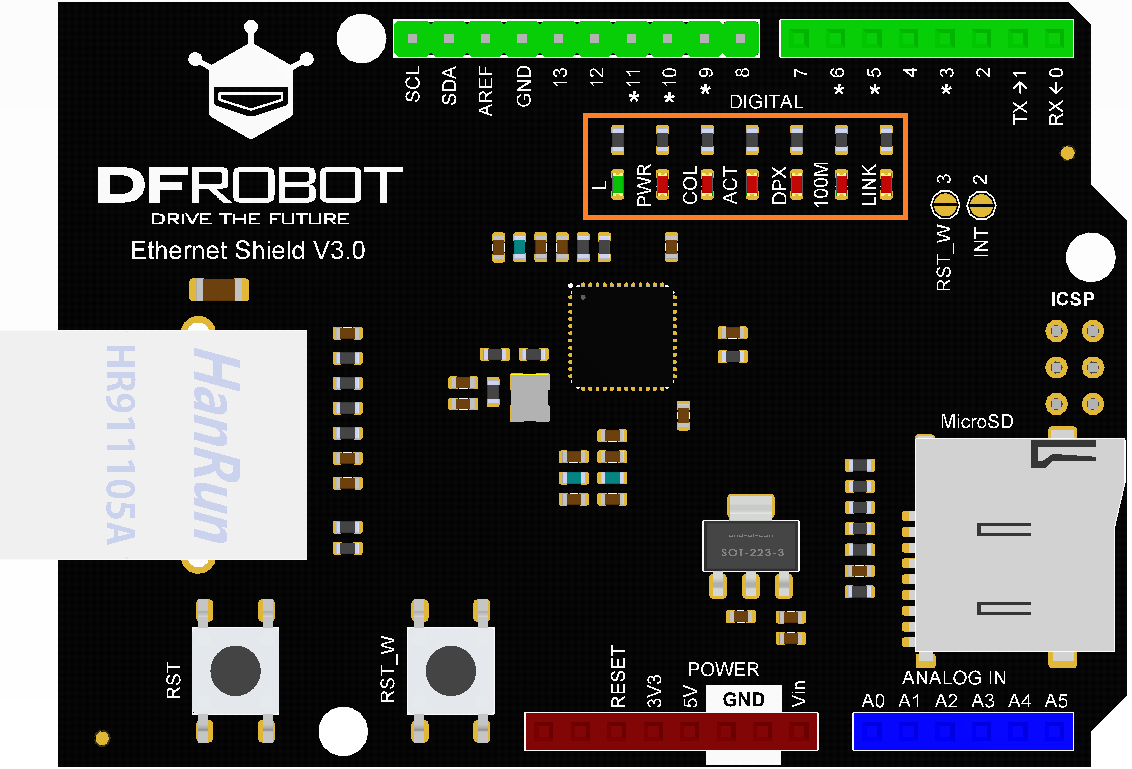
| 丝印 | 描述 |
|---|---|
| L | D13引脚信号指示灯 |
| PWR | 电源指示灯 |
| COL | 连接冲突检测指示灯 低电平: 发生冲突 高电平: 无冲突 |
| ACT | 连接活动指示灯 未闪烁: 已连接但没有收发数据 闪烁: 已连接,并根据数据收发情况闪烁 |
| DPX | 全双工指示灯 低电平: 全双工 高电平: 半双工 |
| 100M | 连接速度指示灯 低电平: 100Mbps 高电平: 10Mbps |
| LINK | 连接指示灯 低电平: Link连接 高电平: Link断开 |
使用教程
准备
- 硬件
- 1 x Arduino UNO控制板
- 1 x DFRduino Ethernet W5100S扩展板
- 1 x 网线
- 1 x 路由器或交换机
- 若干 杜邦线
- 软件
- Arduino IDE, 点击下载Arduino IDE
- W5100S库文件
使用前请使用下载好的文件替换原有的W5100.cpp文件(替换目的是为了兼容W5100S芯片)
文件路径:arduino安装目录下的 Arduino\libraries\Ethernet\src\utility
连接图

样例代码1 - 获取网络时间
该示例演示了从NTP时间服务器获取网络时间,上传该实例,打开串口监视器即可看见时间。
/*

 Udp NTP Client

 Get the time from a Network Time Protocol (NTP) time server
 Demonstrates use of UDP sendPacket and ReceivePacket
 For more on NTP time servers and the messages needed to communicate with them,
 see http://en.wikipedia.org/wiki/Network_Time_Protocol

 created 4 Sep 2010
 by Michael Margolis
 modified 9 Apr 2012
 by Tom Igoe
 modified 02 Sept 2015
 by Arturo Guadalupi

 This code is in the public domain.

 */

#include <SPI.h>
#include <Ethernet.h>
#include <EthernetUdp.h>

// Enter a MAC address for your controller below.
byte mac[] = {0xDE, 0xAD, 0xBE, 0xEF, 0xFE, 0xED};

unsigned int localPort = 8888;       // local port to listen for UDP packets

const char timeServer[] = "time.nist.gov"; // time.nist.gov NTP server

const int NTP_PACKET_SIZE = 48; // NTP time stamp is in the first 48 bytes of the message

byte packetBuffer[NTP_PACKET_SIZE]; //buffer to hold incoming and outgoing packets

// A UDP instance to let us send and receive packets over UDP
EthernetUDP Udp;

void setup() {
  // You can use Ethernet.init(pin) to configure the CS pin
  //Ethernet.init(10);  // Most Arduino shields
  //Ethernet.init(5);   // MKR ETH shield
  //Ethernet.init(0);   // Teensy 2.0
  //Ethernet.init(20);  // Teensy++ 2.0
  //Ethernet.init(15);  // ESP8266 with Adafruit Featherwing Ethernet
  //Ethernet.init(33);  // ESP32 with Adafruit Featherwing Ethernet

  // Open serial communications and wait for port to open:
  Serial.begin(9600);
  while (!Serial); // wait for serial port to connect. Needed for native USB port only

  // start Ethernet and UDP
  if (Ethernet.begin(mac) == 0) {
    Serial.println("Failed to configure Ethernet using DHCP");
    // Check for Ethernet hardware present
    if (Ethernet.hardwareStatus() == EthernetNoHardware) {
      Serial.println("Ethernet shield was not found.  Sorry, can't run without hardware. :(");
    } else if (Ethernet.linkStatus() == LinkOFF) {
      Serial.println("Ethernet cable is not connected.");
    }
    // no point in carrying on, so do nothing forevermore:
    while (true) {
      delay(1);
    }
  }
  Udp.begin(localPort);
}

void loop() {
  sendNTPpacket(timeServer); // send an NTP packet to a time server

  // wait to see if a reply is available
  delay(1000);
  if (Udp.parsePacket()) {
    // We've received a packet, read the data from it
    Udp.read(packetBuffer, NTP_PACKET_SIZE); // read the packet into the buffer

    // the timestamp starts at byte 40 of the received packet and is four bytes,
    // or two words, long. First, extract the two words:

    unsigned long highWord = word(packetBuffer[40], packetBuffer[41]);
    unsigned long lowWord = word(packetBuffer[42], packetBuffer[43]);
    // combine the four bytes (two words) into a long integer
    // this is NTP time (seconds since Jan 1 1900):
    unsigned long secsSince1900 = highWord << 16 | lowWord;
    Serial.print("Seconds since Jan 1 1900 = ");
    Serial.println(secsSince1900);

    // now convert NTP time into everyday time:
    Serial.print("Unix time = ");
    // Unix time starts on Jan 1 1970. In seconds, that's 2208988800:
    const unsigned long seventyYears = 2208988800UL;
    // Subtract 70 years and change to China time zone:
    unsigned long epoch = secsSince1900 - seventyYears + 28800;
    // print Unix time:
    Serial.println(epoch);


    // print the hour, minute and second:
    Serial.print("The UTC time is ");       // UTC is the time at Greenwich Meridian (GMT)
    Serial.print((epoch  % 86400L) / 3600); // print the hour (86400 equals secs per day)
    Serial.print(':');
    if (((epoch % 3600) / 60) < 10) {
      // In the first 10 minutes of each hour, we'll want a leading '0'
      Serial.print('0');
    }
    Serial.print((epoch  % 3600) / 60); // print the minute (3600 equals secs per minute)
    Serial.print(':');
    if ((epoch % 60) < 10) {
      // In the first 10 seconds of each minute, we'll want a leading '0'
      Serial.print('0');
    }
    Serial.println(epoch % 60); // print the second
  }
  // wait ten seconds before asking for the time again
  delay(10000);
  Ethernet.maintain();
}

// send an NTP request to the time server at the given address
void sendNTPpacket(const char * address) {
  // set all bytes in the buffer to 0
  memset(packetBuffer, 0, NTP_PACKET_SIZE);
  // Initialize values needed to form NTP request
  // (see URL above for details on the packets)
  packetBuffer[0] = 0b11100011;   // LI, Version, Mode
  packetBuffer[1] = 0;     // Stratum, or type of clock
  packetBuffer[2] = 6;     // Polling Interval
  packetBuffer[3] = 0xEC;  // Peer Clock Precision
  // 8 bytes of zero for Root Delay & Root Dispersion
  packetBuffer[12]  = 49;
  packetBuffer[13]  = 0x4E;
  packetBuffer[14]  = 49;
  packetBuffer[15]  = 52;

  // all NTP fields have been given values, now
  // you can send a packet requesting a timestamp:
  Udp.beginPacket(address, 123); // NTP requests are to port 123
  Udp.write(packetBuffer, NTP_PACKET_SIZE);
  Udp.endPacket();
}
结果

样例代码2 - 网页查看IO状态
该示例将使UNO变成了一个web服务器,使统一局域网内的其他设备能够访问查看IO状态
/*!
 * @file webServer.ino
 * @brief A simple web server with DHPC capbabilty.
 * @n       1)Get IP address from router automatically
 * @n       2)Show the value of the analog input pins
 * @copyright  Copyright (c) 2010 DFRobot Co.Ltd (http://www.dfrobot.com)
 * @licence     The MIT License (MIT)
 * @author [yangfeng]<feng.yang@dfrobot.com>
 * @version  V1.0
 * @date  2021-07-14
 * @get from https://www.dfrobot.com
 */
#include <SPI.h>
#include <Ethernet.h>

// Enter a MAC address and IP address for your controller below.
byte mac[] = {0xDE, 0xCD, 0xAE, 0x0F, 0xFE, 0xED };

// Initialize the Ethernet server library
// with the IP address and port you want to use
// (port 80 is default for HTTP):
EthernetServer server(80);

void setup() {
  // Open serial communications and wait for port to open:
  Serial.begin(9600);
  while (!Serial); // wait for serial port to connect. Needed for Leonardo only


  // start the Ethernet connection:
  if (Ethernet.begin(mac) == 0) {
    Serial.println("Failed to configure Ethernet using DHCP");
    // no point in carrying on, so do nothing forevermore:
    for(;;);
  }
  // print your local IP address:
  Serial.print("My IP address: ");
  for (byte thisByte = 0; thisByte < 4; thisByte++) {
    // print the value of each byte of the IP address:
    Serial.print(Ethernet.localIP()[thisByte], DEC);
    Serial.print(".");
  }
  Serial.println();

  // start the Ethernet connection and the server:

  server.begin();
  Serial.print("server is at ");
  Serial.println(Ethernet.localIP());
}


void loop() {
  // listen for incoming clients
  EthernetClient client = server.available();
  if (client) {
    Serial.println("new client");
    // an http request ends with a blank line
    boolean currentLineIsBlank = true;
    while (client.connected()) {
      if (client.available()) {
        char c = client.read();
        Serial.write(c);
        // if you've gotten to the end of the line (received a newline
        // character) and the line is blank, the http request has ended,
        // so you can send a reply
        if (c == '\n' && currentLineIsBlank) {
          // send a standard http response header
          client.println("HTTP/1.1 200 OK");
          client.println("Content-Type: text/html");
          client.println("Connnection: close");
          client.println();
          client.println("<!DOCTYPE HTML>");
          client.println("<html>");
          // add a meta refresh tag, so the browser pulls again every 5 seconds:
          client.println("<meta http-equiv=\"refresh\" content=\"5\">");
          client.println("<link rel=\"stylesheet\" type=\"text/css\" href=\"http://www.dfrobot.com/ihome/stylesheet/stylesheet.css\" />");

          client.println("<center> <a href=\"http://www.dfrobot.com\"><img src=\"http://alturl.com/qf6vz\"></a> </center> ");
          client.println("<br />");

          client.println("<div>");
/********************************Page display section***********************************/
          // output the value of each analog input pin
          for (int analogChannel = 0; analogChannel < 6; analogChannel++) {
            int sensorReading = analogRead(analogChannel);
            client.print("analog input ");
            client.print(analogChannel);
            client.print(" is ");
            client.print(sensorReading);
            client.println("<br />");

          }

          // output the value of each digital input pin
          for (int digitalChannel = 2; digitalChannel < 10; digitalChannel++) {
            int sensorReading = digitalRead(digitalChannel);
            if(digitalChannel!=7&&digitalChannel!=8)
            {
              client.print("Digital input ");
              client.print(digitalChannel);
              client.print(" is ");
              client.print(sensorReading);
              client.println("<br />");
            }
          }
/****************************************************************************/
          client.println("</div>");
          client.println("</html>");
          break;
        }
        if (c == '\n') {
          // you're starting a new line
          currentLineIsBlank = true;
        }
        else if (c != '\r') {
          // you've gotten a character on the current line
          currentLineIsBlank = false;
        }
      }
    }
    // give the web browser time to receive the data
    delay(1);
    // close the connection:
    client.stop();
    Serial.println("client disonnected");
  }
}
结果
上传代码后打开串口监视器,同一局域网其他设备的浏览器中输入IP地址即可访问网页,通过网页可查看IO状态

样例代码3 - 网页控制IO状态
该示例可以让同一局域网的其他设备可以通过网页控制IO2和IO3的状态
/*!
 * @file Webcontrol.ino
 * @brief This demo implements the change of IO port 2 and 3 output state through the web page
 * @copyright  Copyright (c) 2010 DFRobot Co.Ltd (http://www.dfrobot.com)
 * @licence     The MIT License (MIT)
 * @author [yangfeng]<feng.yang@dfrobot.com>
 * @version  V1.0
 * @date  2021-07-14
 * @get from https://www.dfrobot.com
 */
#include <SPI.h>
#include <Ethernet.h>

//Define digital output IO port
uint8_t D2 =2;
uint8_t D3 =3;
int value = LOW;
int value1 = LOW;

// Enter a MAC address and IP address for your controller below.
byte mac[] = {0xDE, 0xCD, 0xAE, 0x0F, 0xFE, 0xED };

// Initialize the Ethernet server library
// with the IP address and port you want to use
// (port 80 is default for HTTP):
EthernetServer server(80);

void setup() {
  // Open serial communications and wait for port to open:
  Serial.begin(9600);
  while (!Serial); // wait for serial port to connect. Needed for Leonardo only
  //Set digital IO port to output mode
  pinMode(D2,OUTPUT);
  pinMode(D3,OUTPUT);
  // start the Ethernet connection:
  if(Ethernet.begin(mac) == 0) {
    Serial.println("Failed to configure Ethernet using DHCP");
    // no point in carrying on, so do nothing forevermore:
    for(;;);
  }
  // print your local IP address:
  Serial.print("My IP address: ");
  for(byte thisByte = 0; thisByte < 4; thisByte++){
    // print the value of each byte of the IP address:
    Serial.print(Ethernet.localIP()[thisByte], DEC);
    Serial.print(".");
  }
  Serial.println();

  // start the Ethernet connection and the server:

  server.begin();
  Serial.print("server is at ");
  Serial.println(Ethernet.localIP());
}


void loop() {
  // listen for incoming clients
  EthernetClient client = server.available();
  String request;
  if(client){
    Serial.println("new client");
    // an http request ends with a blank line
    boolean currentLineIsBlank = true;
    while(client.connected()){
      if(client.available()){
        char c = client.read();
        Serial.write(c);
        request +=c;
        // if you've gotten to the end of the line (received a newline
        // character) and the line is blank, the http request has ended,
        // so you can send a reply
        if (c == '\n' && currentLineIsBlank){
          // send a standard http response header
          client.println("HTTP/1.1 200 OK");
          client.println("Content-Type: text/html");
          client.println("Connnection: close");
          client.println();
          client.println("<!DOCTYPE HTML>");
          client.println("<html>");
          // add a meta refresh tag, so the browser pulls again every 5 seconds:
          client.println("<meta http-equiv=\"refresh\" content=\"5\">");
          client.println("<link rel=\"stylesheet\" type=\"text/css\" href=\"http://www.dfrobot.com/ihome/stylesheet/stylesheet.css\" />");
          client.println("<center> <a href=\"http://www.dfrobot.com\"><img src=\"http://alturl.com/qf6vz\"></a> </center> ");
          client.println("<br />");
          client.println("<div>");
          client.flush();
/********************************Page display section***********************************/
          //Determines whether there is information in the HTTP request that controls the output pins and, if so, sets the output state of the outlet based on the information
          if(request.indexOf("GET /D2=ON") != -1){
            digitalWrite(D2, HIGH);
            value = HIGH;
          }
          if(request.indexOf("GET /D2=OFF") != -1){
            digitalWrite(D2, LOW);
            value = LOW;
          }
          //Reply the status of the set digital IO port according to the request message
          client.print("Digital_2 output: ");
          if(value == HIGH){
            client.print("ON");
          } else{
              client.print("OFF");
          }
          client.println("<br><br>");
          //In the web page set control D2 port hyperlink, used for web control development board digital output IO port state
          client.println("Turn <a href=\"/D2=ON\">ON</a><br>");
          client.println("Turn <a href=\"/D2=OFF\">OFF</a><br>");
          if(request.indexOf("GET /D3=ON") != -1) {
            digitalWrite(D3, HIGH);
            value1 = HIGH;
          }
          if(request.indexOf("GET /D3=OFF") != -1){
            digitalWrite(D3, LOW);
            value1 = LOW;
          }
          client.println("<br />");
          client.print("Digital_3 output: ");
          if(value1 == HIGH){
            client.print("ON");
          } else{
            client.print("OFF");
          }
          client.println("<br><br>");
          client.println("Turn <a href=\"/D3=ON\">ON</a><br>");
          client.println("Turn <a href=\"/D3=OFF\">OFF</a><br>");
/****************************************************************************/
          client.println("</html>");
          break;
        }
        if (c == '\n'){
          // you're starting a new line
          currentLineIsBlank = true;
        } else if (c != '\r'){
          // you've gotten a character on the current line
          currentLineIsBlank = false;
        }
      }
    }
    // give the web browser time to receive the data
    delay(1);
     //close the connection:
    client.stop();
    Serial.println("client disonnected");
  }
}
结果
上传代码后打开串口监视器,同一局域网其他设备的浏览器中输入IP地址即可访问网页,通过此网页可查看和控制IO状态

更多Ethernet库及使用教程
常见问题
Q:计算机浏览器“网页无法加载”怎么办?
A:
1、打开控制面板-->网络和 Internet-->网络和共享中心-->更改适配器设置
2、找到你连接模块的网络-->右键-->属性-->在网络选项卡中找到“Internet协议版本4(TCP/IPv4)"并双击进入属性设置
3、改变IP地址,使计算机IP地址和主控IP地址处于同一局域网即可
Q:获取DHCP失败怎么办?
A:请确认交换机或路由器是否支持DHCP,如果不支持,可以使用指定IP地址的方式设置IP地址。方法请参考更多Ethernet库及使用教程
还没有客户对此产品有任何问题,欢迎通过qq或者论坛联系我们!
更多问题及有趣的应用,可以 访问论坛 进行查阅或发帖。
