使用前请根据MicroPython使用教程烧录固件
1. 基础示例
通过基础示例可以快速的验证开发板板载功能是否正常。
1.1 录音
通过该示例可以验证开发板的MIC是否正常。该示例程序演示了通过MIC采集声音并保存到ESP32-P4上。
import os
from machine import Pin
from machine import I2S

SCK_PIN = 12
#WS_PIN = 25
SD_PIN = 9
I2S_ID = 0
BUFFER_LENGTH_IN_BYTES = 40000

# ======= AUDIO CONFIGURATION =======
WAV_FILE = "mic.wav"
RECORD_TIME_IN_SECONDS = 4
WAV_SAMPLE_SIZE_IN_BITS = 16
FORMAT = I2S.MONO
SAMPLE_RATE_IN_HZ = 4000
# ======= AUDIO CONFIGURATION =======

format_to_channels = {I2S.MONO: 1, I2S.STEREO: 2}
NUM_CHANNELS = format_to_channels[FORMAT]
WAV_SAMPLE_SIZE_IN_BYTES = WAV_SAMPLE_SIZE_IN_BITS // 8
RECORDING_SIZE_IN_BYTES = (
    RECORD_TIME_IN_SECONDS * SAMPLE_RATE_IN_HZ * WAV_SAMPLE_SIZE_IN_BYTES * NUM_CHANNELS
)

def create_wav_header(sampleRate, bitsPerSample, num_channels, num_samples):
    datasize = num_samples * num_channels * bitsPerSample // 8
    o = bytes("RIFF", "ascii")  # (4byte) Marks file as RIFF
    o += (datasize + 36).to_bytes(
        4, "little"
    )  # (4byte) File size in bytes excluding this and RIFF marker
    o += bytes("WAVE", "ascii")  # (4byte) File type
    o += bytes("fmt ", "ascii")  # (4byte) Format Chunk Marker
    o += (16).to_bytes(4, "little")  # (4byte) Length of above format data
    o += (1).to_bytes(2, "little")  # (2byte) Format type (1 - PCM)
    o += (num_channels).to_bytes(2, "little")  # (2byte)
    o += (sampleRate).to_bytes(4, "little")  # (4byte)
    o += (sampleRate * num_channels * bitsPerSample // 8).to_bytes(4, "little")  # (4byte)
    o += (num_channels * bitsPerSample // 8).to_bytes(2, "little")  # (2byte)
    o += (bitsPerSample).to_bytes(2, "little")  # (2byte)
    o += bytes("data", "ascii")  # (4byte) Data Chunk Marker
    o += (datasize).to_bytes(4, "little")  # (4byte) Data size in bytes
    return o

audio_in = I2S(
    I2S_ID,
    sck=Pin(SCK_PIN),
    #ws=Pin(WS_PIN),
    sd=Pin(SD_PIN),
    mode=I2S.PDM_RX,
    bits=WAV_SAMPLE_SIZE_IN_BITS,
    format=FORMAT,
    rate=SAMPLE_RATE_IN_HZ * 4,
    ibuf=BUFFER_LENGTH_IN_BYTES,
)

# allocate sample arrays
# memoryview used to reduce heap allocation in while loop
mic_samples = bytearray(40000)
mic_samples_mv = memoryview(mic_samples)

recording_buffer = bytearray(RECORDING_SIZE_IN_BYTES)
bytes_received = 0

print("Recording size: {} bytes".format(RECORDING_SIZE_IN_BYTES))
print("==========  START RECORDING ==========")
try:
    while bytes_received < RECORDING_SIZE_IN_BYTES:
        # read a block of samples from the I2S microphone
        bytes_read = audio_in.readinto(mic_samples_mv)
        if bytes_read > 0:
            bytes_to_write = min(
                bytes_read, RECORDING_SIZE_IN_BYTES - bytes_received
            )
            recording_buffer[bytes_received:bytes_received+bytes_to_write] = mic_samples_mv[0:bytes_to_write]
            print('FILL', bytes_received, bytes_to_write)
            bytes_received += bytes_read
    print("==========  DONE RECORDING ==========")
except (KeyboardInterrupt, Exception) as e:
    print("caught exception {} {}".format(type(e).__name__, e))

# Write to WAV
wav = open(WAV_FILE, "wb")

# create header for WAV file and write to SD card
wav_header = create_wav_header(
    SAMPLE_RATE_IN_HZ,
    WAV_SAMPLE_SIZE_IN_BITS,
    NUM_CHANNELS,
    SAMPLE_RATE_IN_HZ * RECORD_TIME_IN_SECONDS,
)
wav.write(wav_header)

# write samples to WAV file
wav.write(recording_buffer)

# cleanup
wav.close()
print("Wrote ", WAV_FILE)
audio_in.deinit()

应用案例来自于:[Micropython]玩转ESP32P4:开启使用MicroPython
1.2 TF卡
通过该示例可以验证开发板的TF卡座子是否正常。该示例程序演示了读取TF卡的文件列表(使用前请插入TF卡到)。
from machine import Pin,SDCard
import os

sd = SDCard(slot=0,width=4, sck=43, cmd=44, data=(39, 40, 41, 42), freq=40000000)

os.mount(sd, '/sd')
os.listdir('/sd')
print(os.listdir('/sd'))
os.listdir('/sd')
应用案例来自于:[Micropython]玩转ESP32P4:开启使用MicroPython
1.3 连接WiFi
通过该示例可以验证开发板的ESP32-C6无线通讯模组是否正常。该示例程序演示了通过ESP32-C6连接热点(使用前请修改第7行代码的SSIS和PWD)。
import network,time
def connect():
    wlan = network.WLAN(network.STA_IF)
    wlan.active(True)
    if not wlan.isconnected():
        print('esp32p4正在联网',end="")
        wlan.connect('SSID', 'PWD')
        while not wlan.isconnected():
            print(".",end="")
            time.sleep(1)
    print('\n网络信息为: ', wlan.ifconfig())

connect()

应用案例来自于:[Micropython]玩转ESP32P4:开启使用MicroPython
2. 应用示例
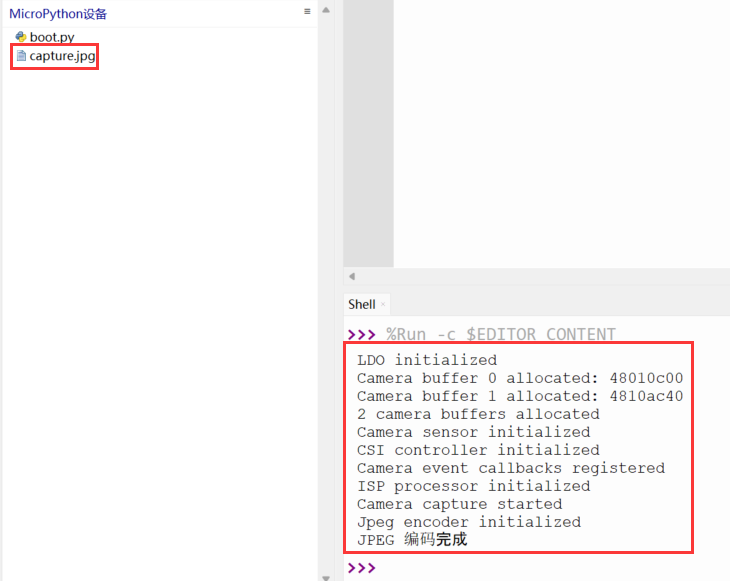
2.1 摄像头拍照
通过该示例演示了通过ESP32-P4进行拍照,并保存到设备。(使用前请连接摄像头)。
适配的摄像头:
-
SEN0173 树莓派摄像头模块 500万像素
import camera,time,jpeg
camera.init()
time.sleep(5)
img = camera.capture()  # bytes
camera.deinit()
with open("capture.jpg", "wb") as f:
    f.write(img)

print("JPEG 编码完成")
应用案例来自于:[Micropython]玩转ESP32P4:开启使用MicroPython
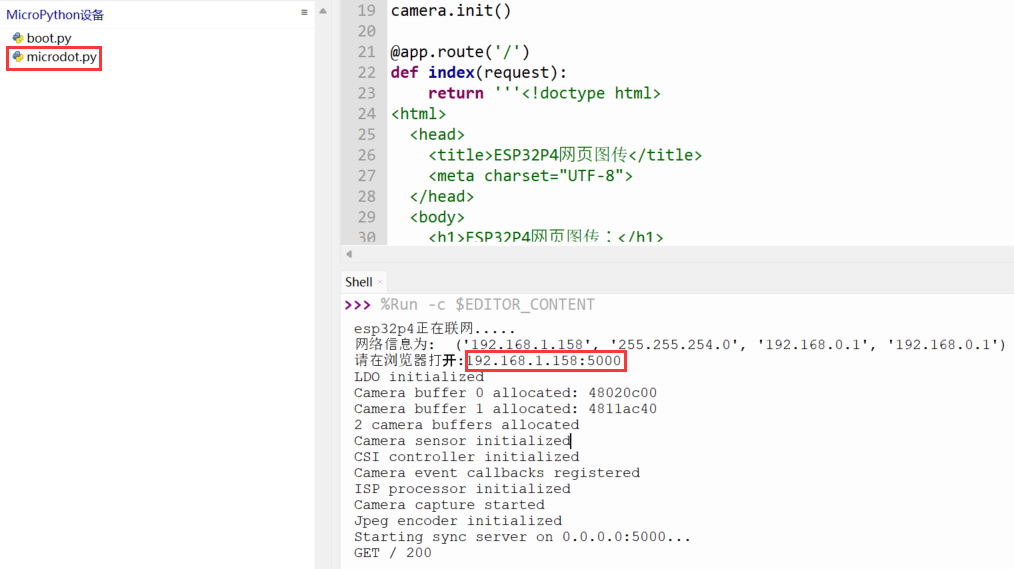
2.2 网页图传
该示例通过ESP32-P4创建一个网页服务器,可以通过浏览器查看摄像头的实时画面。
- 上传【microdot.py】文件到ESP32-P4
- 修改第9行代码的SSIS和PWD,并运行脚本
- 根据打印信息,通过浏览器访问IP地址即可访问网页(访问网页的设备和ESP32-P4须在同局域网)
from microdot import Microdot
import time,jpeg,camera,network

def connect():
    wlan = network.WLAN(network.STA_IF)
    wlan.active(True)
    if not wlan.isconnected():
        print('esp32p4正在联网',end="")
        wlan.connect('ssid', 'PWD')
        while not wlan.isconnected():
            print(".",end="")
            time.sleep(1)
    print('\n网络信息为: ', wlan.ifconfig())
    ifconfig = wlan.ifconfig()
    print('请在浏览器打开:{}:5000'.format(ifconfig[0]))

connect()
app = Microdot()
camera.init()

@app.route('/')
def index(request):
    return '''<!doctype html>
<html>
  <head>
    <title>ESP32P4网页图传</title>
    <meta charset="UTF-8">
  </head>
  <body>
    <h1>ESP32P4网页图传:</h1>
    <img src="/video_feed" width="50%">
  </body>
</html>''', 200, {'Content-Type': 'text/html; charset=utf-8'}

@app.route('/video_feed')
def video_feed(request):
    def stream():
        yield b'--frame\r\n'
        while True:
            frame = camera.capture()
            yield b'Content-Type: image/jpeg\r\n\r\n' + frame + \
                b'\r\n--frame\r\n'
            gc.collect()
            #time.sleep_ms(50)

    return stream(), 200, {'Content-Type':
                           'multipart/x-mixed-replace; boundary=frame'}

if __name__ == '__main__':
    app.run(debug=True)
    camera.deinit()
应用案例来自于:[Micropython]玩转ESP32P4:开启使用MicroPython
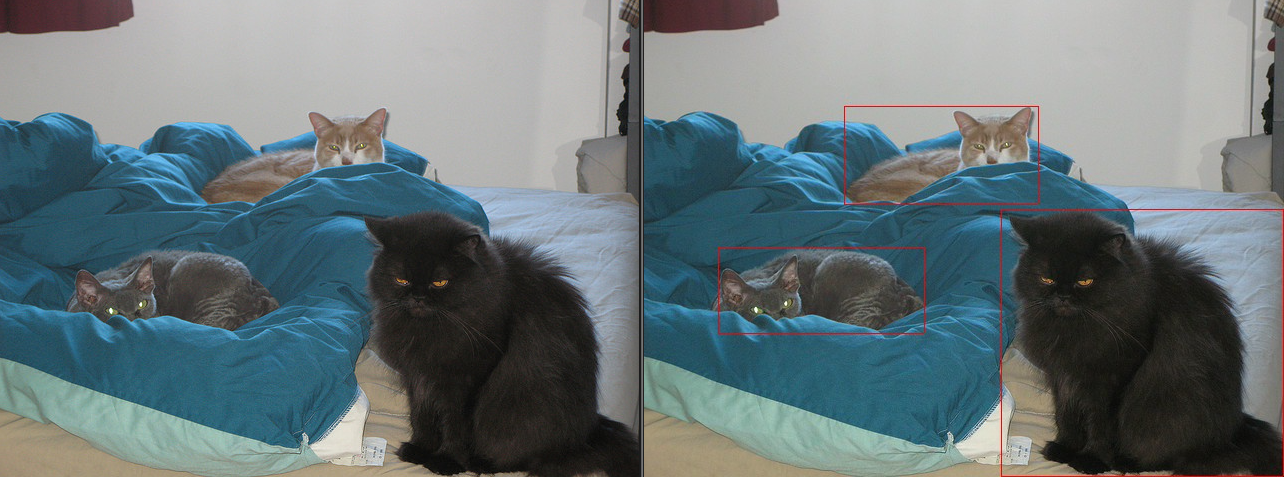
2.3 识别猫
该示例演示了通过ESP32-P4识别图片中的猫,ESP32-P4将标注出图片中的猫并保存为新的图片。
- 上传【cat.jpg】文件到ESP32-P4
- 运行脚本即可看到位置信息
- 点击【停止/重启后端进程】按键即可看到MicroPython设备中标注的图片
from espdl import CatDetector
from jpeg import Decoder, Encoder

decoder = Decoder()
# 捕获并处理图像
img = open("cat.jpg", "rb").read()  # 捕获原始图像(通常是JPEG格式)
wh = decoder.get_img_info(img)# 获取图像的宽度和高度
# 获取图像的宽度和高度
width, height = wh
encoder = Encoder(width=width, height=height, pixel_format="RGB888")
face_detector = CatDetector(width=width, height=height)


framebuffer = decoder.decode(img)  # 转换为RGB888格式
# 将memoryview转换为bytearray以便修改
framebuffer = bytearray(framebuffer)
# 运行检测
results = face_detector.run(framebuffer)

# 绘制边框
def draw_rectangle(buffer, width, height, x, y, w, h, list1, color=(255, 0, 0)):
    """
    在RGB888格式的图像缓冲区上绘制矩形边框
    :param buffer: 图像缓冲区
    :param width: 图像宽度
    :param height: 图像高度
    :param x: 边框左上角的x坐标
    :param y: 边框左上角的y坐标
    :param w: 边框宽度
    :param h: 边框高度
    :param color: 边框颜色(RGB格式)
    """
    # 辅助函数:设置单个像素的颜色
    def set_pixel(buffer, width, x, y, color):
        offset = (y * width + x) * 3
        buffer[offset] = color[0]  # R
        buffer[offset + 1] = color[1]  # G
        buffer[offset + 2] = color[2]  # B

    # 辅助函数:绘制更大的点
    def draw_large_dot(buffer, width, x, y, color, size=3):
        for i in range(x - size, x + size + 1):
            for j in range(y - size, y + size + 1):
                if 0 <= i < width and 0 <= j < height:
                    set_pixel(buffer, width, i, j, color)

    # 绘制上边框
    for i in range(x, x + w):
        if 0 <= i < width and 0 <= y < height:
            set_pixel(buffer, width, i, y, color)

    # 绘制下边框
    for i in range(x, x + w):
        if 0 <= i < width and 0 <= y + h < height:
            set_pixel(buffer, width, i, y + h, color)

    # 绘制左边框
    for j in range(y, y + h):
        if 0 <= j < height and 0 <= x < width:
            set_pixel(buffer, width, x, j, color)

    # 绘制右边框
    for j in range(y, y + h):
        if 0 <= j < height and 0 <= x + w < width:
            set_pixel(buffer, width, x + w, j, color)

    # 绘制特征点
    if list1:
        draw_large_dot(buffer, width, list1[0], list1[1], (0, 0, 255), size=2)
        draw_large_dot(buffer, width, list1[2], list1[3], (0, 0, 255), size=2)
        draw_large_dot(buffer, width, list1[4], list1[5], (0, 255, 0), size=2)
        draw_large_dot(buffer, width, list1[6], list1[7], (255, 0, 0), size=2)
        draw_large_dot(buffer, width, list1[8], list1[9], (255, 0, 0), size=2)
if results:
    # 在图像上绘制人脸边框
    for face in results:
        print(face)
        x1, y1, x2, y2 = face['box']
        draw_rectangle(framebuffer, width, height, x1, y1, x2 - x1, y2 - y1, None, color=(255, 0, 0))  # 使用红色边框

# 将带有边框的图像重新编码为JPEG格式并保存
marked_img = encoder.encode(framebuffer)
with open("cat_marked.jpg", "wb") as f:
    f.write(marked_img)
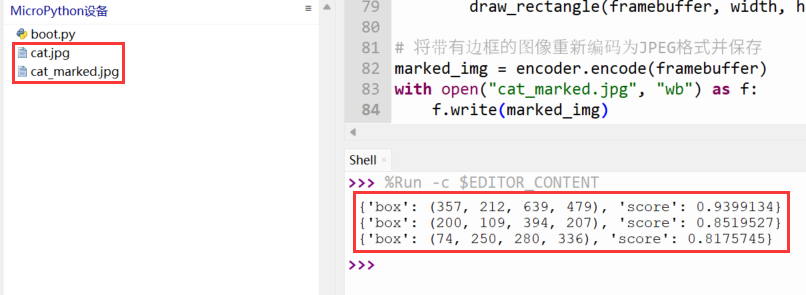
标注结果
应用案例来自于:[Micropython]Micropython玩转ESP32P4:绑定AI相关模块
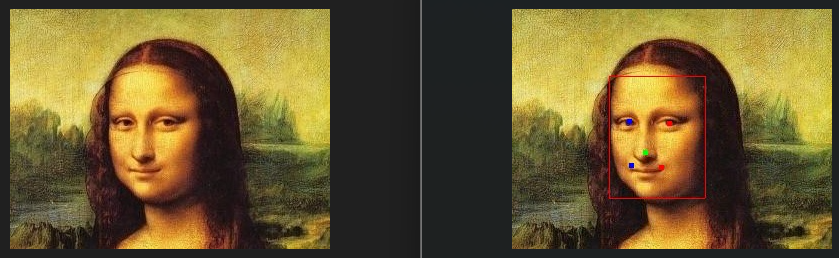
2.4 识别人脸
该示例演示了通过ESP32-P4识别图片中的人脸,ESP32-P4将标注出图片中的人脸并保存为新的图片。
- 上传【face.jpg】文件到ESP32-P4
- 运行脚本即可看到位置信息
- 点击【停止/重启后端进程】按键即可看到MicroPython设备中标注的图片
from espdl import FaceDetector
from jpeg import Decoder, Encoder

decoder = Decoder()
encoder = Encoder(width=320, height=240, pixel_format="RGB888")
face_detector = FaceDetector()

# 捕获并处理图像
img = open("face.jpg", "rb").read()  # 捕获原始图像(通常是JPEG格式)
framebuffer = decoder.decode(img)  # 转换为RGB888格式
# 将memoryview转换为bytearray以便修改
framebuffer = bytearray(framebuffer)
# 运行人脸检测
results = face_detector.run(framebuffer)

# 绘制边框
def draw_rectangle(buffer, width, height, x, y, w, h, list1, color=(255, 0, 0)):
    """
    在RGB888格式的图像缓冲区上绘制矩形边框
    :param buffer: 图像缓冲区
    :param width: 图像宽度
    :param height: 图像高度
    :param x: 边框左上角的x坐标
    :param y: 边框左上角的y坐标
    :param w: 边框宽度
    :param h: 边框高度
    :param color: 边框颜色(RGB格式)
    """
    # 辅助函数:设置单个像素的颜色
    def set_pixel(buffer, width, x, y, color):
        offset = (y * width + x) * 3
        buffer[offset] = color[0]  # R
        buffer[offset + 1] = color[1]  # G
        buffer[offset + 2] = color[2]  # B

    # 辅助函数:绘制更大的点
    def draw_large_dot(buffer, width, x, y, color, size=3):
        for i in range(x - size, x + size + 1):
            for j in range(y - size, y + size + 1):
                if 0 <= i < width and 0 <= j < height:
                    set_pixel(buffer, width, i, j, color)

    # 绘制上边框
    for i in range(x, x + w):
        if 0 <= i < width and 0 <= y < height:
            set_pixel(buffer, width, i, y, color)

    # 绘制下边框
    for i in range(x, x + w):
        if 0 <= i < width and 0 <= y + h < height:
            set_pixel(buffer, width, i, y + h, color)

    # 绘制左边框
    for j in range(y, y + h):
        if 0 <= j < height and 0 <= x < width:
            set_pixel(buffer, width, x, j, color)

    # 绘制右边框
    for j in range(y, y + h):
        if 0 <= j < height and 0 <= x + w < width:
            set_pixel(buffer, width, x + w, j, color)

    # 绘制特征点
    if list1:
        draw_large_dot(buffer, width, list1[0], list1[1], (0, 0, 255), size=2)
        draw_large_dot(buffer, width, list1[2], list1[3], (0, 0, 255), size=2)
        draw_large_dot(buffer, width, list1[4], list1[5], (0, 255, 0), size=2)
        draw_large_dot(buffer, width, list1[6], list1[7], (255, 0, 0), size=2)
        draw_large_dot(buffer, width, list1[8], list1[9], (255, 0, 0), size=2)

# 在图像上绘制人脸边框
for face in results:
    print(face)
    x1, y1, x2, y2 = face['box']
    draw_rectangle(framebuffer, 320, 240, x1, y1, x2 - x1, y2 - y1, face['features'], color=(255, 0, 0))  # 使用红色边框

# 将带有边框的图像重新编码为JPEG格式并保存
marked_img = encoder.encode(framebuffer)
with open("face_marked.jpg", "wb") as f:
    f.write(marked_img)

标注结果
应用案例来自于:[Micropython]Micropython玩转ESP32P4:绑定AI相关模块
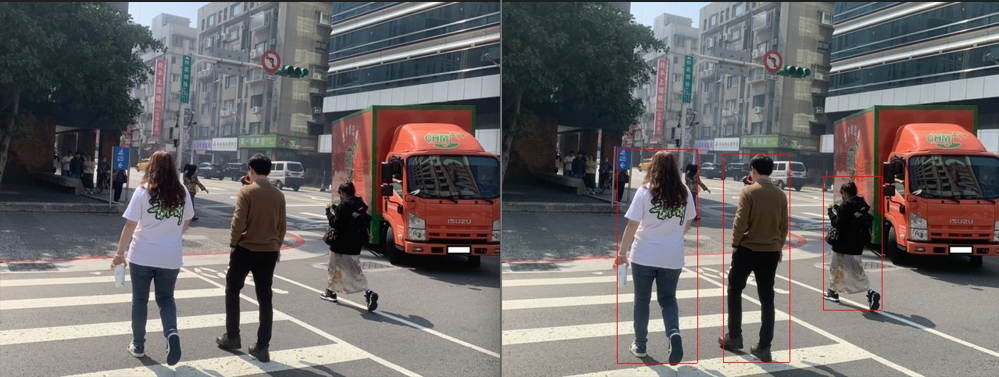
2.5 行人检测
该示例演示了通过ESP32-P4识别图片中的行人,ESP32-P4将标注出图片中的行人并保存为新的图片。
- 上传【pedestrian.jpg】文件到ESP32-P4
- 运行脚本即可看到位置信息
- 点击【停止/重启后端进程】按键即可看到MicroPython设备中标注的图片
from espdl import HumanDetector
from jpeg import Decoder, Encoder


decoder = Decoder()
encoder = Encoder(width=640, height=480,pixel_format="RGB888")
human_detector = HumanDetector(width=640, height=480)

# 捕获并处理图像
img = open("pedestrian.jpg", "rb").read()  # 捕获原始图像(通常是JPEG格式)
framebuffer = decoder.decode(img)  # 转换为RGB888格式
# 将memoryview转换为bytearray以便修改
framebuffer = bytearray(framebuffer)
# 运行行人检测
results = human_detector.run(framebuffer)

# 绘制边框
def draw_rectangle(buffer, width, height, x, y, w, h, color=(255, 0, 0)):
    """
    在RGB888格式的图像缓冲区上绘制矩形边框
    :param buffer: 图像缓冲区
    :param width: 图像宽度
    :param height: 图像高度
    :param x: 边框左上角的x坐标
    :param y: 边框左上角的y坐标
    :param w: 边框宽度
    :param h: 边框高度
    :param color: 边框颜色(RGB格式)
    """
    # 辅助函数:设置单个像素的颜色
    def set_pixel(buffer, width, x, y, color):
        offset = (y * width + x) * 3
        buffer[offset] = color[0]  # R
        buffer[offset + 1] = color[1]  # G
        buffer[offset + 2] = color[2]  # B

    # 绘制上边框
    for i in range(x, x + w):
        if 0 <= i < width and 0 <= y < height:
            set_pixel(buffer, width, i, y, color)

    # 绘制下边框
    for i in range(x, x + w):
        if 0 <= i < width and 0 <= y + h < height:
            set_pixel(buffer, width, i, y + h, color)

    # 绘制左边框
    for j in range(y, y + h):
        if 0 <= j < height and 0 <= x < width:
            set_pixel(buffer, width, x, j, color)

    # 绘制右边框
    for j in range(y, y + h):
        if 0 <= j < height and 0 <= x + w < width:
            set_pixel(buffer, width, x + w, j, color)

# 在图像上绘制边框
for face in results:
    print(face)
    x1, y1, x2, y2 = face['box']
    draw_rectangle(framebuffer, 640, 480, x1, y1, x2-x1, y2-y1, color=(255, 0, 0))  # 使用红色边框

# 将带有边框的图像重新编码为JPEG格式并保存
marked_img = encoder.encode(framebuffer)
with open("pedestrian_marked.jpg", "wb") as f:
    f.write(marked_img)
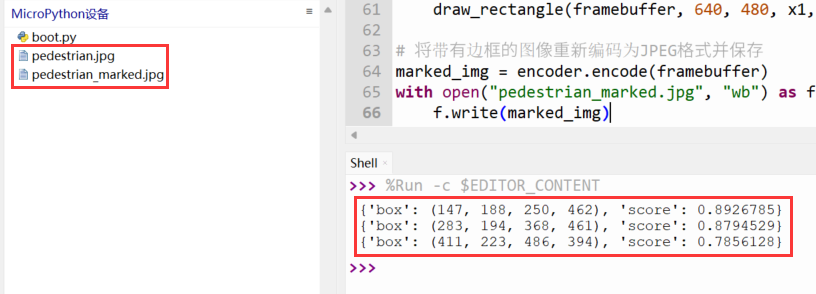
标注结果
应用案例来自于:[Micropython]Micropython玩转ESP32P4:绑定AI相关模块
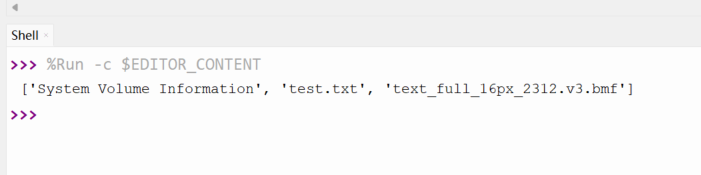
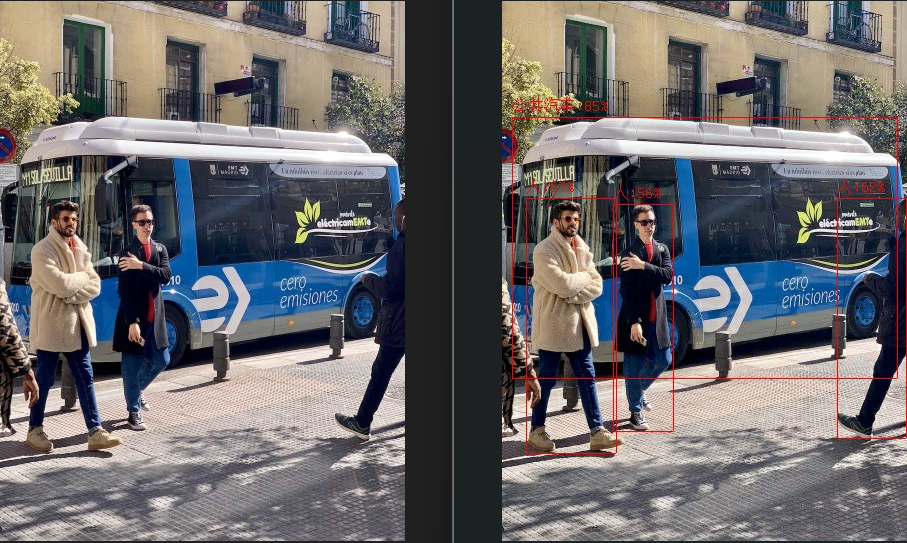
2.6 yolo11
该示例演示了通过ESP32-P4对图片中物体进行分类,ESP32-P4将标注出图片中的物体信息并保存为新的图片。
- 上传【yolo.jpg】和【myufont.py】文件到ESP32-P4
- 运行脚本即可看到位置信息
- 点击【停止/重启后端进程】按键即可看到MicroPython设备中标注的图片
from espdl import CocoDetector
from jpeg import Decoder, Encoder
from myufont import CustomBMFont
from machine import Pin,SDCard
import os
sd = SDCard(slot=0,width=4, sck=43, cmd=44, data=(39, 40, 41, 42))
os.mount(sd, '/sd')
decoder = Decoder()
encoder = Encoder(width=405, height=540,pixel_format="RGB888")
face_detector = CocoDetector(width=405, height=540)
MSCOCO_CLASSES = [
    "人", "自行车", "汽车", "摩托车", "飞机", "公共汽车", "火车", "卡车", "船", "交通灯",
    "消防栓", "消防水带", "停车计时器", "长椅", "鸟", "猫", "狗", "马", "羊", "牛",
    "大象", "熊", "斑马", "长颈鹿", "背包", "伞", "手提包", "领带", "行李箱", "飞盘",
    "滑雪板", "滑雪杖", "滑板", "冲浪板", "网球拍", "瓶子", "酒杯", "杯子", "刀叉", "碗",
    "香蕉", "苹果", "三明治", "橙子", "西兰花", "胡萝卜", "热狗", "披萨", "甜甜圈", "蛋糕",
    "椅子", "沙发", "盆栽", "床", "餐桌", "马桶", "电视", "笔记本电脑", "鼠标", "遥控器",
    "键盘", "手机", "微波炉", "烤箱", "烤面包机", "水槽", "冰箱", "书", "时钟", "花瓶",
    "剪刀", "泰迪熊", "吹风机", "牙刷"
]
font = CustomBMFont('/sd/text_full_16px_2312.v3.bmf')
# 捕获并处理图像
img = open("yolo.jpg", "rb").read()  # 捕获原始图像(通常是JPEG格式)
framebuffer = decoder.decode(img)  # 转换为RGB888格式
# 将memoryview转换为bytearray以便修改
framebuffer = bytearray(framebuffer)
# 运行人脸检测
results = face_detector.run(framebuffer)

# 绘制边框
def draw_rectangle(buffer, width, height, x, y, w, h,font,label, color=(255, 0, 0)):
    """
    在RGB888格式的图像缓冲区上绘制矩形边框
    :param buffer: 图像缓冲区
    :param width: 图像宽度
    :param height: 图像高度
    :param x: 边框左上角的x坐标
    :param y: 边框左上角的y坐标
    :param w: 边框宽度
    :param h: 边框高度
    :param color: 边框颜色(RGB格式)
    """
    # 辅助函数:设置单个像素的颜色
    def set_pixel(buffer, width, x, y, color):
        offset = (y * width + x) * 3
        buffer[offset] = color[0]  # R
        buffer[offset + 1] = color[1]  # G
        buffer[offset + 2] = color[2]  # B
    def is_chinese(ch):
        """判断一个字符是否为中文字符"""
        if '\u4e00' <= ch <= '\u9fff' or \
           '\u3400' <= ch <= '\u4dbf' or \
           '\u20000' <= ch <= '\u2a6df':
            return True
        return False
    def text(font, text, x_start, y_start, color,spacing=0, line_spacing=0, max_width=width):
        font_size = font.font_size
        bytes_per_row = (font_size + 7) // 8  # 每行占用的字节数
        x, y = x_start, y_start

        for char in text:
            # 处理换行符
            if char == '\n':
                y += font_size + line_spacing
                x = x_start
                continue
            if char == '\r':
                x += 2*font_size
                continue
            # 获取字符宽度(中文字符全宽,ASCII字符半宽)
            char_width = font_size if is_chinese(char) else font_size // 2

            # 检查是否需要换行
            if max_width is not None and x + char_width > x_start + max_width:
                y += font_size + line_spacing
                x = x_start

            # 获取字符位图
            bitmap = font.get_char_bitmap(char)

            # 绘制字符
            for row in range(font_size):
                for col in range(char_width if not is_chinese(char) else font_size):
                    byte_idx = row * bytes_per_row + col // 8
                    bit_mask = 0x80 >> (col % 8)

                    if byte_idx < len(bitmap) and (bitmap[byte_idx] & bit_mask):
                        set_pixel(framebuffer,max_width,x + col, y + row, color)

            # 移动到下一个字符位置
            x += char_width + spacing
    # 绘制上边框
    for i in range(x, x + w):
        if 0 <= i < width and 0 <= y < height:
            set_pixel(buffer, width, i, y, color)

    # 绘制下边框
    for i in range(x, x + w):
        if 0 <= i < width and 0 <= y + h < height:
            set_pixel(buffer, width, i, y + h, color)

    # 绘制左边框
    for j in range(y, y + h):
        if 0 <= j < height and 0 <= x < width:
            set_pixel(buffer, width, x, j, color)

    # 绘制右边框
    for j in range(y, y + h):
        if 0 <= j < height and 0 <= x + w < width:
            set_pixel(buffer, width, x + w, j, color)
    text(font,label, x, y-20, color)

# 在图像上绘制人脸边框
for face in results:
    #print(face)
    x1, y1, x2, y2 = face['box']
    label = MSCOCO_CLASSES[face['category']]+":"+str(int(face['score']*100))+"%"
    draw_rectangle(framebuffer, 405, 540, x1, y1, x2-x1, y2-y1,font,label)  # 使用红色边框
    print(label)
# 将带有边框的图像重新编码为JPEG格式并保存
marked_img = encoder.encode(framebuffer)
with open("yolo_marked.jpg", "wb") as f:
    f.write(marked_img)
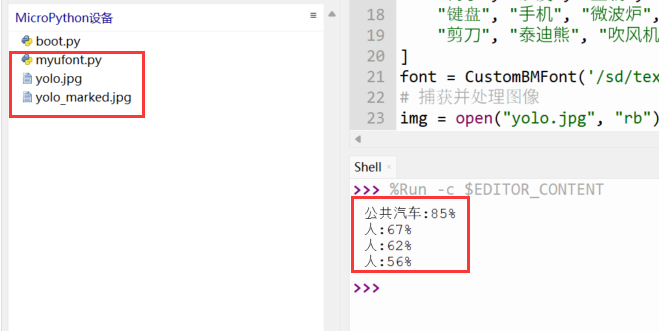
标注结果
应用案例来自于:[Micropython]Micropython玩转ESP32P4:绑定AI相关模块
2.7 MQTT上报数据
该示例演示了ESP32-P4通过MQTT协议上报数据到网络(使用前请修改11-20行代码信息)。
#!/usr/bin/env python3
# main.py
import json
import network
import time
import random
from machine import ADC, Pin
from umqtt.simple import MQTTClient

# ========== 用户可改区域 ==========
WIFI_SSID = "xxx"
WIFI_PASS = "xxx"
ADC_PIN   = 16            # ESP32-P4 的 ADC0 引脚
MQTT_SERVER = "192.168.31.160"
MQTT_PORT   = 32768
MQTT_CLIENT_ID = 'micropython-client-{id}'.format(id=random.getrandbits(8))
MQTT_USER   = "xxx"
MQTT_PASS   = "xxx"
PUB_TOPIC   = "esp/adc/temp"
PUB_INTERVAL = 2         # 发布间隔(秒)
# ===================================
def wifi_connect(ssid, pwd):
    sta = network.WLAN(network.STA_IF)
    sta.active(True)
    if not sta.isconnected():
        print("Connecting Wi-Fi...")
        sta.connect(ssid, pwd)
        for _ in range(20):
            if sta.isconnected():
                break
            time.sleep(1)
    print("Wi-Fi connected:", sta.ifconfig())
# --------------- 温度转换 ---------------
def read_temperature():
    """
    线性转换:
    参考电压 3.3 V,温度传感器输出 10 mV/°C
    """
    adc = ADC(Pin(ADC_PIN))
    adc.atten(ADC.ATTN_11DB)       # 0-3.3 V
    raw = adc.read()
    volt = raw / 4095 * 3.3        # ADC 电压
    temp = (volt - 1.4) * 100      # ADC 温度
    return round(temp, 1)

# --------------- MQTT 连接 ---------------
def mqtt_connect():
    c = MQTTClient(MQTT_CLIENT_ID, MQTT_SERVER, MQTT_PORT,
                   MQTT_USER, MQTT_PASS)
    c.connect()
    print("[MQTT] Connected to", MQTT_SERVER)
    return c

def mqtt_publish(client, data: dict):
    payload = json.dumps(data)
    client.publish(PUB_TOPIC, payload)
    print("[MQTT] Sent ->", payload)

# --------------- 主函数 ---------------
def main():
    wifi_connect(WIFI_SSID, WIFI_PASS)  # 连接 WiFi
    client = mqtt_connect()
    while True:
        temp = read_temperature()
        mqtt_publish(client, {"temperature": temp})
        time.sleep(PUB_INTERVAL)

if __name__ == "__main__":
    main()