简介
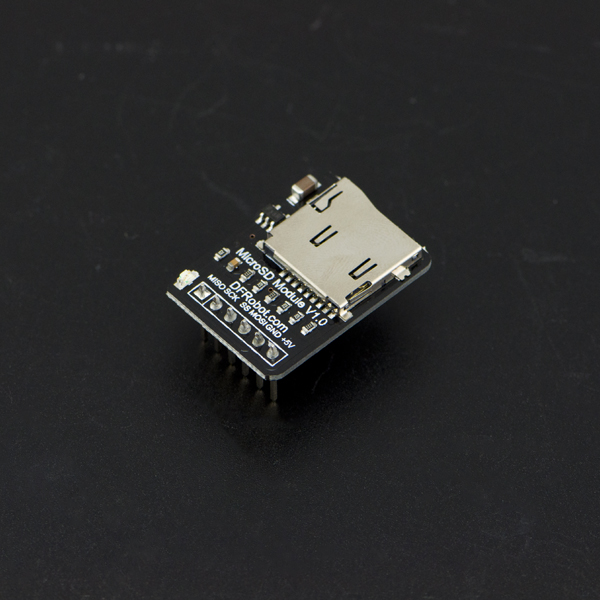
Micro SD(TF)卡的体积为 15mm x 11mm x1mm ,差不多相等于手指甲的大小,是现时最细小的记忆卡。存储模块是互动媒体设备和机器人平台最常用的存储单元,其采用排针型SPI接口设计,可插接到任意单片机控制器上,板载电源指示灯,可实时观察电源供给情况。采用优质钽电解电容滤波退耦,信号回路均用合适电阻进行阻抗匹配以及消寄生振荡处理。本模块兼容Arduino传感器扩展板V5、Arduino MEGA传感器扩展板。
注意:本模块不包含MicroSD(TF)卡。
产品参数
- 工作电压:5V
- 平面尺寸:20x28mm
- 接口类型:SPI
- 存储卡类型:标准MicroSD(TF)卡
使用说明
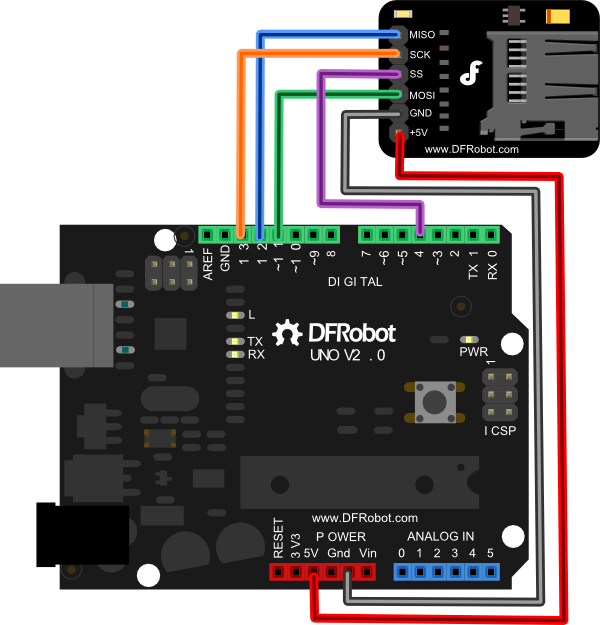
接线图

| 接线说明 | |
|---|---|
| SD模块 | Arduino |
| MISO | D12 |
| SCK | D13 |
| SS片选 | D4 |
| MOSI | D11 |
| GND | GND |
| VCC | 5V |
注意:不同型号的控制板SPI接口可能有所不同,请查阅您所使用的控制板的SPI接口进行接线。
样例代码
库安装
打开Arduino IDE中的样例代码“CardInfo”,上传到Uno。
注意:样例中用到了SD卡的库文件“SD.h”,该库已经包含在Arduino的安装目录中,您也可以自己下载其他开源SD模块库文件。
    /*
      SD card test

     This example shows how use the utility libraries on which the'
     SD library is based in order to get info about your SD card.
     Very useful for testing a card when you're not sure whether its working or not.

     The circuit:
      * SD card attached to SPI bus as follows:
     ** MOSI - pin 11 on Arduino Uno/Duemilanove/Diecimila
     ** MISO - pin 12 on Arduino Uno/Duemilanove/Diecimila
     ** CLK - pin 13 on Arduino Uno/Duemilanove/Diecimila
     ** CS - depends on your SD card shield or module.
            Pin 4 used here for consistency with other Arduino examples


     created  28 Mar 2011
     by Limor Fried
     modified 9 Apr 2012
     by Tom Igoe
     */
     // include the SD library:
    #include <SD.h>

    // set up variables using the SD utility library functions:
    Sd2Card card;
    SdVolume volume;
    SdFile root;

    // change this to match your SD shield or module;
    // Arduino Ethernet shield: pin 4
    // Adafruit SD shields and modules: pin 10
    // Sparkfun SD shield: pin 8
    const int chipSelect = 4;

    void setup()
    {
     // Open serial communications and wait for port to open:
      Serial.begin(9600);
       while (!Serial) {
        ; // wait for serial port to connect. Needed for Leonardo only
      }


      Serial.print("\nInitializing SD card...");
      // On the Ethernet Shield, CS is pin 4. It's set as an output by default.
      // Note that even if it's not used as the CS pin, the hardware SS pin
      // (10 on most Arduino boards, 53 on the Mega) must be left as an output
      // or the SD library functions will not work.
      pinMode(10, OUTPUT);     // change this to 53 on a mega


      // we'll use the initialization code from the utility libraries
      // since we're just testing if the card is working!
      if (!card.init(SPI_HALF_SPEED, chipSelect)) {
        Serial.println("initialization failed. Things to check:");
        Serial.println("* is a card is inserted?");
        Serial.println("* Is your wiring correct?");
        Serial.println("* did you change the chipSelect pin to match your shield or module?");
        return;
      } else {
       Serial.println("Wiring is correct and a card is present.");
      }

      // print the type of card
      Serial.print("\nCard type: ");
      switch(card.type()) {
        case SD_CARD_TYPE_SD1:
          Serial.println("SD1");
          break;
        case SD_CARD_TYPE_SD2:
          Serial.println("SD2");
          break;
        case SD_CARD_TYPE_SDHC:
          Serial.println("SDHC");
          break;
        default:
          Serial.println("Unknown");
      }

      // Now we will try to open the 'volume'/'partition' - it should be FAT16 or FAT32
      if (!volume.init(card)) {
        Serial.println("Could not find FAT16/FAT32 partition.\nMake sure you've formatted the card");
        return;
      }


      // print the type and size of the first FAT-type volume
      uint32_t volumesize;
      Serial.print("\nVolume type is FAT");
      Serial.println(volume.fatType(), DEC);
      Serial.println();

      volumesize = volume.blocksPerCluster();    // clusters are collections of blocks
      volumesize *= volume.clusterCount();       // we'll have a lot of clusters
      volumesize *= 512;                            // SD card blocks are always 512 bytes
      Serial.print("Volume size (bytes): ");
      Serial.println(volumesize);
      Serial.print("Volume size (Kbytes): ");
      volumesize /= 1024;
      Serial.println(volumesize);
      Serial.print("Volume size (Mbytes): ");
      volumesize /= 1024;
      Serial.println(volumesize);


      Serial.println("\nFiles found on the card (name, date and size in bytes): ");
      root.openRoot(volume);

      // list all files in the card with date and size
      root.ls(LS_R | LS_DATE | LS_SIZE);
    }


    void loop(void) {

    }
结果
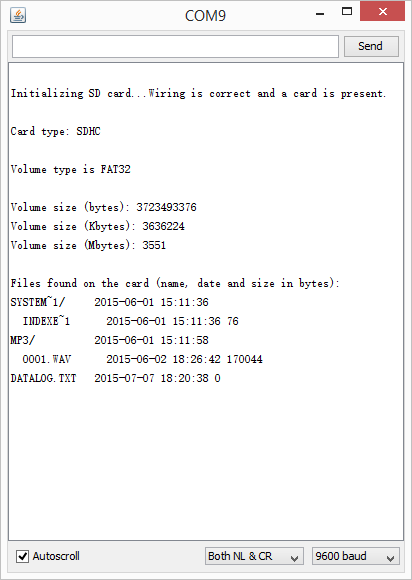
打开Arduino IDE串口监视窗,如果您的SD卡无误,可以得到SD卡信息:

如果SD卡有误或者接线有误,您会看到以下信息:

疑难解答
更多问题及有趣的应用,请访问论坛

