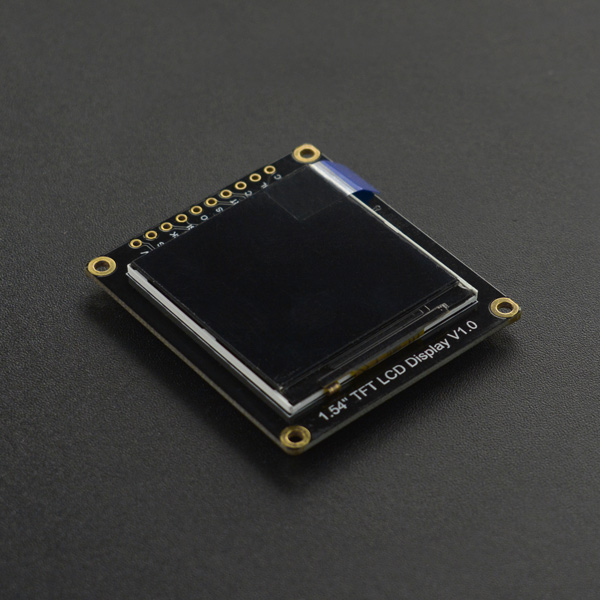
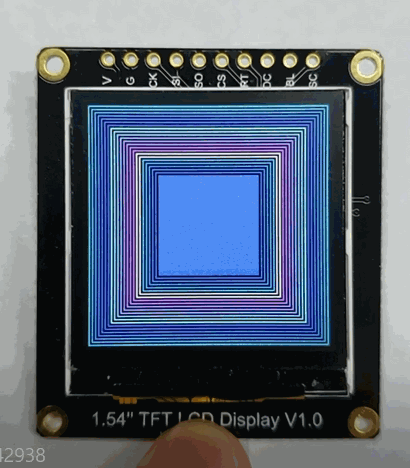
简介
这款显示模块具有分辨高、功耗低、宽视角、体积小巧、接线简单的特点;它的屏幕尺寸为1.54英寸,分辨率为240x240像素,IPS显示屏;采用了SPI接口和GDI接口(GDI接口必须和带GDI接口主控配合使用)。它的工作电压为3.3-5V,全屏的最大功耗为24Ma左右。
它可以适用于可穿戴设备、MP3/MP4、自制小电视、动画和图片的显示等。。
产品参数
- 工作电压:3.3V~5V
- IPS可视角度:80/80/80/80
- 颜色深度:16位色深(RGB565)
- 像素个数:240列 × 240行
- 接口方式:SPI
- 驱动芯片:ST7789
- 亮度:250 (Typ) cd/m2
- 全屏点亮功耗:约17mA(3.3V)17mA(5V)(Typ)
- 工作温度:-30℃~+70℃
- 显示面积:27.72×27.72 mm
- 安装孔直径:2 mm
- 尺寸:44.00x39.00 mm
- 重量:22 g
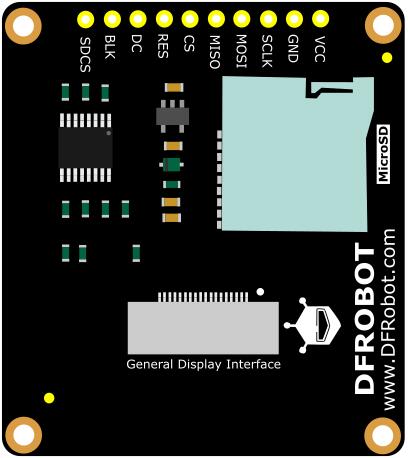
引脚说明
| 标号 | 名称 | 功能描述 |
|---|---|---|
| 1 | VCC | 电源正极 |
| 2 | GND | 电源负极 |
| 3 | SCLK | 时钟 |
| 4 | MOSI | 数据(主机发送从机接收) |
| 5 | MISO | 数据(主机接收从机发送 |
| 6 | CS | 屏幕片选 |
| 7 | RES | 复位 |
| 8 | DC | 数据/命令 |
| 9 | BL | 背光。背光设定了默认值,用户不用连接背光引脚也可点亮;此外,连接背光引脚,输入高电平(1)是将背光亮度调到最大,输入低电平(0)是关闭背光 |
| 10 | SDCS | SD卡片选 |
使用教程
该产品是Breakout模块,采用SPI通信方式,板载GDI接口,降低了接线的复杂程度,并且可以轻松地显示从SD卡中读取到的内容
注意:
1.GDI接口的使用需要与具有GDI接口的主控相匹配
2.建议使用Arduino1.8.10及以上版本
3.SD卡插槽接触不良,有可能会初始化失败,插拔后成功
准备
- 硬件
- 1 x Arduino UNO控制板
- 1 x 1.54" 240x240 LCD显示模块
- 若干杜邦线
- 软件
- Arduino IDE, 点击下载Arduino IDE
- DFRobot_GDL库文件
- 如何安装库文件,点击链接
- DFRobot_GDL API接口函数,点击链接了解详情
注意:
1.本产品的演示demo全部存放于DFRobot_GDL->example->basic文件里
2.烧录Demo之前,请打开对应的实体化函数(DFRobot_ST7789_240x240_HW_SPI)
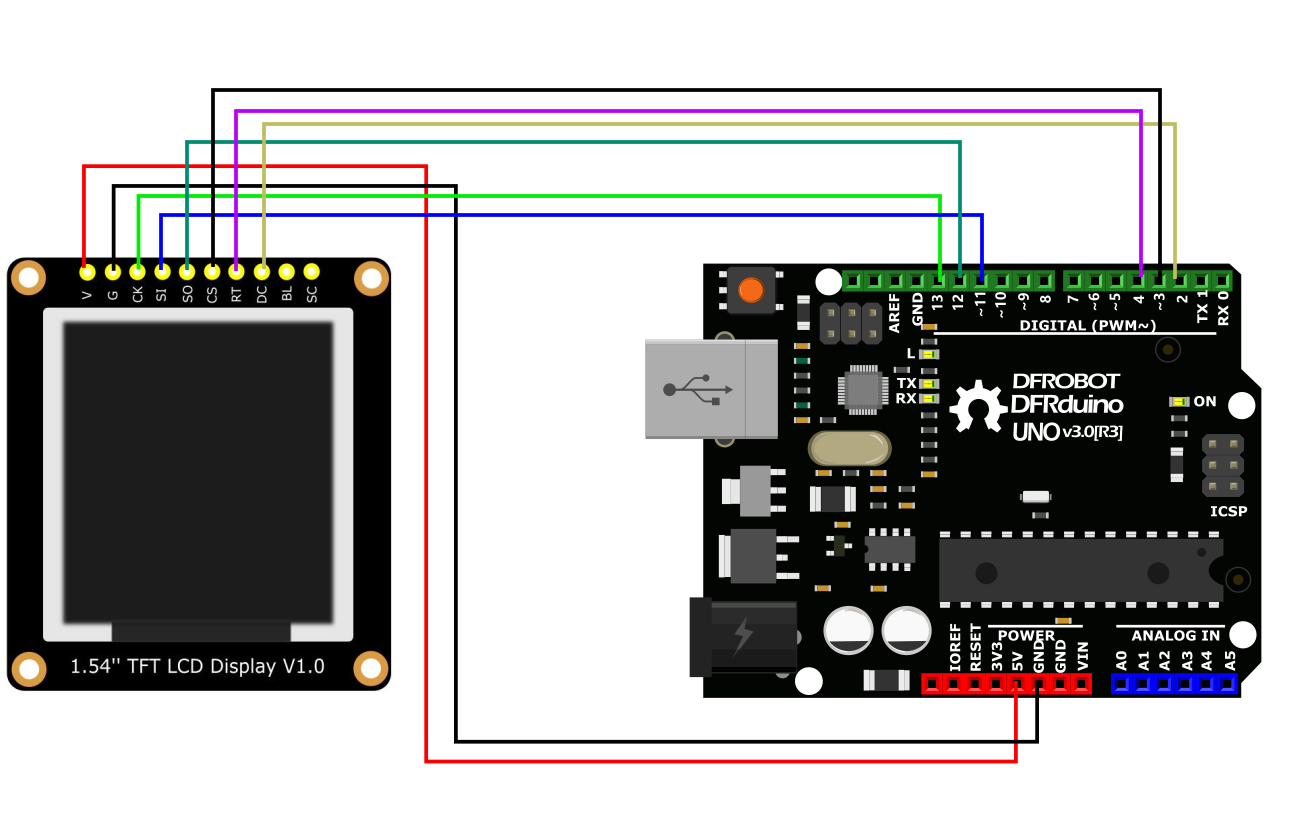
接线图
Arduino 连接图
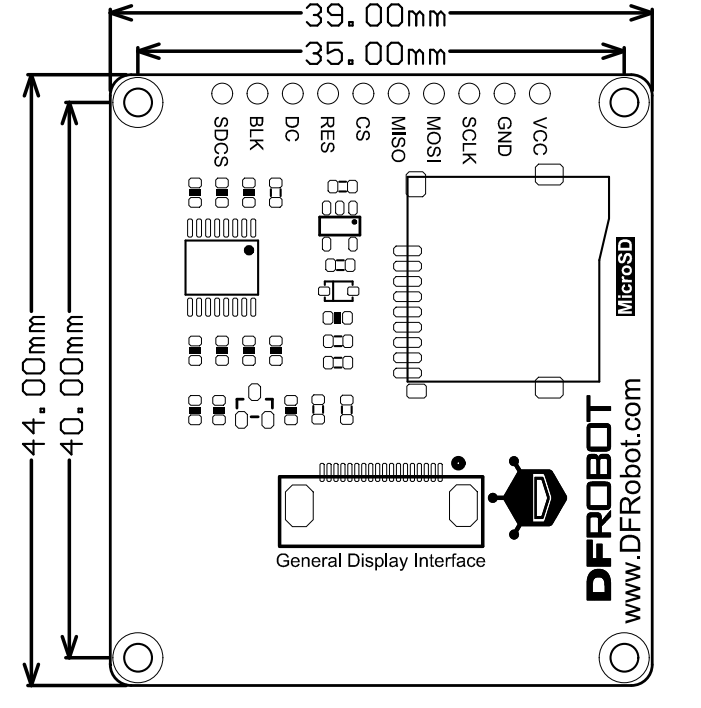
尺寸图
- 模块尺寸:44.00x39.00mm
- 安装孔间距:40mm,35mm
- 安装孔尺寸:2.0mm
样例代码1-basicTest
这是一个基础显示示例,包括画点、线、圆、矩形等。
/*!
 * @file basicTest.ino
 * @brief 演示各种图形绘画效果
 * @n 本示例支持的主板有Arduino Uno, Leonardo, Mega2560, FireBeetle-ESP32, FireBeetle-ESP8266, FireBeetle-M0
 * @copyright	Copyright (c) 2010 DFRobot Co.Ltd (http://www.dfrobot.com)
 * @licence     The MIT License (MIT)
 * @author [LuoYufeng](yufeng.luo@dfrobot.com)
 * @version  V0.1
 * @date  2020-01-07
 * @url https://github.com/DFRobot/DFRobot_GDL
 */

#include "DFRobot_GDL.h"
/*M0*/
#if defined ARDUINO_SAM_ZERO
#define TFT_DC  7
#define TFT_CS  5
#define TFT_RST 6
/*ESP32 and ESP8266*/
#elif defined(ESP32) || defined(ESP8266)
#define TFT_DC  D3
#define TFT_CS  D4
#define TFT_RST D5
/*AVR系列主板*/
#else
#define TFT_DC  2
#define TFT_CS  3
#define TFT_RST 4
#endif

/**
 * @brief Constructor  硬件SPI通信的构造函数
 * @param dc  SPI通信的命令/数据线引脚
 * @param cs  SPI通信的片选引脚
 * @param rst  屏的复位引脚
 */
DFRobot_ST7789_240x240_HW_SPI screen(/*dc=*/TFT_DC,/*cs=*/TFT_CS,/*rst=*/TFT_RST);
//DFRobot_ST7789_240x320_HW_SPI screen(/*dc=*/TFT_DC,/*cs=*/TFT_CS,/*rst=*/TFT_RST);
//DFRobot_ILI9341_240x320_HW_SPI  screen(/*dc=*/TFT_DC,/*cs=*/TFT_CS,/*rst=*/TFT_RST);
//DFRobot_ILI9488_320x480_HW_SPI screen(/*dc=*/TFT_DC,/*cs=*/TFT_CS,/*rst=*/TFT_RST);
/*M0主板下DMA传输*/
//DFRobot_ST7789_240x240_DMA_SPI screen(/*dc=*/TFT_DC,/*cs=*/TFT_CS,/*rst=*/TFT_RST);
//DFRobot_ST7789_240x320_DMA_SPI screen(/*dc=*/TFT_DC,/*cs=*/TFT_CS,/*rst=*/TFT_RST);
//DFRobot_ILI9341_240x320_DMA_SPI screen(/*dc=*/TFT_DC,/*cs=*/TFT_CS,/*rst=*/TFT_RST);
//DFRobot_ILI9488_320x480_DMA_SPI screen(/*dc=*/TFT_DC,/*cs=*/TFT_CS,/*rst=*/TFT_RST);


/*
 *可供用户选择的宏定义颜色
 *COLOR_RGB565_BLACK   COLOR_RGB565_NAVY    COLOR_RGB565_DGREEN   COLOR_RGB565_DCYAN
 *COLOR_RGB565_MAROON  COLOR_RGB565_PURPLE  COLOR_RGB565_OLIVE    COLOR_RGB565_LGRAY
 *COLOR_RGB565_DGRAY   COLOR_RGB565_BLUE    COLOR_RGB565_GREEN    COLOR_RGB565_CYAN
 *COLOR_RGB565_RED     COLOR_RGB565_MAGENTA COLOR_RGB565_YELLOW   COLOR_RGB565_ORANGE
 *COLOR_RGB565_WHITE
 */

void setup() {
  Serial.begin(115200);
  screen.begin();//生成了screen对象
}

void loop(){
    testDrawPixel();
    testLine();
    testFastLines(COLOR_RGB565_PURPLE,COLOR_RGB565_YELLOW);
    testRects(COLOR_RGB565_BLACK,COLOR_RGB565_WHITE);
    testRoundRects();
    testCircles(24,COLOR_RGB565_BLUE);
    testTriangles(COLOR_RGB565_YELLOW);
    testPrint();

}

/*测试画像素点*/
void testDrawPixel() {
  /*
   *@brief 清屏
   *@param c 屏幕颜色
   */
  screen.fillScreen(COLOR_RGB565_BLACK);
  int x = 0;
  int y = screen.height();
  for(int i = 0; i <= screen.width()/2; i += 10){
    for (x = screen.width() - i; x >= i; x-=10 ){
      /*
       *@brief 画像素点
       *@param x 横坐标
       *       y 纵坐标
       *       c 像素点颜色
       */
      screen.drawPixel(x, y, COLOR_RGB565_ORANGE);
      delay(10);
    }

    for (y = screen.height() - i; y >= i; y-=10){
      screen.drawPixel(x, y, COLOR_RGB565_ORANGE);
      delay(10);
    }

    for (x = i; x <= screen.width() - i + 1; x+=10 ){
      screen.drawPixel(x, y, COLOR_RGB565_ORANGE);
      delay(10);
    }

    for (y = i; y <= screen.height() - i + 1; y+=10){
      screen.drawPixel(x, y, COLOR_RGB565_ORANGE);
      delay(10);
    }
  }
}

/*测试画线*/
void testLine(){
	 //0x00FF 是格式为RGB565的颜色数据
  uint16_t color = 0x00FF;
  screen.fillScreen(COLOR_RGB565_BLACK);
  for (int16_t x=0; x < screen.width(); x+=6) {
    /*
     *@brief 画线段
     *@param x0 第一个顶点横坐标
     *       y0 第一个顶点纵坐标
     *       x1 第二个顶点横坐标
     *       y1 第二个顶点纵坐标
     *       c 线段颜色
     */
    screen.drawLine(/*x0=*/screen.width()/*屏幕宽度*//2, /*y0=*/screen.height()/*屏幕高度*//2, /*x1=*/x, /*y1=*/0, /*c=*/color+=0x0700);
  }
  for (int16_t y=0; y < screen.height(); y+=6) {
    screen.drawLine(screen.width()/2, screen.height()/2, screen.width(), y, color+=0x0700);
  }

  for (int16_t x = screen.width(); x >= 0; x-=6) {
    screen.drawLine(screen.width()/2, screen.height()/2, x,screen.height(), color+=0x0700);
  }

  for (int16_t y = screen.height(); y >= 0; y-=6) {
    screen.drawLine(screen.width()/2, screen.height()/2, 0, y, color+=0x0700);
  }
}

/*测试快速画线(需设置延时),只有横线和纵线*/
void testFastLines(uint16_t color1, uint16_t color2) {
  for (int16_t y=0; y < screen.height(); y+=4) {
    /*
     *@brief 画线段
     *@param x 第一个顶点横坐标
     *       y 第一个顶点纵坐标
     *       w 线段的长度
     *       c 线段颜色
     */
    screen.drawFastHLine(/*x=*/0, /*y=*/y, /*w=*/screen.width(),/*c=*/color2);
    delay(10);
  }

  for(int16_t x=0; x < screen.width(); x+=3) {
    /*
     *@brief 画线段
     *@param x 第一个顶点横坐标
     *       y 第一个顶点纵坐标
     *       h 线段的长度
     *       c 线段颜色
     */
    screen.drawFastVLine(/*x=*/x, /*y=*/0, /*h=*/screen.height(), /*c=*/color1);
    delay(10);
  }
}

/*测试画矩形*/
void testRects(uint16_t color1, uint16_t color2) {
    screen.fillScreen(COLOR_RGB565_BLACK);
    int16_t x=screen.width()-12;
    for (; x > 100; x-=screen.width()/40) {
      /*
       *@brief 画空心矩形
       *@param x 顶点横坐标
       *@param y 顶点纵坐标
       *@param w 横向边长
       *@param h 纵向边长
       *@param color 填充颜色,565结构的RGB色
       */
      screen.drawRect(/*x=*/screen.width()/2 -x/2, /*y=*/screen.height()/2 -x/2 , /*w=*/x, /*h=*/x, /*color=*/color2+=0x0F00);
      delay(100);
    }

    /*
     *@brief 画填充矩形
     *@param x 顶点横坐标
     *@param y 顶点纵坐标
     *@param w 横向边长
     *@param h 纵向边长
     *@param color 填充颜色,565结构的RGB色
    */
    screen.fillRect(/*x=*/screen.width()/2 -x/2, /*y=*/screen.height()/2 -x/2 , /*w=*/x, /*h=*/x, /*color=*/color2);
    delay(100);
    for(; x > 6; x-=screen.width()/40){
      screen.drawRect(screen.width()/2 -x/2, screen.height()/2 -x/2 , x, x, color1);
      delay(100);
    }
}

/*测试画圆角矩形*/
void testRoundRects() {
  screen.fillScreen(COLOR_RGB565_BLACK);
   //0xF00F 是格式为RGB565的颜色数据
  int color = 0xF00F;
  int i;
  int x = 0;
  int y = 0;
  int w = screen.width()-3;
  int h = screen.height()-3;
  for(i = 0 ; i <= 16; i+=2) {
    /*
     *@brief 画空心圆角矩形
     *@param x0 起始顶点横坐标
     *@param y0 起始顶点纵坐标
     *@param w 横向边长
     *@param h 纵向边长
     *@param radius 圆角半径
     *@param color 边框颜色,565结构的RGB色
     */
    screen.drawRoundRect(/*x0=*/x, /*y0=*/y, /*w=*/w, /*h=*/h, /*radius=*/20, /*color=*/color);
    x+=5;
    y+=5;
    w-=10;
    h-=10;
    color+=0x0100;
    delay(50);
  }
  for(i = 0 ; i <= 16; i+=2) {
    /*
     *@brief 画填充圆角矩形
     *@param x0 起始顶点横坐标
     *@param y0 起始顶点纵坐标
     *@param w 横向边长
     *@param h 纵向边长
     *@param radius 圆角半径
     *@param color 填充颜色,565结构的RGB色
     */
    screen.fillRoundRect(/*x0=*/x, /*y0=*/y, /*w=*/w, /*h=*/h, /*radius=*/10, /*color=*/color);
    x+=5;
    y+=5;
    w-=10;
    h-=10;
    color+=0x0500;
    delay(50);
  }
}

/*测试画圆*/
void testCircles(uint8_t radius, uint16_t color) {
  screen.fillScreen(COLOR_RGB565_BLACK);
  for (int16_t x=radius; x <=screen.width()-radius; x+=radius*2) {
    for (int16_t y=radius; y <=screen.height()-radius; y+=radius*2) {
      /*
       *@brief 画空心圆
       *@param x0 圆心横坐标
       *@param y0 圆心纵坐标
       *@param r 半径
       *@param color 圆周颜色,565结构的RGB色
       */
      screen.drawCircle(/*x0=*/x, /*y0=*/y, /*r=*/radius, /*color=*/color);
        if(x == y ||x == -y ||x == y + 2*radius)
          /*
           *@brief 画填充圆
           *@param x0 圆心横坐标
           *@param y0 圆心纵坐标
           *@param r 半径
           *@param color 填充颜色,565结构的RGB色
           */
          screen.fillCircle(/*x0=*/x, /*y0=*/y, /*r=*/radius, /*color=*/color);
       color += 800;
       delay(100);
    }
  }
}

/*测试画三角形*/
void testTriangles(uint16_t color){
  screen.fillScreen(COLOR_RGB565_BLACK);

  for (int16_t i=0; i <=screen.width(); i+=24)
    /*
     *@brief 画空心三角形
     *@param x0 起始顶点横坐标
     *@param y0 起始顶点纵坐标
     *@param x1 第二个顶点横坐标
     *@param y1 第二个顶点纵坐标
     *@param x2 第三个顶点横坐标
     *@param y2 第三个顶点纵坐标
     *@param color 边框颜色,565结构的RGB色
     */
    screen.drawTriangle(/*x0=*/i,/*y0=*/0,/*x1=*/0,/*y1=*/screen.height()-i,/*x2=*/screen.width()-i,/*y2=*/screen.height(), /*color=*/color);

  for (int16_t i=0; i <screen.width(); i+=24)
    screen.drawTriangle(screen.width(),i*4/3,0,screen.height()-i*4/3,i,0, color);

  for (int16_t i=0; i <screen.width(); i+=24)
    screen.drawTriangle(screen.width(),i*4/3,i,0,screen.width()-i,screen.height(), color);

  color = COLOR_RGB565_RED;
  for (int16_t i=0; i <=screen.width(); i+=24)
    /*
     *@brief 画填充三角形
     *@param x0 起始顶点横坐标
     *@param y0 起始顶点纵坐标
     *@param x1 第二个顶点横坐标
     *@param y1 第二个顶点纵坐标
     *@param x2 第三个顶点横坐标
     *@param y2 第三个顶点纵坐标
     *@param color 填充颜色,565结构的RGB色
     */
    screen.fillTriangle(/*x0=*/i,/*y0=*/0,/*x1=*/0,/*y1=*/screen.height()-i,/*x2=*/screen.width()-i,/*y2=*/screen.height(), /*color=*/color+=100);

  for (int16_t i=0; i <screen.width(); i+=24)
    screen.fillTriangle(screen.width(),i*4/3,0,screen.height()-i*4/3,i,0, color+=100);

  for (int16_t i=0; i <screen.width(); i+=24)
    screen.fillTriangle(screen.width(),i*4/3,i,0,screen.width()-i,screen.height(), color+=100);
}

void testPrint() {
 //0x00FF 是格式为RGB565的颜色数据
  int16_t color = 0x00FF;
  //设置文本自动换行模式
  //true=文本自动换行,false=不自动换行
  screen.setTextWrap(false);
  //填充颜色,565结构的RGB色
  screen.fillScreen(COLOR_RGB565_BLACK);

  //设置坐标位置x=0,y=50
  screen.setCursor(0, 50);
  //设置文本颜色;这是变化的值
  screen.setTextColor(color+=0x3000);
  //设置文本大小为0
  screen.setTextSize(0);
  //输出文本
  screen.println("Hello World!");

  screen.setTextColor(color+=0x3000);
  //设置文本大小为1
  screen.setTextSize(1);
  screen.println("Hello World!");

  screen.setTextColor(color+=0x3000);
  //设置文本大小为2
  screen.setTextSize(2);
  screen.println("Hello World!");

  screen.setTextColor(color+=0x3000);
  //设置文本大小为3
  screen.setTextSize(3);
  screen.println("Hello World!");

  screen.setTextColor(color+=0x3000);
  //设置文本大小为4
  screen.setTextSize(4);
  screen.println("Hello!");
  //设置文本大小为5
  screen.setTextSize(5);
  screen.print("Hello!");
  delay(2000);

  //设置坐标位置x=0,y=0
  screen.setCursor(0, 0);
  //填充颜色,565结构的RGB色
  screen.fillScreen(COLOR_RGB565_BLACK);
  screen.setTextSize(2);
  screen.setTextColor(color+=0x3000);
  screen.print("a = ");

  screen.setTextColor(color+=0x3000);
  int a = 1234;
  screen.println(a, 1);
  screen.setTextColor(color+=0x3000);
  screen.print(8675309, HEX);
  screen.println("this is HEX!");
  screen.println("");

  screen.setTextColor(color+=0x0F00);
  screen.println("running for: ");
  screen.setTextColor(color+=0x0F00);
  //输出毫秒时间
  screen.print(millis());
  screen.setTextColor(color+=0x0F00);
  screen.println("/1000 seconds.");

  char *text = "Hi DFRobot!";
  screen.setTextColor(color+=0x0F00);
  screen.setTextWrap(true);
  screen.setTextSize(3);
  screen.println(text);
  //screen.setFonts((const gdl_Font_t *)SIMKAIFont18ptBitmaps);
  screen.println(text);
  delay(2000);
}
结果
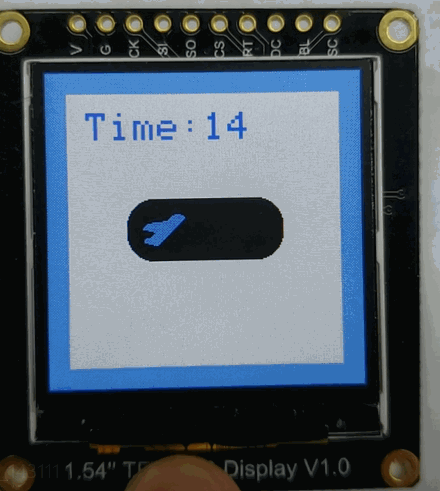
样例代码2 - icon
这是常用图标的示例
1.我们使用GIMP2点击下载将图标转换成代码,便于显示;
2.我们提供了一些图标,GIMP2点击下载。
/*!
 * @file icon.ino
 * @brief 在屏幕上显示一些小图标
 * @n 本示例支持的主板有Arduino Uno, Leonardo, Mega2560, FireBeetle-ESP32, FireBeetle-ESP8266, FireBeetle-M0
 * @copyright  Copyright (c) 2010 DFRobot Co.Ltd (http://www.dfrobot.com)
 * @licence     The MIT License (MIT)
 * @author [YeHangYu](hangyu.ye@dfrobot.com)
 * @version  V0.1
 * @date  2020-01-07
 * @url https://github.com/DFRobot/DFRobot_GDL
 */
#include "DFRobot_GDL.h"
#include "Icon.h"
//自定义通信引脚
/*M0*/
#if defined ARDUINO_SAM_ZERO
#define TFT_DC  7
#define TFT_CS  5
#define TFT_RST 6
/*ESP32 and ESP8266*/
#elif defined(ESP32) || defined(ESP8266)
#define TFT_DC  D3
#define TFT_CS  D4
#define TFT_RST D5
/*AVR系列主板*/
#else
#define TFT_DC  2
#define TFT_CS  3
#define TFT_RST 4
#endif

/**
 * @brief Constructor  硬件SPI通信的构造函数
 * @param dc  SPI通信的命令/数据线引脚
 * @param cs  SPI通信的片选引脚
 * @param rst  屏的复位引脚
 */
DFRobot_ST7789_240x240_HW_SPI screen(/*dc=*/TFT_DC,/*cs=*/TFT_CS,/*rst=*/TFT_RST);
//DFRobot_ST7789_240x320_HW_SPI screen(/*dc=*/TFT_DC,/*cs=*/TFT_CS,/*rst=*/TFT_RST);
//DFRobot_ILI9341_240x320_HW_SPI  screen(/*dc=*/TFT_DC,/*cs=*/TFT_CS,/*rst=*/TFT_RST);
//DFRobot_ILI9488_320x480_HW_SPI screen(/*dc=*/TFT_DC,/*cs=*/TFT_CS,/*rst=*/TFT_RST);
/*M0主板下DMA传输*/
//DFRobot_ST7789_240x240_DMA_SPI screen(/*dc=*/TFT_DC,/*cs=*/TFT_CS,/*rst=*/TFT_RST);
//DFRobot_ST7789_240x320_DMA_SPI screen(/*dc=*/TFT_DC,/*cs=*/TFT_CS,/*rst=*/TFT_RST);
//DFRobot_ILI9341_240x320_DMA_SPI screen(/*dc=*/TFT_DC,/*cs=*/TFT_CS,/*rst=*/TFT_RST);
//DFRobot_ILI9488_320x480_DMA_SPI screen(/*dc=*/TFT_DC,/*cs=*/TFT_CS,/*rst=*/TFT_RST);


void setup() {
  Serial.begin(115200);
  screen.begin();
}

void loop() {
  int w = screen.width();
  int h = screen.height();
  int a = millis()/1000;//获取时间
     //0x00FF 是格式为RGB565的颜色数据
  uint16_t color = 0x00FF;

  screen.fillScreen(COLOR_RGB565_WHITE);

  while(1) {
    for(int i = 0;i < 12; i++){
      //用字库显示时间,程序执行秒数
      screen.fillRect(16,16,w-16*2,35, COLOR_RGB565_WHITE);
      screen.setTextWrap(false);
	   //0x30FF 是格式为RGB565的颜色数据
      screen.setTextColor(0x30FF);
      screen.setTextSize(3);
      screen.setCursor(30, 30);
      screen.println("Time:");
	   //0x00FF 是格式为RGB565的颜色数据
      screen.setTextColor(0x00FF);
      screen.setTextSize(3);
      screen.setCursor(120, 30);
      a = millis()/1000;
      screen.println(a, 1);
      /**
       * @brief 填充圆角矩形
       * @param x      矩形的起始点坐标
       * @param y      矩形的起始点坐标
       * @param w      矩形宽度
       * @param h      矩形高度
       * @param r      圆角半径
       * @param color  矩形颜色
       */
       screen.fillRoundRect(w/2-48-12, h/2-16-8, 32*3+12*2, 32+8*2, 20, 0x0000);
       /**
       * @brief 画水平线和竖线来绘制边框
       * @param x      画线起始点的x坐标
       * @param y      画线起始点的y坐标
       * @param h      线的长度
       * @param color  线的颜色
       */
      for(int x = 0; x<16 ;x++)
      screen.drawFastVLine(/*x=*/x,/*y=*/0,/*h=*/h,/*color=*/color);
      for(int y = 0; y<16 ;y++)
      screen.drawFastHLine(/*x=*/16,/*y=*/y,/*w=*/w-16*2,/*color=*/color);
      for(int x = w-1; x>=w-16 ;x--)
      screen.drawFastVLine(x,0,h, color);
      for(int y = h-1; y>=h-16 ;y--)
      screen.drawFastHLine(16,y,w-16*2,color);
      /**
       * @brief 画位顺序不同的单色图
       * @param x      0 设置画图起点是屏幕左上方,靠左
       * @param y      0 靠上
       * @param bitmap gImage_XBitmap 头文件XBitmap中的数组,数组元素是单字节
       * @param w      240 图片宽度
       * @param h      240 图片高度
       * @param color  为图片黑色部分设置为颜色
       */
      screen.drawXBitmap(/*x=*/w/2-48,/*y=*/h/2-16,/*bitmap gImage_Bitmap=*/gImage[i],/*w=*/32,/*h=*/32,color+=0x0700);
      //延时1秒
      delay(1000);

      screen.drawXBitmap(/*x=*/w/2-16,/*y=*/h/2-16,/*bitmap gImage_Bitmap=*/gImage[i+1],/*w=*/32,/*h=*/32,color+=0x0700);
      delay(1000);

      screen.drawXBitmap(/*x=*/w/2+16,/*y=*/h/2-16,/*bitmap gImage_Bitmap=*/gImage[i+2],/*w=*/32,/*h=*/32,color+=0x0700);
      delay(1000);

    }
  }


}
结果
样例代码3 - UI控件
这是一个加载控件的显示示例,显示了三种不同的加载控件
/*!
 * @file UI_bar.ino
 * @brief Create a progress bar control on the screen that allows the user to customize the parameters of the progress bar, or they can use the
 * default parameters.
 * @n The user can control the value of the progress bar through the callback function of the progress bar.
 * @n The example supports Arduino Uno, Leonardo, Mega2560, FireBeetle-ESP32, FireBeetle-ESP8266, FireBeetle-M0.
 * @copyright  Copyright (c) 2010 DFRobot Co.Ltd (http://www.dfrobot.com)
 * @licence     The MIT License (MIT)
 * @author [fengli](li.feng@dfrobot.com)
 * @version  V1.0
 * @date  2019-12-6
 * @get from https://www.dfrobot.com
 * @url https://github.com/DFRobot/DFRobot_GDL/src/DFRpbot_UI
*/


#include "DFRobot_UI.h"
 #include "DFRobot_GDL.h"

/*M0*/
#if defined ARDUINO_SAM_ZERO
#define TFT_DC  7
#define TFT_CS  5
#define TFT_RST 6
/*ESP32 and ESP8266*/
#elif defined(ESP32) || defined(ESP8266)
#define TFT_DC  D3
#define TFT_CS  D4
#define TFT_RST D5
/*AVR系列主板*/
#else
#define TFT_DC  2
#define TFT_CS  3
#define TFT_RST 4
#endif

/**
 * @brief Constructor  Constructors for hardware SPI communication
 * @param dc  Command pin or data line pin of SPI communication
 * @param cs  Chip select pin for SPI communication
 * @param rst Reset pin of the screen
 * @param bl  Screen backlight pin
 */
DFRobot_ST7789_240x240_HW_SPI screen(/*dc=*/TFT_DC,/*cs=*/TFT_CS,/*rst=*/TFT_RST);
//DFRobot_ST7789_240x320_HW_SPI screen(/*dc=*/TFT_DC,/*cs=*/TFT_CS,/*rst=*/TFT_RST);
//DFRobot_ILI9341_240x320_HW_SPI  screen(/*dc=*/TFT_DC,/*cs=*/TFT_CS,/*rst=*/TFT_RST);
//DFRobot_ILI9488_320x480_HW_SPI screen(/*dc=*/TFT_DC,/*cs=*/TFT_CS,/*rst=*/TFT_RST);
/*M0主板下DMA传输*/
//DFRobot_ST7789_240x240_DMA_SPI screen(/*dc=*/TFT_DC,/*cs=*/TFT_CS,/*rst=*/TFT_RST);
//DFRobot_ST7789_240x320_DMA_SPI screen(/*dc=*/TFT_DC,/*cs=*/TFT_CS,/*rst=*/TFT_RST);
//DFRobot_ILI9341_240x320_DMA_SPI screen(/*dc=*/TFT_DC,/*cs=*/TFT_CS,/*rst=*/TFT_RST);
//DFRobot_ILI9488_320x480_DMA_SPI screen(/*dc=*/TFT_DC,/*cs=*/TFT_CS,/*rst=*/TFT_RST);


/**
 * @brief Construct a function
 * @param gdl Screen object
 * @param touch Touch object
 */
DFRobot_UI ui(&screen, NULL);


uint8_t value1 = 0;
uint8_t value2 = 0;
uint8_t value3 = 0;
//Callback function of progress bar1
void barCallback1(DFRobot_UI:: sBar_t &obj){
    //Enable the progress bar plus 1 in each time, it enters the callback function.
   delay(50);
    obj.setValue(value1);
	if(value1 < 100) value1++;
}
//Callback function of progress bar2
void barCallback2(DFRobot_UI:: sBar_t &obj){
    //Enable the progress bar plus 1 in each time, it enters the callback function.
   delay(50);
    delay(50);
    obj.setValue(value2);
	if(value2 < 100) value2++;

}
//Callback function of progress bar3
void barCallback3(DFRobot_UI:: sBar_t &obj){
    //Enable the progress bar plus 1 in each time, it enters the callback function.
   delay(50);
    delay(50);
    obj.setValue(value3);
	if(value3 < 100) value3++;
}
void setup()
{

  Serial.begin(9600);
  //ui初始化
  ui.begin();
  ui.setTheme(DFRobot_UI::MODERN);

  //在屏幕上显示字符串
  ui.drawString(/*x=*/33,/*y=*/screen.height()/5*4,"Page of loading",COLOR_RGB565_WHITE,ui.bgColor,/*fontsize =*/2,/*Invert=*/0);
  //创建一个进度条控件
  DFRobot_UI::sBar_t &bar1 = ui.creatBar();
  /**用户自定义进度条参数*/
  bar1.setStyle(DFRobot_UI::COLUMN);
  bar1.fgColor = COLOR_RGB565_GREEN;
  bar1.setCallback(barCallback1);
  ui.draw(&bar1,/*x=*/33,/*y=*/screen.height()/5*3);

  DFRobot_UI::sBar_t &bar2 = ui.creatBar();
  /**用户自定义进度条参数*/
  bar2.setStyle(DFRobot_UI::CIRCULAR);
  bar2.setCallback(barCallback2);
  ui.draw(&bar2,/*x=*/120,/*y=*/screen.height()/5*2);

  DFRobot_UI::sBar_t &bar3 = ui.creatBar();
  /**用户自定义进度条参数*/
  bar3.fgColor = COLOR_RGB565_BLUE;
  bar3.setStyle(DFRobot_UI::BAR);
  bar3.setCallback(barCallback3);
  ui.draw(&bar3,/*x=*/(screen.width()-bar3.width)/2,/*y=*/screen.height()/10);
}


void loop()
{
  //Refresh
  ui.refresh();
}
结果

兼容性测试
| MCU | 测试通过 | 测试失败 | 未测试 | 特别关注 |
|---|---|---|---|---|
| FireBeetle-ESP32 | √ | |||
| FireBeetle-ESP8266 | √ | |||
| Arduino Uno | √ | |||
| Leonardo | √ | |||
| Mega2560 | √ | |||
| Arduino M0 | √ |
疑难解答
1.问:屏幕通过FPC排线接到esp32E,出现花屏?
答:修改代码中的引脚定义.
esp32-E GDL接口引脚定义详见:https://wiki.dfrobot.com.cn/_SKU_DFR0654_FireBeetle_Board_ESP32_E#target_12
/*ESP32 and ESP8266*/
#elif defined(ESP32) || defined(ESP8266)
#define TFT_DC  D2
#define TFT_CS  D6
#define TFT_RST D3
更多问题及有趣的应用,可以 访问论坛 进行查阅或发帖!
