简介
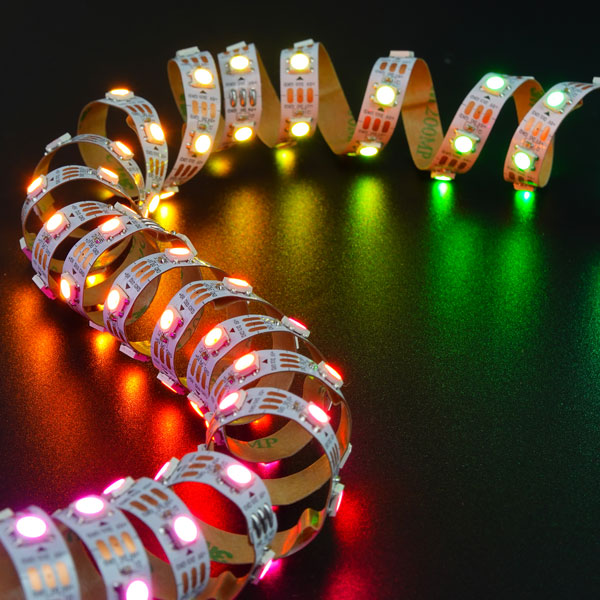
我们新推出一款由一系列的全彩LED组成的灯带。仅需一根管脚即可控制所有LED,每一颗LED都是一个独立的像素点,每个像素点都是由R,G,B三基色颜色组成,可实现256级亮度显示,完成16777216种颜色的全真色彩显示,同时像素点内部包含了智能数字接口数据锁存信号整形放大驱动电路,还内置信号整形电路,有效保证了像素点光的颜色高度一致。
本款产品显示色彩纯正,柔性较大,可随意对接,弯曲,裁剪,且背面配有3M粘性胶带,可任意固定在凹凸表面,可在窄小的空间里面安装;通上电源,房间就能被色彩斑斓的灯光所充盈。可以用在节日或者特殊的日子中,各种宴会活动现场,酷炫书包,DIY智能灯光小车等。
注意:
- 如果需要搭配uno和Gravity: IO 传感器扩展板 V7.1使用,需要搭配杜邦线使用:https://www.dfrobot.com.cn/goods-947.html
- 如果灯带由uno供电,工作电压无法让全部LED亮起,若想要点亮更多灯珠,请搭配电源适配器:https://www.dfrobot.com.cn/goods-1930.html ,转接头:https://www.dfrobot.com.cn/goods-569.html
产品参数
- 输入电压: 5V
- 功耗:0.2W/颗
- 尺寸(长度): 2米
- 尺寸(宽度): 10毫米
- 光束角:120°
- 灯珠数量:60颗/米
引脚说明
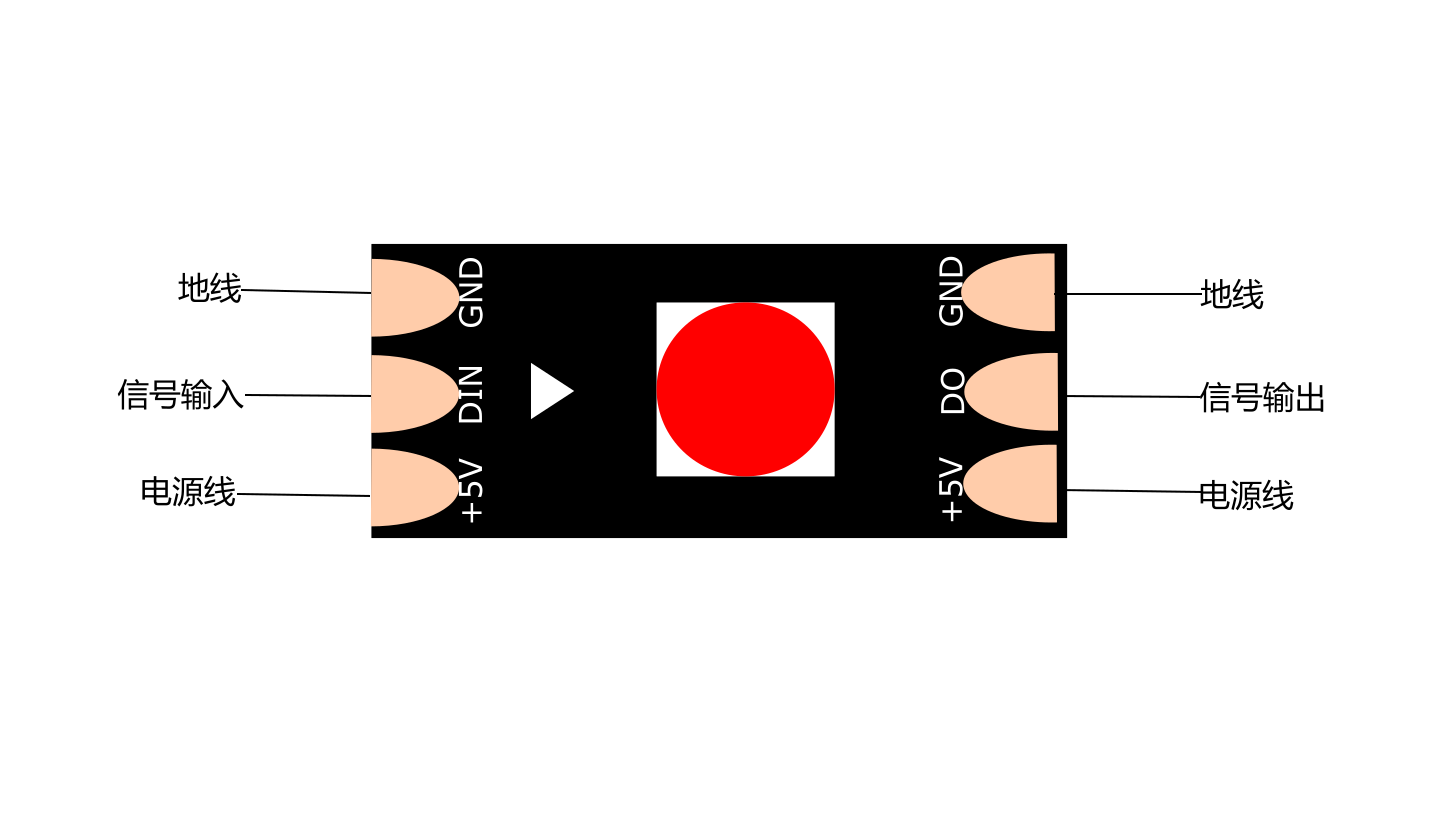
| 标号 | 名称 | 功能描述 |
|---|---|---|
| 1 | +5V | 电源+ |
| 2 | GND | 电源- |
| 3 | DIN | 控制信号输入端 |
| 4 | DO | 控制信号输出端 |
线序:红线-正极,白线-负极,绿线-信号线
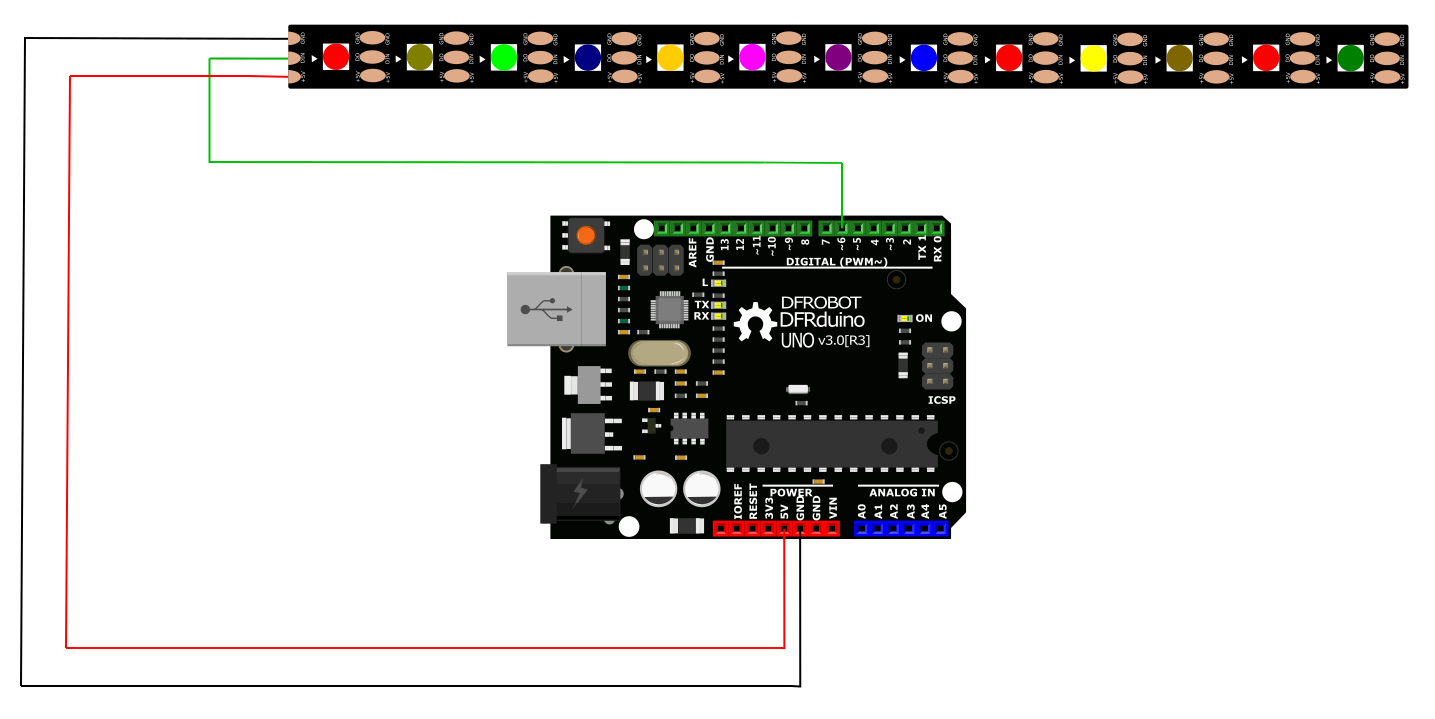
使用说明
本说明介绍的是灯带在Arduino UNO主控板控制下实现不同的变色,呼吸,闪烁等各种显示效果。
准备
- 硬件
- Arduino UNO x1
- RGB LED 彩色灯带 2米(带3M背胶-黑/白) x1
- 杜邦线 若干
- 软件
- Arduino IDE 点击下载Arduino IDE
接线图
样例代码
点击下载库文件Arduino库(Github)。如何安装库?
    /***************************************************
    * Digital RGB LED Strip 120 LED-Black/White
    * ****************************************************
    *  Control an Light string on like a Breathing LED, repeatedly.

    * @author WENZHENG.WANG
    * @version  V1.0
    * @date  2019-1-29
    * All above must be included in any redistribution
    * ****************************************************/
    #include <Adafruit_NeoPixel.h>

    #define PIN 6     //The signal pin connected with Arduino
    #define LED_COUNT 180 // the amount of the leds of your strip

    // Create an instance of the Adafruit_NeoPixel class called "leds".
    // That'll be what we refer to from here on...
    Adafruit_NeoPixel leds = Adafruit_NeoPixel(LED_COUNT, PIN, NEO_GRB + NEO_KHZ800);

    void setup()
    {
      leds.begin();  // Call this to start up the LED strip.
      clearLEDs();   // This function, defined below, turns all LEDs off...
      leds.show();   // ...but the LEDs don't actually update until you call this.
    }

    void loop()
    {
        for (int i=0; i<LED_COUNT; i++)
      {
        rainbow(i);
        delay(10);  // Delay between rainbow slides
      }
    }


    // Sets all LEDs to off, but DOES NOT update the display;
    // call leds.show() to actually turn them off after this.
    void clearLEDs()
    {
      for (int i=0; i<LED_COUNT; i++)
      {
        leds.setPixelColor(i, 0);
      }
    }

    // Prints a rainbow on the ENTIRE LED strip.
    //  The rainbow begins at a specified position.
    // ROY G BIV!
    void rainbow(byte startPosition)
    {
      // Need to scale our rainbow. We want a variety of colors, even if there
      // are just 10 or so pixels.
      int rainbowScale = 192 / LED_COUNT;

      // Next we setup each pixel with the right color
      for (int i=0; i<LED_COUNT; i++)
      {
        // There are 192 total colors we can get out of the rainbowOrder function.
        // It'll return a color between red->orange->green->...->violet for 0-191.
        leds.setPixelColor(i, rainbowOrder((rainbowScale * (i + startPosition)) % 192));
      }
      // Finally, actually turn the LEDs on:
      leds.show();
    }

    // Input a value 0 to 191 to get a color value.
    // The colors are a transition red->yellow->green->aqua->blue->fuchsia->red...
    //  Adapted from Wheel function in the Adafruit_NeoPixel library example sketch
    uint32_t rainbowOrder(byte position)
    {
      // 6 total zones of color change:
      if (position < 31)  // Red -> Yellow (Red = FF, blue = 0, green goes 00-FF)
      {
        return leds.Color(0xFF, position * 8, 0);
      }
      else if (position < 63)  // Yellow -> Green (Green = FF, blue = 0, red goes FF->00)
      {
        position -= 31;
        return leds.Color(0xFF - position * 8, 0xFF, 0);
      }
      else if (position < 95)  // Green->Aqua (Green = FF, red = 0, blue goes 00->FF)
      {
        position -= 63;
        return leds.Color(0, 0xFF, position * 8);
      }
      else if (position < 127)  // Aqua->Blue (Blue = FF, red = 0, green goes FF->00)
      {
        position -= 95;
        return leds.Color(0, 0xFF - position * 8, 0xFF);
      }
      else if (position < 159)  // Blue->Fuchsia (Blue = FF, green = 0, red goes 00->FF)
      {
        position -= 127;
        return leds.Color(position * 8, 0, 0xFF);
      }
      else  //160 <position< 191   Fuchsia->Red (Red = FF, green = 0, blue goes FF->00)
      {
        position -= 159;
        return leds.Color(0xFF, 0x00, 0xFF - position * 8);
      }
    }
结果
程序烧录后 灯带出现呼吸灯效果
Mind+(基于Scratch3.0)图形化编程
1、下载及安装软件。下载地址:https://www.mindplus.cc 详细教程:Mind+基础wiki教程-软件下载安装
2、切换到“上传模式”。 详细教程:Mind+基础wiki教程-上传模式编程流程
3、“扩展”中选择“主控板”中的“Arduino Uno”,选择“显示器”中的“ws2812灯带”。 详细教程:Mind+基础wiki教程-加载扩展库流程
4、进行编程,程序如下图:
5、菜单“连接设备”,“上传到设备”

常见问题
还没有客户对此产品有任何问题,欢迎通过qq或者论坛联系我们!
更多问题及有趣的应用,可以 访问论坛 进行查阅或发帖!
