概 述
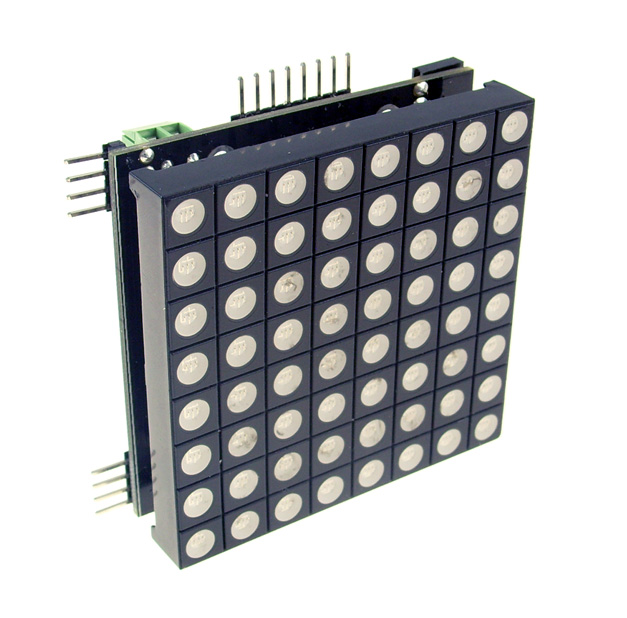
8*8 LED RGB Matrix是一个XY轴可任意级联的三色多彩LED显示矩阵模块,可用于显示图片和文字,支持多图层和各图层的各种平移效果。
理论上支持X轴横向最大4096个和Y轴纵向最大4096个模块的任意级联,无需设计硬件。当然,如果您想要把它们级联成一个大型矩阵显示屏的话,那么您就需要一个高速控制器和大功率电源。
实际使用中,级联个数主要取决于您所用MCU的数据存储空间和模块允许通过的最大电流。
注:由于限制,目前只支持7种颜色的显示,最大3×3级联!
性能描述
- 工作电源:+5V至+5.3V
- 工作电流:最大300mA(单个)
- 允许通过电流:最大2000mA
- 工作温度范围:-10℃~+50℃
硬件特性
- 支持多个任意级联,无需设置硬件。
- 支持RGB三种单色显示及混合色显示。
- 点阵序列采用平面直角坐标系,方便理解。
- 支持arduino开发板供电或外部独立电源供电。
- 支持硬件SPI模式和软件SPI模式。软件SPI模式下,可直接插在Interface Shield的Shiftout接口。
- 软件SPI最多支持2*2或1*5, 硬件SPI支持的个数10个以上
- 当多个级联使用时,如果颜色太暗淡,可提高电源电压至5.2v左右,不能超过5.4V。
- 多个级联时,数据线一律接在1号子板上(原点(0,0)所在的子板为1号子板)。
软件特性
- 支持英文字符,汉字,图片的显示。英文字符内置ascii码,汉字和图片数据需要用户自己提供。
- 字符支持正常显示和逆时针旋转90度显示。
- 图片和汉字一律采用纵向取模,高位在上,先左后右,先上后下原则。
- 支持多图层,可单独对任意图层进行操作。
- 可随时增加图层,随时移除图层,顶层不允许移除。
- 多图层的buf支持定义在data段,bss段,heap段。
- 支持画点,画线,画函数图象功能,画线和函数图象时支持补齐未连接的点。画图函数采用类matlab函数接口形式。
- 支持print函数。
- 支持全部清屏,部分区域清屏功能。
- 支持全屏彩虹图象显示功能,方便进行测试。
模块的连接与测试
显示屏与子板的连接
注意文字的方向是一致的
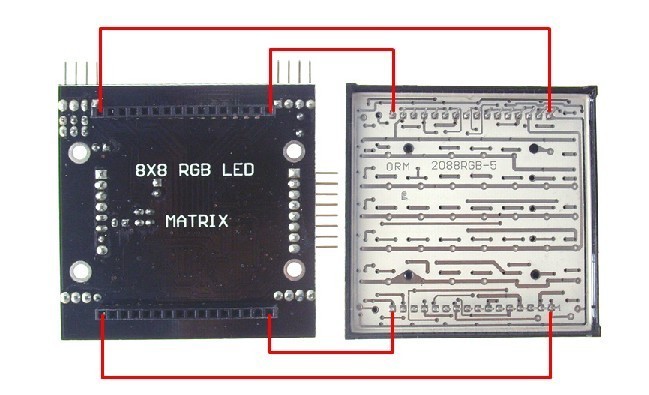
数据接口
SPI接口采用六针接口形式,其中1针是CLK接口,2针是LATCH接口,3针是DATA接口。这三个排阵分别于右侧的三个横向的长排针水平连接。
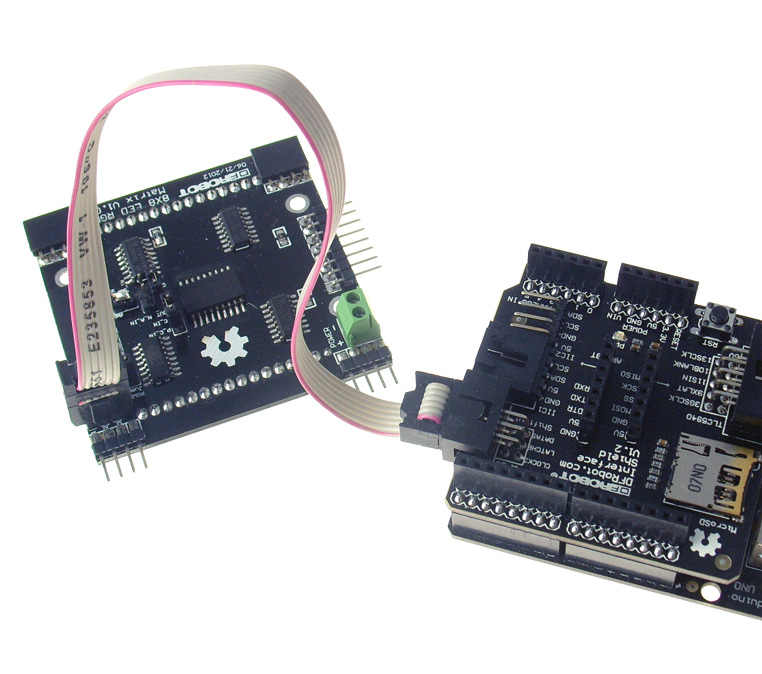
与Arduino UNO的连接

与interface shield的连接
注意123脚位于有突起的一边数据线的方向。
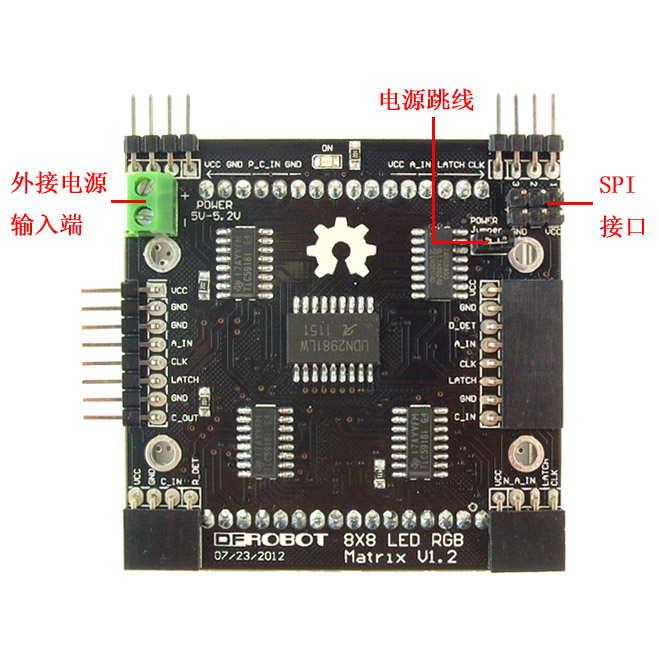
供电方式
这个六针接口可以直接连接到inerface shield的shiftout接口上,如果使用1-5个模块,可以直接采用shiftout接口的vcc直接供电,这时,需要将POWER Jumper短接。
如果模块较多,可采用外接电源供电,直接连接外接5V电源至外接电源输出入POWER接线柱,这时,POWER Jumper电源跳线帽需要拔掉。如下图所示:

硬件连接
数据输入端,datapin clkpin latchpin都要连接在1号子板上。
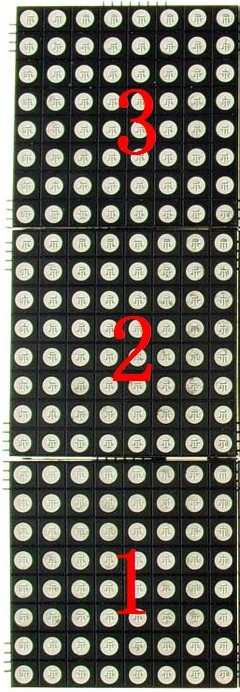
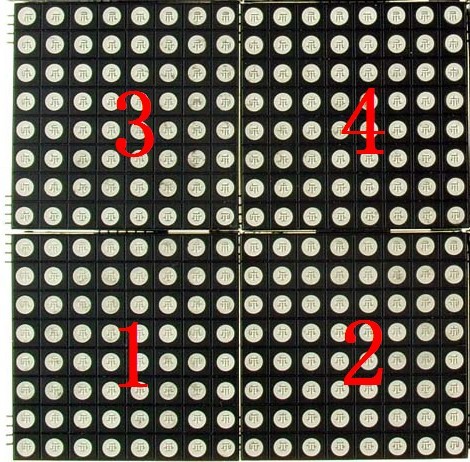
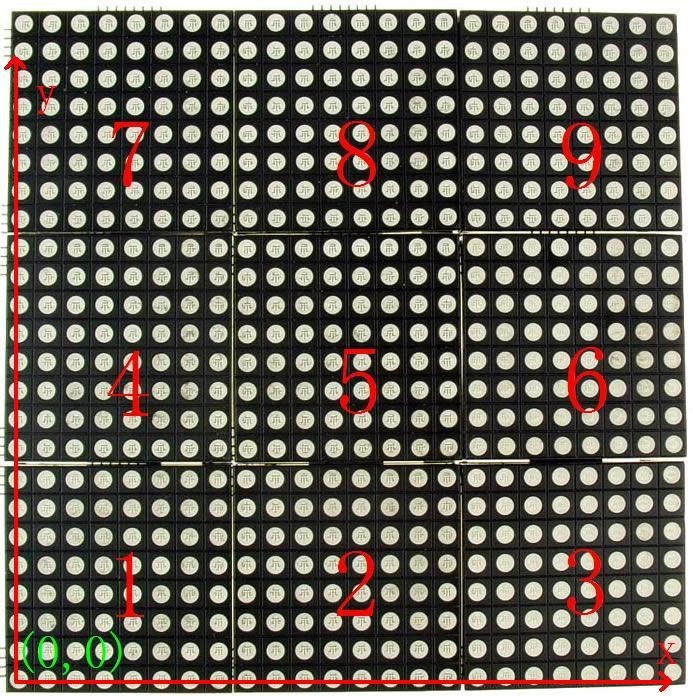
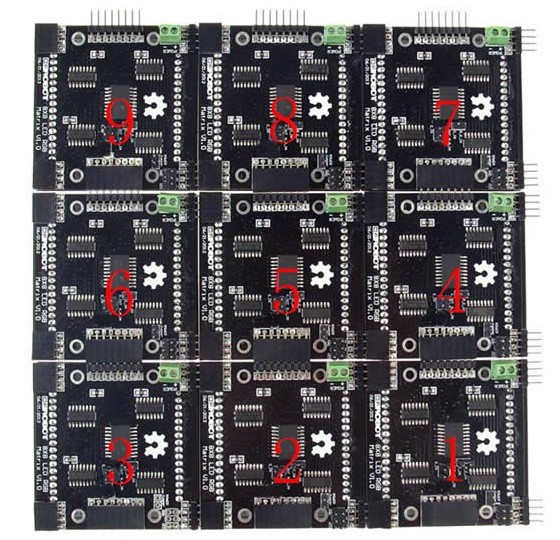
注意子板的方向,以上图为例,双四针的方向朝左,单八针的方向朝上,这样才能构成平面直角坐标系。
当用户使用少于4个子板时,可以使用arduino供电,此时需要将POWER Jumper跳线帽短接。可使用interface shield子板,将shiftout口接到下图红色区域的接口即可。数据接口一律连接到1号子板。
软件使用说明
成员函数列表
- Description:
rgb_matrix构造函数
- Param: x8 -- X方向8X8矩阵块的个数
- Param: y8 -- y方向8X8矩阵块的个数
- Param: _data_pin -- data 引脚号
- Param: _clk_pin -- clk 引脚号
- Param: _latch_pin -- latch 引脚号
- Retval: none
rgb_matrix(uint8_t x8, uint8_t y8,uint8_t _data_pin, uint8_t _clk_pin,uint8_t _latch_pin);
构造函数 ,当 data使用数字11口,clk使用数字13口时,使用硬件spi。当使用其他口时为软件spi。
Eg:
rgb_matrix M = rgb_matrix(1,2,11,13,8); //x方向一个子板,y方向2个子版级联,使用硬件spi,latch使用数字8口
- Description:
向顶层图层缓存中写入一个ASCII字符
- Param: x x坐标地址
- Param: y y坐标地址
- Param: asc 要写入字符的ASCII码
- Param: rotation NO_ROT 不翻转, ANTI_90逆时针90度翻转
- Param: mode MULTIPLY 与原有数据混合 COVER 覆盖原有数据
- Param: color 要写入数据的颜色 RED GREEN BLUE或其混合色
- Retval: 0 成功
- Retval -1 失败
int put_char(uint16_t x,uint16_t y, uint8_t asc, uint8_t rotation, uint8_t mode, uint8_t color);
eg:
M.put_char(0,0,’B’,NO_ROT,MULTIPLY,RED+GREEN); //在(0,0)出不翻转使用红+绿色显示B,如果这个位置上原来有数据,那么和原有数据叠�
- Description:
向指定图层缓存中写入一个ASCII字符
- Param: x x坐标地址
- Param: y y坐标地址
- Param: asc 要写入字符的ASCII码
- Param: rotation NO_ROT 不翻转 , ANTI_90逆时针90度翻转
- Param: mode MULTIPLY 与原有数据混合 COVER 覆盖原有数据
- Param: color 要写入数据的颜色 RED GREEN BLUE或其混合色
- Param: index 图层索引号
- Retval: 0 成功
- Retval -1 失败
int put_char(uint16_t x,uint16_t y, uint8_t asc, uint8_t rotation, uint8_t mode, uint8_t color, uint8_t index);
eg:
M.put_char(0,0,’B’,ANTI_90,COVER,RED,TOP_LAYER); //在顶层(0,0)处逆时针翻转90度,使用红色显示字符B,如果这个位置上有数据,那么将其覆盖。
- Description:
在顶层用红色画一个点
- Param: x x坐标
- Param: y y坐标
- Retval: 0 成功
- Retval -1 失败
int plot(int16_t x, int16_t y); //point
eg:
M.plot(1,2) //顶层(1,2)这个点用红色点亮
- Description:
在顶层用红色画一条线
- Param: x0 y0 线的起始坐标
- Param: x1 y1 线的终止坐标
- Param: add_dot ADD_DOT 不连贯处用点补齐 NO_ADD_DOT 不连贯处不用点补齐
- Retval: 0 成功
- Retval -1 失败
int plot(int16_t x0,int16_t y0,int16_t x1,int16_t y1,uint8_t add_dot); //line
eg:
M.plot(0,0,5,7,NO_ADD_DOT); //将顶层(0,0)至(5,7)点,用红色直线连接起来,不补全不连续点
- Description:
在顶层用红色画一条函数曲线
- Param: x0 函数的起始x坐标
- Param: x1 函数的终止x坐标
- Param: y[] 函数[x0,x1]范围内对应的y坐标数组
- Param: add_dot 1 不连贯处用点补齐 0 不连贯处不用点补齐
- Retval: 0 成功
- Retval -1 失败
int plot(int16_t x0,int16_t x1,int16_t y[],uint8_t add_dot); //function
eg:
uint16_t y[]={0,2,5,7,4,2,5,1};
M.plot(0,7,y,ADD_DOT);  //在顶层用红色绘制函数图象,图象上点的坐标为(x,y[x]),x范围从0到7,不连贯处用点补齐,
- Description:
在指定图层上画一个点
- Param: x x坐标
- Param: y y坐标
- Param: color 要写入数据的颜色 RED GREEN BLUE或其混合色
- Param: index 图层索引号
- Retval: 0 成功
- Retval -1 失败
int plot(int16_t x, int16_t y, uint8_t color, uint8_t index); //point eg:
M.plot(1,5,BLUE,TOP_LAYER+1); //在图层1上(1,5)处用蓝色画点
- Description:
在指定图层上画一条线
- Param: x0 y0 线的起始坐标
- Param: x1 y1 线的终止坐标
- Param: add_dot ADD_DOT 不连贯处用点补齐 NO_ADD_DOT 不连贯处不用点补齐
- Param: color 要写入数据的颜色 RED GREEN BLUE或其混合色
- Param: index 图层索引号
- Retval: 0 成功
- Retval -1 失败
int plot(int16_t x0, int16_t y0, int16_t x1, int16_t y1, uint8_t add_dot, uint8_t color, uint8_t index); //line
eg:
M.plot(0,0,5,5,NO_ADD_DOT,GREEN,TOP_LAYER); //在图层1上,从点(0,0)到(5,5)画一条绿色线,不连续点不用补齐。
- Description:
在指定图层上画一条函数曲线
- Param: x0 函数的起始x坐标
- Param: x1 函数的终止x坐标
- Param: y[] 函数[x0,x1]范围内对应的y坐标数组
- Param: add_dot 1 不连贯处用点补齐 0 不连贯处不用点补齐
- Param: color 要写入数据的颜色 RED GREEN BLUE或其混合色
- Param: index 图层索引号
- Retval: 0 成功
- Retval -1 失败
'''int plot(int16_t x0, int16_t x1, int16_t y[], uint8_t add_dot,uint8_t color, uint8_t index); '''
eg:
uint16_t y[]={0,2,5,7,4,2,5,1};
M.plot(0,7,y,ADD_DOT,GREEN,TOP_LAYER);  //在顶层用绿色绘制函数图象,图象上点的坐标为(x,y[x]),x范围从0到7,不连贯处用点补齐,
- Description:
增加新图层(从heap中分配缓存空间)
- Param: none
- Retval: >0 新增图层的索引号
- Retval -1 失败
int add_layer();
eg:
M.add_layer(); //增加新图层,从heap中分配缓存空间。空间不足则返回-1
- Description:
增加新图层(由调用者指定缓存空间)
- Param: p_param 传入的缓存空间的指针
- Retval: >0 新增图层的索引号
- Retval -1 失败
int add_layer(uint8_t*);
eg:
static uint8_t   data_buf[N_X*N_Y*8*3]={0};
M.add_layer(data_buf);   //增加新图层,使用data段的data_buf作为图层缓存
- Description:
移除最后一个图层(top层禁止移除)
- Param: none
- Retval: 0 成功
- Retval -1 失败
int remove_layer();
eg:
M.remove_layer(); //移除最后一个图层,顶层进制移除
- Description:
移除指定索引号的一个图层(top层禁止移动)
- Param: index 指定移除图层的索引号
- Retval: 0 成功
- Retval -1 失败
int remove_layer(uint8_t index);
eg:
M.remove_layer(TOP_LAYER+1); //移除图层1
- Description:
设置光标位置
- Param: x x坐标
- Param: y y坐标
- Retval: 0 成功
- Retval -1 失败
int set_cur(uint16_t x,uint16_t y);
eg:
M.set_cur(0,8); //将光标设置到(0,8)处,主要用于print函数
- Description:
将光标设置到初始位置
- Param: rotation = NO_ROT 设置到不翻转显示时的光标初始位置
- ANTI_90 设置到逆时针翻转90度显示是的光标初始位置
- Retval: 0 成功
- Retval -1 失败
int set_cur(uint8_t rotation);
Eg:
M.set_cur(NO_ROT); //将光标设置到不翻转显示时的初始位置
- Description:
在顶层用红色打印一个16bit数据(10进制形式)
- Param: data 需要打印的数据
- Param: rotation NO_ROT 字符不旋转,ANTI_90字符逆时针旋转90度
- Retval: 0 成功
- Retval -1 失败
int print(uint16_t data, uint8_t rotation);
eg:
M.set_cur(0,0);
M.print(3561,NO_ROT);  //在顶层(0,0)处开始用红色显示3561,不翻转显示
- Description:
在顶层用红色打印一个字符串,不支持转义字符
- Param: 字符串的首地址
- Param: rotation NO_ROT 字符不旋转,ANTI_90字符逆时针旋转90度
- Retval: 0 成功
- Retval -1 失败
int print(const char p[], uint8_t rotation); //string
eg:
M.set_cur(NO_ROT);
M.print(“Hello Matrix”,NO_ROT);  //在顶层左上角开始用红色打印字符串Hello Matrix。不翻转显示。
- Description:
向指定图层加入单色图片
- Param: x y 显示图片的起始坐标
- Param: size_x size_y 图片尺寸(需要是8的倍数)
- Param: p 图片数据
- Param: mode MULTIPLY 与原有数据混合 COVER 覆盖原有数据
- Param: color 要写入数据的颜色 RED GREEN BLUE或其混合色
- Param: index 图层索引号
- Retval: 0 成功
- Retval -1 失败
int put_pic(int16_t x, int16_t y, uint8_t size_x, uint8_t size_y, const char p[], uint8_t mode,uint8_t color,uint8_t index);
eg:
//纵向取模,高位在上。先左后右,先上后下。
const char pic[] =
{
      0x02,0x04,0x1F,0xE0,0x02,0x04,0x18,0xF0,
      0x10,0x13,0x10,0x10,0x14,0x18,0x00,0x00,
      0x00,0x00,0xFF,0x00,0x00,0x10,0x20,0xC2,
      0x01,0xFE,0x00,0x80,0x60,0x30,0x00,0x00
};

M.put_pic(0,0,16,16,pic,COVER,GREEN,TOP_LAYER);  //在顶层用绿色显示一个16X16图片,如果这个位置原来有数据,那么覆盖它。
- Description:
向指定图层加入汉字
- Param: x y 显示图片的起始坐标
- Param: p 汉字字模数据
- Param: mode MULTIPLY 与原有数据混合 COVER 覆盖原有数据
- Param: color 要写入数据的颜色 RED GREEN BLUE或其混合色
- Param: index 图层索引号
- Retval: 0 成功
- Retval -1 失败
int put_HZ(int16_t x, int16_t y, const char p[], uint8_t mode,uint8_t color,uint8_t index);
eg:
const char ni[] =
{
      0x02,0x04,0x1F,0xE0,0x02,0x04,0x18,0xF0,
      0x10,0x13,0x10,0x10,0x14,0x18,0x00,0x00,
      0x00,0x00,0xFF,0x00,0x00,0x10,0x20,0xC2,
      0x01,0xFE,0x00,0x80,0x60,0x30,0x00,0x00
};

M.put_HZ(0,0,ni,COVER,GREEN,TOP_LAYER);  //在顶层(0,0)处用绿色显示汉字”你”,如果这个位置原来有数据,那么覆盖它。
- Description:
向顶层图层加入汉字
- Param: x y 显示图片的起始坐标
- Param: p 汉字字模数据
- Param: mode MULTIPLY 与原有数据混合 COVER 覆盖原有数据
- Param: color 要写入数据的颜色 RED GREEN BLUE或其混合色
- Param: index 图层索引号
- Retval: 0 成功
- Retval -1 失败
int put_HZ(int16_t x, int16_t y, const char p[]);
eg:
const char ni[] =
{
      0x02,0x04,0x1F,0xE0,0x02,0x04,0x18,0xF0,
      0x10,0x13,0x10,0x10,0x14,0x18,0x00,0x00,
      0x00,0x00,0xFF,0x00,0x00,0x10,0x20,0xC2,
      0x01,0xFE,0x00,0x80,0x60,0x30,0x00,0x00
};

M.put_HZ(0,0,ni,COVER,GREEN,TOP_LAYER);  //在顶层(0,0)处用红色显示汉字”你”
- Description:
向指定图层缓存中打印16bit数据(10进制)
- Param: data 需要打印的数据
- Param: rotation NO_ROT字符不旋转,ANTI_90字符逆时针旋转90度
- Param: mode MULTIPLY 与原有数据混合 COVER 覆盖原有数据
- Param: color 要写入数据的颜色 RED GREEN BLUE或其混合色
- Param: index 图层索引号
- Retval: 0 成功
- Retval -1 失败
int print(uint16_t data, uint8_t rotation, uint8_t mode,uint8_t color,uint8_t index);
eg:
M.set_cur(0,0);
M.print(2356,NO_ROT,COVER,GREEN,TOP_LAYER);  //在顶层(0,0)处开始用绿色显示2356,不翻转显示,如果这个位置有数据,那么覆盖它
- Description:
向指定图层缓存中打印一个字符串
- Param: 字符串的首地址
- Param: rotation NO_ROT 字符不旋转,ANTI_90字符逆时针旋转90度
- Param: mode MULTIPLY 与原有数据混合 COVER 覆盖原有数据
- Param: color 要写入数据的颜色 RED GREEN BLUE或其混合色
- Param: index 图层索引号
- Retval: 0 成功
- Retval -1 失败
int print(const char p[], uint8_t rotation, uint8_t mode,uint8_t color,uint8_t index); //string
eg:
M.set_cur(NO_ROT);
M.print(“Hello Matrix”,NO_ROT,COVER,GREEN,TOP_LAYER);  //在顶层左上角开始用绿色打印字符串Hello Matrix。不翻转显示。
- Description:
在指定图层上全屏显示彩虹
- Param: index 图层索引号
- Retval: 0 成功
- Retval -1 失败
int rainbow(uint8_t index);
eg:
M.rainbow(TOP_LAYER); //顶层显示彩虹
- Description:
显示函数(调用后将进入此函数的死循环)
- Param: display_hook 显示函数的回调函数指针,在刷新的间隙被调用 传入空指针0不调用
- Retval: none
void display(void (*display_hook)());
eg:详见loop和hook函数介绍
- Description:
清除所有图层缓存的所有数据
- Param: none
- Retval: 0 成功
- Retval -1 失败
int clear(void);
eg: 略
- Description:
清除指定图层缓存的所有数据
- Param: index 图层索引号
- Retval: 0 成功
- Retval -1 失败
int clear(uint8_t index);
eg:略
- Description:
清除指定图层缓存中指定矩形位置处所有数据
- Param: x0 y0 指定矩形的一个顶点
- Param: x1 y1 指定矩形(x0,y0)的对角顶点
- Param: index 图层索引号
- Retval: 0 成功
- Retval -1 失败
int clear(int16_t x0, int16_t y0, int16_t x1, int16_t y1, uint8_t index);
Eg:
M.clear(2,3,6,6,TOP_LAYER); //清除顶层(2,3) (6,6)为对角顶点的矩形区域的所有数据
- Description:
图层平移函数
- Param: dir 平移方向 UP DOWN LEFT RIGHT
- Param: step 平移的步数
- Param: index 图层索引号
- Retval: 0 成功
- Retval -1 失败
int move(uint8_t dir, uint16_t step, uint8_t index);
eg:
M.move(RIGHT,1,TOP_LAYER); //顶层向右平移一位
- Description:
执行AT指令
- Param: p at指令存放的字符串首地址
- Retval: 0 成功
- Retval -1 失败
int at_cmd(uint8_t *p);
eg: 详见AT指令支持调用的函数
AT命令支持调用的函数
plot                AT命令下不支持显示函数图象
clear               AT命令下支持clear的所有重载格式
print               AT命令下不支持字符串打印
put_char            AT命令下支持put_char的所有重载格式
add_layer           AT命令下不支持buf定义在bss和data段
remove_layer        AT命令下支持remove_layer的所有重载格式
move                AT命令下支持图层上下左右平移任意单位
set_cur             AT命令下支持set_cur的所有重载格式
loop和hook函数介绍
(假设是个2X2矩阵):
void loop()
{
    M.rainbow(TOP_LAYER);
    M.display(hook);
}
程序调用display后,会陷入这个函数永远不出来,我们需要向它传入一个回调函数指针,在刷新的间隔,这个回调函数将被调用,完成用户控制。这个hook函数的执行时间会影响到刷新频率,因此不能太长。如果采用硬件spi模式,这个函数执行时间也不能太短,太短的话会造成屏幕重影显示。在例程中有这个延时函数的指导使用时间,用户可根据自己的需要进行更改。
AT指令执行例程
这个函数执行后,可用串口(波特率115200)进行如下控制:
AT+clear() 清屏
AT+set_cur(0) 初始化不翻转显示时的光标位置
AT+print(123,0) 在顶层显示123 注:AT指令控制的print函数不支持显示字符串
AT+add_layer() 增加新图层
AT+set_cur(0,8) 重新设置光标位置
AT+put_char(0,8,65,1,0,3,1) 在(0,8)处翻转显示A,颜色是red+green
AT+put_char(8,8,66,1,0,5,1) 在(8,8)处翻转显示B,颜色是red+blue
AT+move(4,1,0) 图层0向右移动一格
AT+move(3,1,0) 图层0向左移动一格
AT+move(1,1,1) 图层1向上移动一格
AT+move(2,1,1) 图层1向下移动一格
AT+remove_layer(1) 移除图层1
程序实例:1X1
    /*****************************************************************************
    * Copyright:    ChengDu Geeker Tech. Co., Ltd. (DFRobot)
    * File name:      hello_matrix.pde
    * Description:    test the function of rgb matrix
    * Author:       wanghui_CD
    * Version:      V1.0
    * Date:         2012.06.21
    * History:      none
    *****************************************************************************/
    #include <rgb_matrix.h>
    #include <SPI.h>

    unsigned long time=0;
    unsigned int tick_100ms = 0;
    unsigned char counter=0;

    #define N_X 1
    #define N_Y 1

    /*
    //Interface shield ShiftOut connector
    #define DATA_PIN  9
    #define CLK_PIN   3
    */
    //Hardware SPI
    #define DATA_PIN  11
    #define CLK_PIN   13

    #define LATCH_PIN 8

    rgb_matrix M = rgb_matrix(N_X, N_Y, DATA_PIN, CLK_PIN, LATCH_PIN);

    unsigned char cmd[50]={0},cmd_num=0;
    unsigned char tmp =  'A';
    unsigned char st=0;

    void setup()
    {
           Serial.begin(115200);
           delay(200);
    }

    /*************************************************************************
    *  Description:
    *                         display callback function
    *        Receive AT comand via serial,and then run the right comand.
    *        This function can be run in sweep interval.
    *        Reduce delay time at function tail if screen blink.
    *        Increase delay time at function tail if screen shows a double image.
    * Param:   none
    * Retval:  none
    **************************************************************************/
    void hook(void)
    {
        int i = 0;
        unsigned long enter_time,exit_time;
        enter_time = micros();
        if((++counter)%10 == 0)
        {
            if(millis() - time >= 100)
            {
                time = millis();
                tick_100ms ++;
                M.move(UP,1,0);
                if(tick_100ms%2 == 0)
                {
                }
                if(tick_100ms%5 == 0)
                {
                    M.clear();
                    M.put_char(0,0,tmp+(st++)%26,1,MULTIPLY,RED << (st%3),TOP_LAYER);
                }
                if(tick_100ms%10 == 0)
                {
                }
                if(tick_100ms%20 == 0)
                {
                }
                if(tick_100ms%50 == 0)
                {
                }
            }
        }
        if(Serial.available())
        {
            cmd[cmd_num++] = Serial.read();
            if((cmd_num>=2) && (cmd[cmd_num-1] == 0x0a) && (cmd[cmd_num-2] == 0x0d))
            {
                M.at_cmd(cmd);
                cmd_num = 0;
            }
         }
         exit_time = micros();
         if(enter_time < exit_time)
         {
           if(exit_time - enter_time < 500)
           {
             delayMicroseconds(500 - (exit_time-enter_time));
           }
         }
    }

    /*************************************************************************************
    *  Description:
    *                         loop function
    *        Display function must be called.
    *        If you wanna do something after display be called,
    *    you should give display function a parameter which is a pointer to a function.
    * Param:   none
    * Retval:  none
    **************************************************************************************/
    void loop()
    {
        M.set_cur(0,0);
        M.display(hook);
    }
程序实例:2X2
    /*****************************************************************************
    * Copyright:  ChengDu Geeker Tech. Co., Ltd. (DFRobot)
    * File name:      hello_matrix.pde
    * Description:    test the function of rgb matrix
    * Author:       wanghui_CD
    * Version:      V1.0
    * Date:         2012.06.21
    * History:      none
    *****************************************************************************/
    #include <rgb_matrix.h>
    #include <SPI.h>

    unsigned long time=0;
    unsigned int tick_100ms = 0;
    unsigned char counter=0;

    #define N_X 2
    #define N_Y 2

    /*
    //Interface shield ShiftOut connector
    #define DATA_PIN  9
    #define CLK_PIN   3
    */
    //Hardware SPI
    #define DATA_PIN  11
    #define CLK_PIN   13

    #define LATCH_PIN 8

    rgb_matrix M = rgb_matrix(N_X, N_Y, DATA_PIN, CLK_PIN, LATCH_PIN);

    unsigned char cmd[50]={0},cmd_num=0;

    void setup()
    {
           Serial.begin(115200);
           delay(200);
    }

    /*************************************************************************
    *  Description:
    *                         display callback function
    *        Receive AT comand via serial,and then run the right comand.
    *        This function can be run in sweep interval.
    *        Reduce delay time at function tail if screen blink.
    *        Increase delay time at function tail if screen shows a double image.
    * Param:   none
    * Retval:  none
    **************************************************************************/
    void hook(void)
    {
        int i = 0;
        if((++counter)%5 == 0)    //如果100ms时钟不准,5这个值是可以微调的
        {
            if(millis() - time >= 100)
            {
                time = millis();
                tick_100ms ++;
                if(tick_100ms%2 == 0)
                {
                }
                if(tick_100ms%5 == 0)
                {
                }
                if(tick_100ms%10 == 0)
                {
                    M.move(LEFT,1,TOP_LAYER);    //顶层(图层0)每秒左移一位
                }
                if(tick_100ms%20 == 0)
                {
                    M.move(RIGHT,1,TOP_LAYER+1);   //图层1每2秒右移一位
                }
                if(tick_100ms%50 == 0)
                {
                }
            }
        }
        if(Serial.available())                            //接收AT指令
        {
            cmd[cmd_num++] = Serial.read();
            if((cmd_num>=2) && (cmd[cmd_num-1] == 0x0a) && (cmd[cmd_num-2] == 0x0d))
            {
                M.at_cmd(cmd);
                cmd_num = 0;
            }
         }
    }

    /*************************************************************************************
    *  Description:
    *                         loop function
    *        Display function must be called.
    *        If you wanna do something after display be called,
    *    you should give display function a parameter which is a pointer to a function.
    * Param:   none
    * Retval:  none
    **************************************************************************************/
    void loop()
    {
        int tmp,i;
        M.add_layer();
        M.put_char(0,0,'A',NO_ROT,MULTIPLY,RED,TOP_LAYER);
        M.put_char(5,0,'B',NO_ROT,MULTIPLY,GREEN,TOP_LAYER);
        M.put_char(10,0,'C',NO_ROT,MULTIPLY,BLUE,TOP_LAYER);

        M.put_char(0,8,'D',NO_ROT,MULTIPLY,GREEN+RED,1);
        M.put_char(5,8,'E',NO_ROT,MULTIPLY,RED+BLUE,1);
        M.put_char(10,8,'F',NO_ROT,MULTIPLY,BLUE+GREEN,1);
        M.display(hook);
    }
相关资料
原理图
数据手册
rgb_matrix_1.0版库文件
rgb_matrix_0023版库文件
8*8 LED 三色多彩显示矩阵模块介绍
 购买
购买