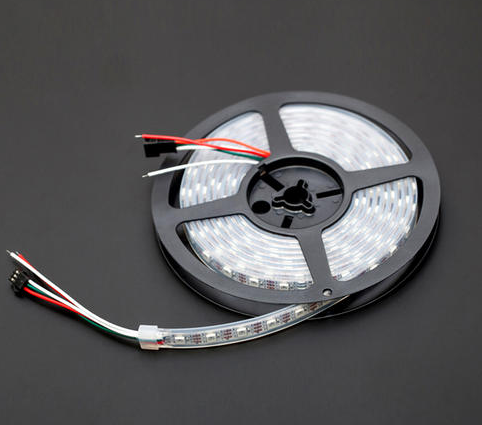
简介
这是一种内含芯片(WS2812)的LED灯条,用户可以单独控制每个LED,每米有60个RGB的LED,可以呈现出各种颜色。仅需要Arduino可以提供3.3V-5V的数字引脚驱动即可。
技术规格
每米包含60个灯珠 最大电流:1A(每米LED灯带)@5V(可以工作在3.3v-5V之间) 对于该条带,至少需要5V / 3A,因为它是3米长,如果电流不够,颜色可能不正确 芯片名称:WS2812 亮度等级:256 防水
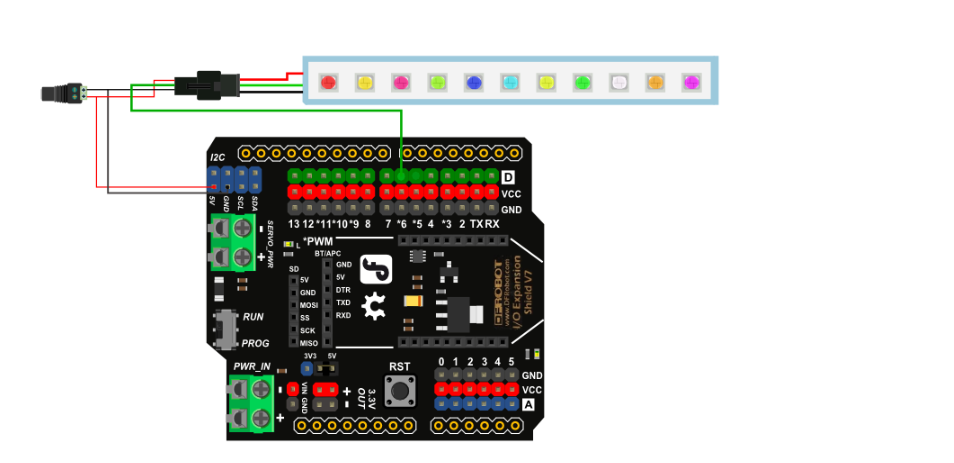
连接图
示例代码
/*
 This code can be a good test code for your strip
 function: leds.setPixelColor(i,y) can be used to let number i of your led turn on with color of y
 and you can draw your idea easily with this function but never forget function: led.show()
*/

#include <Adafruit_NeoPixel.h>

#define PIN 6     //The signal pin connected with Arduino
#define LED_COUNT 180 // the amount of the leds of your strip

// Create an instance of the Adafruit_NeoPixel class called "leds".
// That'll be what we refer to from here on...
Adafruit_NeoPixel leds = Adafruit_NeoPixel(LED_COUNT, PIN, NEO_GRB + NEO_KHZ800);

void setup()
{
  leds.begin();  // Call this to start up the LED strip.
  clearLEDs();   // This function, defined below, turns all LEDs off...
  leds.show();   // ...but the LEDs don't actually update until you call this.
}

void loop()
{
    for (int i=0; i<LED_COUNT; i++)
  {
    rainbow(i);
    delay(50);  // Delay between rainbow slides
  }
}


// Sets all LEDs to off, but DOES NOT update the display;
// call leds.show() to actually turn them off after this.
void clearLEDs()
{
  for (int i=0; i<LED_COUNT; i++)
  {
    leds.setPixelColor(i, 0);
  }
}

// Prints a rainbow on the ENTIRE LED strip.
//  The rainbow begins at a specified position.
// ROY G BIV!
void rainbow(byte startPosition)
{
  // Need to scale our rainbow. We want a variety of colors, even if there
  // are just 10 or so pixels.
  int rainbowScale = 192 / LED_COUNT;

  // Next we setup each pixel with the right color
  for (int i=0; i<LED_COUNT; i++)
  {
    // There are 192 total colors we can get out of the rainbowOrder function.
    // It'll return a color between red->orange->green->...->violet for 0-191.
    leds.setPixelColor(i, rainbowOrder((rainbowScale * (i + startPosition)) % 192));
  }
  // Finally, actually turn the LEDs on:
  leds.show();
}

// Input a value 0 to 191 to get a color value.
// The colors are a transition red->yellow->green->aqua->blue->fuchsia->red...
//  Adapted from Wheel function in the Adafruit_NeoPixel library example sketch
uint32_t rainbowOrder(byte position)
{
  // 6 total zones of color change:
  if (position < 31)  // Red -> Yellow (Red = FF, blue = 0, green goes 00-FF)
  {
    return leds.Color(0xFF, position * 8, 0);
  }
  else if (position < 63)  // Yellow -> Green (Green = FF, blue = 0, red goes FF->00)
  {
    position -= 31;
    return leds.Color(0xFF - position * 8, 0xFF, 0);
  }
  else if (position < 95)  // Green->Aqua (Green = FF, red = 0, blue goes 00->FF)
  {
    position -= 63;
    return leds.Color(0, 0xFF, position * 8);
  }
  else if (position < 127)  // Aqua->Blue (Blue = FF, red = 0, green goes FF->00)
  {
    position -= 95;
    return leds.Color(0, 0xFF - position * 8, 0xFF);
  }
  else if (position < 159)  // Blue->Fuchsia (Blue = FF, green = 0, red goes 00->FF)
  {
    position -= 127;
    return leds.Color(position * 8, 0, 0xFF);
  }
  else  //160 <position< 191   Fuchsia->Red (Red = FF, green = 0, blue goes FF->00)
  {
    position -= 159;
    return leds.Color(0xFF, 0x00, 0xFF - position * 8);
  }
}
文件
Arduino Library for LED Strip RGB LED Strip Datasheet Arduino IDE (根据能够使用的Arduino版本来选择,不要盲目追求最新版本), 点击下载Arduino IDE
Mind+ 上传模式编程
1、下载及安装软件。下载地址:http://www.mindplus.cc 详细教程:Mind+基础wiki教程-软件下载安装
2、切换到“上传模式”。 详细教程:Mind+基础wiki教程-上传模式编程流程
3、“扩展”中选择“主控板”中的“Arduino Uno”,“显示器”中加载“WS2812 RGB灯”。 详细教程:Mind+基础wiki教程-加载扩展库流程
4、进行编程,程序如下图:
5、菜单“连接设备”,“上传到设备”
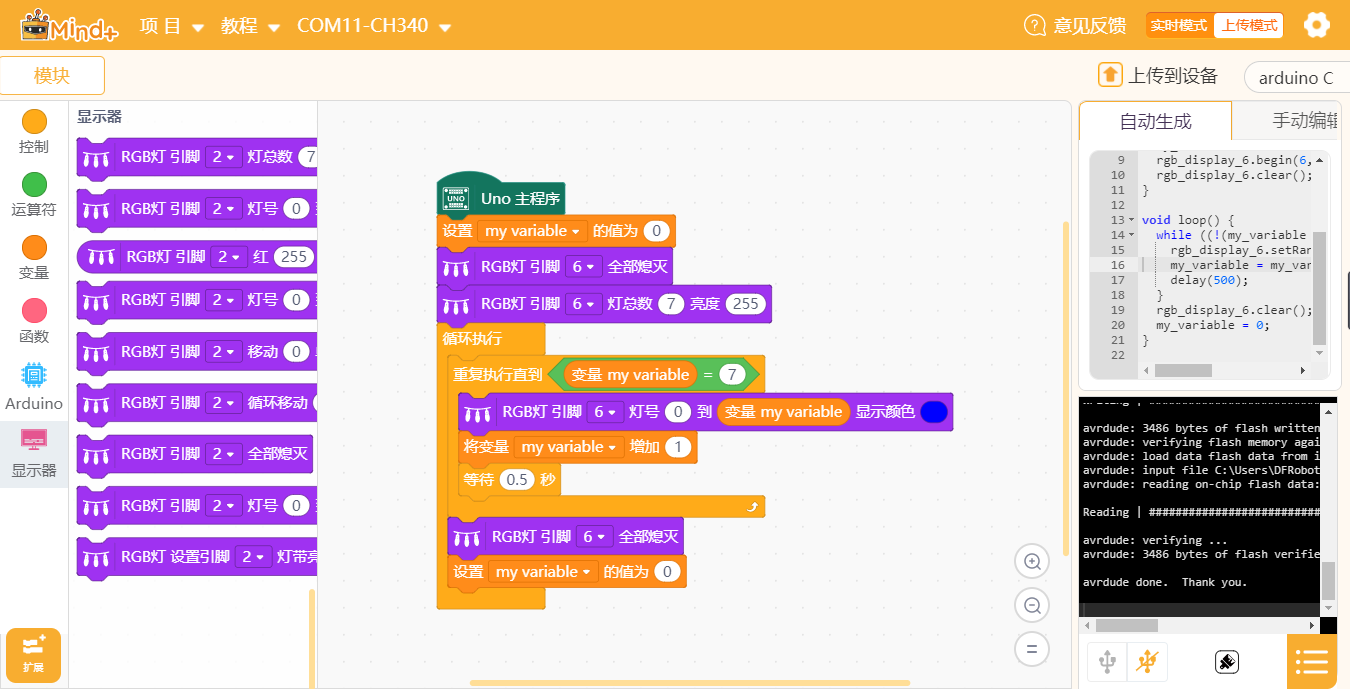
结果
代码上传完成后,观察到灯带从第一颗LED到第七颗LED循环点亮,且呈现蓝色光。
Mind+ Python模式编程(行空板)
Mind+Python模式为完整Python编程,因此需要能运行完整Python的主控板,此处以行空板为例说明
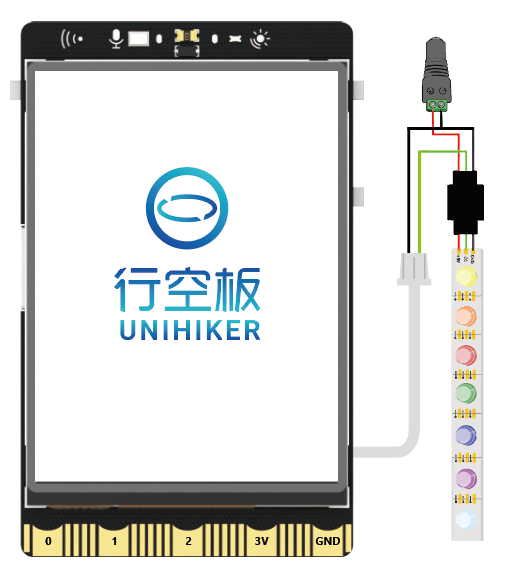
连接图
注意:
1、在使用外部供电时,灯带连接行空板只需要接GND与信号线
2、PinPong当前版本(V0.5.1)仅支持同时使用一条灯带
操作步骤
1、下载及安装官网最新软件。下载地址:https://www.mindplus.cc 详细教程:Mind+基础wiki教程-软件下载安装
2、切换到“Python模式”。“扩展”中选择“官方库”中的“行空板”和“pinpong库”中的”pinpong初始化“和“WS2812 RGB灯”。切换模式和加载库的详细操作链接
3、进行编程
4、连接行空板,程序点击运行后,可在终端查看数据。行空板官方文档-行空板快速上手教程 (unihiker.com)
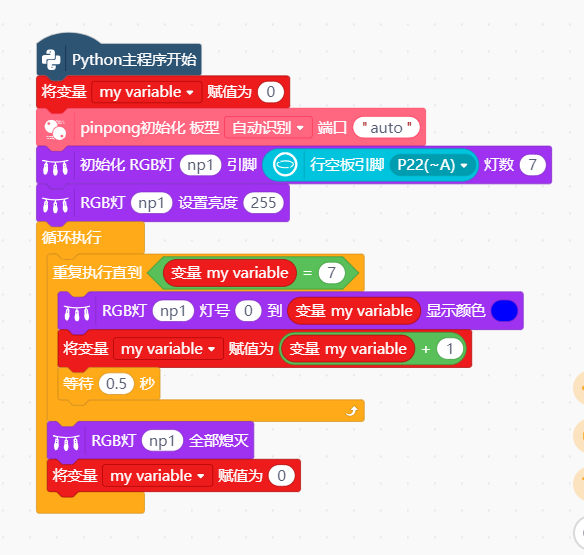
代码编程
以pinpong库为例,行空板官方文档-行空板快速上手教程 (unihiker.com)
#  -*- coding: UTF-8 -*-

# MindPlus
# Python
from pinpong.extension.unihiker import *
from pinpong.board import Board,Pin
from pinpong.board import NeoPixel
from pinpong.board import Board
import time


Board().begin()
my_variable = 0
np1 = NeoPixel(Pin((Pin.P22)),7)
np1.brightness(255)

while True:
    while not ((my_variable == 7)):
        np1.range_color(0,my_variable,0x0000FF)
        my_variable = (my_variable + 1)
        time.sleep(0.5)
    np1.clear()
    my_variable = 0
常见问题
还没有客户对此产品有任何问题,欢迎通过qq或者论坛联系我们!
 购买
购买