简介
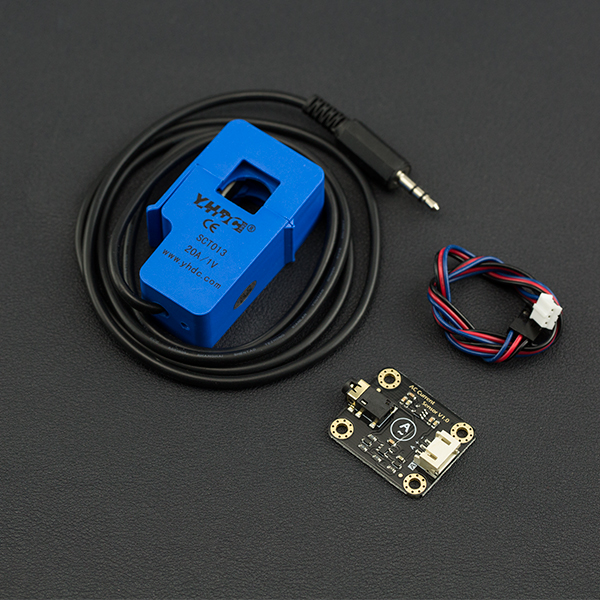
当你想要测量交流电流的时候,你是不是还在为怎么剪线,接线,搭电路感到烦恼。DF出品的模拟量交流电流传感器能够很方便的帮助您解决这个问题,不再需要您剪线,搭电路。只需要将我们的开合式交流互感器打开套在您的交流线上,然后将交流互感器的3.5mm耳机插头插到我们的模块上,就可以方便快捷的读取到当前的交流电流值。即插即用,随套随测。可以很方便的用于交流电机、照明设备、空压机等的电流测量、监控和保护。 科普小常识:什么是交流电?
产品参数
信号转换模块
- 工作电压:3.3V-5.5V
- 通信接口:Gravity Analog(PH2.0-3P,模拟电压输出0.2-2.8VDC)
- 交流电压输入范围:0-1V (交流有效值)
- 相对误差:±4%
- 尺寸:32×27 mm
- 重量:4 g
开合式交流互感器探头
- 交流电流量程:3种量程0-5A(SEN0287)、0-10A(SEN0288)、0-20A(SEN0211)
- 信号输出: 0-1V交流电压,线性对应探头量程0-5A、0-10A、0-20A(标准Φ3.5mm三芯插头)
- 精度:±1%
- 非线性度:≤±0.2%
- 频率范围:50Hz ~ 1kHz
- 引线长度:1 m
- 工作温度:-25℃ ~ +70℃
- 开合尺寸:13×13 mm
- 重量:50 g
引脚说明
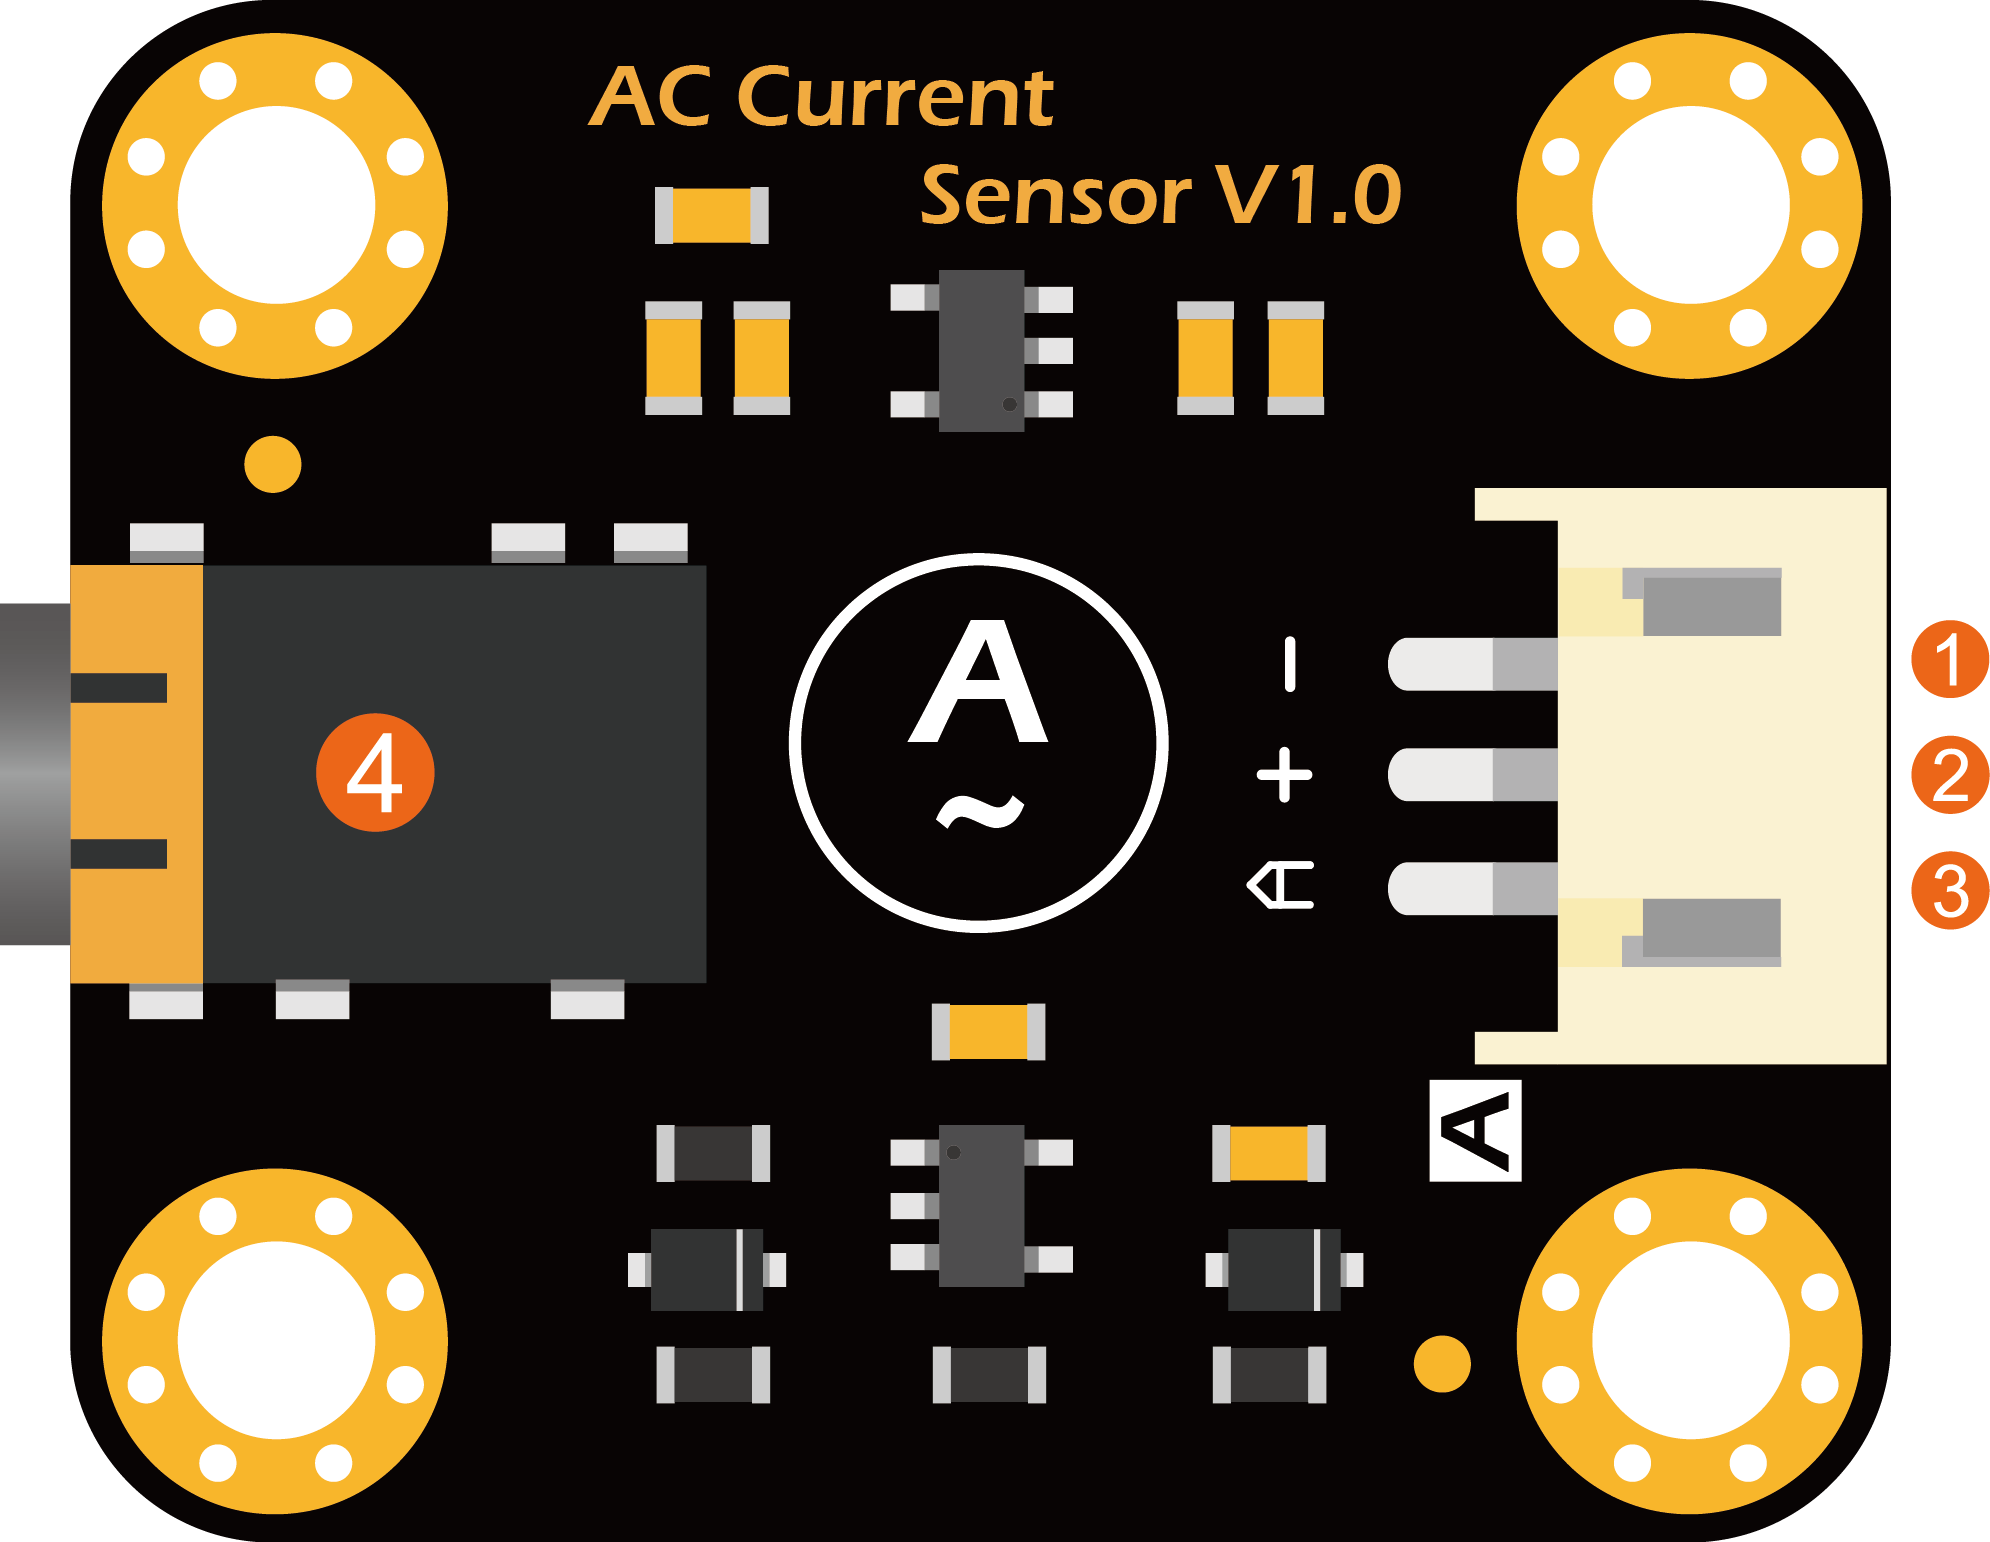
| 标号 | 名称 | 功能描述 |
|---|---|---|
| 1 | - | 电源负极 |
| 2 | + | 电源正极(3.3V - 5.5V) |
| 3 | A | 模拟信号输出(0.2V-2.8V,DC) |
| 4 | Φ3.5mm三芯耳机座 | 交流互感器接头 |
使用教程
本教程将介绍如何用交流互感器探头与交流传感器模块来检测交流电流的大小。
准备
硬件
- UNO x1
- 交流电流互感器 x1
- 交流电流传感器模块 x1
- LCD Keypad Shield 按键扩展板 x1
- PH2.0-3P接线 x1
软件
- Arduino IDE 版本1.6.6 点击下载Arduino IDE
接线图
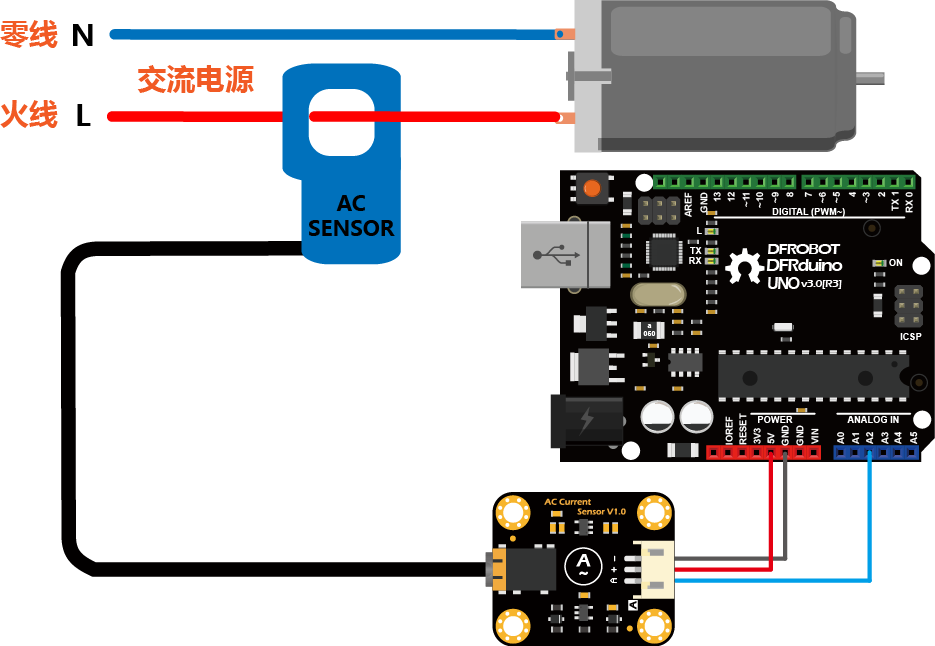
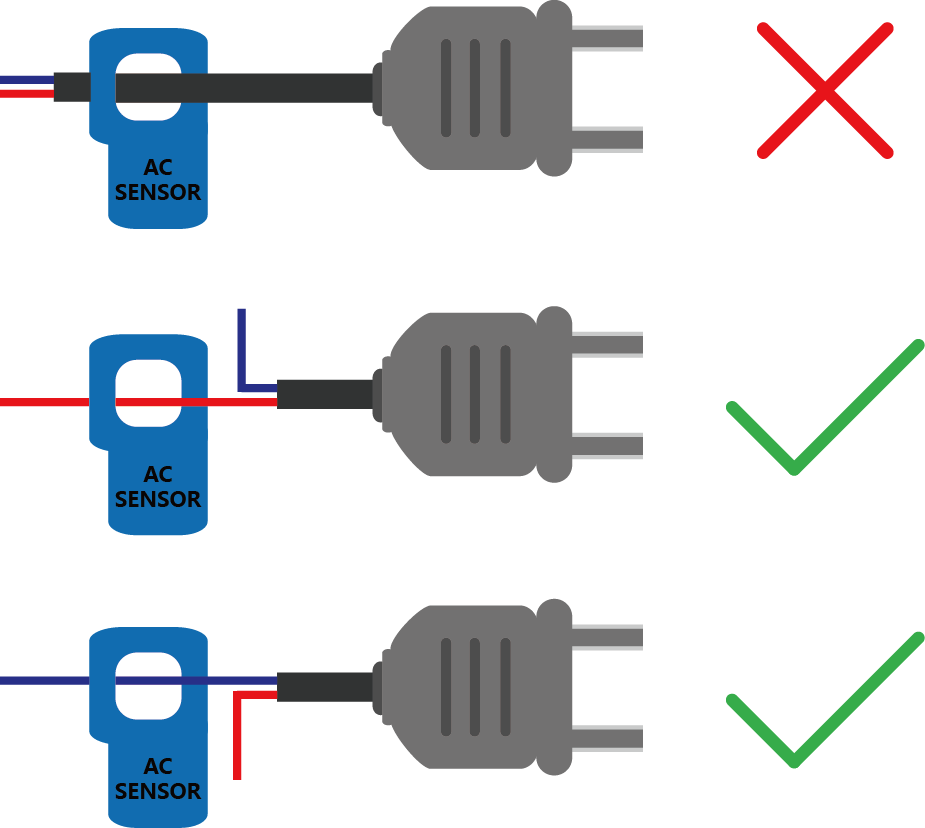
交流互感器的探头只能夹住两根交流线其中的一根,不能两根线同时夹住!
样例代码
测量交流电电流(串口打印)
- 按照第1张连线图将模块与Arduino UNO的A2相连。
- 根据所使用的交流互感器量程修改代码中“#define ACTectionRange 20;”的参数。如:交流互感器量程为5A(SEN0287),则将该参数改为“5”。
- 上传下面的样例程序。
- 打开串口监控,波特率设为115200,观察串口打印数据。
| 关于校准: |
|---|
| 由于模拟读数受到参考电压的影响,较大程度影响读数精度。为了得到更准确的读数,可使用高精度万用表测量主控的模拟参考电压(通常与供电电压一致),并修改下方样例代码中的“#define VREF 5.0”的参数,完成校准。 |
/*!
@file readACCurrent.
@n This example reads Analog AC Current Sensor.
@copyright Copyright (c) 2010 DFRobot Co.Ltd (http://www.dfrobot.com)
@licence The MIT License (MIT)
@get from https://www.dfrobot.com
Created 2016-3-10
By berinie Chen <bernie.chen@dfrobot.com>
Revised 2019-8-6
By Henry Zhao<henry.zhao@dfrobot.com>
*/
const int ACPin = A2; //set arduino signal read pin
#define ACTectionRange 20; //set Non-invasive AC Current Sensor tection range (5A,10A,20A)
// VREF: Analog reference
// For Arduino UNO, Leonardo and mega2560, etc. change VREF to 5
// For Arduino Zero, Due, MKR Family, ESP32, etc. 3V3 controllers, change VREF to 3.3
#define VREF 5.0
float readACCurrentValue()
{
float ACCurrtntValue = 0;
float peakVoltage = 0;
float voltageVirtualValue = 0; //Vrms
for (int i = 0; i < 5; i++)
{
peakVoltage += analogRead(ACPin); //read peak voltage
delay(1);
}
peakVoltage = peakVoltage / 5;
voltageVirtualValue = peakVoltage * 0.707; //change the peak voltage to the Virtual Value of voltage
/*The circuit is amplified by 2 times, so it is divided by 2.*/
voltageVirtualValue = (voltageVirtualValue / 1024 * VREF ) / 2;
ACCurrtntValue = voltageVirtualValue * ACTectionRange;
return ACCurrtntValue;
}
void setup()
{
Serial.begin(115200);
pinMode(13, OUTPUT);
}
void loop()
{
float ACCurrentValue = readACCurrentValue(); //read AC Current Value
Serial.print(ACCurrentValue);
Serial.println(" A");
digitalWrite(13, HIGH);
delay(500);
digitalWrite(13, LOW);
delay(500);
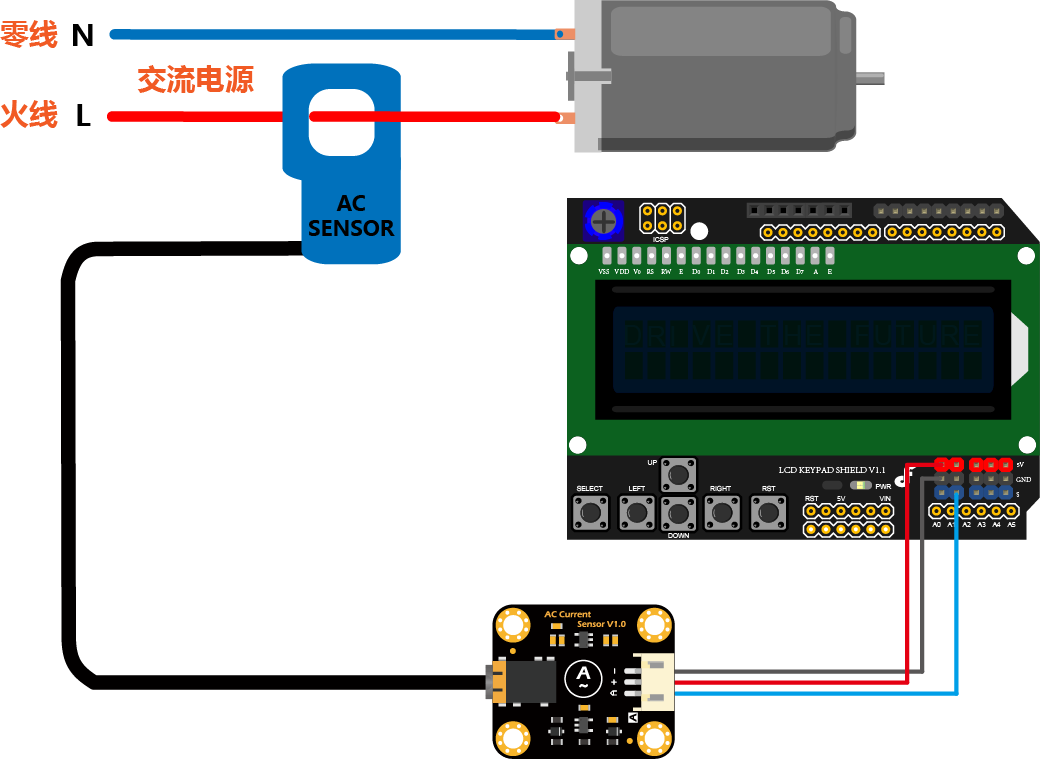
}测量交流电电流(LCD显示)
- 按照第2张连线图将模块与LCD Keypad Shield 按键扩展板的A2相连。
- 上传下面的样例程序。
- 打开串口监控,波特率设为115200,观察LCD屏幕显示数据。
/*!
       @file readACCurrent_LCD.
       @n This example reads Analog AC Current Sensor and display on the LCD.

       @copyright   Copyright (c) 2010 DFRobot Co.Ltd (http://www.dfrobot.com)
       @licence     The MIT License (MIT)
       @get from https://www.dfrobot.com

     Created 2016-3-10
     By berinie Chen <bernie.chen@dfrobot.com>

     Revised 2019-8-6
     By Henry Zhao<henry.zhao@dfrobot.com>
*/

#include <LiquidCrystal.h>

LiquidCrystal lcd(8, 9, 4, 5, 6, 7);        // select the pins used on the LCD panel

const int ACPin = A2;         //set arduino signal read pin
#define ACTectionRange 20;    //set Non-invasive AC Current Sensor tection range (5A,10A,20A)

// VREF: Analog reference
// For Arduino UNO, Leonardo and mega2560, etc. change VREF to 5
// For Arduino Zero, Due, MKR Family, ESP32, etc. 3V3 controllers, change VREF to 3.3
#define VREF 5.0

float readACCurrentValue()
{
  float ACCurrtntValue = 0;
  float peakVoltage = 0;
  float voltageVirtualValue = 0;  //Vrms
  for (int i = 0; i < 5; i++)
  {
    peakVoltage += analogRead(ACPin);   //read peak voltage
    delay(1);
  }
  peakVoltage = peakVoltage / 5;
  voltageVirtualValue = peakVoltage * 0.707;    //change the peak voltage to the Virtual Value of voltage

  /*The circuit is amplified by 2 times, so it is divided by 2.*/
  voltageVirtualValue = (voltageVirtualValue / 1024 * VREF ) / 2;

  ACCurrtntValue = voltageVirtualValue * ACTectionRange;

  return ACCurrtntValue;
}

void setup()
{
  Serial.begin(115200);
  lcd.begin(16, 2);                       // start the library
  pinMode(13, OUTPUT);
}

void loop()
{
  lcd.setCursor(3, 0);
  float ACCurrentValue = readACCurrentValue(); //read AC Current Value
  //  Serial.println(ACCurrentValue);
  lcd.print("AC CURRENT");
  lcd.setCursor(5, 1);
  lcd.print(ACCurrentValue);
  lcd.print("  A");
  digitalWrite(13, HIGH);
  delay(500);
  digitalWrite(13, LOW);
  delay(500);
}
常见问题
还没有客户对此产品有任何问题,欢迎通过qq或者论坛联系我们!
更多问题及有趣的应用,可以 访问论坛 进行查阅或发帖!
更多
 SEN0287 Gravity: 模拟交流电流传感器(5A) DFRobot商城购买链接